display warning Hyundai Creta 2019 User Guide
[x] Cancel search | Manufacturer: HYUNDAI, Model Year: 2019, Model line: Creta, Model: Hyundai Creta 2019Pages: 472, PDF Size: 13.39 MB
Page 153 of 472
3-68
Convenient features of your vehicle
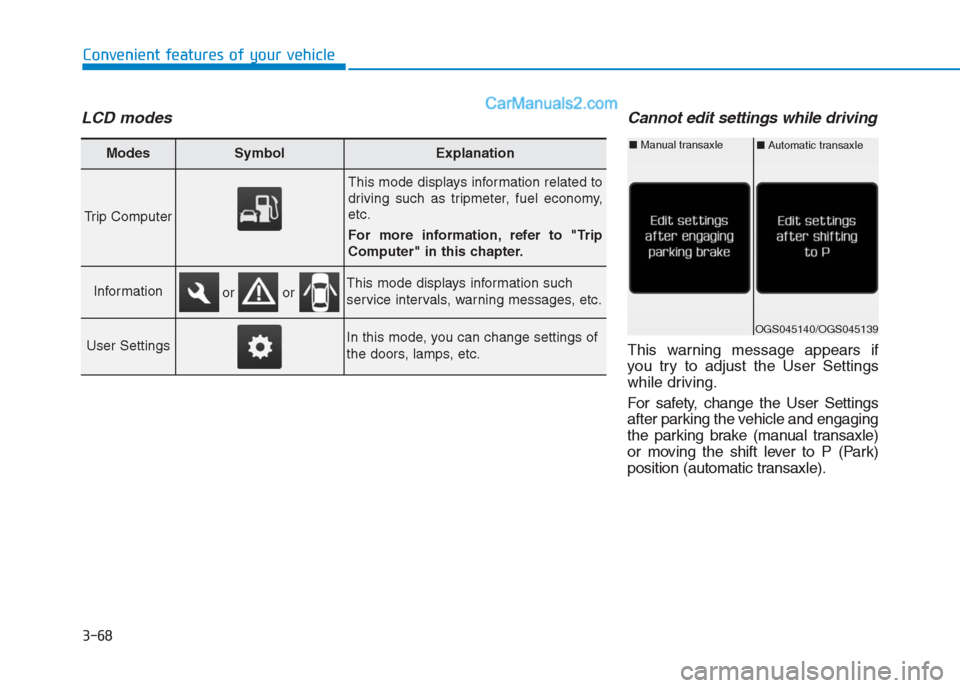
LCD modesCannot edit settings while driving
This warning message appears if
you try to adjust the User Settings
while driving.
For safety, change the User Settings
after parking the vehicle and engaging
the parking brake (manual transaxle)
or moving the shift lever to P (Park)
position (automatic transaxle).
Modes SymbolExplanation
Trip Computer
This mode displays information related to
driving such as tripmeter, fuel economy,
etc.
For more information, refer to "Trip
Computer" in this chapter.
InformationThis mode displays information such
service intervals, warning messages, etc.
User SettingsIn this mode, you can change settings of
the doors, lamps, etc.
or or
OGS045140/OGS045139
■Automatic transaxle■Manual transaxle
Page 155 of 472
3-70
Convenient features of your vehicle
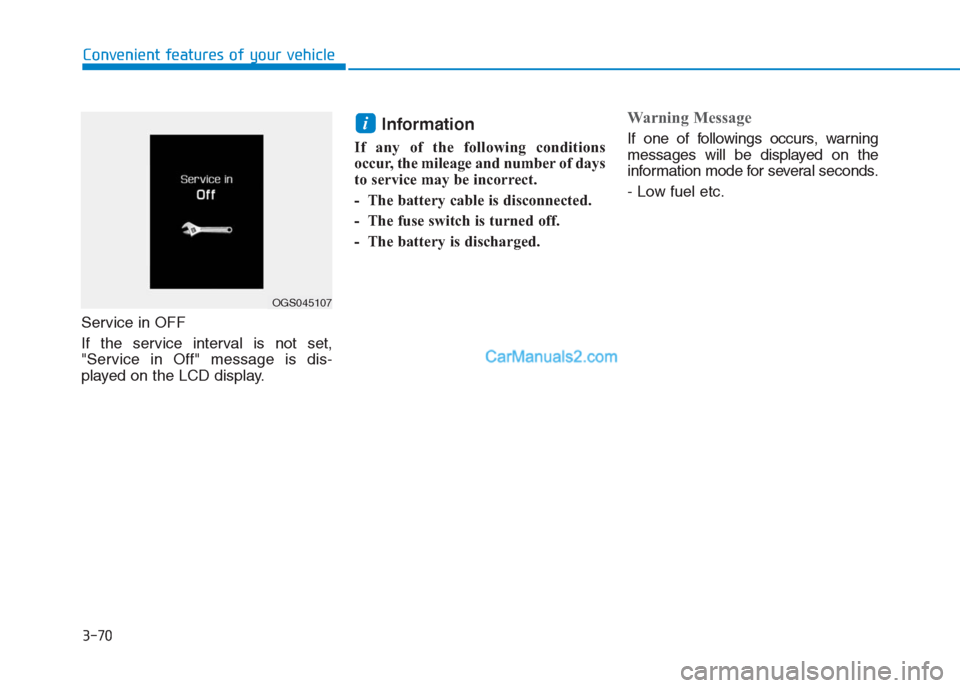
Service in OFF
If the service interval is not set,
"Service in Off" message is dis-
played on the LCD display.
Information
If any of the following conditions
occur, the mileage and number of days
to service may be incorrect.
- The battery cable is disconnected.
- The fuse switch is turned off.
- The battery is discharged.
Warning Message
If one of followings occurs, warning
messages will be displayed on the
information mode for several seconds.
- Low fuel etc.i
OGS045107
Page 160 of 472
3-75
Convenient features of your vehicle
3
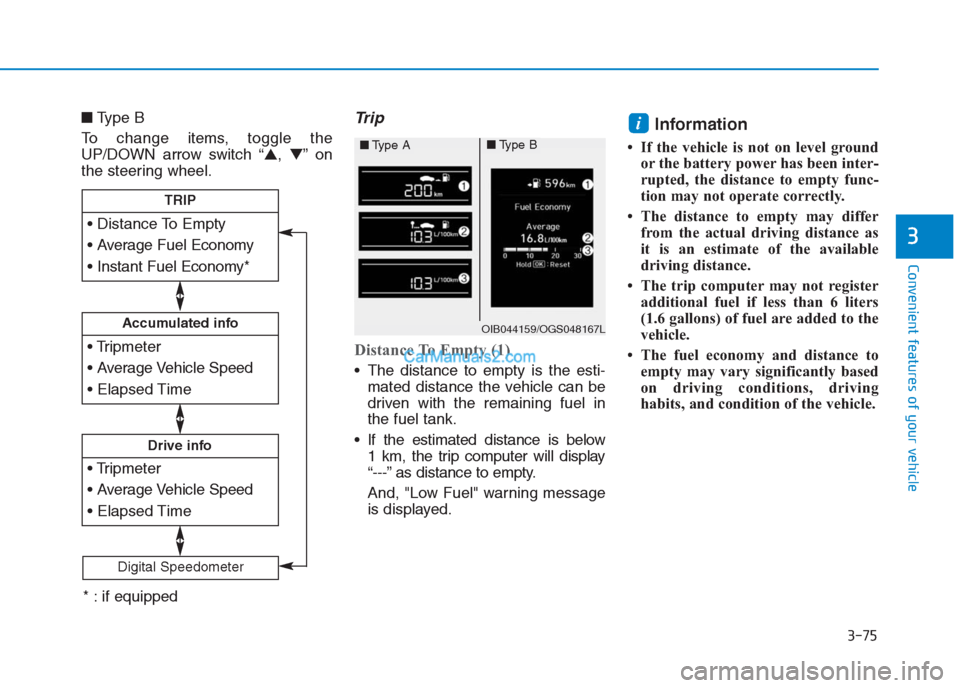
■Type B
To change items, toggle the
UP/DOWN arrow switch “▲,▼”on
the steering wheel.Trip
Distance To Empty (1)
The distance to empty is the esti-
mated distance the vehicle can be
driven with the remaining fuel in
the fuel tank.
If the estimated distance is below
1 km, the trip computer will display
“---” as distance to empty.
And, "Low Fuel" warning message
is displayed.
Information
• If the vehicle is not on level ground
or the battery power has been inter-
rupted, the distance to empty func-
tion may not operate correctly.
• The distance to empty may differ
from the actual driving distance as
it is an estimate of the available
driving distance.
• The trip computer may not register
additional fuel if less than 6 liters
(1.6 gallons) of fuel are added to the
vehicle.
• The fuel economy and distance to
empty may vary significantly based
on driving conditions, driving
habits, and condition of the vehicle.
i
Accumulated info
Drive info
TRIP
Digital Speedometer
OIB044159/OGS048167L
■Type A■Type B
* : if equipped
Page 178 of 472
3-93
Convenient features of your vehicle
3
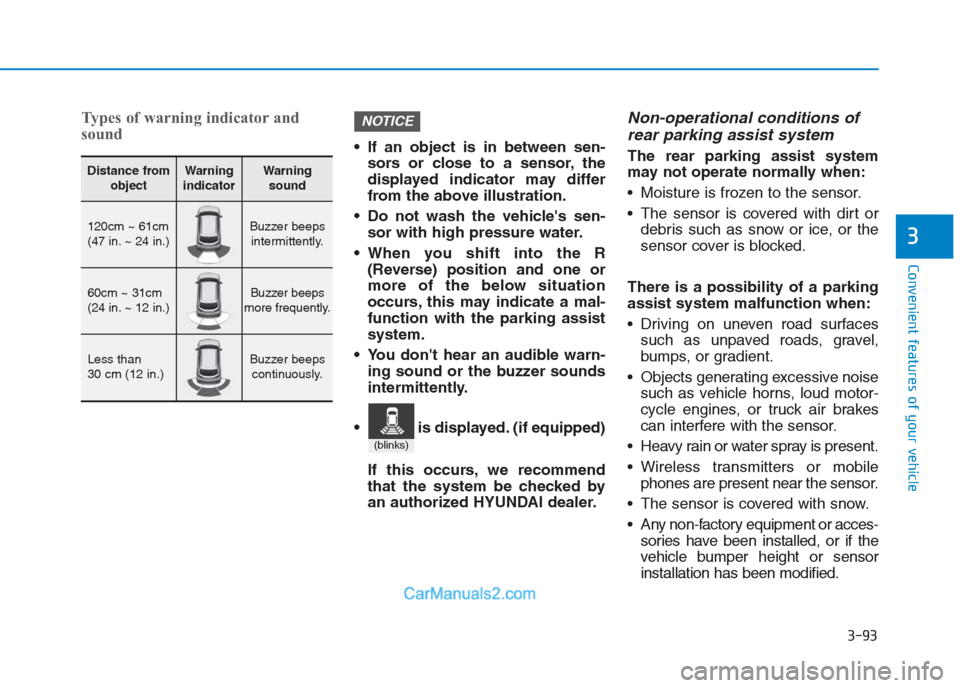
Types of warning indicator and
sound
If an object is in between sen-
sors or close to a sensor, the
displayed indicator may differ
from the above illustration.
Do not wash the vehicle's sen-
sor with high pressure water.
When you shift into the R
(Reverse) position and one or
more of the below situation
occurs, this may indicate a mal-
function with the parking assist
system.
You don't hear an audible warn-
ing sound or the buzzer sounds
intermittently.
If this occurs, we recommend
that the system be checked by
an authorized HYUNDAI dealer.
Non-operational conditions of
rear parking assist system
The rear parking assist system
may not operate normally when:
Moisture is frozen to the sensor.
The sensor is covered with dirt or
debris such as snow or ice, or the
sensor cover is blocked.
There is a possibility of a parking
assist system malfunction when:
Driving on uneven road surfaces
such as unpaved roads, gravel,
bumps, or gradient.
Objects generating excessive noise
such as vehicle horns, loud motor-
cycle engines, or truck air brakes
can interfere with the sensor.
Heavy rain or water spray is present.
Wireless transmitters or mobile
phones are present near the sensor.
The sensor is covered with snow.
Any non-factory equipment or acces-
sories have been installed, or if the
vehicle bumper height or sensor
installation has been modified.
NOTICE
Distance from
objectWarning
indicatorWarning
sound
120cm ~ 61cm
(47 in. ~ 24 in.)Buzzer beeps
intermittently.
60cm ~ 31cm
(24 in. ~ 12 in.)Buzzer beeps
more frequently.
Less than
30 cm (12 in.)Buzzer beeps
continuously.
(blinks)
is displayed. (if equipped)
Page 207 of 472
3-122
Convenient features of your vehicle
I IN
NT
TE
ER
RI
IO
OR
R
F
FE
EA
AT
TU
UR
RE
ES
S
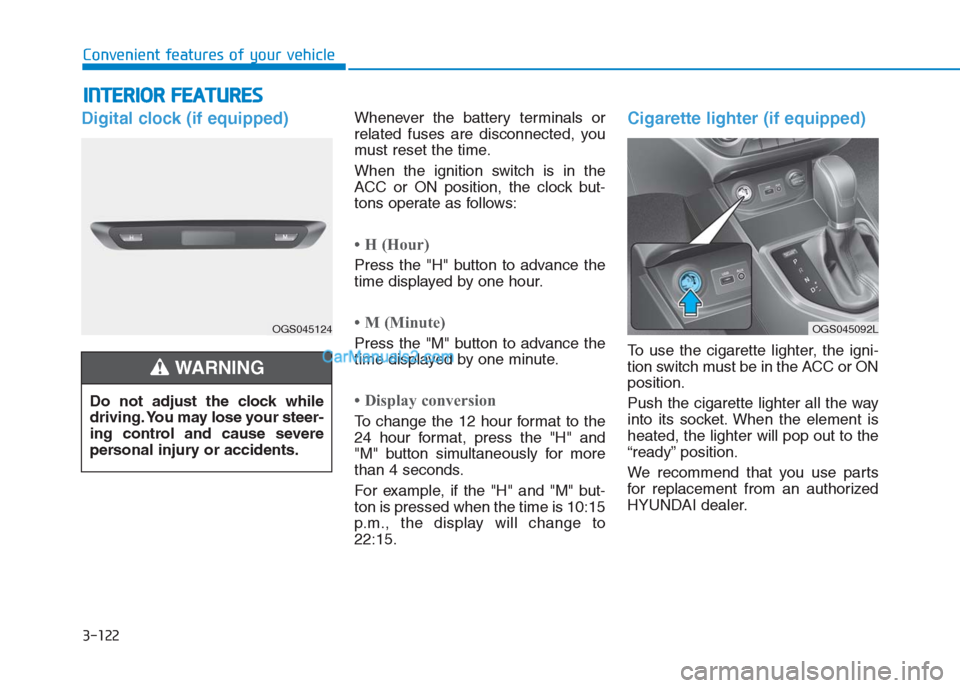
Digital clock (if equipped)Whenever the battery terminals or
related fuses are disconnected, you
must reset the time.
When the ignition switch is in the
ACC or ON position, the clock but-
tons operate as follows:
• H (Hour)
Press the "H" button to advance the
time displayed by one hour.
• M (Minute)
Press the "M" button to advance the
time displayed by one minute.
• Display conversion
To change the 12 hour format to the
24 hour format, press the "H" and
"M" button simultaneously for more
than 4 seconds.
For example, if the "H" and "M" but-
ton is pressed when the time is 10:15
p.m., the display will change to
22:15.
Cigarette lighter (if equipped)
To use the cigarette lighter, the igni-
tion switch must be in the ACC or ON
position.
Push the cigarette lighter all the way
into its socket. When the element is
heated, the lighter will pop out to the
“ready” position.
We recommend that you use parts
for replacement from an authorized
HYUNDAI dealer. Do not adjust the clock while
driving. You may lose your steer-
ing control and cause severe
personal injury or accidents.
WARNING
OGS045124OGS045092L
Page 226 of 472
4-12
Multimedia System
- Press in Bluetooth
®Handsfree
mode to switch to the waiting call.
When pressed and held (more
than 1.0 seconds)
- If not in Bluetooth
®Handsfree
mode or receiving a phone call,
the most recently Dialed Call
number is dialed.
- When pressed in Bluetooth
®
Handsfree mode to switch the
call to your cell phone.
- When pressed in cell phone
mode to switch to Bluetooth
®
Handsfree mode.
- If Bluetooth
®is not connected,
displays Bluetooth®Pair/
Connection screen.
(6) END
When pressed during a call, ends
the phone call.
When pressed in the incoming call
screen, rejects the call. Do not stare at the screen
while driving. Staring at the
screen for prolonged periods
of time could lead to traffic
accidents.
Do not disassemble, assem-
ble, or modify the audio sys-
tem. Such acts could result in
accidents, fire, or electric
shock.
Using the phone while driving
may lead to a lack of attention
of traffic conditions and
increase the likelihood of
accidents. Use the phone fea-
ture after parking the vehicle.
Exercise caution not to spill
water or introduce foreign
objects into the device. Such
acts could lead to smoke, fire,
or product malfunction.
(Continued)
WARNING(Continued)
Please refrain from use if the
screen is blank or no sound
can be heard as these signs
may indicate product malfunc-
tion. Continued use in such
conditions could lead to acci-
dents (fires, electric shock) or
product malfunctions.
Do not touch the antenna dur-
ing thunder or lightning
because such an act may
cause electric shock.
Do not stop or park in park-
ing-restricted areas to operate
the product. Such acts could
lead to traffic accidents.
Use the system with the vehicle
engine turned on. Prolonged
use with the ignition turned
on only could result in battery
discharge.
Page 271 of 472
![Hyundai Creta 2019 User Guide 4-57
Multimedia System
4
Setup
Setup is the screen to control Audio
system settings.
Press the [SETUP]button on the
audio system.
Display
Press the [SETUP]button on the
audio system ➟Select [Displa Hyundai Creta 2019 User Guide 4-57
Multimedia System
4
Setup
Setup is the screen to control Audio
system settings.
Press the [SETUP]button on the
audio system.
Display
Press the [SETUP]button on the
audio system ➟Select [Displa](/img/35/14529/w960_14529-270.png)
4-57
Multimedia System
4
Setup
Setup is the screen to control Audio
system settings.
Press the [SETUP]button on the
audio system.
Display
Press the [SETUP]button on the
audio system ➟Select [Display].
Mode: Set the screen brightness to
be adjusted automatically accord-
ing to ambient lighting conditions
or set the screen to stay bright or
dark continuously.
Illumination: The brightness of the
audio screen can be changed.
Text Scroll: If text is too long to be
displayed on the screen, enable
the text scroll function.
Sound
Press the [SETUP]button on the
audio system ➟Select [Sound].
Position: Sound balance and fader
can be adjusted.
Tone: Sound tone color can be
adjusted.
Back-up Warning Priority:
- Automatically lower audio vol-
ume while reversing.
- Control the audio volume level
automatically in R-Position.
If volume level over “5 level” then
down to “5 level”.If volume level under “5 level”
then maintain the volume level.
Return the volume level when R-
Position was cancelled.
In R-Positon, if driver change the
volume level then volume
changed.
Apply the volume control option
“On/Off ” in “Setup”: Default is
“On”.
Speed Dependent Volume:
Automatically adjust volume based
on vehicle speed.
Beep: Select whether to play a
beep sound when the screen is
touched.
Page 299 of 472
5-24
Driving your vehicle
Automatic transaxle operation
The automatic transaxle has six for-
ward speeds and one reverse speed.
The individual speeds are selected
automatically in the D (Drive) posi-
tion.The indicator in the instrument clus-
ter displays the shift lever position
when the ignition switch is in the ON
position.
P (Park)
Always come to a complete stop
before shifting into P (Park).
To shift from P (Park), you must
depress firmly on the brake pedal
and make sure your foot is off the
accelerator pedal.
If you have done all of the above and
still cannot shift the lever out of P
(Park), see “Shift-Lock Release” on
page 5-27.
The shift lever must be in P (Park)
before turning the engine off. To reduce the risk of serious
injury or death:
ALWAYS check the surround-
ing areas near your vehicle for
people, especially children,
before shifting a vehicle into
D (Drive) or R (Reverse).
Before leaving the driver’s
seat, always make sure the
shift lever is in the P (Park)
position, then set the parking
brake, and place the ignition
switch in the LOCK/OFF posi-
tion. Unexpected and sudden
vehicle movement can occur
if these precautions are not
followed.
Do not use engine braking
(shifting from a high gear to
lower gear) rapidly on slip-
pery roads. The vehicle may
slip causing an accident.
WARNING
Page 314 of 472
The ESC OFF indicator light comes
on when the ESC is turned off with
the button.
Driving with wheels and tires with
different sizes may cause the ESC
system to malfunction. Before
replacing tires, make sure all four
tires and wheels are the same
size. Never drive the vehicle with
different sized tires and wheels
installed.ESC OFF usage
When Driving
The ESC OFF mode should only be
used briefly to help free the vehicle if
stuck in snow or mud by temporarily
stopping operation of the ESC to
maintain wheel torque.
To turn ESC off while driving, press
the ESC OFF button while driving on
a flat road surface.To prevent damage to the
transaxle:
Do not allow wheel(s) of one
axle to spin excessively while
the ESC, ABS, and parking brake
warning lights are displayed.
The repairs would not be cov-
ered by the vehicle warranty.
Reduce engine power and do
not spin the wheel(s) excessive-
ly while these lights are dis-
played.
When operating the vehicle on a
dynamometer, make sure the
ESC is turned off (ESC OFF light
illuminated).
Information
Turning the ESC off does not affect
ABS or standard brake system opera-
tion.
i
NOTICE
NOTICE
5-39
Driving your vehicle
5
When the ESC is blinking, this
indicates the ESC is active:
Drive slowly and NEVER
attempt to accelerate. NEVER
turn the ESC off while the ESC
indicator light is blinking or you
may lose control of the vehicle
resulting in an accident.
WARNING
Page 469 of 472
I-5
If the engine overheats ...................................................6-8
If the engine will not start ..............................................6-4
If the engine doesn't turn over or turns over ..............6-4
If the engine turns over normally but doesn't start ......6-4
If you have a flat tire ....................................................6-16
Changing tires ...........................................................6-17
Jack and tools ...........................................................6-16
Jack label ...................................................................6-21
Removing and storing the spare tire ..........................6-16
Ignition switch ................................................................5-5
Engine Start/Stop button ..............................................5-9
Key ignition switch......................................................5-5
In case of an emergency while driving ..........................6-3
If the engine stalls at a crossroad or crossing..............6-3
If the engine stalls while driving .................................6-3
If you have a flat tire while driving.............................6-3
Instrument cluster .........................................................3-43
Gauges .......................................................................3-45
Instrument Cluster Control ........................................3-44
LCD display ...............................................................3-67
Transaxle shift indicator ............................................3-48
Trip computer ............................................................3-74
Warning and indicator lights......................................3-50
Warning Messages (for Type B) ................................3-61Instrument panel overview (I) ........................................1-6
Instrument panel overview (II) .......................................1-7
Interior features...........................................................3-122
Ashtray .....................................................................3-123
Cargo area cover ......................................................3-129
Cigarette lighter .......................................................3-122
Clothes hanger .........................................................3-127
Cup holder ...............................................................3-124
Digital clock.............................................................3-122
Floor mat anchor(s) .................................................3-127
Luggage net holder ..................................................3-128
Power outlet/USB charger .......................................3-125
Sunvisor ...................................................................3-125
Interior overview (I) .......................................................1-4
Interior overview (II) ......................................................1-5
Jump starting...................................................................6-5
I
Index
I
J