Hyundai Elantra 2008 Owner's Manual
Manufacturer: HYUNDAI, Model Year: 2008, Model line: Elantra, Model: Hyundai Elantra 2008Pages: 360, PDF Size: 12.2 MB
Page 191 of 360
Features of your vehicle118 4
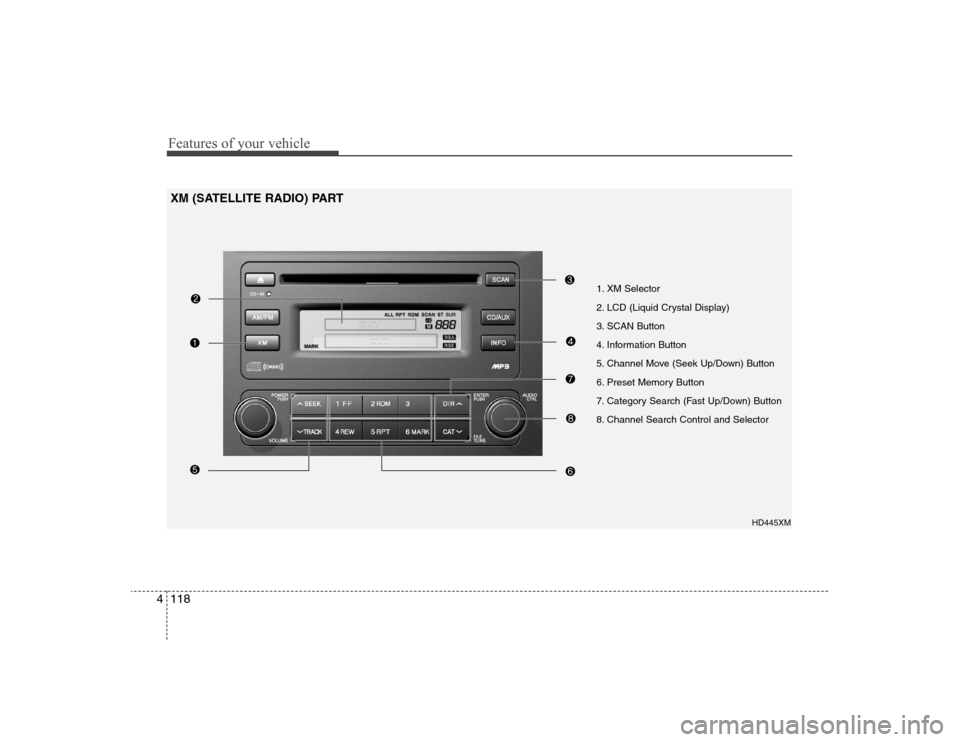
1. XM Selector
2. LCD (Liquid Crystal Display)
3. SCAN Button
4. Information Button
5. Channel Move (Seek Up/Down) Button
6. Preset Memory Button
7. Category Search (Fast Up/Down) Button
8. Channel Search Control and Selector
HD445XM
XM (SATELLITE RADIO) PART
Page 192 of 360
4119
Features of your vehicle
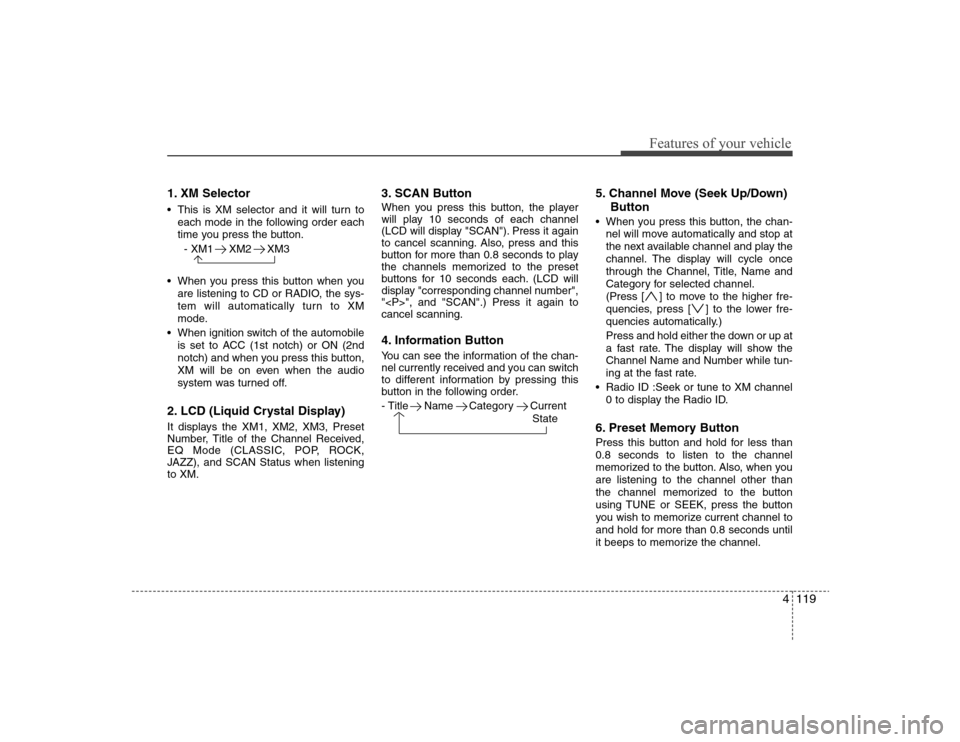
1. XM Selector This is XM selector and it will turn to
each mode in the following order each
time you press the button.
- XM1 XM2 XM3
When you press this button when you
are listening to CD or RADIO, the sys-
tem will automatically turn to XM
mode.
When ignition switch of the automobile
is set to ACC (1st notch) or ON (2nd
notch) and when you press this button,
XM will be on even when the audio
system was turned off.2. LCD (Liquid Crystal Display)It displays the XM1, XM2, XM3, Preset
Number, Title of the Channel Received,
EQ Mode (CLASSIC, POP, ROCK,
JAZZ), and SCAN Status when listening
to XM.
3. SCAN ButtonWhen you press this button, the player
will play 10 seconds of each channel
(LCD will display "SCAN"). Press it again
to cancel scanning. Also, press and this
button for more than 0.8 seconds to play
the channels memorized to the preset
buttons for 10 seconds each. (LCD will
display "corresponding channel number",
"
", and "SCAN".) Press it again to
cancel scanning.4. Information ButtonYou can see the information of the chan-
nel currently received and you can switch
to different information by pressing this
button in the following order.
- Title Name Category Current
State
5. Channel Move (Seek Up/Down)
Button When you press this button, the chan-
nel will move automatically and stop at
the next available channel and play the
channel. The display will cycle once
through the Channel, Title, Name and
Category for selected channel.
(Press [ ] to move to the higher fre-
quencies, press [ ] to the lower fre-
quencies automatically.)
Press and hold either the down or up at
a fast rate. The display will show the
Channel Name and Number while tun-
ing at the fast rate.
Radio ID :Seek or tune to XM channel
0 to display the Radio ID.6. Preset Memory ButtonPress this button and hold for less than
0.8 seconds to listen to the channel
memorized to the button. Also, when you
are listening to the channel other than
the channel memorized to the button
using TUNE or SEEK, press the button
you wish to memorize current channel to
and hold for more than 0.8 seconds until
it beeps to memorize the channel.
Page 193 of 360
![Hyundai Elantra 2008 Owners Manual Features of your vehicle120 47. Category Search ButtonPress this button to search another cate-
gory while listening to current channel
(LCD will display "CAT"). (Press [ ] to
search in the higher cat Hyundai Elantra 2008 Owners Manual Features of your vehicle120 47. Category Search ButtonPress this button to search another cate-
gory while listening to current channel
(LCD will display "CAT"). (Press [ ] to
search in the higher cat](/img/35/14599/w960_14599-192.png)
Features of your vehicle120 47. Category Search ButtonPress this button to search another cate-
gory while listening to current channel
(LCD will display "CAT"). (Press [ ] to
search in the higher categories and [ ],
lower categories. Press 8 when you want
to choose the category you want and the
system will receive the channel on the
top of the list in the selected category.)8. Channel Search Control and
SelectorWhile listening to XM broadcast, rotate
this control to the right or left to search
other channels while listening to current
channel. (Turn to the right to search
higher channels and left, lower channels.
When you find the channel you want,
press the button to select the channel.)✽ ✽
NOTICERotate this control to right or left during
category search, the LCD will display
"
the channel you want within the catego-
ry you want.
Page 194 of 360
4121
Features of your vehicle
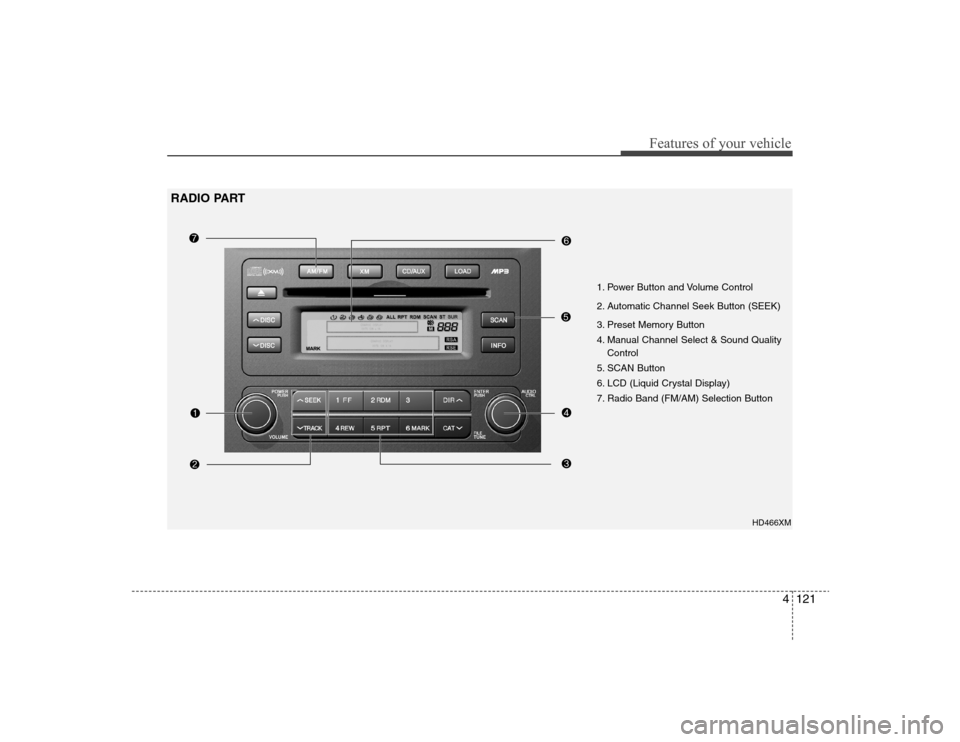
HD466XM
1. Power Button and Volume Control
2. Automatic Channel Seek Button (SEEK)
3. Preset Memory Button
4. Manual Channel Select & Sound Quality
Control
5. SCAN Button
6. LCD (Liquid Crystal Display)
7. Radio Band (FM/AM) Selection Button
RADIO PART
Page 195 of 360
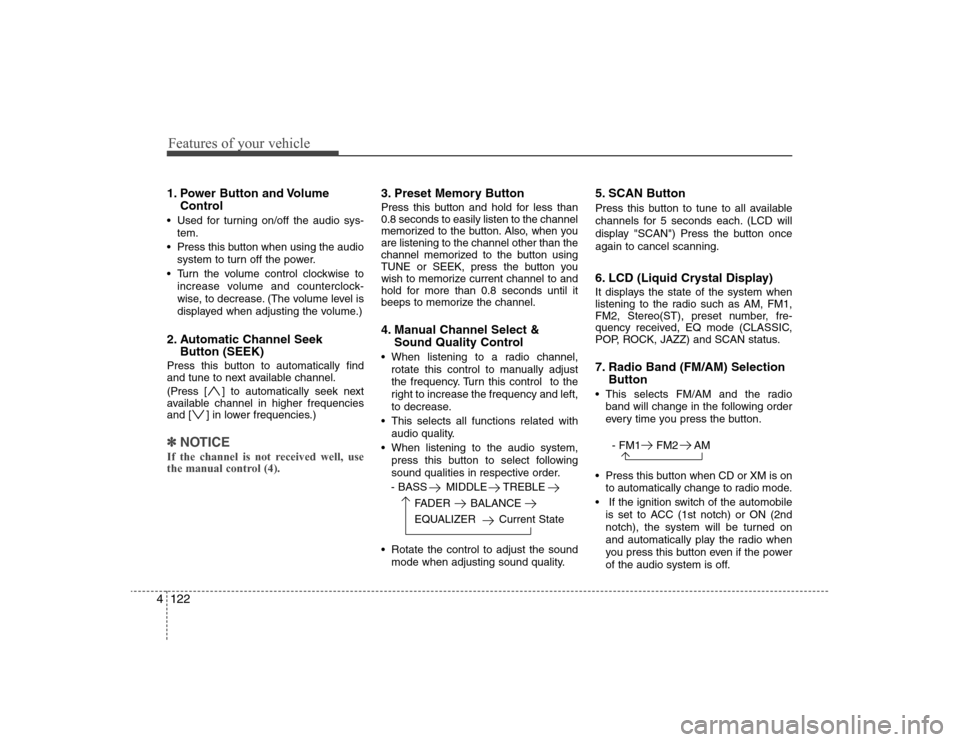
Features of your vehicle122 41. Power Button and Volume
Control Used for turning on/off the audio sys-
tem.
Press this button when using the audio
system to turn off the power.
Turn the volume control clockwise to
increase volume and counterclock-
wise, to decrease. (The volume level is
displayed when adjusting the volume.)2. Automatic Channel Seek
Button (SEEK)Press this button to automatically find
and tune to next available channel.
(Press [ ] to automatically seek next
available channel in higher frequencies
and [ ] in lower frequencies.)✽ ✽
NOTICEIf the channel is not received well, use
the manual control (4).
3. Preset Memory ButtonPress this button and hold for less than
0.8 seconds to easily listen to the channel
memorized to the button. Also, when you
are listening to the channel other than the
channel memorized to the button using
TUNE or SEEK, press the button you
wish to memorize current channel to and
hold for more than 0.8 seconds until it
beeps to memorize the channel.4. Manual Channel Select &
Sound Quality Control When listening to a radio channel,
rotate this control to manually adjust
the frequency. Turn this control to the
right to increase the frequency and left,
to decrease.
This selects all functions related with
audio quality.
When listening to the audio system,
press this button to select following
sound qualities in respective order.
- BASS MIDDLE TREBLE
FADER BALANCE
EQUALIZER Current State
Rotate the control to adjust the sound
mode when adjusting sound quality.
5. SCAN ButtonPress this button to tune to all available
channels for 5 seconds each. (LCD will
display "SCAN") Press the button once
again to cancel scanning.6. LCD (Liquid Crystal Display)It displays the state of the system when
listening to the radio such as AM, FM1,
FM2, Stereo(ST), preset number, fre-
quency received, EQ mode (CLASSIC,
POP, ROCK, JAZZ) and SCAN status.7. Radio Band (FM/AM) Selection
Button This selects FM/AM and the radio
band will change in the following order
every time you press the button.
- FM1 FM2 AM
Press this button when CD or XM is on
to automatically change to radio mode.
If the ignition switch of the automobile
is set to ACC (1st notch) or ON (2nd
notch), the system will be turned on
and automatically play the radio when
you press this button even if the power
of the audio system is off.
Page 196 of 360
4123
Features of your vehicle
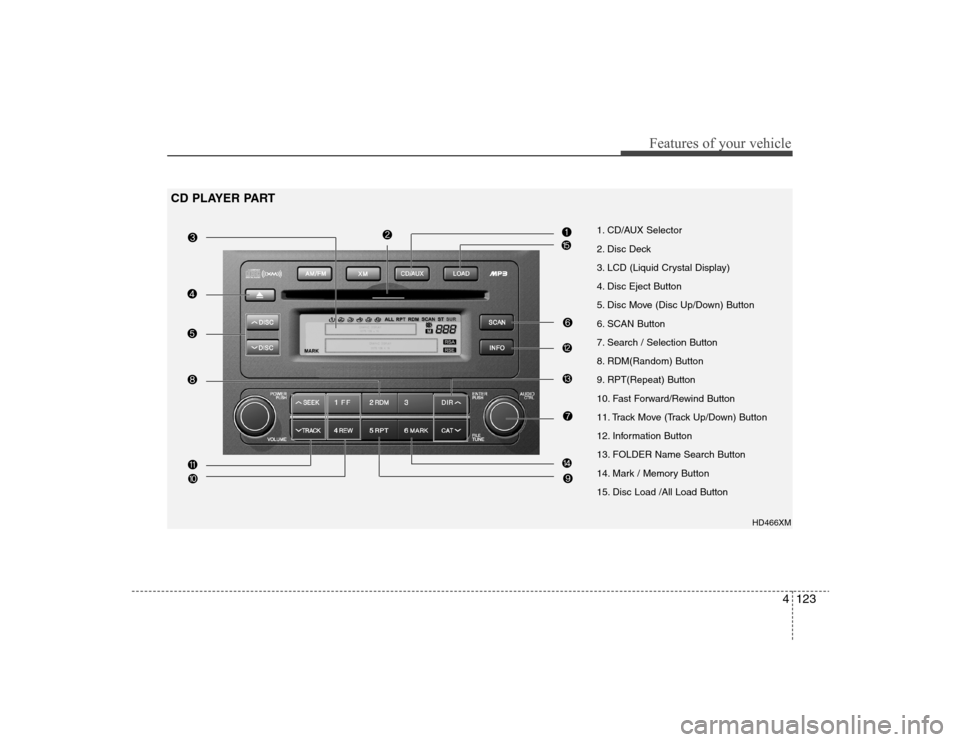
1. CD/AUX Selector
2. Disc Deck
3. LCD (Liquid Crystal Display)
4. Disc Eject Button
5. Disc Move (Disc Up/Down) Button
6. SCAN Button
7. Search / Selection Button
8. RDM(Random) Button
9. RPT(Repeat) Button
10. Fast Forward/Rewind Button
11. Track Move (Track Up/Down) Button
12. Information Button
13. FOLDER Name Search Button
14. Mark / Memory Button
15. Disc Load /All Load Button
HD466XM
CD PLAYER PART
Page 197 of 360
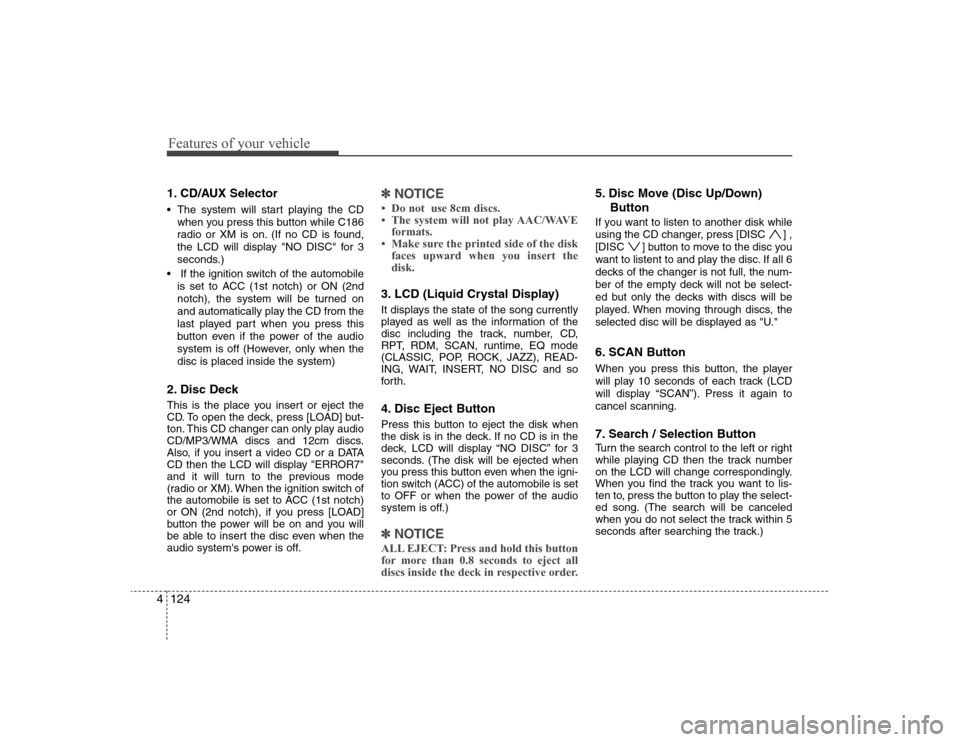
Features of your vehicle124 41. CD/AUX Selector The system will start playing the CD
when you press this button while C186
radio or XM is on. (If no CD is found,
the LCD will display "NO DISC" for 3
seconds.)
If the ignition switch of the automobile
is set to ACC (1st notch) or ON (2nd
notch), the system will be turned on
and automatically play the CD from the
last played part when you press this
button even if the power of the audio
system is off (However, only when the
disc is placed inside the system)2. Disc DeckThis is the place you insert or eject the
CD. To open the deck, press [LOAD] but-
ton. This CD changer can only play audio
CD/MP3/WMA discs and 12cm discs.
Also, if you insert a video CD or a DATA
CD then the LCD will display "ERROR7"
and it will turn to the previous mode
(radio or XM). When the ignition switch of
the automobile is set to ACC (1st notch)
or ON (2nd notch), if you press [LOAD]
button the power will be on and you will
be able to insert the disc even when the
audio system's power is off.
✽ ✽
NOTICE• Do not use 8cm discs.
• The system will not play AAC/WAVE
formats.
• Make sure the printed side of the disk
faces upward when you insert the
disk.3. LCD (Liquid Crystal Display)It displays the state of the song currently
played as well as the information of the
disc including the track, number, CD,
RPT, RDM, SCAN, runtime, EQ mode
(CLASSIC, POP, ROCK, JAZZ), READ-
ING, WAIT, INSERT, NO DISC and so
forth.4. Disc Eject ButtonPress this button to eject the disk when
the disk is in the deck. If no CD is in the
deck, LCD will display “NO DISC” for 3
seconds. (The disk will be ejected when
you press this button even when the igni-
tion switch (ACC) of the automobile is set
to OFF or when the power of the audio
system is off.)✽ ✽
NOTICEALL EJECT: Press and hold this button
for more than 0.8 seconds to eject all
discs inside the deck in respective order.
5. Disc Move (Disc Up/Down)
ButtonIf you want to listen to another disk while
using the CD changer, press [DISC ] ,
[DISC ] button to move to the disc you
want to listent to and play the disc. If all 6
decks of the changer is not full, the num-
ber of the empty deck will not be select-
ed but only the decks with discs will be
played. When moving through discs, the
selected disc will be displayed as "U."6. SCAN ButtonWhen you press this button, the player
will play 10 seconds of each track (LCD
will display “SCAN”). Press it again to
cancel scanning.7. Search / Selection ButtonTurn the search control to the left or right
while playing CD then the track number
on the LCD will change correspondingly.
When you find the track you want to lis-
ten to, press the button to play the select-
ed song. (The search will be canceled
when you do not select the track within 5
seconds after searching the track.)
Page 198 of 360
4125
Features of your vehicle
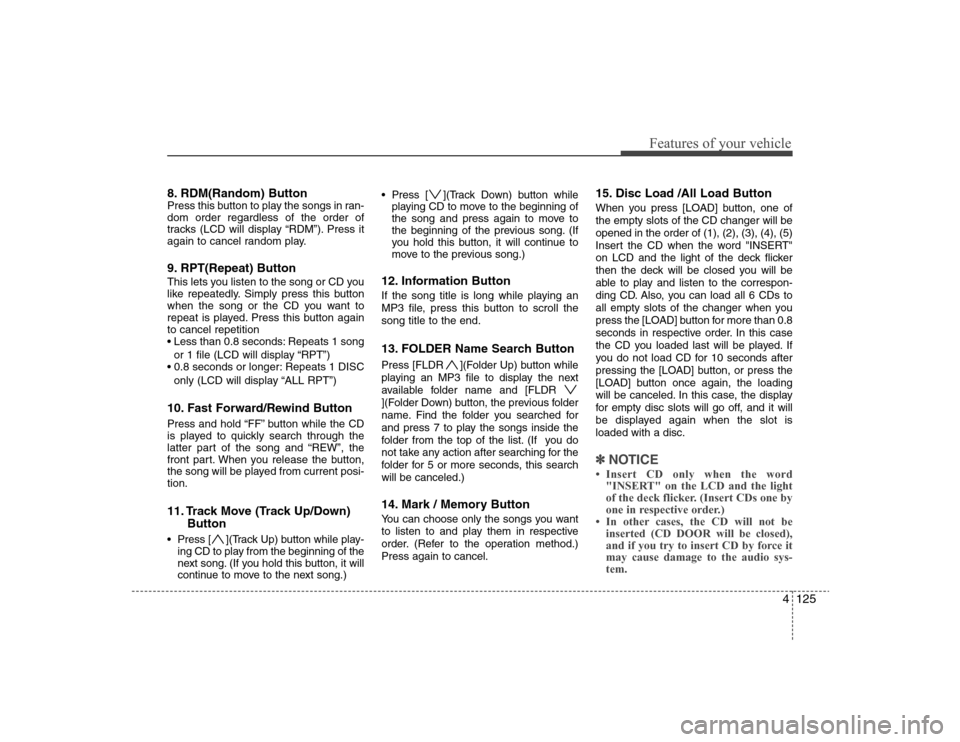
8. RDM(Random) ButtonPress this button to play the songs in ran-
dom order regardless of the order of
tracks (LCD will display “RDM”). Press it
again to cancel random play.9. RPT(Repeat) ButtonThis lets you listen to the song or CD you
like repeatedly. Simply press this button
when the song or the CD you want to
repeat is played. Press this button again
to cancel repetition
Repeats 1 song
or 1 file (LCD will display “RPT”)
Repeats 1 DISC
only (LCD will display “ALL RPT”)10. Fast Forward/Rewind ButtonPress and hold “FF” button while the CD
is played to quickly search through the
latter part of the song and “REW”, the
front part. When you release the button,
the song will be played from current posi-
tion.11. Track Move (Track Up/Down)
Button Press [ ](Track Up) button while play-
ing CD to play from the beginning of the
next song. (If you hold this button, it will
continue to move to the next song.) Press [ ](Track Down) button while
playing CD to move to the beginning of
the song and press again to move to
the beginning of the previous song. (If
you hold this button, it will continue to
move to the previous song.)
12. Information ButtonIf the song title is long while playing an
MP3 file, press this button to scroll the
song title to the end.13. FOLDER Name Search ButtonPress [FLDR ](Folder Up) button while
playing an MP3 file to display the next
available folder name and [FLDR
](Folder Down) button, the previous folder
name. Find the folder you searched for
and press 7 to play the songs inside the
folder from the top of the list. (If you do
not take any action after searching for the
folder for 5 or more seconds, this search
will be canceled.)14. Mark / Memory ButtonYou can choose only the songs you want
to listen to and play them in respective
order. (Refer to the operation method.)
Press again to cancel.
15. Disc Load /All Load ButtonWhen you press [LOAD] button, one of
the empty slots of the CD changer will be
opened in the order of (1), (2), (3), (4), (5)
Insert the CD when the word "INSERT"
on LCD and the light of the deck flicker
then the deck will be closed you will be
able to play and listen to the correspon-
ding CD. Also, you can load all 6 CDs to
all empty slots of the changer when you
press the [LOAD] button for more than 0.8
seconds in respective order. In this case
the CD you loaded last will be played. If
you do not load CD for 10 seconds after
pressing the [LOAD] button, or press the
[LOAD] button once again, the loading
will be canceled. In this case, the display
for empty disc slots will go off, and it will
be displayed again when the slot is
loaded with a disc.✽ ✽
NOTICE• Insert CD only when the word
"INSERT" on the LCD and the light
of the deck flicker. (Insert CDs one by
one in respective order.)
• In other cases, the CD will not be
inserted (CD DOOR will be closed),
and if you try to insert CD by force it
may cause damage to the audio sys-
tem.
Page 199 of 360
Features of your vehicle126 4
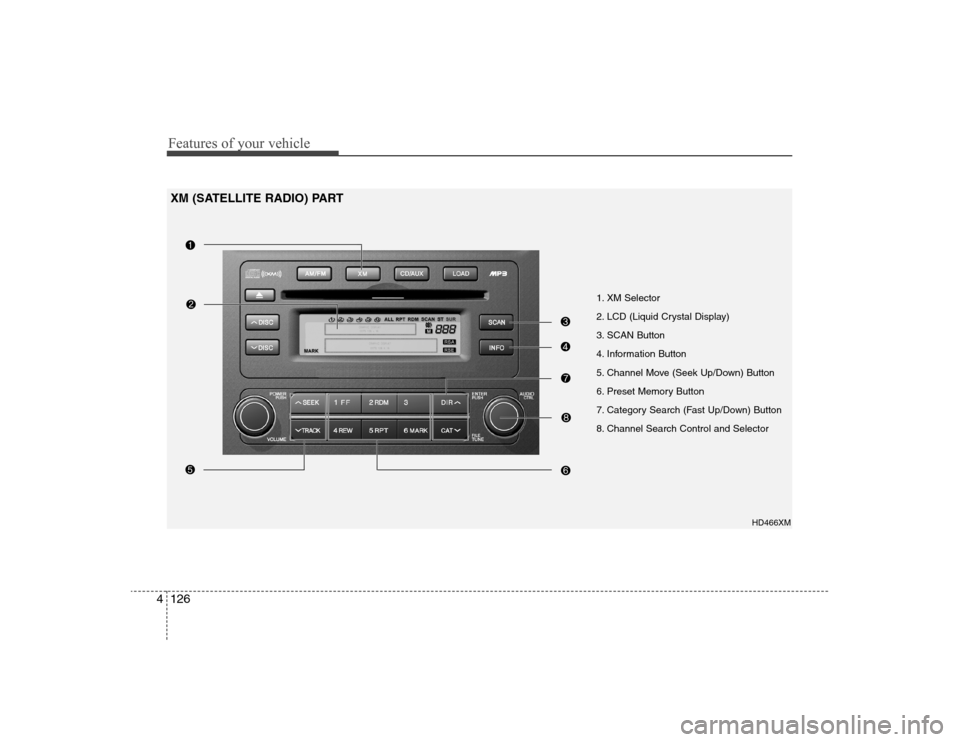
1. XM Selector
2. LCD (Liquid Crystal Display)
3. SCAN Button
4. Information Button
5. Channel Move (Seek Up/Down) Button
6. Preset Memory Button
7. Category Search (Fast Up/Down) Button
8. Channel Search Control and Selector
HD466XM
XM (SATELLITE RADIO) PART
Page 200 of 360
4127
Features of your vehicle
1. XM Selector This is XM selector and it will turn to
each mode in the following order each
time you press the button.
- XM1 XM2 XM3
When you press this button when you
are listening to CD or RADIO, the sys-
tem will automatically turn to XM
mode.
When ignition switch of the automobile
is set to ACC (1st notch) or ON (2nd
notch) and when you press this button,
XM will be on even when the audio
system was turned off.2. LCD (Liquid Crystal Display)It displays the XM1, XM2, XM3, Preset
Number, Title of the Channel Received,
EQ Mode (CLASSIC, POP, ROCK,
JAZZ), and SCAN Status when listening
to XM.
3. SCAN ButtonWhen you press this button, the player
will play 10 seconds of each channel
(LCD will display "SCAN"). Press it again
to cancel scanning. Also, press and this
button for more than 0.8 seconds to play
the channels memorized to the preset
buttons for 10 seconds each. (LCD will
display "corresponding channel number",
"
", and "SCAN".) Press it again to
cancel scanning.4. Information ButtonYou can see the information of the chan-
nel currently received and you can switch
to different information by pressing this
button in the following order.
- Title Name Category Current
State
5. Channel Move (Seek Up/Down)
Button When you press this button, the chan-
nel will move automatically and stop at
the next available channel and play the
channel. The display will cycle once
through the Channel, Title, Name and
Category for selected channel.
(Press [ ] to move to the higher fre-
quencies, press [ ] to the lower fre-
quencies automatically.)
Press and hold either the down or up at
a fast rate. The display will show the
Channel Name and Number while tun-
ing at the fast rate.
Radio ID :Seek or tune to XM channel
0 to display the Radio ID.6. Preset Memory ButtonPress this button and hold for less than
0.8 seconds to listen to the channel
memorized to the button. Also, when you
are listening to the channel other than
the channel memorized to the button
using TUNE or SEEK, press the button
you wish to memorize current channel to
and hold for more than 0.8 seconds until
it beeps to memorize the channel.