brake rotor Hyundai Elantra 2008 Owner's Manual
[x] Cancel search | Manufacturer: HYUNDAI, Model Year: 2008, Model line: Elantra, Model: Hyundai Elantra 2008Pages: 360, PDF Size: 12.2 MB
Page 219 of 360

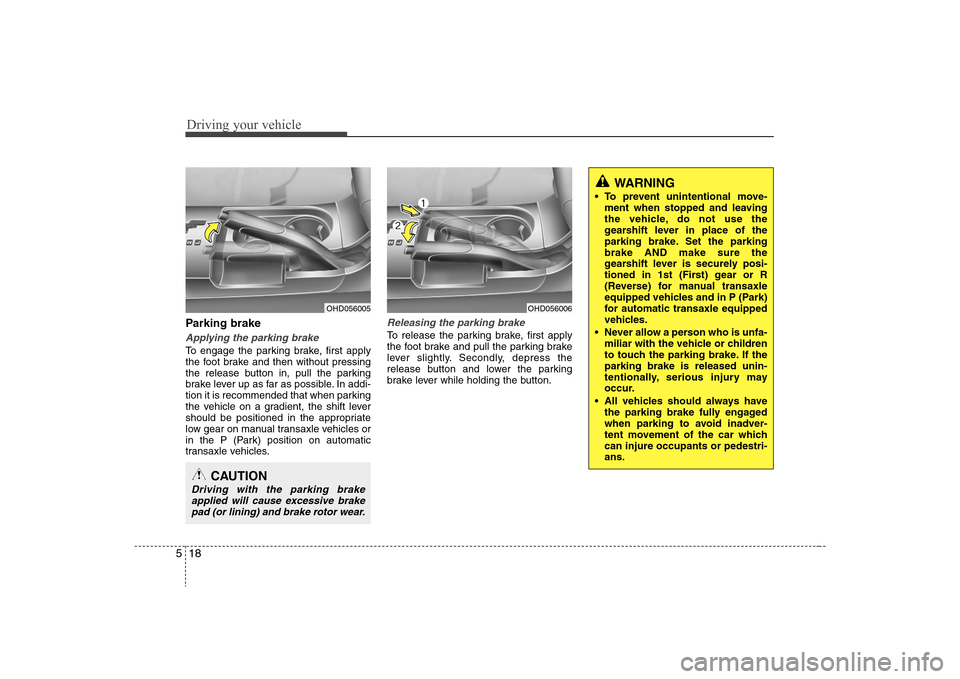
Driving your vehicle18 5Parking brake Applying the parking brakeTo engage the parking brake, first apply
the foot brake and then without pressing
the release button in, pull the parking
brake lever up as far as possible. In addi-
tion it is recommended that when parking
the vehicle on a gradient, the shift lever
should be positioned in the appropriate
low gear on manual transaxle vehicles or
in the P (Park) position on automatic
transaxle vehicles.
Releasing the parking brakeTo release the parking brake, first apply
the foot brake and pull the parking brake
lever slightly. Secondly, depress the
release button and lower the parking
brake lever while holding the button.
CAUTION
Driving with the parking brake
applied will cause excessive brake
pad (or lining) and brake rotor wear.
WARNING
To prevent unintentional move-
ment when stopped and leaving
the vehicle, do not use the
gearshift lever in place of the
parking brake. Set the parking
brake AND make sure the
gearshift lever is securely posi-
tioned in 1st (First) gear or R
(Reverse) for manual transaxle
equipped vehicles and in P (Park)
for automatic transaxle equipped
vehicles.
Never allow a person who is unfa-
miliar with the vehicle or children
to touch the parking brake. If the
parking brake is released unin-
tentionally, serious injury may
occur.
All vehicles should always have
the parking brake fully engaged
when parking to avoid inadver-
tent movement of the car which
can injure occupants or pedestri-
ans.
OHD056005
OHD056006
Page 285 of 360

No.1
2
3
4
5
6
7
8
9
10
79
Maintenance
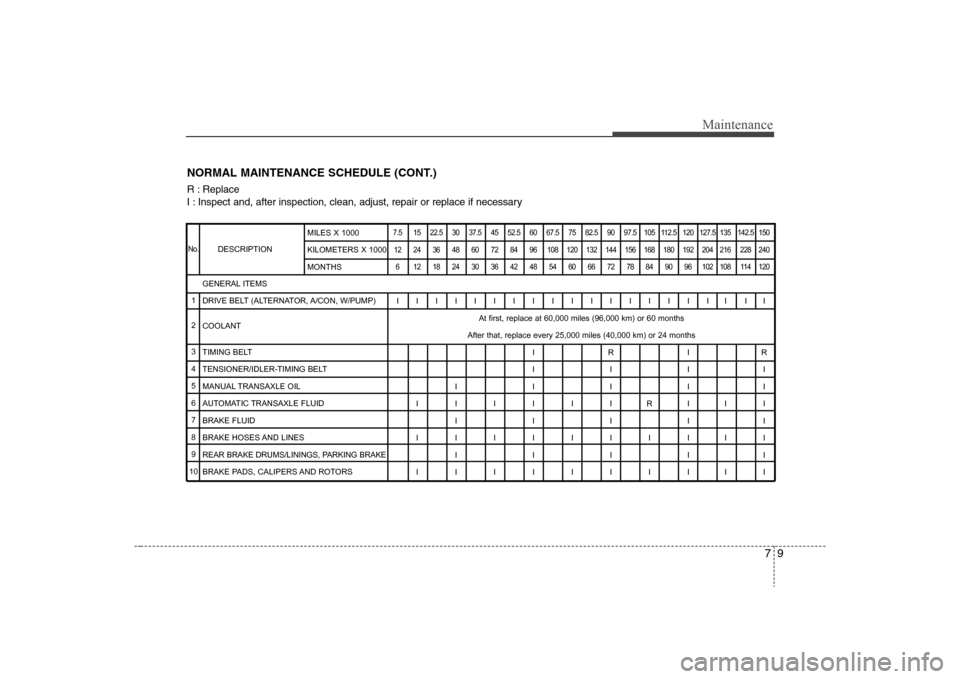
NORMAL MAINTENANCE SCHEDULE (CONT.)
DESCRIPTION
7.5 15 22.5 30 37.5 45 52.5 60 67.5 75 82.5 90 97.5 105 112.5 120 127.5 135 142.5 150
12 24 36 48 60 72 84 96 108 120 132 144 156 168 180 192 204 216 228 240
6 121824303642485460667278849096102108114120IIIIIIIIIIIIIIIIII II
At first, replace at 60,000 miles (96,000 km) or 60 months
After that, replace every 25,000 miles (40,000 km) or 24 months
IRIR
IIII
IIIII
IIIIIIRIII
IIIII
IIIIIIIIII
IIIII
IIIIIIIIII GENERAL ITEMS
DRIVE BELT (ALTERNATOR, A/CON, W/PUMP)
COOLANT
TIMING BELT
TENSIONER/IDLER-TIMING BELT
MANUAL TRANSAXLE OIL
AUTOMATIC TRANSAXLE FLUID
BRAKE FLUID
BRAKE HOSES AND LINES
REAR BRAKE DRUMS/LININGS, PARKING BRAKE
BRAKE PADS, CALIPERS AND ROTORSMILES X 1000
KILOMETERS X 1000
MONTHS
R : Replace
I : Inspect and, after inspection, clean, adjust, repair or replace if necessary
Page 287 of 360

711
Maintenance
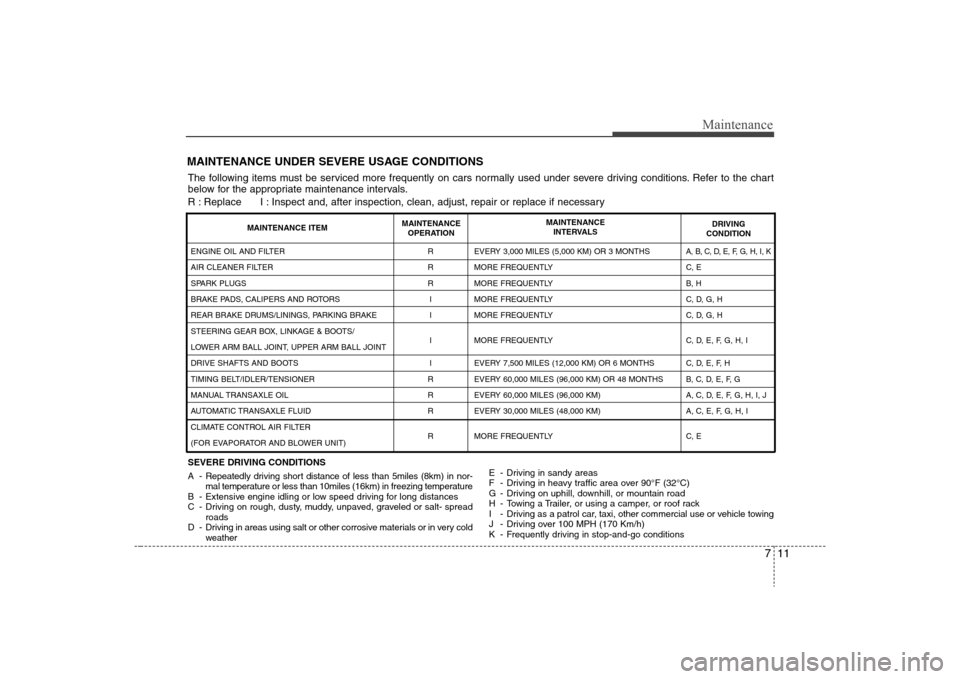
MAINTENANCE UNDER SEVERE USAGE CONDITIONSSEVERE DRIVING CONDITIONS
A - Repeatedly driving short distance of less than 5miles (8km) in nor-
mal temperature or less than 10miles (16km) in freezing temperature
B - Extensive engine idling or low speed driving for long distances
C - Driving on rough, dusty, muddy, unpaved, graveled or salt- spread
roads
D - Driving in areas using salt or other corrosive materials or in very cold
weatherE - Driving in sandy areas
F - Driving in heavy traffic area over 90°F (32°C)
G - Driving on uphill, downhill, or mountain road
H - Towing a Trailer, or using a camper, or roof rack
I - Driving as a patrol car, taxi, other commercial use or vehicle towing
J - Driving over 100 MPH (170 Km/h)
K - Frequently driving in stop-and-go conditionsENGINE OIL AND FILTER
AIR CLEANER FILTER
SPARK PLUGS
BRAKE PADS, CALIPERS AND ROTORS
REAR BRAKE DRUMS/LININGS, PARKING BRAKE
STEERING GEAR BOX, LINKAGE & BOOTS/
LOWER ARM BALL JOINT, UPPER ARM BALL JOINT
DRIVE SHAFTS AND BOOTS
TIMING BELT/IDLER/TENSIONER
MANUAL TRANSAXLE OIL
AUTOMATIC TRANSAXLE FLUID
CLIMATE CONTROL AIR FILTER
(FOR EVAPORATOR AND BLOWER UNIT)R
R
R
I
I
I
I
R
R
R
REVERY 3,000 MILES (5,000 KM) OR 3 MONTHS
MORE FREQUENTLY
MORE FREQUENTLY
MORE FREQUENTLY
MORE FREQUENTLY
MORE FREQUENTLY
EVERY 7,500 MILES (12,000 KM) OR 6 MONTHS
EVERY 60,000 MILES (96,000 KM) OR 48 MONTHS
EVERY 60,000 MILES (96,000 KM)
EVERY 30,000 MILES (48,000 KM)
MORE FREQUENTLY
A, B, C, D, E, F, G, H, I, KC, E
B, H
C, D, G, H
C, D, G, H
C, D, E, F, G, H, I
C, D, E, F, H
B, C, D, E, F, G
A, C, D, E, F, G, H, I, J
A, C, E, F, G, H, I
C, E
MAINTENANCE ITEMMAINTENANCE
OPERATIONMAINTENANCE
INTERVALSDRIVING
CONDITION
The following items must be serviced more frequently on cars normally used under severe driving conditions. Refer to the chart
below for the appropriate maintenance intervals.
R : Replace I : Inspect and, after inspection, clean, adjust, repair or replace if necessary
Page 290 of 360

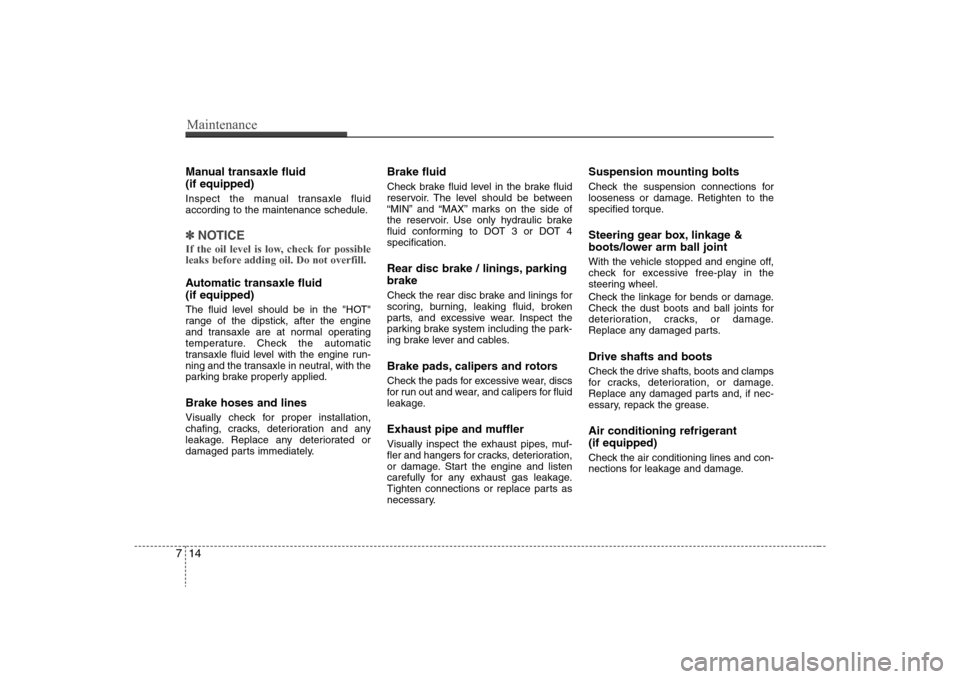
Maintenance14 7Manual transaxle fluid
(if equipped)Inspect the manual transaxle fluid
according to the maintenance schedule.✽ ✽
NOTICEIf the oil level is low, check for possible
leaks before adding oil. Do not overfill.Automatic transaxle fluid
(if equipped)The fluid level should be in the "HOT"
range of the dipstick, after the engine
and transaxle are at normal operating
temperature. Check the automatic
transaxle fluid level with the engine run-
ning and the transaxle in neutral, with the
parking brake properly applied.Brake hoses and linesVisually check for proper installation,
chafing, cracks, deterioration and any
leakage. Replace any deteriorated or
damaged parts immediately.
Brake fluidCheck brake fluid level in the brake fluid
reservoir. The level should be between
“MIN” and “MAX” marks on the side of
the reservoir. Use only hydraulic brake
fluid conforming to DOT 3 or DOT 4
specification.Rear disc brake / linings, parking
brakeCheck the rear disc brake and linings for
scoring, burning, leaking fluid, broken
parts, and excessive wear. Inspect the
parking brake system including the park-
ing brake lever and cables.Brake pads, calipers and rotorsCheck the pads for excessive wear, discs
for run out and wear, and calipers for fluid
leakage.Exhaust pipe and mufflerVisually inspect the exhaust pipes, muf-
fler and hangers for cracks, deterioration,
or damage. Start the engine and listen
carefully for any exhaust gas leakage.
Tighten connections or replace parts as
necessary.
Suspension mounting boltsCheck the suspension connections for
looseness or damage. Retighten to the
specified torque.Steering gear box, linkage &
boots/lower arm ball jointWith the vehicle stopped and engine off,
check for excessive free-play in the
steering wheel.
Check the linkage for bends or damage.
Check the dust boots and ball joints for
deterioration, cracks, or damage.
Replace any damaged parts.Drive shafts and bootsCheck the drive shafts, boots and clamps
for cracks, deterioration, or damage.
Replace any damaged parts and, if nec-
essary, repack the grease.Air conditioning refrigerant
(if equipped)Check the air conditioning lines and con-
nections for leakage and damage.