oil temperature Hyundai Elantra 2008 Owner's Manual
[x] Cancel search | Manufacturer: HYUNDAI, Model Year: 2008, Model line: Elantra, Model: Hyundai Elantra 2008Pages: 360, PDF Size: 12.2 MB
Page 185 of 360
Features of your vehicle112 4✽
✽
NOTICE• To assure proper operation of the unit,
keep the vehicle interior temperature
within a normal range by using the
vehicle’s air conditioning or heating
system.
• When replacing the fuse, replace it
with a fuse having the correct capaci-
ty.
• All stored bookmarks are all erased
when the car battery is disconnected
or power to the vehicle is lost. If this
occurs, the bookmarks will have to be
reset.
• Do not add any oil to the rotating
parts. Keep magnets, screwdrivers
and other metallic objects away from
the tape mechanism and head.
✽ ✽
NOTICEWhen using a portable audio device
connected to the power outlet, noise may
occur during playback. If this happens,
use the power source of the portable
audio device.
CAUTION
Do not insert warped or poor
quality discs into the CD player
as damage to the unit may occur.
Do not insert anything like coins
into the player slot as damage to
the unit may occur.
Do not place beverages close to
the audio system. The playback
mechanism may be damaged if
you spill them.
(Continued)
(Continued)
Do not strike or allow anything to
impact the audio system, damage
to the system mechanisms could
occur.
Off-road or rough surface driving
may cause the com- pact disc to
skip. Do not use the compact disc
when driving in such conditions
as damage to the compact disc
face could occur.
Do not attempt to grab or pull the
compact disc out while the disc is
being pulled into the audio unit
by the self-loading mechanism.
Damage to the audio unit and
compact disc could occur.
This equipment is designed to be
used only in a 12 volt DC battery
system with negative ground.
This unit is made of precision
parts. Do not attempt to disas-
semble or adjust any parts.
When driving your vehicle, be
sure to keep the volume of the
unit set low enough to allow you
to hear sounds coming from the
outside.
(Continued)
(Continued)
Do not expose this equipment
(including the speakers and tape)
to water or excessive moisture.
Avoid using recorded compact
discs in your audio unit. Original
compact discs are recommended.
The unit is not sure of playing CD-
RW (Rewritable).
When using the EQ funtion, turn
off the EQ funtion of the device
on the AUX input.
When no device is connected to
the AUX cable, please pull out the
cable from the JACK on the car.
(AUX MODE is operational and
noise may heard in the AUX
MODE.)
Page 238 of 360
537
Driving your vehicle
Use high quality ethylene glycol
coolantYour vehicle is delivered with high quality
ethylene glycol coolant in the cooling
system. It is the only type of coolant that
should be used because it helps prevent
corrosion in the cooling system, lubri-
cates the water pump and prevents
freezing. Be sure to replace or replenish
your coolant in accordance with the
maintenance schedule in Section 7.
Before winter, have your coolant tested to
assure that its freezing point is sufficient
for the temperatures anticipated during
the winter.Check battery and cablesWinter puts additional burdens on the
battery system. Visually inspect the bat-
tery and cables as described in Section
7. The level of charge in your battery can
be checked by an authorized Hyundai
dealer or a service station.
Change to "winter weight" oil if
necessaryIn some climates it is recommended that
a lower viscosity "winter weight" oil be
used during cold weather. See Section 9
for recommendations. If you aren't sure
what weight oil you should use, consult
an authorized Hyundai dealer.Check spark plugs and ignition
systemInspect your spark plugs as described in
Section 7 and replace them if necessary.
Also check all ignition wiring and compo-
nents to be sure they are not cracked,
worn or damaged in any way.
To keep locks from freezingTo keep the locks from freezing, squirt an
approved de-icer fluid or glycerine into
the key opening. If a lock is covered with
ice, squirt it with an approved de-icing
fluid to remove the ice. If the lock is
frozen internally, you may be able to thaw
it out by using a heated key. Handle the
heated key with care to avoid injury.Use approved window washer
anti-freeze in systemTo keep the water in the window washer
system from freezing, add an approved
window washer anti-freeze solution in
accordance with instructions on the con-
tainer. Window washer anti-freeze is
available from an authorized Hyundai
dealer and most auto parts outlets. Do
not use engine coolant or other types of
anti-freeze as these may damage the
paint finish.
Page 287 of 360
711
Maintenance
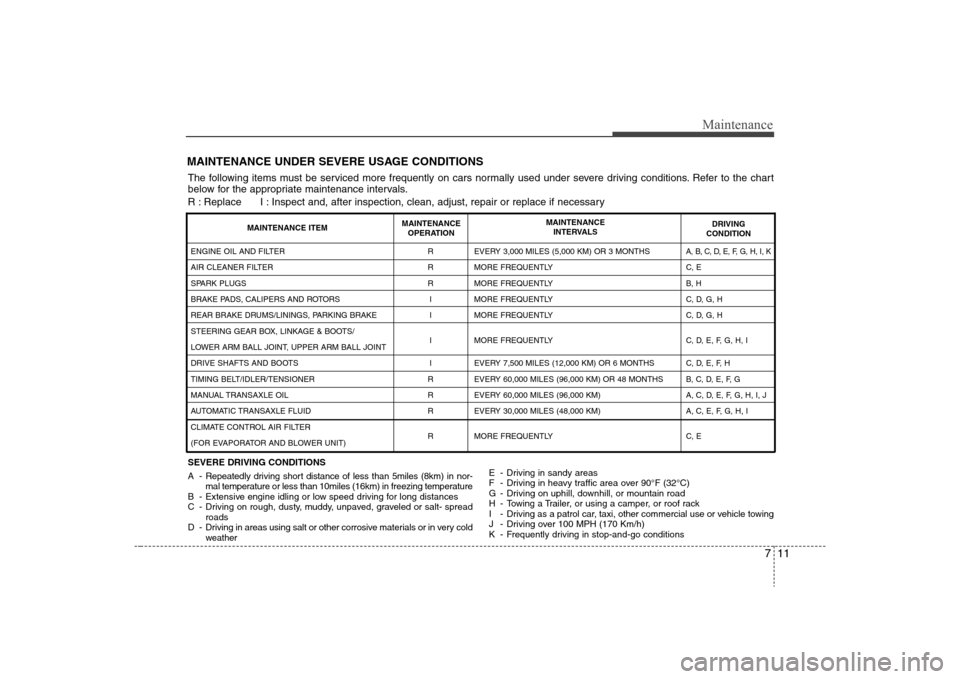
MAINTENANCE UNDER SEVERE USAGE CONDITIONSSEVERE DRIVING CONDITIONS
A - Repeatedly driving short distance of less than 5miles (8km) in nor-
mal temperature or less than 10miles (16km) in freezing temperature
B - Extensive engine idling or low speed driving for long distances
C - Driving on rough, dusty, muddy, unpaved, graveled or salt- spread
roads
D - Driving in areas using salt or other corrosive materials or in very cold
weatherE - Driving in sandy areas
F - Driving in heavy traffic area over 90°F (32°C)
G - Driving on uphill, downhill, or mountain road
H - Towing a Trailer, or using a camper, or roof rack
I - Driving as a patrol car, taxi, other commercial use or vehicle towing
J - Driving over 100 MPH (170 Km/h)
K - Frequently driving in stop-and-go conditionsENGINE OIL AND FILTER
AIR CLEANER FILTER
SPARK PLUGS
BRAKE PADS, CALIPERS AND ROTORS
REAR BRAKE DRUMS/LININGS, PARKING BRAKE
STEERING GEAR BOX, LINKAGE & BOOTS/
LOWER ARM BALL JOINT, UPPER ARM BALL JOINT
DRIVE SHAFTS AND BOOTS
TIMING BELT/IDLER/TENSIONER
MANUAL TRANSAXLE OIL
AUTOMATIC TRANSAXLE FLUID
CLIMATE CONTROL AIR FILTER
(FOR EVAPORATOR AND BLOWER UNIT)R
R
R
I
I
I
I
R
R
R
REVERY 3,000 MILES (5,000 KM) OR 3 MONTHS
MORE FREQUENTLY
MORE FREQUENTLY
MORE FREQUENTLY
MORE FREQUENTLY
MORE FREQUENTLY
EVERY 7,500 MILES (12,000 KM) OR 6 MONTHS
EVERY 60,000 MILES (96,000 KM) OR 48 MONTHS
EVERY 60,000 MILES (96,000 KM)
EVERY 30,000 MILES (48,000 KM)
MORE FREQUENTLY
A, B, C, D, E, F, G, H, I, KC, E
B, H
C, D, G, H
C, D, G, H
C, D, E, F, G, H, I
C, D, E, F, H
B, C, D, E, F, G
A, C, D, E, F, G, H, I, J
A, C, E, F, G, H, I
C, E
MAINTENANCE ITEMMAINTENANCE
OPERATIONMAINTENANCE
INTERVALSDRIVING
CONDITION
The following items must be serviced more frequently on cars normally used under severe driving conditions. Refer to the chart
below for the appropriate maintenance intervals.
R : Replace I : Inspect and, after inspection, clean, adjust, repair or replace if necessary
Page 290 of 360
Maintenance14 7Manual transaxle fluid
(if equipped)Inspect the manual transaxle fluid
according to the maintenance schedule.✽ ✽
NOTICEIf the oil level is low, check for possible
leaks before adding oil. Do not overfill.Automatic transaxle fluid
(if equipped)The fluid level should be in the "HOT"
range of the dipstick, after the engine
and transaxle are at normal operating
temperature. Check the automatic
transaxle fluid level with the engine run-
ning and the transaxle in neutral, with the
parking brake properly applied.Brake hoses and linesVisually check for proper installation,
chafing, cracks, deterioration and any
leakage. Replace any deteriorated or
damaged parts immediately.
Brake fluidCheck brake fluid level in the brake fluid
reservoir. The level should be between
“MIN” and “MAX” marks on the side of
the reservoir. Use only hydraulic brake
fluid conforming to DOT 3 or DOT 4
specification.Rear disc brake / linings, parking
brakeCheck the rear disc brake and linings for
scoring, burning, leaking fluid, broken
parts, and excessive wear. Inspect the
parking brake system including the park-
ing brake lever and cables.Brake pads, calipers and rotorsCheck the pads for excessive wear, discs
for run out and wear, and calipers for fluid
leakage.Exhaust pipe and mufflerVisually inspect the exhaust pipes, muf-
fler and hangers for cracks, deterioration,
or damage. Start the engine and listen
carefully for any exhaust gas leakage.
Tighten connections or replace parts as
necessary.
Suspension mounting boltsCheck the suspension connections for
looseness or damage. Retighten to the
specified torque.Steering gear box, linkage &
boots/lower arm ball jointWith the vehicle stopped and engine off,
check for excessive free-play in the
steering wheel.
Check the linkage for bends or damage.
Check the dust boots and ball joints for
deterioration, cracks, or damage.
Replace any damaged parts.Drive shafts and bootsCheck the drive shafts, boots and clamps
for cracks, deterioration, or damage.
Replace any damaged parts and, if nec-
essary, repack the grease.Air conditioning refrigerant
(if equipped)Check the air conditioning lines and con-
nections for leakage and damage.
Page 291 of 360
715
Maintenance
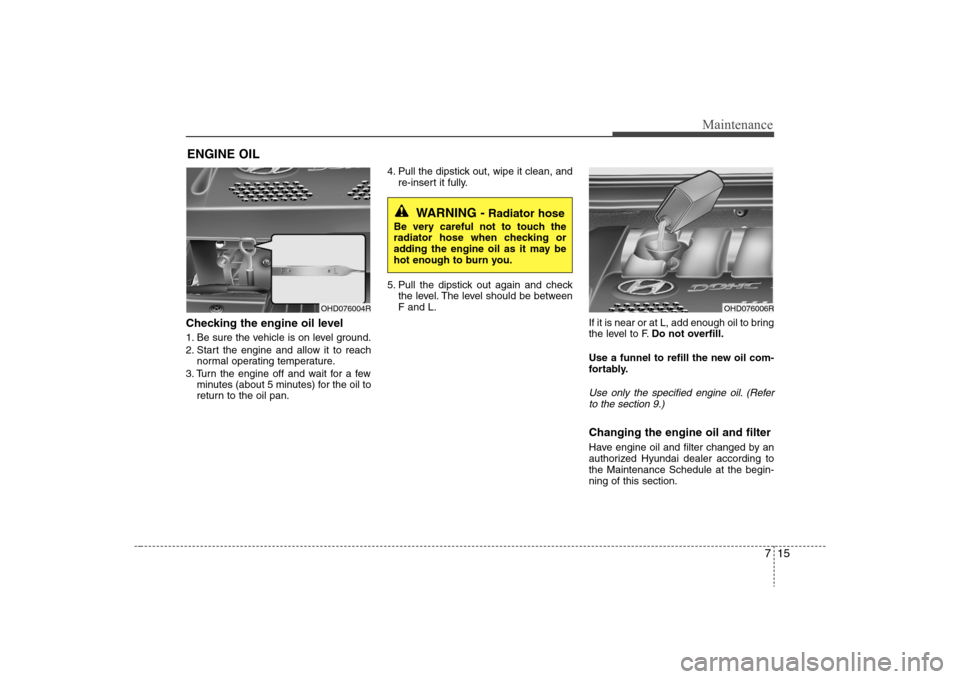
ENGINE OILChecking the engine oil level 1. Be sure the vehicle is on level ground.
2. Start the engine and allow it to reach
normal operating temperature.
3. Turn the engine off and wait for a few
minutes (about 5 minutes) for the oil to
return to the oil pan.4. Pull the dipstick out, wipe it clean, and
re-insert it fully.
5. Pull the dipstick out again and check
the level. The level should be between
F and L.
If it is near or at L, add enough oil to bring
the level to F.Do not overfill.
Use a funnel to refill the new oil com-
fortably.
Use only the specified engine oil. (Refer
to the section 9.)Changing the engine oil and filterHave engine oil and filter changed by an
authorized Hyundai dealer according to
the Maintenance Schedule at the begin-
ning of this section.
WARNING -
Radiator hose
Be very careful not to touch the
radiator hose when checking or
adding the engine oil as it may be
hot enough to burn you.
OHD076004R
OHD076006R
Page 297 of 360
721
Maintenance
✽ ✽
NOTICE“COLD” range is for reference only and
should NOT be used to determine
transaxle fluid level.
✽ ✽
NOTICENew automatic transaxle fluid should be
red. The red dye is added so the assem-
bly plant can identify it as automatic
transaxle fluid and distinguish it from
engine oil or antifreeze. The red dye,
which is not an indicator of fluid quali-
ty, is not permanent. As the vehicle is
driven, the automatic transaxle fluid
will begin to look darker. The color may
eventually appear light brown.
Therefore, have an authorized Hyundai
dealer change the automatic transaxle
fluid according to the Scheduled
Maintenance at the beginning of this
section.Use only the specified automatic
transaxle fluid. (Refer to the section 9.)Changing the automatic transaxle
fluidHave automatic transaxle fluid changed
by an authorized Hyundai dealer accord-
ing to the Maintenance Schedule at the
beginning of this section.
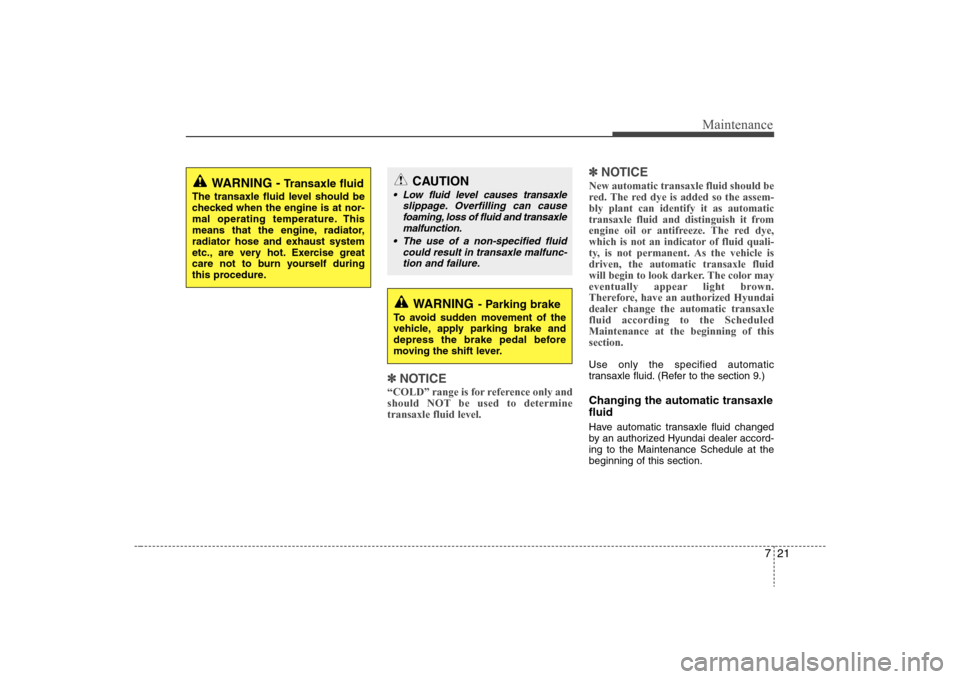
WARNING -
Transaxle fluid
The transaxle fluid level should be
checked when the engine is at nor-
mal operating temperature. This
means that the engine, radiator,
radiator hose and exhaust system
etc., are very hot. Exercise great
care not to burn yourself during
this procedure.
WARNING
- Parking brake
To avoid sudden movement of the
vehicle, apply parking brake and
depress the brake pedal before
moving the shift lever.
CAUTION
Low fluid level causes transaxle
slippage. Overfilling can cause
foaming, loss of fluid and transaxle
malfunction.
The use of a non-specified fluid
could result in transaxle malfunc-
tion and failure.
Page 307 of 360
731
Maintenance
WARNING
- Recharging
battery
When recharging the battery,
observe the following precautions:
The battery must be removed
from the vehicle and placed in an
area with good ventilation.
Do not allow cigarettes, sparks,
or flame near the battery.
Watch the battery during charg-
ing, and stop or reduce the charg-
ing rate if the battery cells begin
gassing (boiling) violently or if
the temperature of the electrolyte
of any cell exceeds 120°F (49°C).
Wear eye protection when check-
ing the battery during charging.
(Continued)
(Continued)
Disconnect the battery charger in
the following order.
1. Turn off the battery charger main
switch.
2. Unhook the negative clamp from
the negative battery terminal.
3. Unhook the positive clamp from
the positive battery terminal.
WARNING
Before performing maintenance
or recharging the battery, turn off
all accessories and stop the
engine.
The negative battery cable must
be removed first and installed
last when the battery is discon-
nected.
Page 353 of 360
95
Specifications
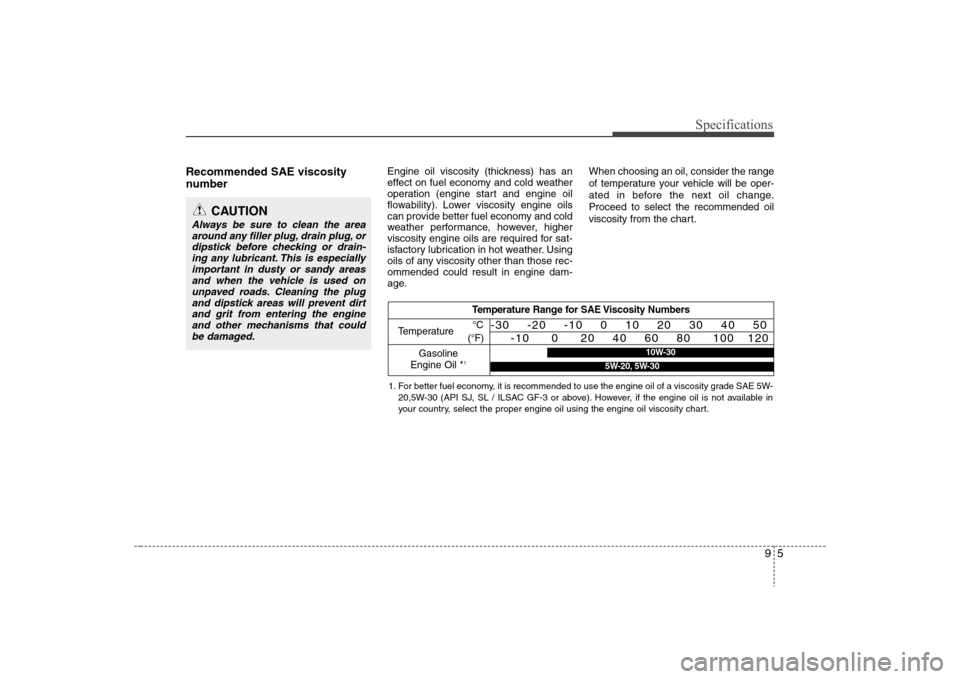
Recommended SAE viscosity
number
Engine oil viscosity (thickness) has an
effect on fuel economy and cold weather
operation (engine start and engine oil
flowability). Lower viscosity engine oils
can provide better fuel economy and cold
weather performance, however, higher
viscosity engine oils are required for sat-
isfactory lubrication in hot weather. Using
oils of any viscosity other than those rec-
ommended could result in engine dam-
age.When choosing an oil, consider the range
of temperature your vehicle will be oper-
ated in before the next oil change.
Proceed to select the recommended oil
viscosity from the chart.
CAUTION
Always be sure to clean the area
around any filler plug, drain plug, or
dipstick before checking or drain-
ing any lubricant. This is especially
important in dusty or sandy areas
and when the vehicle is used on
unpaved roads. Cleaning the plug
and dipstick areas will prevent dirt
and grit from entering the engine
and other mechanisms that could
be damaged.
Temperature Range for SAE Viscosity Numbers
Temperature
Gasoline
Engine Oil *
1°C
(°F)
-30 -20 -10 0 10 20 30 40 50
-10 0 20 40 60 80 100 120
1. For better fuel economy, it is recommended to use the engine oil of a viscosity grade SAE 5W-
20,5W-30 (API SJ, SL / ILSAC GF-3 or above). However, if the engine oil is not available in
your country, select the proper engine oil using the engine oil viscosity chart.
10W-30
5W-20, 5W-30
Page 356 of 360
I3
Index
Emergency starting ························································ 6-4
Emission control system ·············································· 7-65
Engine compartment ······················································ 7-2
Engine coolant ····························································· 7-16
Engine oil ····································································· 7-15
Explanation of scheduled maintenance items ············· 7-12
Fuel filler lid ································································ 4-20
Fuel requirements ·························································· 1-3
Fuses ············································································ 7-45
Hazard warning flasher ··············································· 4-51
Hood ············································································ 4-18
How to use this manual ················································· 1-2
If the engine overheats ·················································· 6-5
If the engine will not start ············································· 6-3
If you have a flat tire ··················································· 6-12
Changing tires ·························································· 6-13
Removing the spare tire ··········································· 6-13
Storing the spare tire ················································ 6-13
Important - use of compact spare tire ······················ 6-18
In case of an emergency while driving ························· 6-2Indicator symbols on the instrument cluster ················· 1-7
Instrument cluster ························································ 4-38
Gauges ······································································ 4-40
Engine temperature gauge ········································ 4-38
Fuel gauge ································································ 4-40
Instrument panel illumination ·································· 4-39
Odometer/Trip odometer ·········································· 4-41
Speedometer ····························································· 4-39
Tachometer ······························································· 4-39
Instrument panel overview ············································ 2-3
Interior features ··························································· 4-82
Ashtray ····································································· 4-82
Cigarette lighter ························································ 4-82
Clothes hanger ·························································· 4-86
Cup holder ································································ 4-83
Digital clock ····························································· 4-85
Power outlet ····························································· 4-84
Shopping bag holder ················································ 4-85
Sunvisor ···································································· 4-83
Interior light ································································· 4-56
Interior overview ··························································· 2-2
Key positions ································································· 5-4
Keys ··············································································· 4-2FHI
K