roof Hyundai Elantra 2008 Owner's Manual
[x] Cancel search | Manufacturer: HYUNDAI, Model Year: 2008, Model line: Elantra, Model: Hyundai Elantra 2008Pages: 360, PDF Size: 12.2 MB
Page 62 of 360
343
Safety features of your vehicle
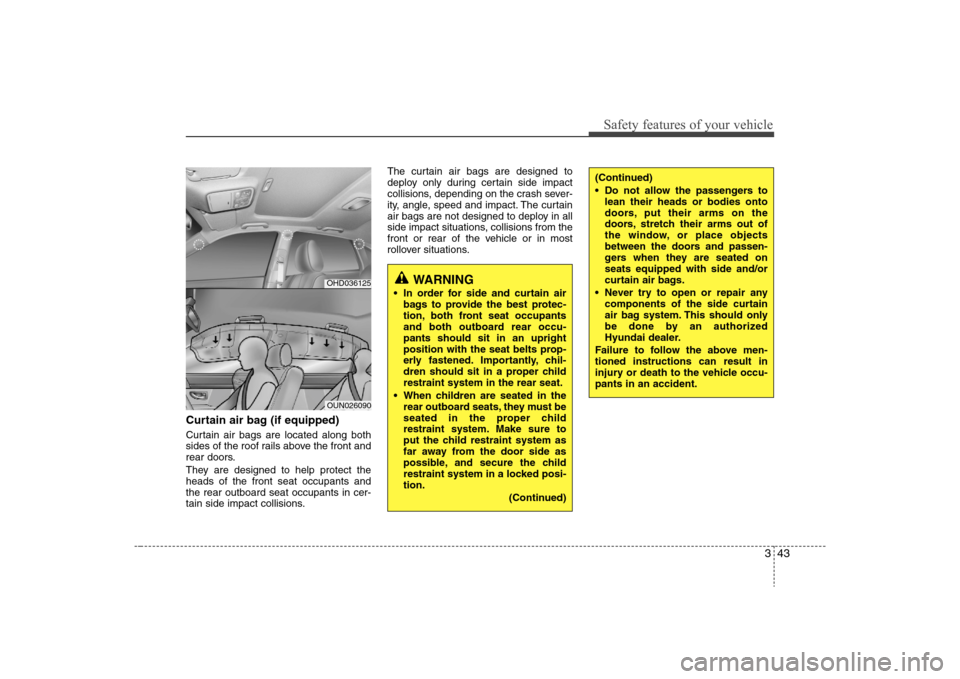
Curtain air bag (if equipped)Curtain air bags are located along both
sides of the roof rails above the front and
rear doors.
They are designed to help protect the
heads of the front seat occupants and
the rear outboard seat occupants in cer-
tain side impact collisions.The curtain air bags are designed to
deploy only during certain side impact
collisions, depending on the crash sever-
ity, angle, speed and impact. The curtain
air bags are not designed to deploy in all
side impact situations, collisions from the
front or rear of the vehicle or in most
rollover situations.
WARNING
In order for side and curtain air
bags to provide the best protec-
tion, both front seat occupants
and both outboard rear occu-
pants should sit in an upright
position with the seat belts prop-
erly fastened. Importantly, chil-
dren should sit in a proper child
restraint system in the rear seat.
When children are seated in the
rear outboard seats, they must be
seated in the proper child
restraint system. Make sure to
put the child restraint system as
far away from the door side as
possible, and secure the child
restraint system in a locked posi-
tion.
(Continued)
OHD036125OUN026090
(Continued)
Do not allow the passengers to
lean their heads or bodies onto
doors, put their arms on the
doors, stretch their arms out of
the window, or place objects
between the doors and passen-
gers when they are seated on
seats equipped with side and/or
curtain air bags.
Never try to open or repair any
components of the side curtain
air bag system. This should only
be done by an authorized
Hyundai dealer.
Failure to follow the above men-
tioned instructions can result in
injury or death to the vehicle occu-
pants in an accident.
Page 69 of 360
Safety features of your vehicle50 3Noise and smokeWhen the air bags inflate, they make a
loud noise and they leave smoke and
powder in the air inside of the vehicle.
This is normal and is a result of the igni-
tion of the air bag inflator. After the air
bag inflates, you may feel substantial dis-
comfort in breathing due to the contact of
your chest with both the seat belt and the
air bag, as well as from breathing the
smoke and powder.We strongly urge
you to open your doors and/or win-
dows as soon as possible after impact
in order to reduce discomfort and pre-
vent prolonged exposure to the
smoke and powder.
Though smoke and powder are non-
toxic, it may cause irritation to the skin
(eyes, nose and throat etc). If this is the
case, wash and rinse with cold water
immediately and consult a doctor if the
symptom persists.
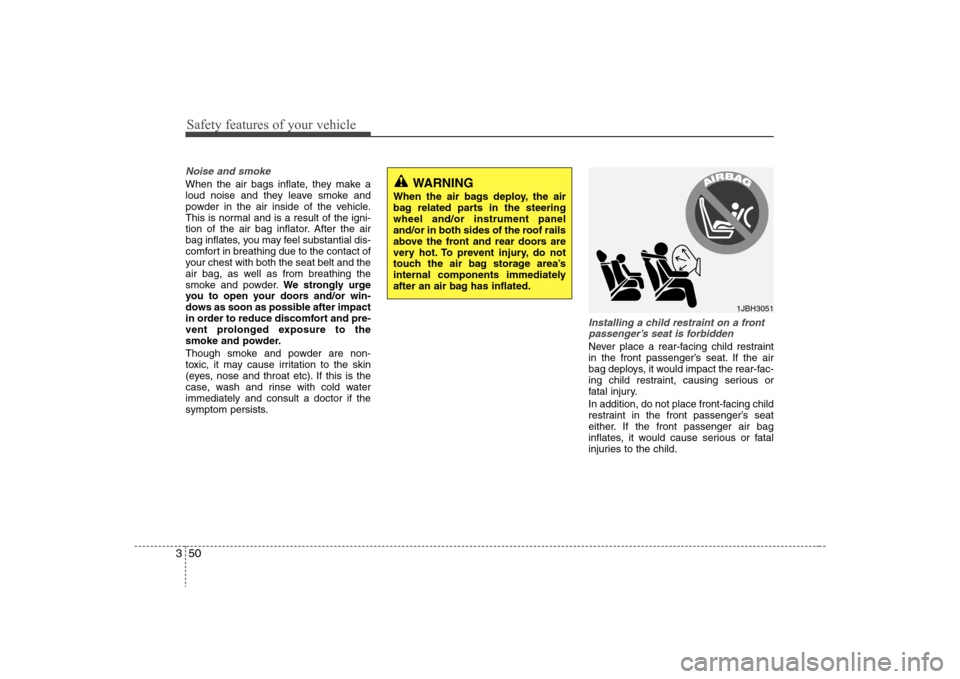
Installing a child restraint on a front
passenger’s seat is forbiddenNever place a rear-facing child restraint
in the front passenger’s seat. If the air
bag deploys, it would impact the rear-fac-
ing child restraint, causing serious or
fatal injury.
In addition, do not place front-facing child
restraint in the front passenger’s seat
either. If the front passenger air bag
inflates, it would cause serious or fatal
injuries to the child.
1JBH3051
WARNING
When the air bags deploy, the air
bag related parts in the steering
wheel and/or instrument panel
and/or in both sides of the roof rails
above the front and rear doors are
very hot. To prevent injury, do not
touch the air bag storage area’s
internal components immediately
after an air bag has inflated.
Page 74 of 360
4
Keys / 4-2
Remote keyless entry / 4-3
Theft-alarm system / 4-6
Door locks / 4-8
Trunk / 4-12
Windows / 4-14
Hood / 4-18
Fuel filler lid / 4-20
Sunroof / 4-23
Steering wheel / 4-28
Mirrors / 4-30
Instrument cluster / 4-38
Hazard warning flasher / 4-51
Lighting / 4-51
Wipers and washers / 4-54
Interior light / 4-56
Defroster / 4-59
Manual climate control system / 4-60
Automatic climate control system / 4-69
Windshield defrosting and defogging / 4-77
Storage compartment / 4-80
Interior features / 4-82
Audio system / 4-87
Features of your vehicle
Page 96 of 360
423
Features of your vehicle
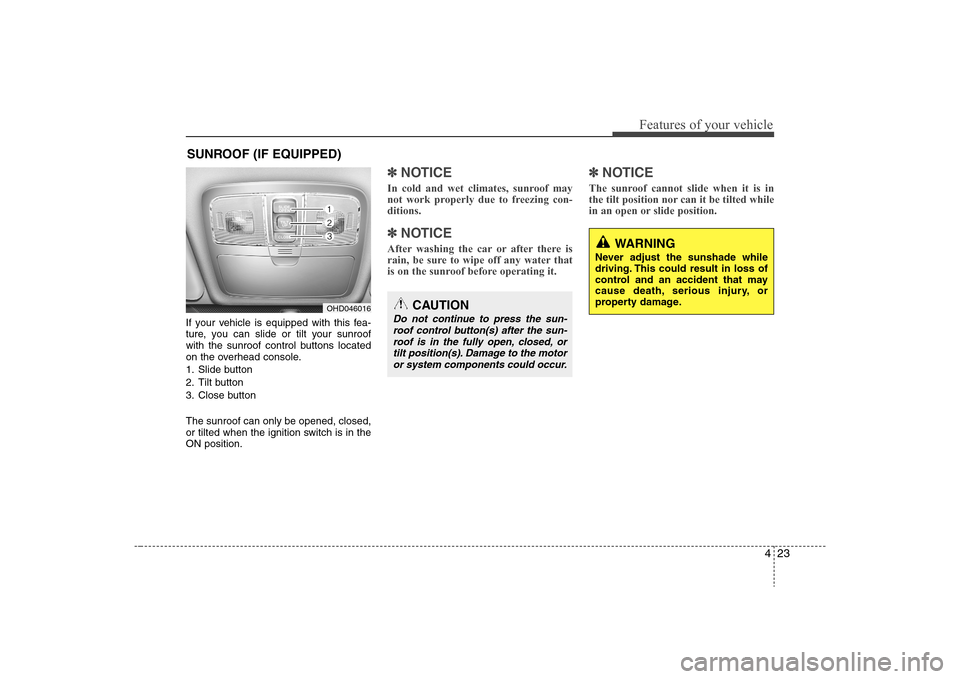
If your vehicle is equipped with this fea-
ture, you can slide or tilt your sunroof
with the sunroof control buttons located
on the overhead console.
1. Slide button
2. Tilt button
3. Close button
The sunroof can only be opened, closed,
or tilted when the ignition switch is in the
ON position.
✽ ✽
NOTICEIn cold and wet climates, sunroof may
not work properly due to freezing con-
ditions.✽ ✽
NOTICEAfter washing the car or after there is
rain, be sure to wipe off any water that
is on the sunroof before operating it.
✽ ✽
NOTICEThe sunroof cannot slide when it is in
the tilt position nor can it be tilted while
in an open or slide position.
SUNROOF (IF EQUIPPED)
OHD046016
CAUTION
Do not continue to press the sun-
roof control button(s) after the sun-
roof is in the fully open, closed, or
tilt position(s). Damage to the motor
or system components could occur.
WARNING
Never adjust the sunshade while
driving. This could result in loss of
control and an accident that may
cause death, serious injury, or
property damage.
Page 97 of 360
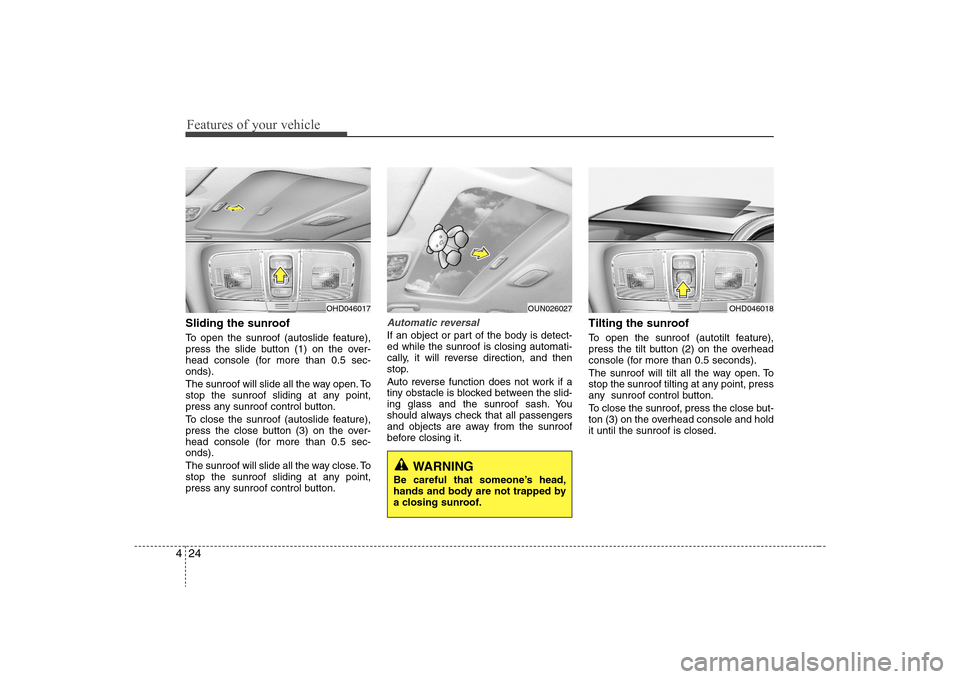
Features of your vehicle24 4Sliding the sunroof To open the sunroof (autoslide feature),
press the slide button (1) on the over-
head console (for more than 0.5 sec-
onds).
The sunroof will slide all the way open. To
stop the sunroof sliding at any point,
press any sunroof control button.
To close the sunroof (autoslide feature),
press the close button (3) on the over-
head console (for more than 0.5 sec-
onds).
The sunroof will slide all the way close. To
stop the sunroof sliding at any point,
press any sunroof control button.
Automatic reversalIf an object or part of the body is detect-
ed while the sunroof is closing automati-
cally, it will reverse direction, and then
stop.
Auto reverse function does not work if a
tiny obstacle is blocked between the slid-
ing glass and the sunroof sash. You
should always check that all passengers
and objects are away from the sunroof
before closing it.
Tilting the sunroof To open the sunroof (autotilt feature),
press the tilt button (2) on the overhead
console (for more than 0.5 seconds).
The sunroof will tilt all the way open. To
stop the sunroof tilting at any point, press
any sunroof control button.
To close the sunroof, press the close but-
ton (3) on the overhead console and hold
it until the sunroof is closed.
OHD046018
WARNING
Be careful that someone’s head,
hands and body are not trapped by
a closing sunroof.
OHD046017
OUN026027
Page 98 of 360
425
Features of your vehicle
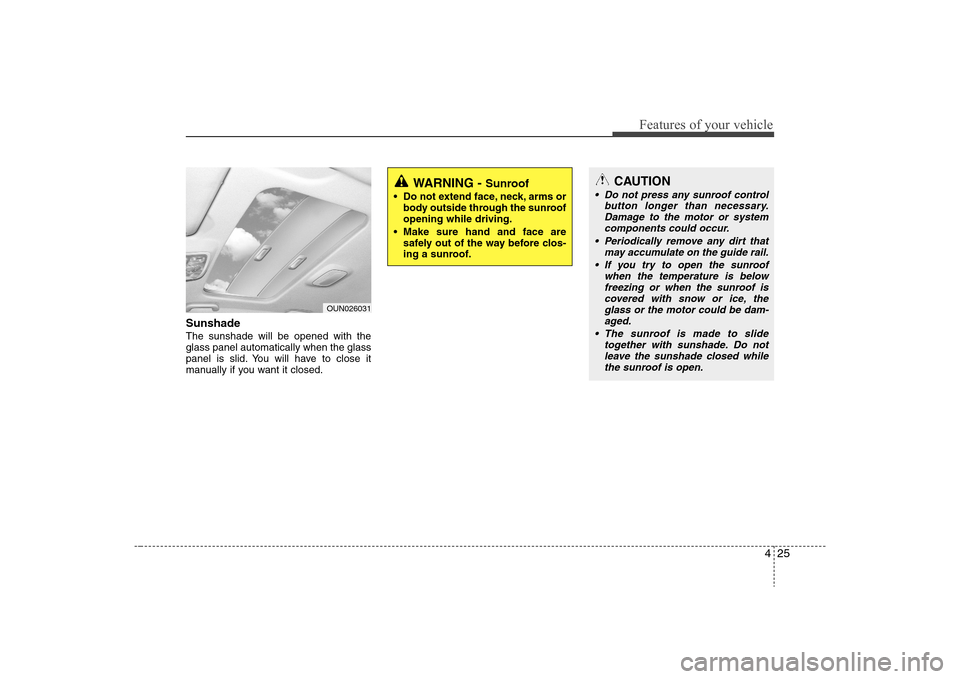
Sunshade The sunshade will be opened with the
glass panel automatically when the glass
panel is slid. You will have to close it
manually if you want it closed.
OUN026031
WARNING -
Sunroof
Do not extend face, neck, arms or
body outside through the sunroof
opening while driving.
Make sure hand and face are
safely out of the way before clos-
ing a sunroof.
CAUTION
Do not press any sunroof control
button longer than necessary.
Damage to the motor or system
components could occur.
Periodically remove any dirt that
may accumulate on the guide rail.
If you try to open the sunroof
when the temperature is below
freezing or when the sunroof is
covered with snow or ice, the
glass or the motor could be dam-
aged.
The sunroof is made to slide
together with sunshade. Do not
leave the sunshade closed while
the sunroof is open.
Page 99 of 360
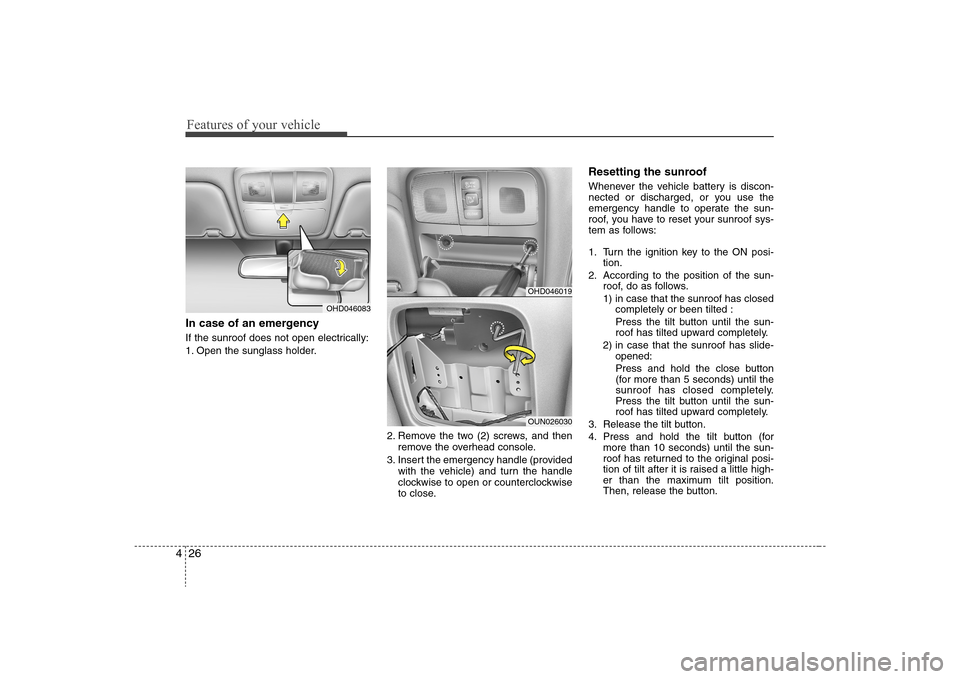
Features of your vehicle26 4In case of an emergency If the sunroof does not open electrically:
1. Open the sunglass holder.
2. Remove the two (2) screws, and then
remove the overhead console.
3. Insert the emergency handle (provided
with the vehicle) and turn the handle
clockwise to open or counterclockwise
to close.
Resetting the sunroofWhenever the vehicle battery is discon-
nected or discharged, or you use the
emergency handle to operate the sun-
roof, you have to reset your sunroof sys-
tem as follows:
1. Turn the ignition key to the ON posi-
tion.
2. According to the position of the sun-
roof, do as follows.
1) in case that the sunroof has closed
completely or been tilted :
Press the tilt button until the sun-
roof has tilted upward completely.
2) in case that the sunroof has slide-
opened:
Press and hold the close button
(for more than 5 seconds) until the
sunroof has closed completely.
Press the tilt button until the sun-
roof has tilted upward completely.
3. Release the tilt button.
4. Press and hold the tilt button (for
more than 10 seconds) until the sun-
roof has returned to the original posi-
tion of tilt after it is raised a little high-
er than the maximum tilt position.
Then, release the button.
OHD046019OUN026030
OHD046083
Page 100 of 360
427
Features of your vehicle
5. Press and hold the tilt button (for
more than 5 seconds) until the sun-
roof is operated as follows;
TILT DOWN →SLIDE OPEN →
SLIDE CLOSE
Then, release the button.
When this is complete, the sunroof sys-
tem is reset.
Page 160 of 360
487
Features of your vehicle
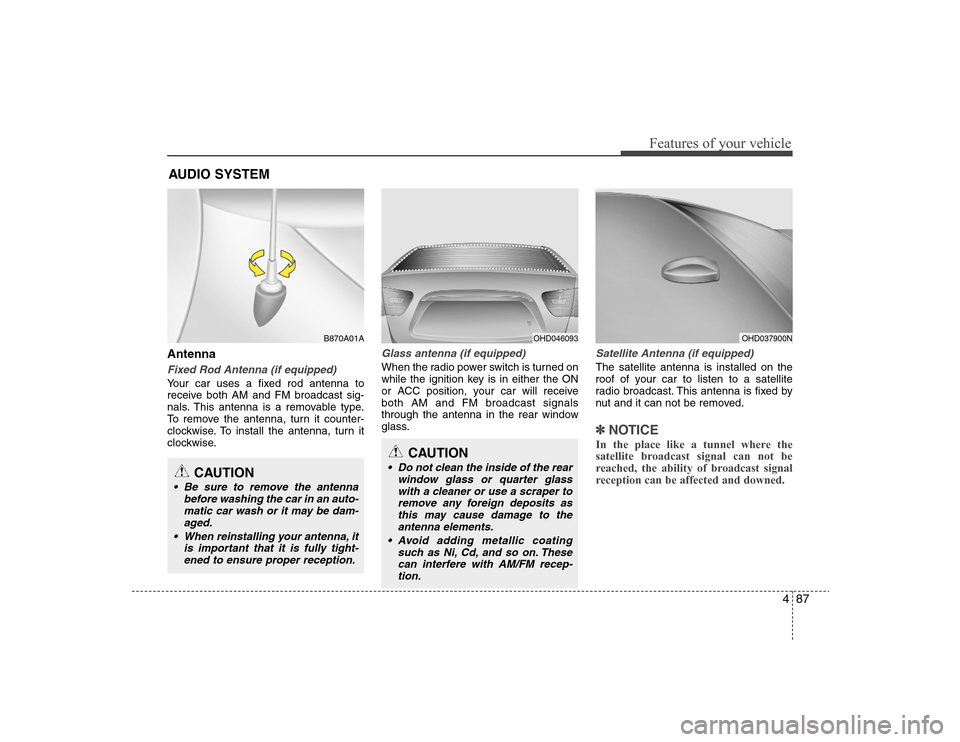
AntennaFixed Rod Antenna (if equipped)Your car uses a fixed rod antenna to
receive both AM and FM broadcast sig-
nals. This antenna is a removable type.
To remove the antenna, turn it counter-
clockwise. To install the antenna, turn it
clockwise.
Glass antenna (if equipped)When the radio power switch is turned on
while the ignition key is in either the ON
or ACC position, your car will receive
both AM and FM broadcast signals
through the antenna in the rear window
glass.
Satellite Antenna (if equipped)The satellite antenna is installed on the
roof of your car to listen to a satellite
radio broadcast. This antenna is fixed by
nut and it can not be removed.✽ ✽
NOTICEIn the place like a tunnel where the
satellite broadcast signal can not be
reached, the ability of broadcast signal
reception can be affected and downed.
AUDIO SYSTEM
OHD046093
OHD037900N
CAUTION
• Do not clean the inside of the rear
window glass or quarter glass
with a cleaner or use a scraper to
remove any foreign deposits as
this may cause damage to the
antenna elements.
Avoid adding metallic coating
such as Ni, Cd, and so on. These
can interfere with AM/FM recep-
tion.
B870A01A
CAUTION
Be sure to remove the antenna
before washing the car in an auto-
matic car wash or it may be dam-
aged.
When reinstalling your antenna, it
is important that it is fully tight-
ened to ensure proper reception.
Page 287 of 360
711
Maintenance
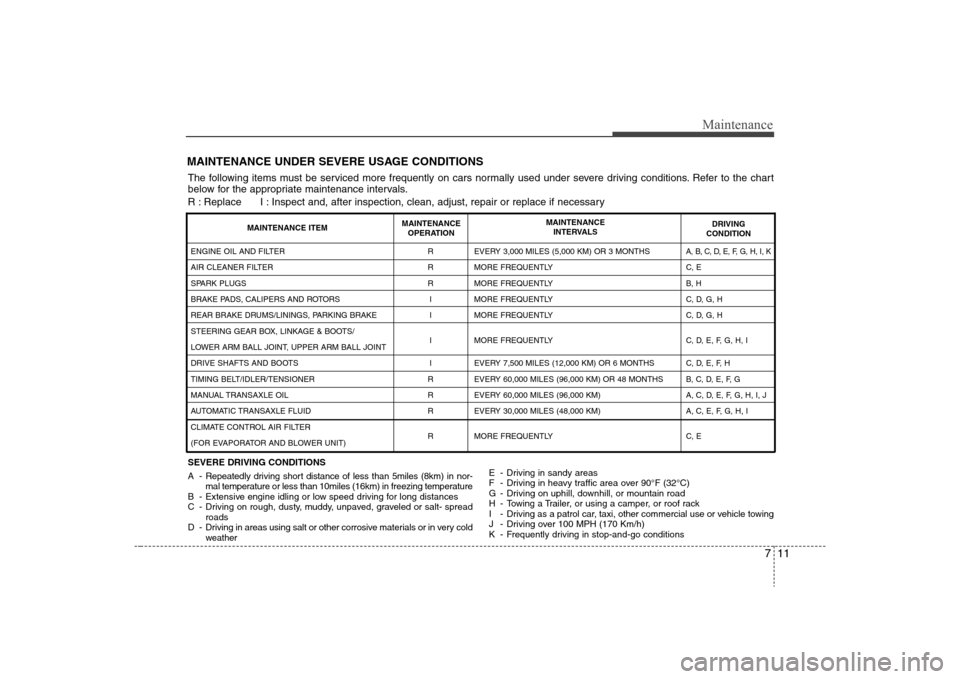
MAINTENANCE UNDER SEVERE USAGE CONDITIONSSEVERE DRIVING CONDITIONS
A - Repeatedly driving short distance of less than 5miles (8km) in nor-
mal temperature or less than 10miles (16km) in freezing temperature
B - Extensive engine idling or low speed driving for long distances
C - Driving on rough, dusty, muddy, unpaved, graveled or salt- spread
roads
D - Driving in areas using salt or other corrosive materials or in very cold
weatherE - Driving in sandy areas
F - Driving in heavy traffic area over 90°F (32°C)
G - Driving on uphill, downhill, or mountain road
H - Towing a Trailer, or using a camper, or roof rack
I - Driving as a patrol car, taxi, other commercial use or vehicle towing
J - Driving over 100 MPH (170 Km/h)
K - Frequently driving in stop-and-go conditionsENGINE OIL AND FILTER
AIR CLEANER FILTER
SPARK PLUGS
BRAKE PADS, CALIPERS AND ROTORS
REAR BRAKE DRUMS/LININGS, PARKING BRAKE
STEERING GEAR BOX, LINKAGE & BOOTS/
LOWER ARM BALL JOINT, UPPER ARM BALL JOINT
DRIVE SHAFTS AND BOOTS
TIMING BELT/IDLER/TENSIONER
MANUAL TRANSAXLE OIL
AUTOMATIC TRANSAXLE FLUID
CLIMATE CONTROL AIR FILTER
(FOR EVAPORATOR AND BLOWER UNIT)R
R
R
I
I
I
I
R
R
R
REVERY 3,000 MILES (5,000 KM) OR 3 MONTHS
MORE FREQUENTLY
MORE FREQUENTLY
MORE FREQUENTLY
MORE FREQUENTLY
MORE FREQUENTLY
EVERY 7,500 MILES (12,000 KM) OR 6 MONTHS
EVERY 60,000 MILES (96,000 KM) OR 48 MONTHS
EVERY 60,000 MILES (96,000 KM)
EVERY 30,000 MILES (48,000 KM)
MORE FREQUENTLY
A, B, C, D, E, F, G, H, I, KC, E
B, H
C, D, G, H
C, D, G, H
C, D, E, F, G, H, I
C, D, E, F, H
B, C, D, E, F, G
A, C, D, E, F, G, H, I, J
A, C, E, F, G, H, I
C, E
MAINTENANCE ITEMMAINTENANCE
OPERATIONMAINTENANCE
INTERVALSDRIVING
CONDITION
The following items must be serviced more frequently on cars normally used under severe driving conditions. Refer to the chart
below for the appropriate maintenance intervals.
R : Replace I : Inspect and, after inspection, clean, adjust, repair or replace if necessary