Brake fluid Hyundai Elantra 2010 Owner's Manual
[x] Cancel search | Manufacturer: HYUNDAI, Model Year: 2010, Model line: Elantra, Model: Hyundai Elantra 2010Pages: 348, PDF Size: 5.78 MB
Page 14 of 348
17
Introduction
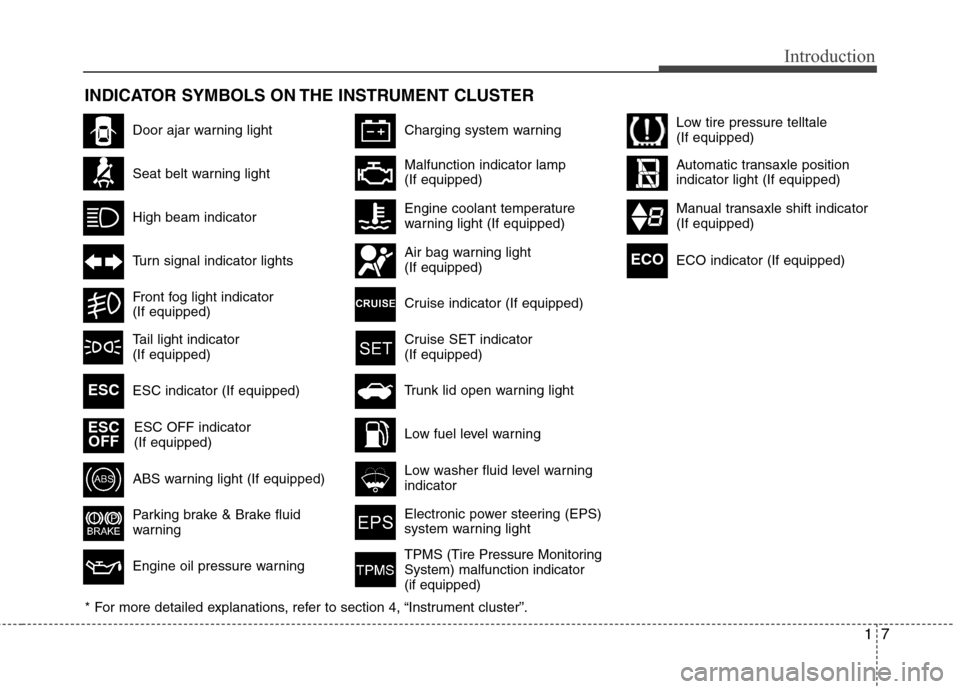
INDICATOR SYMBOLS ON THE INSTRUMENT CLUSTER
Door ajar warning light
Seat belt warning light
High beam indicator
Turn signal indicator lights
Front fog light indicator
(If equipped)
ABS warning light (If equipped)
Parking brake & Brake fluid
warning
Engine oil pressure warning
Charging system warning
ESC indicator (If equipped) ESC OFF indicator
(If equipped)
Malfunction indicator lamp
(If equipped)
Engine coolant temperature
warning light (If equipped)
Air bag warning light
(If equipped)
Cruise indicator (If equipped)
Cruise SET indicator
(If equipped)
Low fuel level warning
Low washer fluid level warning
indicator
Electronic power steering (EPS)
system warning light
Trunk lid open warning light
* For more detailed explanations, refer to section 4, “Instrument cluster”.ESC
ESC OFF
TPMS (Tire Pressure Monitoring
System) malfunction indicator
(if equipped)
Low tire pressure telltale
(If equipped)
Automatic transaxle position
indicator light (If equipped)
Manual transaxle shift indicator
(If equipped)
Tail light indicator
(If equipped) ECO indicator (If equipped)
ECO
Page 122 of 348
449
Features of your vehicle
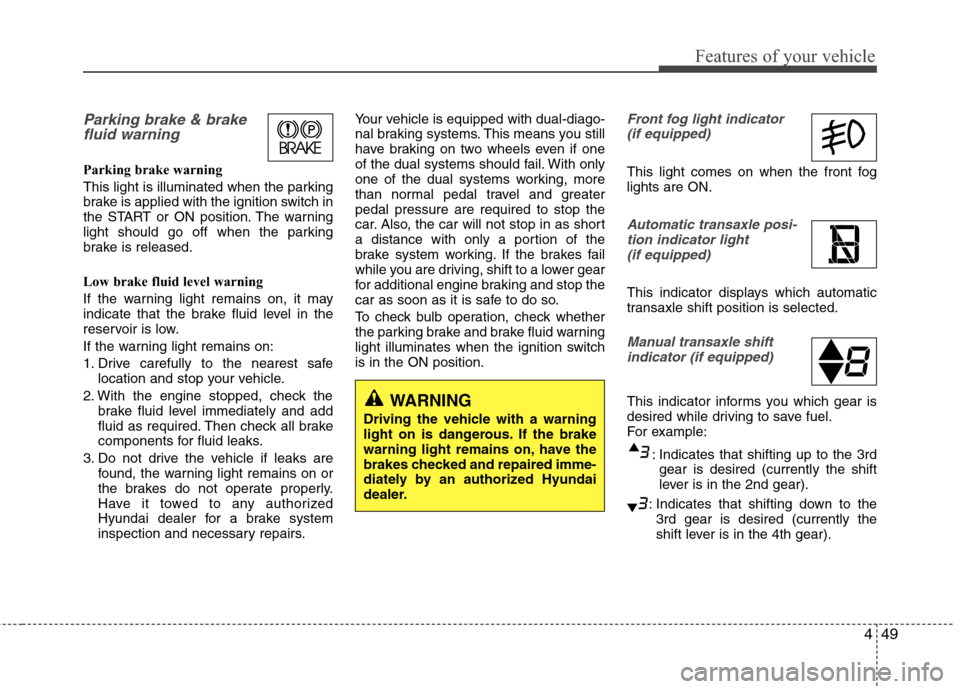
Parking brake & brakefluid warning
Parking brake warning
This light is illuminated when the parking
brake is applied with the ignition switch in
the START or ON position. The warning
light should go off when the parking
brake is released.
Low brake fluid level warning
If the warning light remains on, it may
indicate that the brake fluid level in the
reservoir is low.
If the warning light remains on:
1. Drive carefully to the nearest safe
location and stop your vehicle.
2. With the engine stopped, check the brake fluid level immediately and add
fluid as required. Then check all brake
components for fluid leaks.
3. Do not drive the vehicle if leaks are found, the warning light remains on or
the brakes do not operate properly.
Have it towed to any authorized
Hyundai dealer for a brake system
inspection and necessary repairs. Your vehicle is equipped with dual-diago-
nal braking systems. This means you still
have braking on two wheels even if one
of the dual systems should fail. With only
one of the dual systems working, more
than normal pedal travel and greater
pedal pressure are required to stop the
car. Also, the car will not stop in as short
a distance with only a portion of the
brake system working. If the brakes fail
while you are driving, shift to a lower gear
for additional engine braking and stop the
car as soon as it is safe to do so.
To check bulb operation, check whether
the parking brake and brake fluid warning
light illuminates when the ignition switch
is in the ON position.
Front fog light indicator
(if equipped)
This light comes on when the front fog
lights are ON.
Automatic transaxle posi- tion indicator light (if equipped)
This indicator displays which automatic
transaxle shift position is selected.
Manual transaxle shiftindicator (if equipped)
This indicator informs you which gear is
desired while driving to save fuel.
For example:
: Indicates that shifting up to the 3rdgear is desired (currently the shift
lever is in the 2nd gear).
: Indicates that shifting down to the 3rd gear is desired (currently the
shift lever is in the 4th gear).
WARNING
Driving the vehicle with a warning
light on is dangerous. If the brake
warning light remains on, have the
brakes checked and repaired imme-
diately by an authorized Hyundai
dealer.
Page 195 of 348
53
Driving your vehicle
Before entering vehicle
• Be sure that all windows, outside mir-ror(s), and outside lights are clean.
Check the condition of the tires.
Check under the vehicle for any sign of leaks.
Be sure there are no obstacles behind you if you intend to back up.
Necessary inspections
Fluid levels, such as engine oil, engine
coolant, brake fluid, and washer fluid
should be checked on a regular basis,
with the exact interval depending on the
fluid. Further details are provided in
Section 7, “Maintenance”.
Before starting
Close and lock all doors.
Position the seat so that all controls areeasily reached.
Adjust the inside and outside rearview mirrors. Be sure that all lights work.
Check all gauges.
Check the operation of warning lights
when the ignition switch is turned to
the ON position.
Release the parking brake and make sure the brake warning light goes out.
For safe operation, be sure you are famil-
iar with your vehicle and its equipment.
BEFORE DRIVING
WARNING
All passengers must be properly
belted whenever the vehicle is mov-
ing. Refer to “Seat belts” in section
3 for more information on their
proper use.
WARNING
Always check the surrounding
areas near your vehicle for people,
especially children, before putting a
car into “Drive” or “Reverse”.
CALIFORNIA PROPOSI-
TION 65 WARNING
Engine exhaust and a wide variety
of automobile components and
parts, including components found
in the interior furnishings in a vehi-
cle, contain or emit chemicals
known to the State of California to
cause cancer and birth defects and
reproductive harm. In addition, cer-
tain fluids contained in vehicles
and certain products of component
wear contain or emit chemicals
known to the State of California to
cause cancer and birth defects or
other reproductive harm.
Page 205 of 348
513
Driving your vehicle
✽
✽NOTICE
Always come to a complete stop before
shifting into D (Drive).
3 (Third gear)
Use for towing a trailer during hill climb-
ing or to use engine braking downhill.
"3" automatically shifts between 1st, 2nd
and 3rd gears. This means that no shift-
up to 4th gear is performed. However, the
shift-up to 4th gear is done when the car
speed exceeds a certain value to prevent
the engine from over-revving. Manually
move the selector to "D" when returning
to normal driving condition.
2 (Second gear)
Use for driving on a slippery road, hill
climbing or engine braking downhill. "2"
automatically shifts between first and
second gears.
This means that no shift-up to 3rd gear is
performed. However, the shift-up to third
gear is done when the car speed
exceeds a certain value to prevent the
engine from over-revving. Manually move
the selector to "D" returning to normal
driving condition. L (Low gear)
Use for driving up a very steep grade or
for engine braking when descending
steep hills. When downshifting to "L", the
transaxle will temporarily remain in sec-
ond gear until the vehicle has slowed
enough for low gear to engage. Do not
exceed 30 mph (50 km/h) in low gear.
"L" shifts to 1st gear only. However, shift
up to 2nd is performed when the car
exceeds a certain speed and, as speed
increases, the transaxle will shift up to
3rd gear to prevent over-revving the
engine.
✽ ✽
NOTICE
• For smooth and safe operation,
depress the brake pedal when shifting
from "N" (Neutral) position or "P"
(Park) position to a forward or "R"
(Reverse) gear.
• Fully depress the brake pedal in order to move the shift lever from the "P"
(Park) position to any of the other
positions.
• It is always possible to shift from "R", "N", "D", "3", "2", "L" position to
"P" position. The vehicle must be
fully stopped to avoid transaxle dam-
age.
CAUTION
Shift into "R" and "P" position
only when the vehicle has com-pletely stopped.
Do not accelerate the engine in reverse or any of the forwardpositions with the brakes applied.
Always apply the footbrake when shifting from "P" or "N", to "R","D","3", "2" or "L" position.
Check the automatic transaxle fluid level regularly, and add fluidas necessary.
See the maintenance schedule forthe proper fluid recommendation.
Page 235 of 348
543
Driving your vehicle
5. Start the vehicle, hold the brakes, shiftto neutral, release the parking brake
and slowly release the brakes until the
trailer chocks absorb the load.
6. Reapply the brakes, reapply the park- ing brake and shift the vehicle to R
(Reverse) for manual transaxle or P
(Park) for automatic transaxle.
7. Shut off the vehicle and release the vehicle brakes but leave the parking
brake set.
When you are ready to leave after park-
ing on a hill
1. With the manual transaxle in Neutral or automatic transaxle in P (Park),
apply your brakes and hold the brake
pedal down while you:
and
2. Slowly remove your foot from the
brake pedal.
3. Drive slowly until the trailer is clear of the chocks.
4. Stop and have someone pick up and store the chocks.
Maintenance when trailer towing
Your vehicle will need service more often
when you regularly pull a trailer.
Important items to pay particular atten-
tion to include engine oil, automatic
transaxle fluid, axle lubricant and cooling
system fluid. Brake condition is another
important item to frequently check. Each
item is covered in this manual, and the
Index will help you find them quickly. If
you’re trailering, it’s a good idea to review
these sections before you start your trip.
Don’t forget to also maintain your trailer
and hitch. Follow the maintenance
schedule that accompanied your trailer
and check it periodically. Preferably, con-
duct the check at the start of each day’s
driving. Most importantly, all hitch nuts
and bolts should be tight.
WARNING- Parking brake
It can be dangerous to get out of
your vehicle if the parking brake is
not firmly set.
If you have left the engine running,
the vehicle can move suddenly. You
or others could be seriously or
fatally injured.
CAUTION
Due to higher load during trailer usage, overheating might occurin hot days or during uphill driv- ing. If the coolant gauge indicatesover-heating, switch off the A/Cand stop the vehicle in a safe area to cool down the engine.
When towing check transaxle fluid more frequently.
If your vehicle is not equipped with the air conditioner, youshould install a condenser fan toimprove engine performancewhen towing a trailer.
Page 267 of 348
623
What to do in an emergency
Emergency towing precautions
Turn the ignition switch to ACC so thesteering wheel isn’t locked.
Place the transaxle shift lever in N (Neutral).
Release the parking bake.
Press the brake pedal with more force than normal since you will have
reduced brake performance.
More steering effort will be required because the power steering system
will be disabled.
If you are driving down a long hill, the brakes may overheat and brake per-
formance will be reduced. Stop often
and let the brakes cool off.
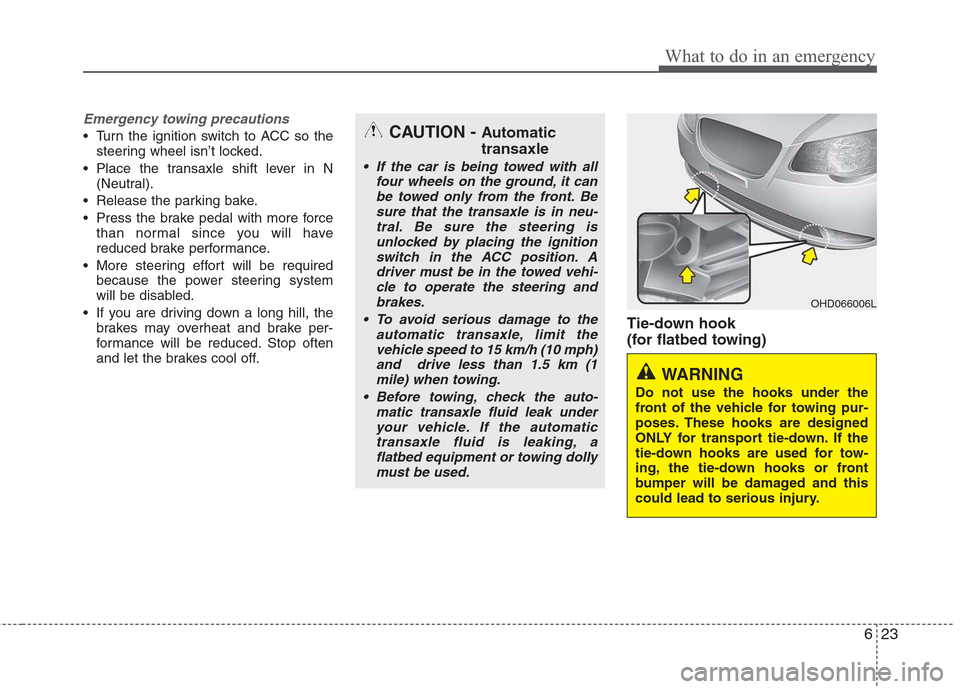
Tie-down hook
(for flatbed towing)
OHD066006L
WARNING
Do not use the hooks under the
front of the vehicle for towing pur-
poses. These hooks are designed
ONLY for transport tie-down. If the
tie-down hooks are used for tow-
ing, the tie-down hooks or front
bumper will be damaged and this
could lead to serious injury.
CAUTION - Automatic
transaxle
If the car is being towed with all four wheels on the ground, it canbe towed only from the front. Besure that the transaxle is in neu-tral. Be sure the steering isunlocked by placing the ignition switch in the ACC position. Adriver must be in the towed vehi-cle to operate the steering andbrakes.
To avoid serious damage to the automatic transaxle, limit thevehicle speed to 15 km/h (10 mph)and drive less than 1.5 km (1mile) when towing.
Before towing, check the auto- matic transaxle fluid leak underyour vehicle. If the automatictransaxle fluid is leaking, aflatbed equipment or towing dollymust be used.
Page 268 of 348
7
Engine compartment / 7-2
Maintenance services / 7-3
Owner maintenance / 7-5
Scheduled maintenance service / 7-7
Explanation of scheduled maintenance items / 7-12
Engine oil / 7-15
Engine coolant / 7-16
Brakes and clutch fluid / 7-19
Automatic transaxle fluid / 7-20
Washer fluid / 7-22
Parking brake / 7-22
Air cleaner / 7-23
Climate control air filter / 7-25
Wiper blades / 7-27
Battery / 7-29
Tires and wheels / 7-32
Fuses / 7-45
Light bulbs / 7-54
Appearance care / 7-59
Emission control system / 7-65
California perchlorate notice / 7-67
Maintenance
Page 269 of 348
Maintenance
2
7
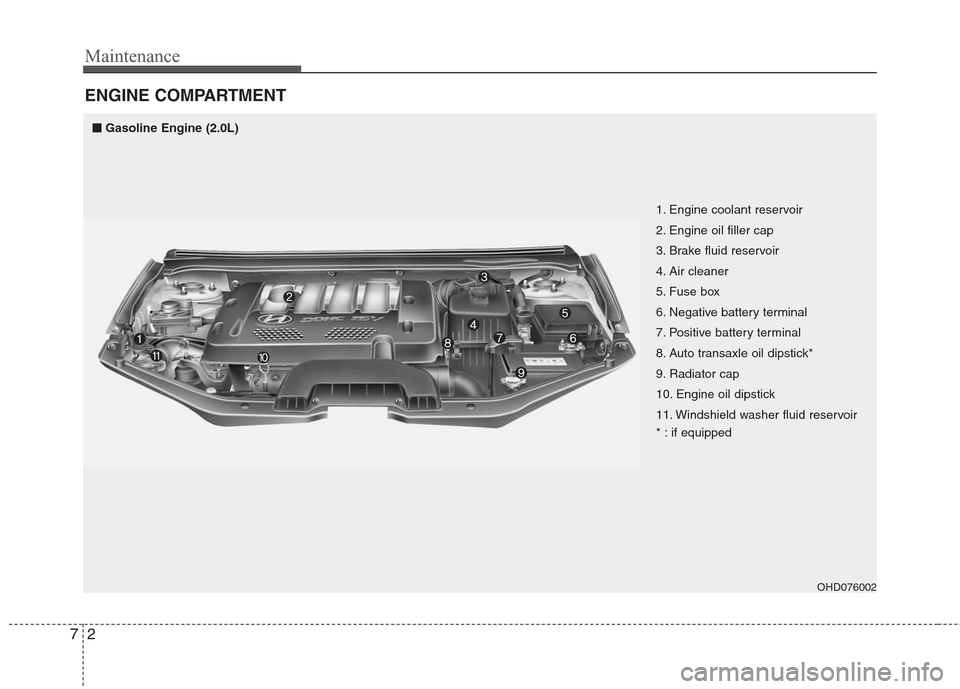
ENGINE COMPARTMENT
OHD076002
1. Engine coolant reservoir
2. Engine oil filler cap
3. Brake fluid reservoir
4. Air cleaner
5. Fuse box
6. Negative battery terminal
7. Positive battery terminal
8. Auto transaxle oil dipstick*
9. Radiator cap
10. Engine oil dipstick
11. Windshield washer fluid reservoir
* : if equipped
■
■
Gasoline Engine (2.0L)
Page 272 of 348
75
Maintenance
OWNER MAINTENANCE
The following lists are vehicle checks and
inspections that should be performed by
the owner or an authorized Hyundai
dealer at the frequencies indicated to
help ensure safe, dependable operation
of your vehicle.
Any adverse conditions should be
brought to the attention of your dealer as
soon as possible.
These Owner Maintenance Checks are
generally not covered by warranties and
you may be charged for labor, parts and
lubricants used.Owner maintenance schedule
When you stop for fuel:
Check the engine oil level.
Check coolant level in coolant reser-voir.
Check the windshield washer fluid level.
Look for low or under-inflated tires.
While operating your vehicle:
Note any changes in the sound of the exhaust or any smell of exhaust fumes
in the vehicle.
Check for vibrations in the steering wheel. Notice any increased steering
effort or looseness in the steering
wheel, or change in its straight-ahead
position.
Notice if your vehicle constantly turns slightly or “pulls” to one side when trav-
eling on smooth, level road.
When stopping, listen and check for unusual sounds, pulling to one side,
increased brake pedal travel or “hard-
to-push” brake pedal.
If any slipping or changes in the oper- ation of your transaxle occurs, check
the transaxle fluid level.
Check automatic transaxle P (Park) function.
Check parking brake.
Check for fluid leaks under your vehicle (water dripping from the air condition-
ing system during or after use is nor-
mal).
WARNING
Be careful when checking your
engine coolant level when the
engine is hot. Scalding hot coolant
and steam may blow out under
pressure. This could cause burns
or other serious injury.
Page 273 of 348
Maintenance
6
7
At least monthly:
Check coolant level in the engine
coolant reservoir.
Check the operation of all exterior lights, including the stoplights, turn sig-
nals and hazard warning flashers.
Check the inflation pressures of all tires including the spare.
At least twice a year (i.e., every Spring and Fall) :
Check radiator, heater and air condi- tioning hoses for leaks or damage.
Check windshield washer spray and wiper operation. Clean wiper blades
with clean cloth dampened with wash-
er fluid.
Check headlight alignment.
Check muffler, exhaust pipes, shields and clamps.
Check the lap/shoulder belts for wear and function.
Check for worn tires and loose wheel lug nuts.
At least once a year :
Clean body and door drain holes.
Lubricate door hinges and checks, andhood hinges.
Lubricate door and hood locks and latches.
Lubricate door rubber weatherstrips.
Check the air conditioning system.
Inspect and lubricate automatic transaxle linkage and controls.
Clean battery and terminals.
Check the brake (and clutch) fluid level.