engine oil Hyundai Elantra 2012 - RHD (UK. Australia) Owner's Guide
[x] Cancel search | Manufacturer: HYUNDAI, Model Year: 2012, Model line: Elantra, Model: Hyundai Elantra 2012Pages: 384, PDF Size: 26.92 MB
Page 306 of 384

719
Maintenance
EXPLANATION OF SCHEDULED MAINTENANCE ITEMS
Engine oil and filter The engine oil and filter should be
changed at the intervals specified in the
maintenance schedule. If the car is being
driven in severe conditions, more fre-quent oil and filter changes are required. Drive belts
Inspect all drive belts for evidence of
cuts, cracks, excessive wear or oil satu-
ration and replace if necessary. Drive
belts should be checked periodically forproper tension and adjusted as neces-
sary. Fuel filter A clogged filter can limit the speed at
which the vehicle may be driven, damage
the emission system and cause multiple
issues such as hard starting. If an exces-
sive amount of foreign matter accumu-
lates in the fuel tank, the filter may
require replacement more frequently.
After installing a new filter, run the engine
for several minutes, and check for leaks
at the connections. Fuel filters should be
installed by an authorised HYUNDAI
dealer.
Fuel lines, fuel hoses and con- nections
Check the fuel lines, fuel hoses and con-
nections for leakage and damage. Have
an authorised HYUNDAI dealer replace
any damaged or leaking parts immedi-
ately.Vapour hose and fuel filler cap
The vapour hose and fuel filler cap
should be inspected at those intervals
specified in the maintenance schedule.
Make sure that a new vapour hose or fuelfiller cap is correctly replaced.
Vacuum crankcase ventilation hoses (if equipped)
Inspect the surface of hoses for evidence
of heat and/or mechanical damage. Hard
and brittle rubber, cracking, tears, cuts,
abrasions, and excessive swelling indi-
cate deterioration. Particular attention
should be paid to examine those hose
surfaces nearest to high heat sources,
such as the exhaust manifold. Inspect the hose routing to assure that the hoses do not come in contact with
any heat source, sharp edges or movingcomponent which might cause heat dam-
age or mechanical wear. Inspect all hose
connections, such as clamps and cou-
plings, to make sure they are secure, and
that no leaks are present. Hoses should
be replaced immediately if there is any
evidence of deterioration or damage.
Page 309 of 384

Maintenance
22
7
ENGINE OIL
Checking the engine oil level
1. Be sure the vehicle is on level ground.
2. Start the engine and allow it to reach normal operating temperature.
3. Turn the engine off and wait for a few minutes (about 5 minutes) for the oil to
return to the oil pan.
4. Pull the dipstick out, wipe it clean, and reinsert it fully. 5. Pull the dipstick out again and check
the level. The level should be between
F (Full) and L (Low).
If it is near or at L (Low), add enough oil
to bring the level to F (Full).Do not over-
fill.
Use a funnel to help prevent oil from being spilled on engine components.
Use only the specified engine oil. (Refer
to “Recommended lubricants and capac-ities” in section 8.)
WARNING - Radiator hose
Be very careful not to touch the
radiator hose when checking or
adding the engine oil as it may be
hot enough to burn you.
CAUTION
Do not overfill the engine oil. It may damage the engine.
CAUTION
Do not spill engine oil, when adding or changing engine oil. If you dropthe engine oil on the engine room,
wipe it off immediately.
OMD071002LOMD071003R
Page 310 of 384
723
Maintenance
Changing the engine oil and filter
Have the engine oil and filter changed by
an authorised HYUNDAI dealer accord-ing to the Maintenance Schedule at thebeginning of this section.The high-pressure cooling system has a
reservoir filled with year-round antifreeze
coolant. The reservoir is filled at the fac-
tory.
Check the antifreeze protection and
coolant level at least once a year, at thebeginning of the winter season, and
before travelling to a colder climate.
WARNING
Used engine oil may cause skin irri- tation or cancer if left in contact
with the skin for prolonged periods
of time. Used engine oil contains
chemicals that have caused cancer
in laboratory animals. Always pro-
tect your skin by washing your
hands thoroughly with soap and
warm water as soon as possibleafter handling used oil.
ENGINE COOLANT
Page 313 of 384
Maintenance
26
7
BRAKE/CLUTCH FLUID (IF EQUIPPED)
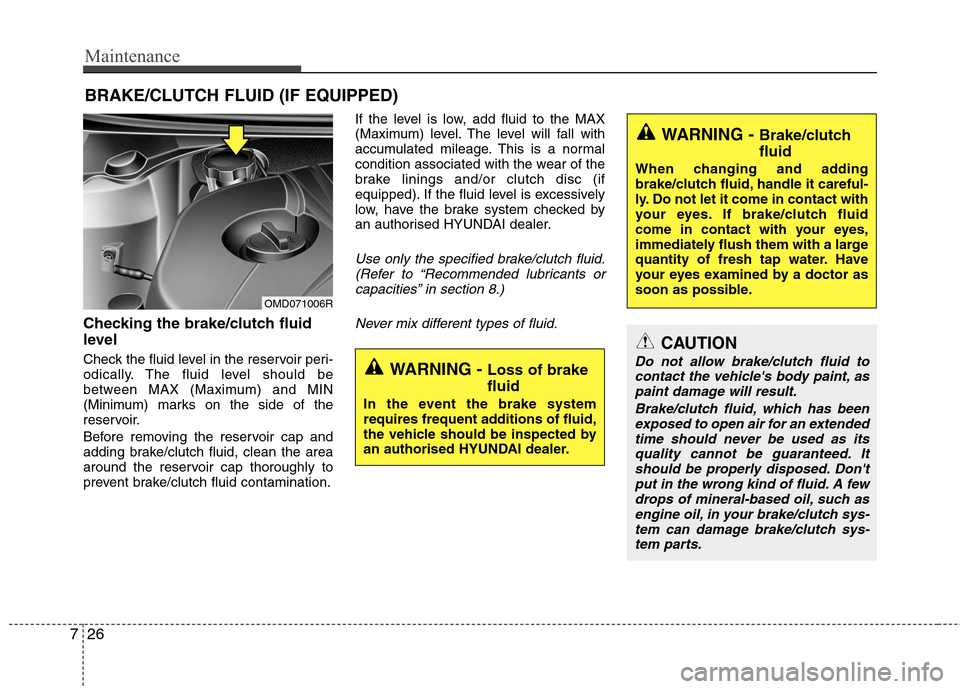
Checking the brake/clutch fluid
level
Check the fluid level in the reservoir peri-
odically. The fluid level should be
between MAX (Maximum) and MIN
(Minimum) marks on the side of the
reservoir.
Before removing the reservoir cap and
adding brake/clutch fluid, clean the area
around the reservoir cap thoroughly to
prevent brake/clutch fluid contamination. If the level is low, add fluid to the MAX
(Maximum) level. The level will fall with
accumulated mileage. This is a normal
condition associated with the wear of the
brake linings and/or clutch disc (if
equipped). If the fluid level is excessively
low, have the brake system checked by
an authorised HYUNDAI dealer.
Use only the specified brake/clutch fluid.
(Refer to “Recommended lubricants or
capacities” in section 8.)
Never mix different types of fluid.
WARNING - Loss of brake fluid
In the event the brake system
requires frequent additions of fluid,
the vehicle should be inspected by
an authorised HYUNDAI dealer.
WARNING - Brake/clutch fluid
When changing and adding
brake/clutch fluid, handle it careful-
ly. Do not let it come in contact with
your eyes. If brake/clutch fluid
come in contact with your eyes,
immediately flush them with a large
quantity of fresh tap water. Have
your eyes examined by a doctor as
soon as possible.
CAUTION
Do not allow brake/clutch fluid to contact the vehicle's body paint, as
paint damage will result.
Brake/clutch fluid, which has beenexposed to open air for an extendedtime should never be used as its quality cannot be guaranteed. It
should be properly disposed. Don'tput in the wrong kind of fluid. A few drops of mineral-based oil, such asengine oil, in your brake/clutch sys-
tem can damage brake/clutch sys-tem parts.
OMD071006R
Page 322 of 384
735
Maintenance
Battery recharging
Your vehicle has a maintenance-free,
calcium-based battery.
If the battery becomes discharged in ashort time (because, for example, the
headlights or interior lights were left on
whilst the vehicle was not in use),
recharge it by slow charging (trickle)
for 10 hours.
If the battery gradually discharges because of high electric load whilst the
vehicle is being used, recharge it at 20-
30A for two hours.(Continued)
When lifting a plastic-cased bat-tery, excessive pressure on the
case may cause battery acid to
leak, resulting in personal injury.
Lift with a battery carrier or with
your hands on opposite corners.
Never attempt to recharge the battery when the battery cablesare connected.
The electrical ignition system works with high voltage. Never
touch these components with theengine running or the ignition
switched on.
Failure to follow the above warn-
ings can result in serious bodily
injury or death.WARNING - Recharging
battery
When recharging the battery,
observe the following precautions:
The battery must be removed from the vehicle and placed in an area with good ventilation.
Do not allow cigarettes, sparks, or flame near the battery.
Watch the battery during charg- ing, and stop or reduce the charg-
ing rate if the battery cells begin
gassing (boiling) violently or if
the temperature of the electrolyte
of any cell exceeds 49°C (120°F).
Wear eye protection when check- ing the battery during charging.
Disconnect the battery charger in the following order.
1. Turn off the battery charger main switch.
2. Unhook the negative clamp from the negative battery terminal.
3. Unhook the positive clamp from the positive battery terminal.
CAUTION
If you connect unauthorised elec-
tronic devices to the battery, thebattery may be discharged. Never use unauthorised devices.
Page 334 of 384
747
Maintenance
FUSESA vehicle’s electrical system is protected
from electrical overload damage by
fuses.
This vehicle has 2 fuse panels, one locat-
ed in the driver’s side panel bolster, the
other in the engine compartment near
the battery.
If any of your vehicle’s lights, acces-
sories, or controls do not work, check the
appropriate circuit fuse. If a fuse has
blown, the element inside the fuse will bemelted.
If the electrical system does not work,
first check the driver’s side fuse panel.
Always replace a blown fuse with one of
the same rating.
If the replacement fuse blows, this indi-
cates an electrical problem. Avoid using
the system involved and immediately
consult an authorised HYUNDAI dealer.
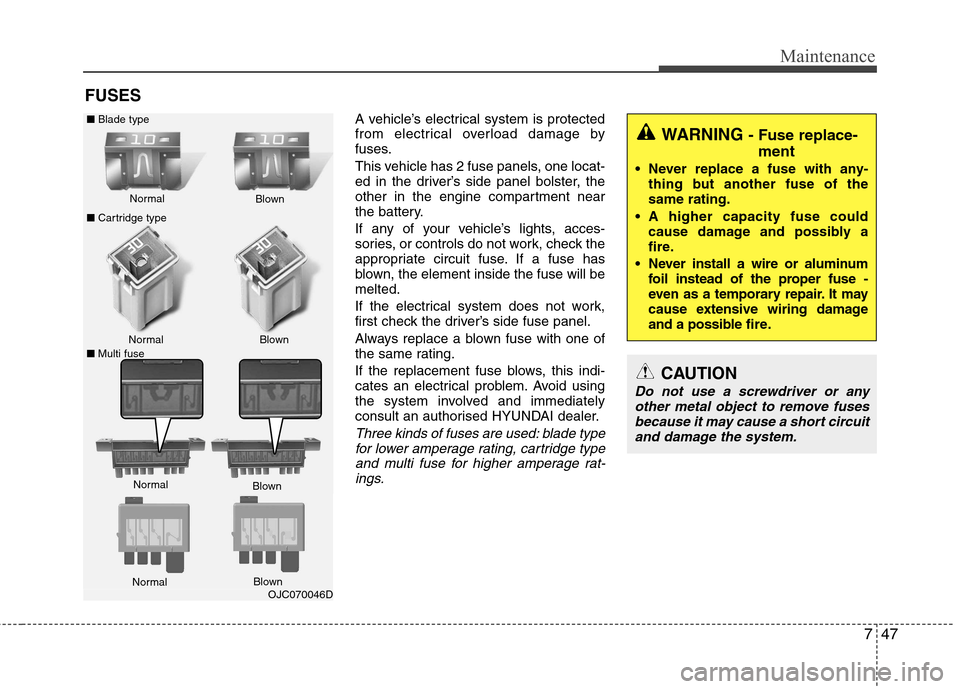
Three kinds of fuses are used: blade typefor lower amperage rating, cartridge type
and multi fuse for higher amperage rat-ings.
WARNING - Fuse replace-
ment
Never replace a fuse with any- thing but another fuse of the same rating.
A higher capacity fuse could cause damage and possibly a
fire.
Never install a wire or aluminum foil instead of the proper fuse -
even as a temporary repair. It may
cause extensive wiring damage
and a possible fire.
CAUTION
Do not use a screwdriver or any
other metal object to remove fusesbecause it may cause a short circuit
and damage the system.
OJC070046D
Normal
Normal
■ Cartridge type
■ Multi fuse Blown
Blown
Normal Blown
■
Blade type
Normal Blown
Page 342 of 384
755
Maintenance
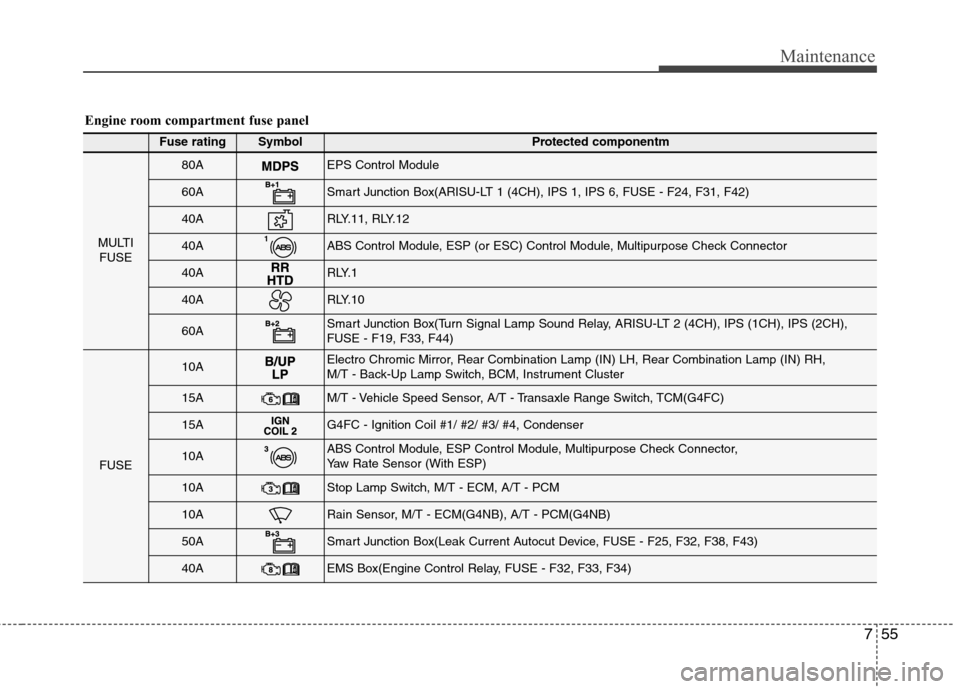
Engine room compartment fuse panel
Fuse ratingSymbol Protected componentm
MULTIFUSE
80AEPS Control Module
60ASmart Junction Box(ARISU-LT 1 (4CH), IPS 1, IPS 6, FUSE - F24, F31, F42)
40ARLY.11, RLY.12
40AABS Control Module, ESP (or ESC) Control Module, Multipurpose Check Connector
40AR LY. 1
40ARLY.10
60ASmart Junction Box(Turn Signal Lamp Sound Relay, ARISU-LT 2 (4CH), IPS (1CH), IPS (2CH), FUSE - F19, F33, F44)
FUSE
10AElectro Chromic Mirror, Rear Combination Lamp (IN) LH, Rear Combination Lamp (IN) RH,
M/T - Back-Up Lamp Switch, BCM, Instrument Cluster
15AM/T - Vehicle Speed Sensor, A/T - Transaxle Range Switch, TCM(G4FC)
15AG4FC - Ignition Coil #1/ #2/ #3/ #4, Condenser
10AABS Control Module, ESP Control Module, Multipurpose Check Connector,
Yaw Rate Sensor (With ESP)
10AStop Lamp Switch, M/T - ECM, A/T - PCM
10ARain Sensor, M/T - ECM(G4NB), A/T - PCM(G4NB)
50ASmart Junction Box(Leak Current Autocut Device, FUSE - F25, F32, F38, F43)
40AEMS Box(Engine Control Relay, FUSE - F32, F33, F34)
Page 361 of 384

Maintenance
74
7
Waxing
Wax the vehicle when water will no longer bead on the paint.
Always wash and dry the vehicle before
waxing. Use a good quality liquid or
paste wax, and follow the manufacturer’s
instructions. Wax all metal trim to protect
it and to maintain its luster.
Removing oil, tar, and similar materials
with a spot remover will usually strip the
wax from the finish. Be sure to re-wax
these areas even if the rest of the vehicle
does not yet need waxing.Finish damage repair
Deep scratches or stone chips in the
painted surface must be repaired
promptly. Exposed metal will quickly rust
and may develop into a major repair
expense.
✽✽
NOTICE
If your vehicle is damaged and requires
any metal repair or replacement, be sure
the body shop applies anti-corrosion
materials to the parts repaired or
replaced.
CAUTION
Wiping dust or dirt off the body with a dry cloth will scratch thefinish.
Do not use steel wool, abrasive cleaners, or strong detergentscontaining highly alkaline or
caustic agents on chrome-platedor anodized aluminum parts. This may result in damage to the pro-tective coating and cause discol-
oration or paint deterioration.
CAUTION
Water washing in the engine com- partment including high pressurewater washing may cause the fail-ure of electrical circuits located inthe engine compartment.
Never allow water or other liquids to come in contact with electri-cal/electronic components insidethe vehicle as this may damage
them.
OJB037800
Page 372 of 384

Specifications & Consumer information
4
8
RECOMMENDED LUBRICANTS AND CAPACITIES
* 1
: Refer to the recommended SAE viscosity numbers on the next page.
* 2
: Engine oils labeled Energy Conserving Oil are now available. Along with other additional benefits, they contribute to fuel econ -
omy by reducing the amount of fuel necessary to overcome engine friction. Often, these improvements are difficult to measure
in everyday driving, but in a year’s time, they can offer significant cost and energy savings.
To help achieve proper engine and powertrain performance and durability, use only lubricants of the proper quality. The correct
lubricants also help promote engine efficiency that results in improved fuel economy.
These lubricants and fluids are recommended for use in your vehicle.
Lubricant Volume Classification
Engine oil * 1
*2
(drain and refill) Recommends 4.0 l (4.23 US qt.) API Service SL or SM,
ILSAC GF-3 or ACEA A3 or above
Engine oil consumptionNormal driving conditionMAX. 1 l /1500 km
Severe driving conditionMAX. 1 l /1000 km
Manual transaxle fluid 1.9
l (2.0 US qt.)
API GL-4 SAE 75W-85
Automatic transaxle fluid 7.3
l (7.7 US qt.) MICHANG ATF SP-IV
SK ATF SP-IV
NOCA ATF SP-IV
HYUNDAI genuine ATF SP-IV
CoolantManual transaxle6.0 l (6.34 US qt.)Ethylene glycol base coolant for aluminum radiatorAutomatic transaxle5.9 l (6.23 US qt.)
Brake/Clutch fluid0.7~0.8 l
(0.7~0.8 US qt.)FMVSS116 DOT-3 or DOT-4
Fuel48 l (12.68 US gal.)-
Page 373 of 384
85
Specifications & Consumer information
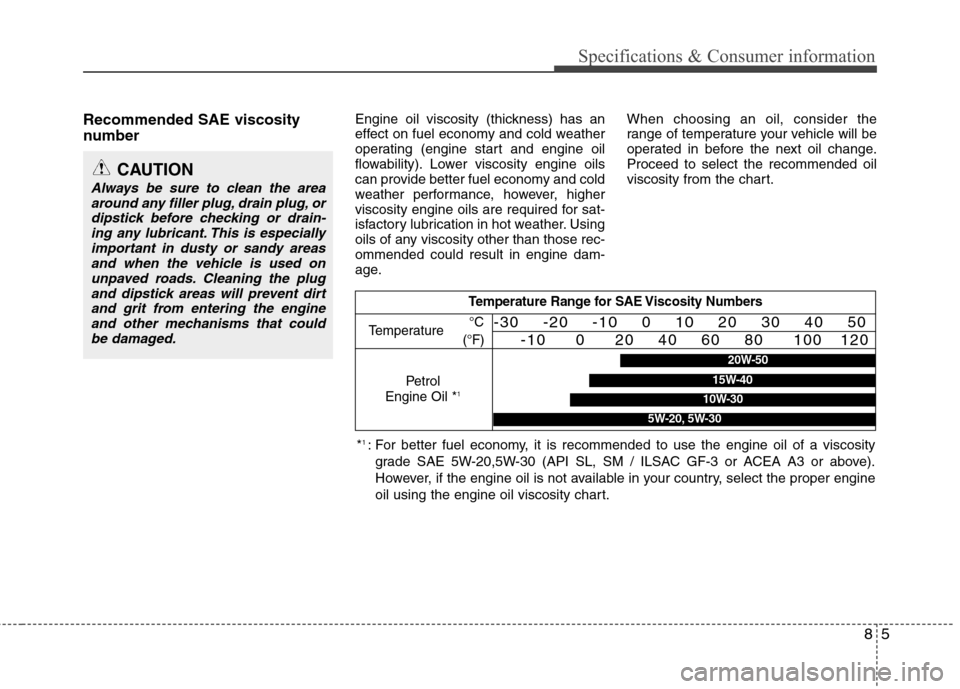
Recommended SAE viscosity
number Engine oil viscosity (thickness) has an
effect on fuel economy and cold weather
operating (engine start and engine oil
flowability). Lower viscosity engine oils
can provide better fuel economy and cold
weather performance, however, higher
viscosity engine oils are required for sat-
isfactory lubrication in hot weather. Using
oils of any viscosity other than those rec-ommended could result in engine dam-
age.When choosing an oil, consider the
range of temperature your vehicle will be
operated in before the next oil change.Proceed to select the recommended oil
viscosity from the chart.
CAUTION
Always be sure to clean the area
around any filler plug, drain plug, ordipstick before checking or drain-ing any lubricant. This is especially
important in dusty or sandy areasand when the vehicle is used on unpaved roads. Cleaning the plugand dipstick areas will prevent dirt
and grit from entering the engine and other mechanisms that couldbe damaged.
Temperature Range for SAE Viscosity Numbers
Temperature °C
(°F)-30 -20 -10 0 10 20 30 40 50 -10 0 20 40 60 80 100 120
Petrol
Engine Oil * 1
20W-50
10W-30
15W-40
5W-20, 5W-30
*1
: For better fuel economy, it is recommended to use the engine oil of a viscosity
grade SAE 5W-20,5W-30 (API SL, SM / ILSAC GF-3 or ACEA A3 or above).
However, if the engine oil is not available in your country, select the proper engine
oil using the engine oil viscosity chart.