instrument panel Hyundai Elantra 2015 Owner's Manual - RHD (UK. Australia)
[x] Cancel search | Manufacturer: HYUNDAI, Model Year: 2015, Model line: Elantra, Model: Hyundai Elantra 2015Pages: 498, PDF Size: 9.45 MB
Page 13 of 498
Your vehicle at a glance
Exterior overview I . . . . . . . . . . . . . . . . . . . . . . . . . 2-2
Exterior overview II . . . . . . . . . . . . . . . . . . . . . . . . . 2-3
Interior overview . . . . . . . . . . . . . . . . . . . . . . . . . . . 2-4
Instrument panel overview . . . . . . . . . . . . . . . . . . . 2-5
Engine compartment . . . . . . . . . . . . . . . . . . . . . . . . 2-6
2
Page 16 of 498
Your vehicle at a glance
4 2
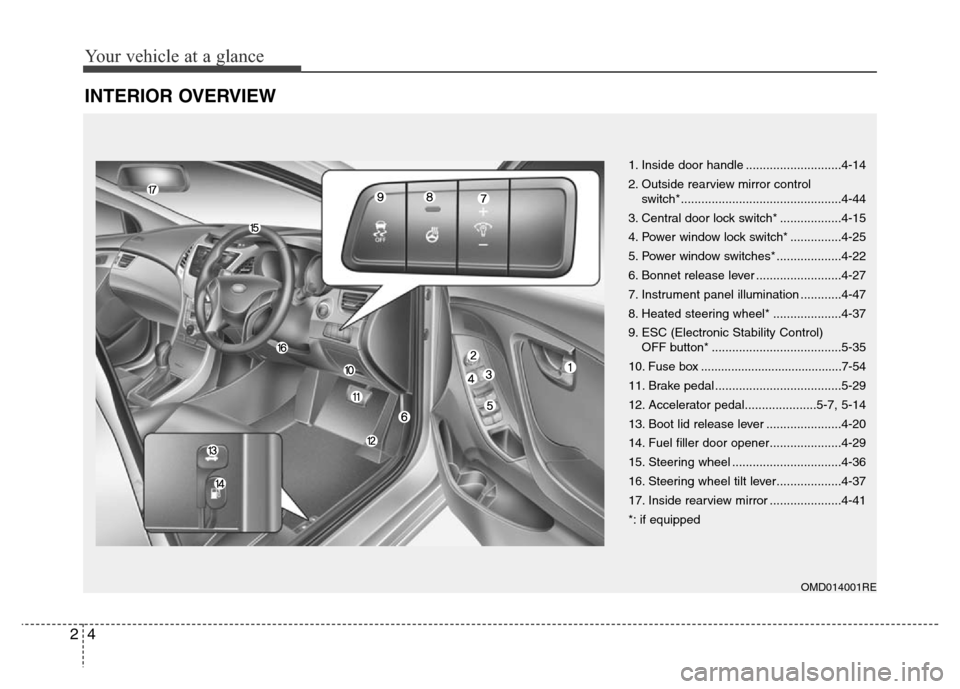
INTERIOR OVERVIEW
OMD014001RE
1. Inside door handle ............................4-14
2. Outside rearview mirror control
switch*...............................................4-44
3. Central door lock switch* ..................4-15
4. Power window lock switch* ...............4-25
5. Power window switches* ...................4-22
6. Bonnet release lever .........................4-27
7. Instrument panel illumination ............4-47
8. Heated steering wheel* ....................4-37
9. ESC (Electronic Stability Control)
OFF button* ......................................5-35
10. Fuse box ..........................................7-54
11. Brake pedal .....................................5-29
12. Accelerator pedal.....................5-7, 5-14
13. Boot lid release lever ......................4-20
14. Fuel filler door opener.....................4-29
15. Steering wheel ................................4-36
16. Steering wheel tilt lever...................4-37
17. Inside rearview mirror .....................4-41
*: if equipped
Page 17 of 498
25
Your vehicle at a glance
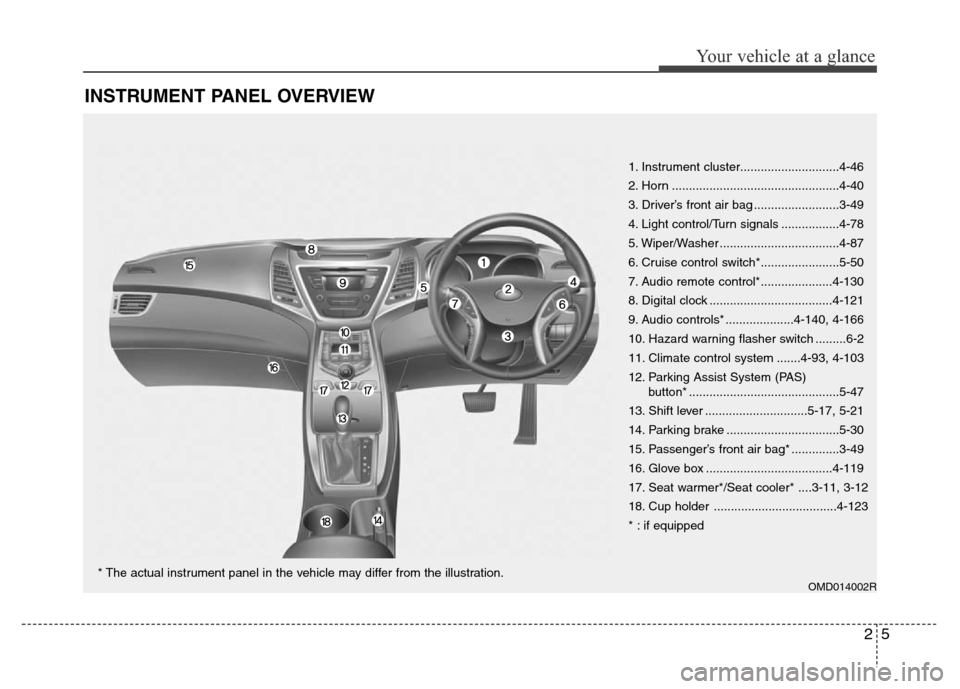
INSTRUMENT PANEL OVERVIEW
OMD014002R
1. Instrument cluster.............................4-46
2. Horn .................................................4-40
3. Driver’s front air bag .........................3-49
4. Light control/Turn signals .................4-78
5. Wiper/Washer ...................................4-87
6. Cruise control switch*.......................5-50
7. Audio remote control*.....................4-130
8. Digital clock ....................................4-121
9. Audio controls* ....................4-140, 4-166
10. Hazard warning flasher switch .........6-2
11. Climate control system .......4-93, 4-103
12. Parking Assist System (PAS)
button* ............................................5-47
13. Shift lever ..............................5-17, 5-21
14. Parking brake .................................5-30
15. Passenger’s front air bag* ..............3-49
16. Glove box .....................................4-119
17. Seat warmer*/Seat cooler* ....3-11, 3-12
18. Cup holder ....................................4-123
* : if equipped
* The actual instrument panel in the vehicle may differ from the illustration.
Page 24 of 498
Safety features of your vehicle
6 3
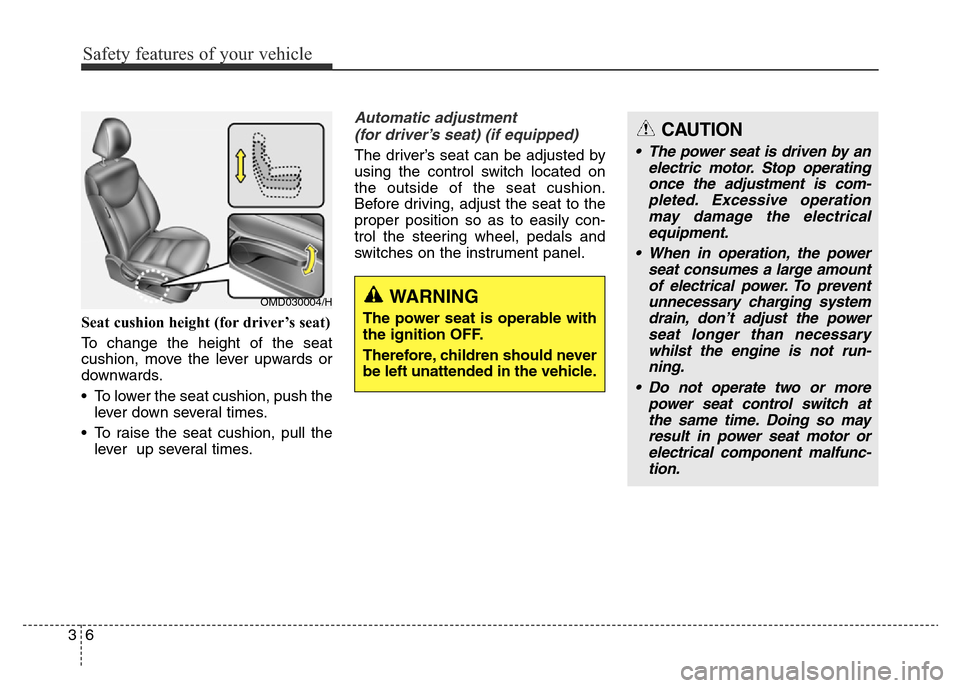
Seat cushion height (for driver’s seat)
To change the height of the seat
cushion, move the lever upwards or
downwards.
• To lower the seat cushion, push the
lever down several times.
• To raise the seat cushion, pull the
lever up several times.
Automatic adjustment
(for driver’s seat) (if equipped)
The driver’s seat can be adjusted by
using the control switch located on
the outside of the seat cushion.
Before driving, adjust the seat to the
proper position so as to easily con-
trol the steering wheel, pedals and
switches on the instrument panel.
OMD030004/HWARNING
The power seat is operable with
the ignition OFF.
Therefore, children should never
be left unattended in the vehicle.
CAUTION
• The power seat is driven by an
electric motor. Stop operating
once the adjustment is com-
pleted. Excessive operation
may damage the electrical
equipment.
• When in operation, the power
seat consumes a large amount
of electrical power. To prevent
unnecessary charging system
drain, don’t adjust the power
seat longer than necessary
whilst the engine is not run-
ning.
• Do not operate two or more
power seat control switch at
the same time. Doing so may
result in power seat motor or
electrical component malfunc-
tion.
Page 66 of 498
Safety features of your vehicle
48 3
WARNING
• If an air bag deploys, there
may be a loud noise followed
by a fine dust released in the
vehicle. These conditions are
normal and are not hazardous
- the air bags are packed in
this fine powder. The dust
generated during air bag
deployment may cause skin
or eye irritation as well as
aggravate asthma for some
people. Always wash all
exposed skin areas thorough-
ly with lukewarm water and a
mild soap after an accident in
which the air bags were
deployed.
(Continued)
WARNING
• Do not install or place any
accessories (drink holder,
stickers, etc.) on the front pas-
senger's panel above the
glove box in a vehicle with a
passenger's air bag. Such
objects may become danger-
ous projectiles and cause
injury if the passenger's air
bag inflates.
(Continued)
(Continued)
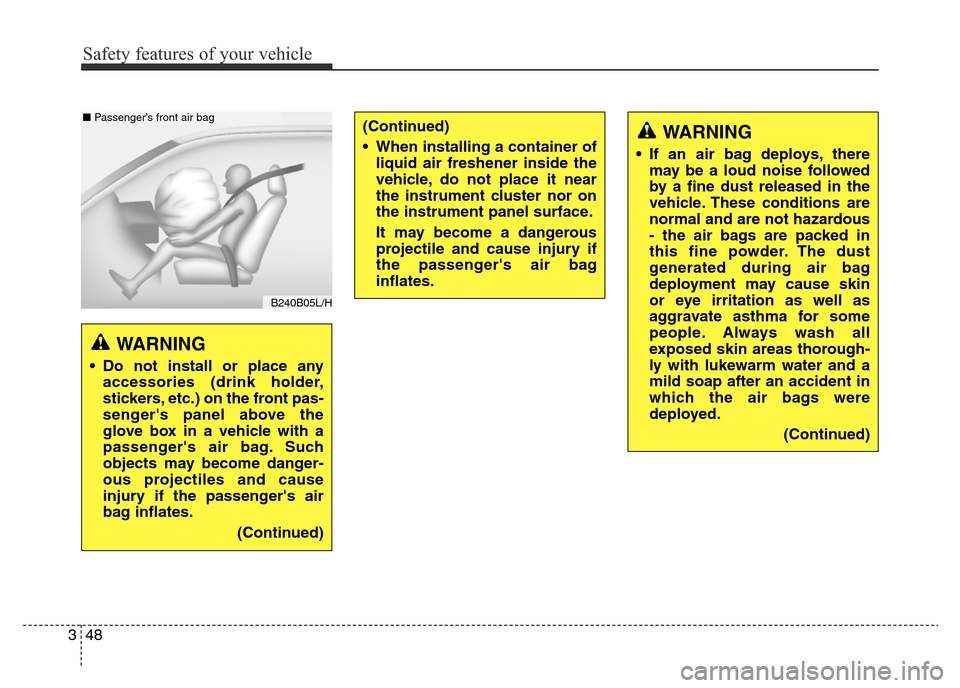
• When installing a container of
liquid air freshener inside the
vehicle, do not place it near
the instrument cluster nor on
the instrument panel surface.
It may become a dangerous
projectile and cause injury if
the passenger's air bag
inflates.
B240B05L/H
■ Passenger’s front air bag
Page 68 of 498
Safety features of your vehicle
50 3
(Continued)
• No objects should be placed
over or near the air bag mod-
ules on the steering wheel,
instrument panel, and the
front passenger's panel
above the glove box, because
any such object could cause
harm if the vehicle is in a
crash severe enough to cause
the air bags to deploy.
• Do not tamper with or discon-
nect SRS wiring or other com-
ponents of the SRS system.
Doing so could result in injury,
due to accidental deployment
of the air bags or by rendering
the SRS inoperative.
• If the SRS air bag warning
light remains illuminated
whilst the vehicle is being
driven, we recommend that
the system be inspected by an
authorised HYUNDAI dealer.
(Continued)(Continued)
• Front and side impact air bags
can injure occupants improp-
erly positioned in the front
seats.
• Move your seat as far back as
practical from the front air
bags, whilst still maintaining
control of the vehicle.
• You and your passengers
should never sit or lean
unnecessarily close to the air
bags. Improperly positioned
drivers and passengers can
be severely injured by inflat-
ing air bags.
• Never lean against the door or
centre console – always sit in
an upright position.
(Continued)WARNING
Always use seat belts and child
restraints – every trip, every
time, everyone! Air bags inflate
with considerable force and in
the blink of an eye. Seat belts
help keep occupants in their
proper position to obtain maxi-
mum benefit from the air bag.
Even with air bags, improperly
and unrestrained occupants
can be severely injured when
the air bag inflates. Always fol-
low the precautions about seat
belts, air bags and occupant
safety contained in this manual.
To reduce the chance of serious
or fatal injuries and receive the
maximum safety benefit from
your restraint system:
• Never place a child in any
child or booster seat in the
front seat.
• ABC – Always Buckle
Children in the back seat. It is
the safest place for children of
any age to travel.
(Continued)
Page 78 of 498
Safety features of your vehicle
60 3
SRS Care
The SRS is virtually maintenance-
free and so there are no parts you
can safely service by yourself. If the
SRS air bag warning light does not
illuminate, or continuously remains
on, we recommend that the system
be inspected by an authorised
HYUNDAI dealer.
We recommend that any work on the
SRS system, such as removing,
installing, repairing, or any work on
the steering wheel, the front passen-
ger's panel, front seats and roof rails
be performed by an authorised
HYUNDAI dealer. Improper handling
of the SRS system may result in seri-
ous personal injury.WARNING
• Modification to SRS compo-
nents or wiring, including the
addition of any kind of badges
to the pad covers or modifica-
tions to the body structure, can
adversely affect SRS perform-
ance and lead to possible
injury.
• For cleaning the air bag pad
covers, use only a soft, dry
cloth or one which has been
moistened with plain water.
Solvents or cleaners could
adversely affect the air bag
covers and proper deployment
of the system.
• No objects should be placed
over or near the air bag mod-
ules on the steering wheel,
instrument panel, and the front
passenger's panel above the
glove box, because any such
object could cause harm if the
vehicle is in a crash severe
enough to cause the air bags
to inflate.
(Continued)
(Continued)
• If the air bags inflate, we rec-
ommend that the system be
replaced by an authorised
HYUNDAI dealer.
• Do not tamper with or discon-
nect SRS wiring, or other com-
ponents of the SRS system.
Doing so could result in injury,
due to accidental inflation of
the air bags or by rendering the
SRS inoperative.
• If components of the air bag
system must be discarded, or if
the vehicle must be scrapped,
certain safety precautions
must be observed. An autho-
rised HYUNDAI dealer knows
these precautions and can give
you the necessary information.
Failure to follow these precau-
tions and procedures could
increase the risk of personal
injury.
• If your vehicle was flooded and
has soaked carpeting or water
on the flooring, you shouldn't
try to start the engine; we rec-
ommend that you contact an
authorised HYUNDAI dealer.
Page 127 of 498
447
Features of your vehicle
Instrument Cluster ControlAdjusting Instrument Cluster
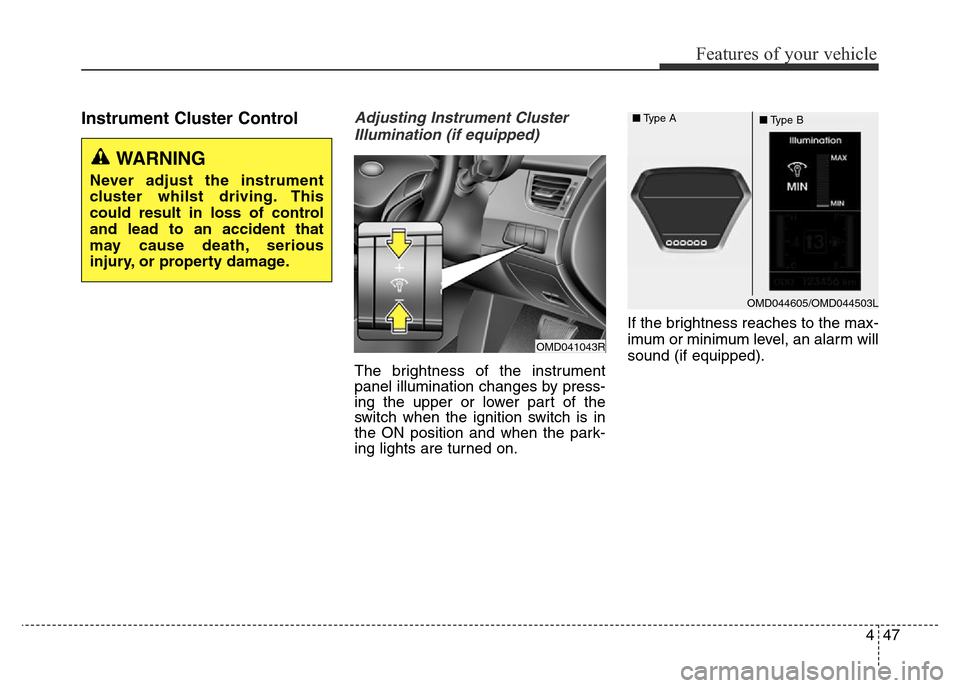
Illumination (if equipped)
The brightness of the instrument
panel illumination changes by press-
ing the upper or lower part of the
switch when the ignition switch is in
the ON position and when the park-
ing lights are turned on.If the brightness reaches to the max-
imum or minimum level, an alarm will
sound (if equipped).
OMD044605/OMD044503L ■Type A
■Type B
WARNING
Never adjust the instrument
cluster whilst driving. This
could result in loss of control
and lead to an accident that
may cause death, serious
injury, or property damage.
OMD041043R
Page 158 of 498
Features of your vehicle
78 4
LIGHT
Exterior lights
Lighting control
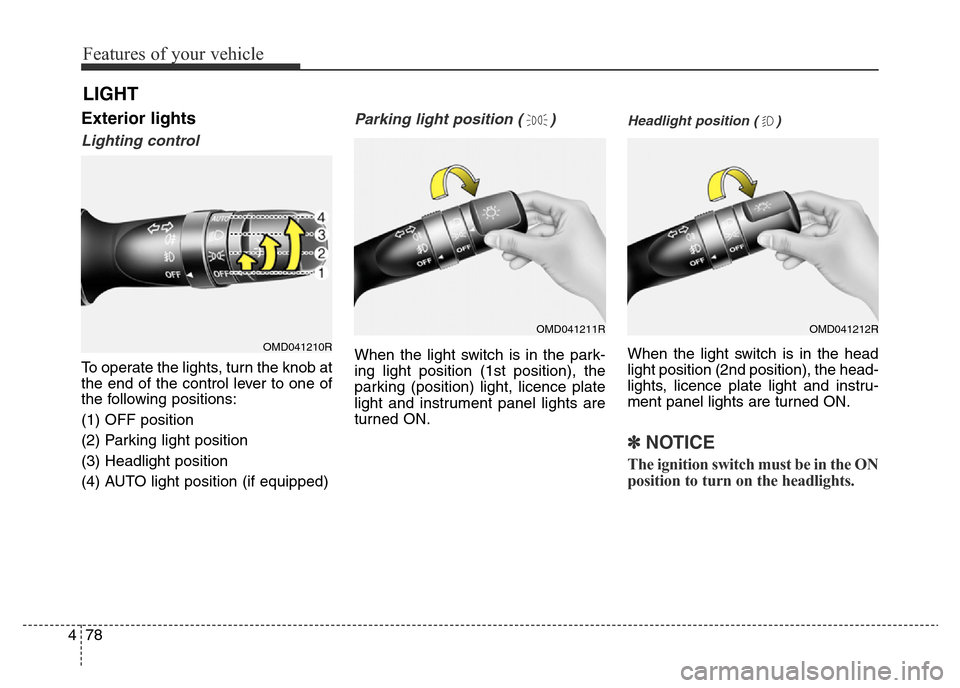
To operate the lights, turn the knob at
the end of the control lever to one of
the following positions:
(1) OFF position
(2) Parking light position
(3) Headlight position
(4) AUTO light position (if equipped)
Parking light position ( )
When the light switch is in the park-
ing light position (1st position), the
parking (position) light, licence plate
light and instrument panel lights are
turned ON.
Headlight position ( )
When the light switch is in the head
light position (2nd position), the head-
lights, licence plate light and instru-
ment panel lights are turned ON.
✽NOTICE
The ignition switch must be in the ON
position to turn on the headlights.
OMD041210R
OMD041211ROMD041212R
Page 159 of 498
479
Features of your vehicle
AUTO light position (if equipped)
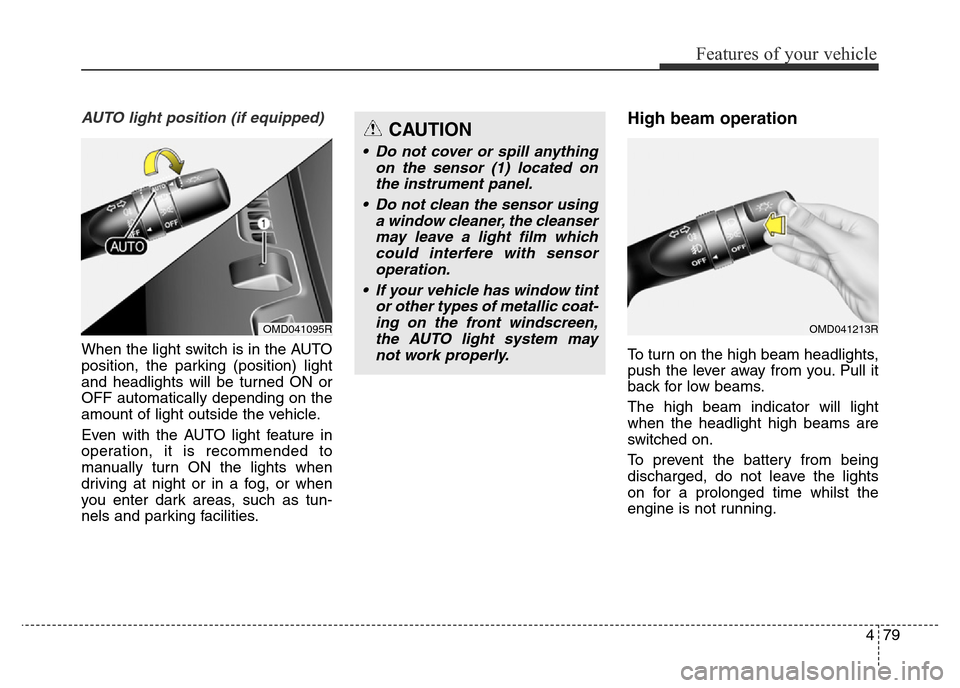
When the light switch is in the AUTO
position, the parking (position) light
and headlights will be turned ON or
OFF automatically depending on the
amount of light outside the vehicle.
Even with the AUTO light feature in
operation, it is recommended to
manually turn ON the lights when
driving at night or in a fog, or when
you enter dark areas, such as tun-
nels and parking facilities.
High beam operation
To turn on the high beam headlights,
push the lever away from you. Pull it
back for low beams.
The high beam indicator will light
when the headlight high beams are
switched on.
To prevent the battery from being
discharged, do not leave the lights
on for a prolonged time whilst the
engine is not running.
CAUTION
• Do not cover or spill anything
on the sensor (1) located on
the instrument panel.
• Do not clean the sensor using
a window cleaner, the cleanser
may leave a light film which
could interfere with sensor
operation.
• If your vehicle has window tint
or other types of metallic coat-
ing on the front windscreen,
the AUTO light system may
not work properly.
OMD041095ROMD041213R