air conditioning Hyundai Elantra 2017 Owner's Guide
[x] Cancel search | Manufacturer: HYUNDAI, Model Year: 2017, Model line: Elantra, Model: Hyundai Elantra 2017Pages: 637, PDF Size: 15.02 MB
Page 242 of 637

3-147
Convenient features of your vehicle
Each symbols and specification on
air conditioning refrigerant label
means as below :
1. Classification of refrigerant
2. Amount of refrigerant
3. Classification of Compressor lubri-
cant
You can find out which air condition-
ing refrigerant is applied to your vehi-
cle on the label located inside of the
hood.Checking the amount of air con-
ditioner refrigerant and com-
pressor lubricant
When the amount of refrigerant is
low, the performance of the air con-
ditioning is reduced. Overfilling also
has a bad influence on the air condi-
tioning system.
Therefore, if abnormal operation is
found, we recommend that the sys-
tem be inspected by an authorized
HYUNDAI dealer.
3
Vehicles equipped with R-134a
Because the refriger-
ant is at very high
pressure, the air con-
ditioning system
should only be serv-
iced by trained and certified
technicians. It is important that
the correct type and amount of
oil and refrigerant is used.
Otherwise, it may cause damage
to the vehicle and personal injury.
WARNING
Vehicles equipped with
R-1234yf
Because the refriger-
ant is mildly inflam-
mable at very high
pressure, the air con-
ditioning system
should only be serv-
iced by trained and
certified technicians.
It is important that the
correct type and amount of oil
and refrigerant is used.
Otherwise, it may cause dam-
age to the vehicle and personal
injury.
WARNING
Page 243 of 637
3-148
Convenient features of your vehicle
• For maximum defrosting, set the
temperature control to the extreme
right/hot position and the fan speed
control to the highest speed.
• If warm air to the floor is desired
while defrosting or defogging, set the
mode to the floor-defrost position.
• Before driving, clear all snow and
ice from the windshield, rear win-
dow, outside rear view mirrors, and
all side windows.
• Clear all snow and ice from the
hood and air inlet in the cowl grill to
improve heater and defroster effi-
ciency and to reduce the probabili-
ty of fogging up inside of the wind-
shield.
Manual climate control system
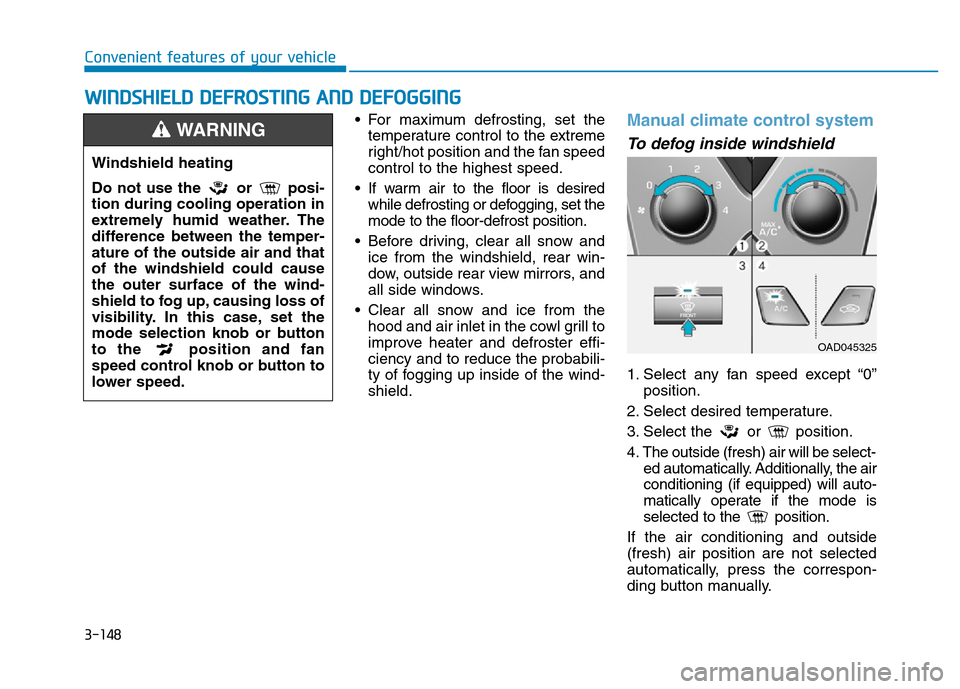
To defog inside windshield
1. Select any fan speed except “0”
position.
2. Select desired temperature.
3. Select the or position.
4. The outside (fresh) air will be select-
ed automatically. Additionally, the air
conditioning (if equipped) will auto-
matically operate if the mode is
selected to the position.
If the air conditioning and outside
(fresh) air position are not selected
automatically, press the correspon-
ding button manually.
WWINDSHIELD DEFROSTING AND DEFOGGING
Windshield heating
Do not use the or posi-
tion during cooling operation in
extremely humid weather. The
difference between the temper-
ature of the outside air and that
of the windshield could cause
the outer surface of the wind-
shield to fog up, causing loss of
visibility. In this case, set the
mode selection knob or button
to the position and fan
speed control knob or button to
lower speed.
WARNING
OAD045325
Page 244 of 637

3-149
Convenient features of your vehicle
3
To defrost outside windshield
1. Set the fan speed to the highest
(extreme right) position.
2. Set the temperature to the
extreme hot position.
3. Select the position.
4. The outside (fresh) air and air con-
ditioning (if equipped) will be
selected automatically.
Automatic climate control
system
To defog inside windshield
1. Select desired fan speed.
2. Select desired temperature.
3. Press the defroster button ( ).
4. The air-conditioning will turn on
according to the detected ambient
temperature, outside (fresh) air
position and higher fan speed will
be selected automatically.If the air-conditioning, outside (fresh)
air position and higher fan speed are
not selected automatically, adjust the
corresponding button or knob manu-
ally.
If the position is selected, lower
fan speed is controlled to higher fan
speed.
OAD045326
OAD045327
Page 245 of 637
3-150
Convenient features of your vehicle
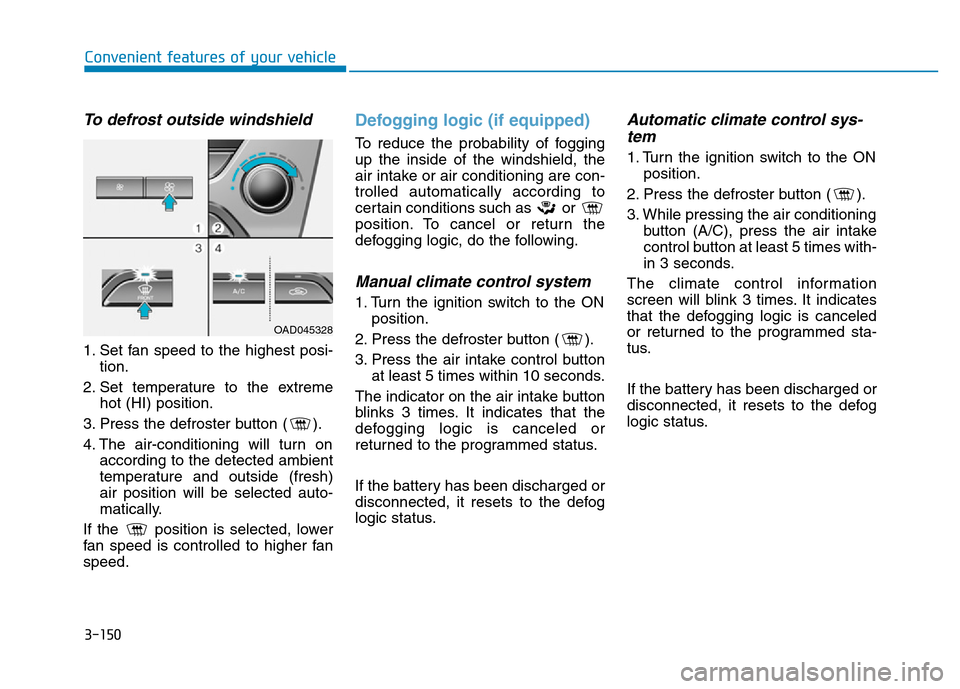
To defrost outside windshield
1. Set fan speed to the highest posi-
tion.
2. Set temperature to the extreme
hot (HI) position.
3. Press the defroster button ( ).
4. The air-conditioning will turn on
according to the detected ambient
temperature and outside (fresh)
air position will be selected auto-
matically.
If the position is selected, lower
fan speed is controlled to higher fan
speed.
Defogging logic (if equipped)
To reduce the probability of fogging
up the inside of the windshield, the
air intake or air conditioning are con-
trolled automatically according to
certain conditions such as or
position. To cancel or return the
defogging logic, do the following.
Manual climate control system
1. Turn the ignition switch to the ON
position.
2. Press the defroster button ( ).
3. Press the air intake control button
at least 5 times within 10 seconds.
The indicator on the air intake button
blinks 3 times. It indicates that the
defogging logic is canceled or
returned to the programmed status.
If the battery has been discharged or
disconnected, it resets to the defog
logic status.
Automatic climate control sys-
tem
1. Turn the ignition switch to the ON
position.
2. Press the defroster button ( ).
3. While pressing the air conditioning
button (A/C), press the air intake
control button at least 5 times with-
in 3 seconds.
The climate control information
screen will blink 3 times. It indicates
that the defogging logic is canceled
or returned to the programmed sta-
tus.
If the battery has been discharged or
disconnected, it resets to the defog
logic status.
OAD045328
Page 246 of 637
3-151
Convenient features of your vehicle
3
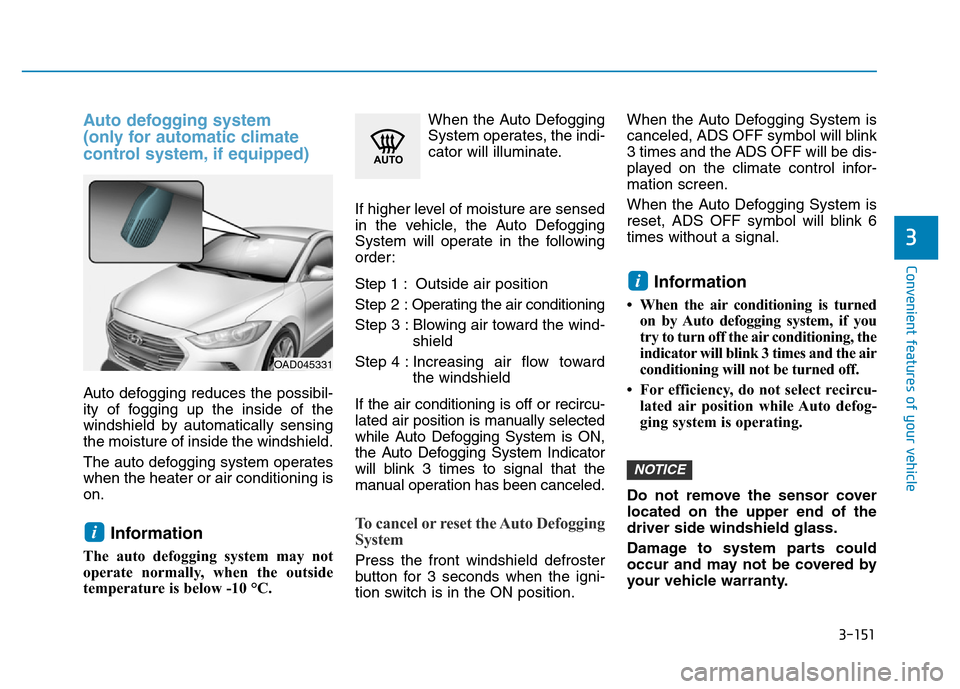
Auto defogging system
(only for automatic climate
control system, if equipped)
Auto defogging reduces the possibil-
ity of fogging up the inside of the
windshield by automatically sensing
the moisture of inside the windshield.
The auto defogging system operates
when the heater or air conditioning is
on.
Information
The auto defogging system may not
operate normally, when the outside
temperature is below -10 °C.When the Auto Defogging
System operates, the indi-
cator will illuminate.
If higher level of moisture are sensed
in the vehicle, the Auto Defogging
System will operate in the following
order:
Step 1 : Outside air position
Step 2 :Operating the air conditioning
Step 3 : Blowing air toward the wind-
shield
Step 4 : Increasing air flow toward
the windshield
If the air conditioning is off or recircu-
lated air position is manually selected
while Auto Defogging System is ON,
the Auto Defogging System Indicator
will blink 3 times to signal that the
manual operation has been canceled.
To cancel or reset the Auto Defogging
System
Press the front windshield defroster
button for 3 seconds when the igni-
tion switch is in the ON position.When the Auto Defogging System is
canceled, ADS OFF symbol will blink
3 times and the ADS OFF will be dis-
played on the climate control infor-
mation screen.
When the Auto Defogging System is
reset, ADS OFF symbol will blink 6
times without a signal.
Information
• When the air conditioning is turned
on by Auto defogging system, if you
try to turn off the air conditioning, the
indicator will blink 3 times and the air
conditioning will not be turned off.
• For efficiency, do not select recircu-
lated air position while Auto defog-
ging system is operating.
Do not remove the sensor cover
located on the upper end of the
driver side windshield glass.
Damage to system parts could
occur and may not be covered by
your vehicle warranty.
NOTICE
i
i
OAD045331
Page 247 of 637
3-152
Convenient features of your vehicle
CLIMATE CONTROL ADDITIONAL FEATURES
Cluster ionizer (if equipped)
When the ignition switch is in the ON
position, the clean air function turns
on automatically.
Also, the clean air function turns off
automatically, when the ignition
switch is in the OFF position.
Sunroof inside air recirculation
(if equipped)
If the sunroof opens while the heater
or Air Conditioning system operates,
the outside (fresh) air will be select-
ed automatically for ventilating the
car. Then, if you select the recirculat-
ed air position, the outside (fresh) air
will be selected automatically after 3
minutes.
If you close the sunroof, the intake
mode will be changed to the previous
selected mode.
Page 489 of 637
6-6
What to do in an emergency
To prevent damage to your vehi-
cle:
• Only use a 12-volt power supply
(battery or jumper system) to
jump start your vehicle.
• Do not attempt to jump start
your vehicle by push-starting.
Information
An inappropriately disposed
battery can be harmful to the
environment and human
health. Dispose the battery
according to your local law(s)
or regulations.
Jump starting procedure
1. Position the vehicles close enough
that the jumper cables will reach,
but do not allow the vehicles to
touch.
2. Avoid fans or any moving parts in
the engine compartment at all
times, even when the vehicles are
turned off.
3. Turn off all electrical devices such
as radios, lights, air conditioning,
etc. Put the vehicles in P (Park, for
automatic transmission vehicle) or
neutral (for manual transmission
vehicle), and set the parking
brakes. Turn both vehicles OFF.iNOTICE
Pb
Page 491 of 637
6-8
What to do in an emergency
If your temperature gauge indicates
overheating, you experience a loss
of power, or hear loud pinging or
knocking, the engine may be over-
heating. If this happens, you should:
1. Pull off the road and stop as soon
as it is safe to do so.
2. Place the shift lever in P (Park, for
automatic transmission vehicle) or
neutral (for manual transmission
vehicle) and set the parking brake.
If the air conditioning is ON, turn it
OFF.
3. If engine coolant is running out
under the vehicle or steam is com-
ing out from the hood, stop the
engine. Do not open the hood until
the coolant has stopped running
or the steaming has stopped. If
there is no visible loss of engine
coolant and no steam, leave the
engine running and check to be
sure the engine cooling fan is
operating. If the fan is not running,
turn the engine off.4. Check for coolant leaking from the
radiator, hoses or under the vehi-
cle. (If the air conditioning had been
in use, it is normal for cold water to
be draining from it when you stop.)
5. If engine coolant is leaking out, stop
the engine immediately and we rec-
ommend that you call an authorized
HYUNDAI dealer for assistance.
IF THE ENGINE OVERHEATS
While the engine is
running, keep hands,
clothing and tools
away from the mov-
ing parts such as the
cooling fan and drive
belt to prevent seri-
ous injury.
WARNING
NEVER remove the
radiator cap or the
drain plug while the
engine and radiator
are hot. Hot coolant
and steam may blow out under
pressure, causing serious injury.
Turn the engine off and wait
until the engine cools down.
Use extreme care when remov-
ing the radiator cap. Wrap a
thick towel around it, and turn it
counterclockwise slowly to the
first stop. Step back while the
pressure is released from the
cooling system. When you are
sure all the pressure has been
released, press down on the
cap, using a thick towel, and
continue turning counterclock-
wise to remove it.
WARNING
Page 520 of 637
At least monthly:
• Check coolant level in the engine
coolant reservoir.
• Check the operation of all exterior
lights, including the stoplights, turn
signals and hazard warning flashers.
• Check the inflation pressures of all
tires including the spare for tires
that are worn, show uneven wear,
or are damaged.
• Check for loose wheel lug nuts.
At least twice a year:
(i.e., every Spring and Fall)
• Check radiator, heater and air condi-
tioning hoses for leaks or damage.
• Check windshield washer spray
and wiper operation. Clean wiper
blades with clean cloth dampened
with washer fluid.
• Check headlamp alignment.
• Check muffler, exhaust pipes,
shields and clamps.
• Check the seat belts for wear and
function.
At least once a year:
• Clean body and door drain holes.
• Lubricate door hinges and hood
hinges.
• Lubricate door and hood locks and
latches.
• Lubricate door rubber weather
strips.
• Lubricate door checker
• Check the air conditioning system.
• Inspect and lubricate automatic
transmission linkage and controls.
• Clean the battery and terminals.
• Check the brake fluid level.
7-9
7
Maintenance
Page 542 of 637
7-31
7
Maintenance
Suspension mounting bolts
Check the suspension connections
for looseness or damage. Retighten
to the specified torque.
Steering gear box, linkage &
boots/lower arm ball joint
With the vehicle stopped and engine
off, check for excessive free-play in
the steering wheel.
Check the linkage for bends or dam-
age. Check the dust boots and ball
joints for deterioration, cracks, or
damage. Replace any damaged
parts.
Drive shafts and boots
Check the drive shafts, boots and
clamps for cracks, deterioration, or
damage. Replace any damaged
parts and, if necessary, repack the
grease.
Air conditioning refrigerant/
compressor
Check the air conditioning lines and
connections for leakage and dam-
age.