clutch Hyundai Elantra 2018 Owner's Guide
[x] Cancel search | Manufacturer: HYUNDAI, Model Year: 2018, Model line: Elantra, Model: Hyundai Elantra 2018Pages: 526, PDF Size: 17.2 MB
Page 326 of 526
5-43
Driving your vehicle
5
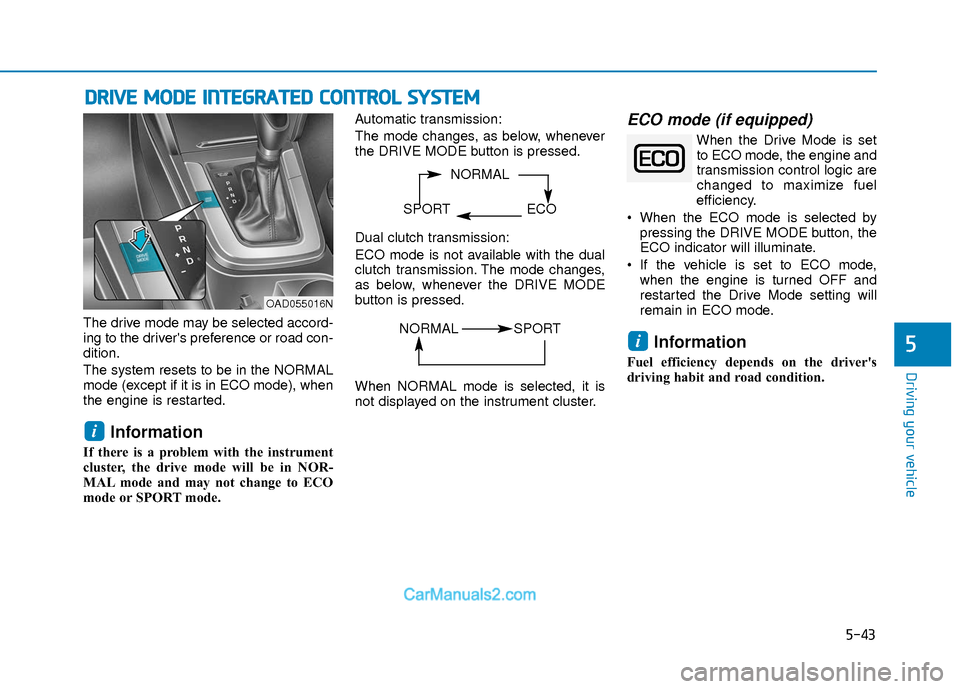
The drive mode may be selected accord-
ing to the driver's preference or road con-
dition.
The system resets to be in the NORMAL
mode (except if it is in ECO mode), when
the engine is restarted.
Information
If there is a problem with the instrument
cluster, the drive mode will be in NOR-
MAL mode and may not change to ECO
mode or SPORT mode. Automatic transmission:
The mode changes, as below, whenever
the DRIVE MODE button is pressed.
Dual clutch transmission:
ECO mode is not available with the dual
clutch transmission. The mode changes,
as below, whenever the DRIVE MODE
button is pressed.
When NORMAL mode is selected, it is
not displayed on the instrument cluster.
ECO mode (if equipped)
When the Drive Mode is set
to ECO mode, the engine and
transmission control logic are
changed to maximize fuel
efficiency.
When the ECO mode is selected by pressing the DRIVE MODE button, the
ECO indicator will illuminate.
If the vehicle is set to ECO mode, when the engine is turned OFF and
restarted the Drive Mode setting will
remain in ECO mode.
Information
Fuel efficiency depends on the driver's
driving habit and road condition.
i
i
D DR
RI
IV
V E
E
M
M O
OD
DE
E
I
IN
N T
TE
EG
G R
RA
A T
TE
ED
D
C
C O
O N
NT
TR
R O
O L
L
S
S Y
Y S
ST
T E
EM
M
NORMAL
SPORT ECO
OAD055016N
NORMAL SPORT
Page 327 of 526
5-44
Driving your vehicle
When the ECO mode is activated:
The acceleration response may beslightly reduced if the accelerator
pedal is depressed moderately.
The air conditioner performance may be limited.
The shift pattern of the automatic transmission/dual clutch transmission
may change.
The engine speed may be lower than when driving in NORMAL mode.
The above situations are normal condi-
tions when the ECO mode is activated to
improve fuel efficiency. Limitation of the ECO mode opera-
tion:
Even though ECO mode is selected and
there is no change in the ECO indicator :
When the coolant temperature is low,
ECO mode will be limited until engine
temperature is at normal operating
temperature.
When driving up a hill, ECO mode will be limited to provide better power
when driving uphill.
When driving the vehicle with the auto- matic transmission/ dual clutch trans-
mission gear shift lever in manual shift
mode, ECO mode will be limited
according to the shift position.SPORT mode
SPORT mode manages the
driving dynamics by automat-
ically adjusting the steering
effort, and the engine and
transmission control logic for enhanced
driver performance.
When SPORT mode is selected by pressing the DRIVE MODE button, the
SPORT indicator will illuminate.
Whenever the engine is restarted, the Drive Mode will revert back to NOR-
MAL mode. If SPORT mode is desired,
re-select SPORT mode from the
DRIVE MODE button.
When SPORT mode is activated: - The engine rpm will tend to remainraised over a certain length of time
even after releasing the accelerator
- Upshifts are delayed when accelerat- ing
Information
In SPORT mode, the fuel efficiency may
decrease.
i
Page 370 of 526
5-87
Driving your vehicle
5
Hazardous Driving Conditions
When hazardous driving elements are
encountered such as water, snow, ice,
mud and sand, take the below sugges-
tions:
Drive cautiously and keep a longerbraking distance.
Avoid abrupt braking or steering.
When your vehicle is stuck in snow, mud, or sand, use second gear.
Accelerate slowly to avoid unneces-
sary wheel spin.
Put sand, rock salt, tire chains or other non-slip materials under the wheels to
provide additional traction while the
vehicle becomes stuck in ice, snow, or
mud.
Rocking the Vehicle
If it is necessary to rock the vehicle to
free it from snow, sand, or mud, first turn
the steering wheel right and left to clear
the area around your front wheels. Then,
shift back and forth between R (Reverse)
and a forward gear.
Try to avoid spinning the wheels, and do
not race the engine.
To prevent transmission wear, wait until
the wheels stop spinning before shifting
gears. Release the accelerator pedal
while shifting, and press lightly on the
accelerator pedal while the transmission
is in gear. Slowly spinning the wheels in
forward and reverse directions causes a
rocking motion that may free the vehicle.
Information
The ESC system must be turned OFF
before rocking the vehicle.
i
S SP
P E
EC
CI
IA
A L
L
D
D R
RI
IV
V I
IN
N G
G
C
C O
O N
ND
DI
IT
T I
IO
O N
NS
S
Downshifting with an automatic
transmission/dual clutch transmis-
sion while driving on slippery sur-
faces can cause an accident. The
sudden change in tire speed could
cause the tires to skid. Be careful
when downshifting on slippery sur-
faces.
WARNING
If the vehicle is stuck and excessive
wheel spin occurs, the temperature
in the tires can increase very quick-
ly. If the tires become damaged, a
tire blow out or tire explosion can
occur. This condition is dangerous -
you and others may be injured. Do
not attempt this procedure if people
or objects are anywhere near the
vehicle.
If you attempt to free the vehicle,
the vehicle can overheat quickly,
possibly causing an engine com-
partment fire or other damage. Try
to avoid spinning the wheels as
much as possible to prevent over-
heating of either the tires or the
engine. DO NOT allow the vehicle to
spin the wheels above 35 mph (56
km/h).
WARNING
Page 400 of 526
6-19
What to do in an emergency
6
Jack labelWith Tire Mobility Kit
(TMK, if equipped) - Type A,B
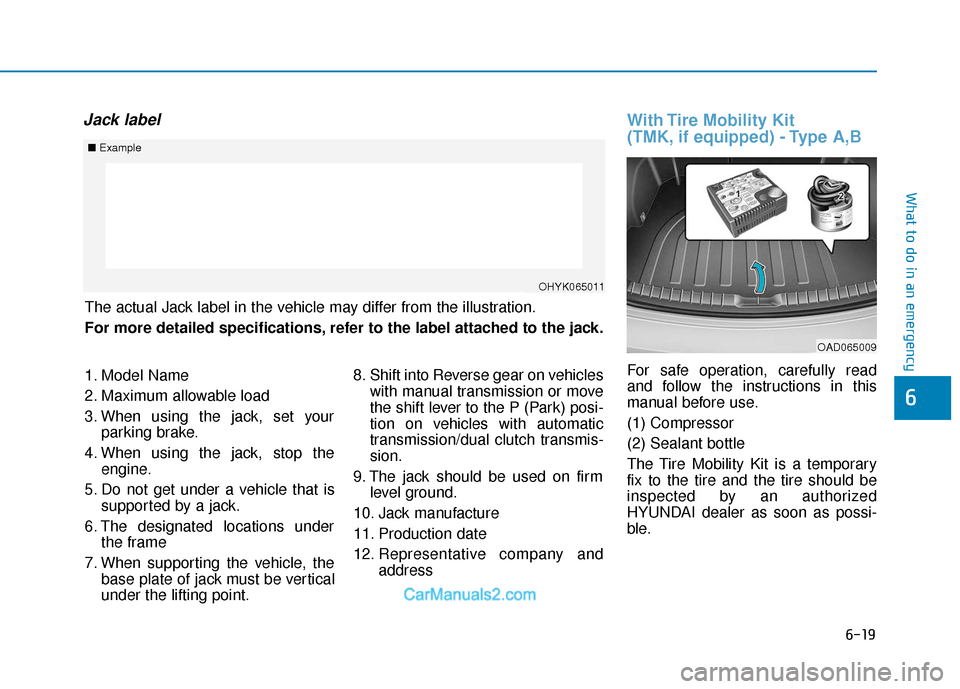
For safe operation, carefully read
and follow the instructions in this
manual before use.
(1) Compressor
(2) Sealant bottle
The Tire Mobility Kit is a temporary
fix to the tire and the tire should be
inspected by an authorized
HYUNDAI dealer as soon as possi-
ble.
The actual Jack label in the vehicle may differ from the illustration.
For more detailed specifications, refer to the label attached to the jack.
■
Example
OHYK065011
1. Model Name
2. Maximum allowable load
3. When using the jack, set your
parking brake.
4. When using the jack, stop the engine.
5. Do not get under a vehicle that is supported by a jack.
6. The designated locations under the frame
7. When supporting the vehicle, the base plate of jack must be vertical
under the lifting point. 8. Shift into Reverse gear on vehicles
with manual transmission or move
the shift lever to the P (Park) posi-
tion on vehicles with automatic
transmission/dual clutch transmis-
sion.
9. The jack should be used on firm level ground.
10. Jack manufacture
11. Production date
12. Representative company and address
OAD065009
Page 418 of 526
6-37
What to do in an emergency
6
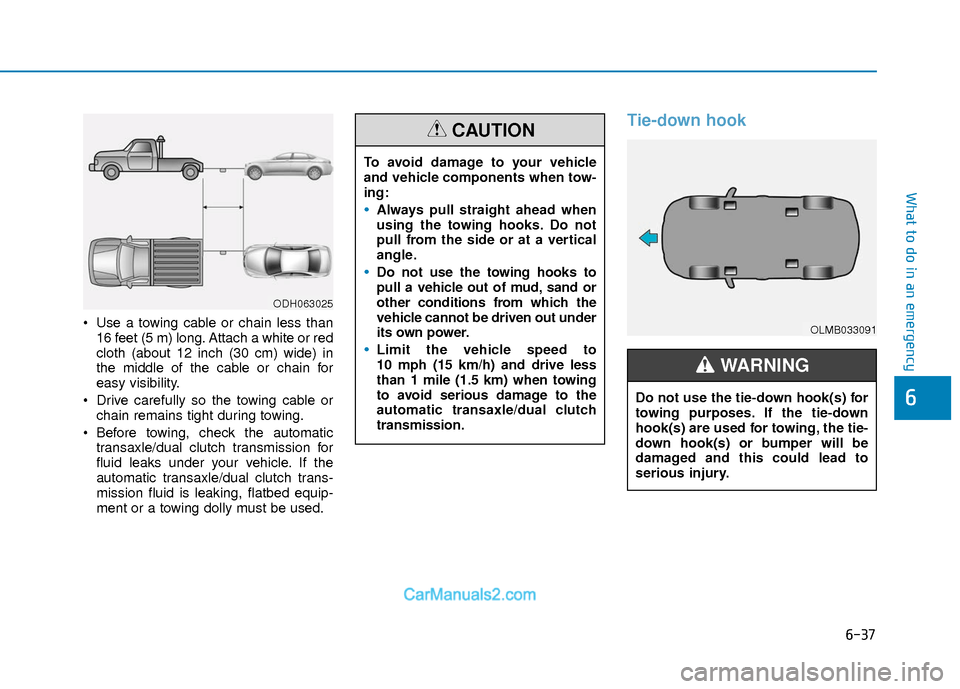
Use a towing cable or chain less than16 feet (5 m) long. Attach a white or red
cloth (about 12 inch (30 cm) wide) in
the middle of the cable or chain for
easy visibility.
Drive carefully so the towing cable or chain remains tight during towing.
Before towing, check the automatic transaxle/dual clutch transmission for
fluid leaks under your vehicle. If the
automatic transaxle/dual clutch trans-
mission fluid is leaking, flatbed equip-
ment or a towing dolly must be used.
Tie-down hook
ODH063025
To avoid damage to your vehicle
and vehicle components when tow-
ing:
Always pull straight ahead when
using the towing hooks. Do not
pull from the side or at a vertical
angle.
Do not use the towing hooks to
pull a vehicle out of mud, sand or
other conditions from which the
vehicle cannot be driven out under
its own power.
Limit the vehicle speed to
10 mph (15 km/h) and drive less
than 1 mile (1.5 km) when towing
to avoid serious damage to the
automatic transaxle/dual clutch
transmission.
CAUTION
OLMB033091
Do not use the tie-down hook(s) for
towing purposes. If the tie-down
hook(s) are used for towing, the tie-
down hook(s) or bumper will be
damaged and this could lead to
serious injury.
WARNING
Page 419 of 526
7
Maintenance
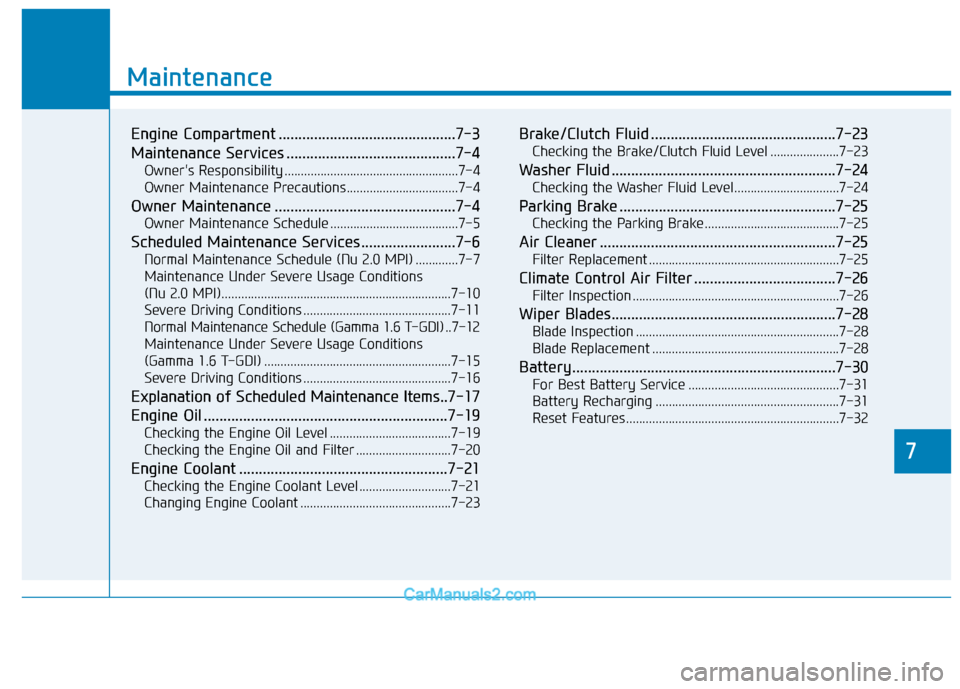
7
Maintenance
Engine Compartment .............................................7-3
Maintenance Services ...........................................7-4
Owner's Responsibility .....................................................7-4
Owner Maintenance Precautions..................................7-4
Owner Maintenance ..............................................7-4
Owner Maintenance Schedule .......................................7-5
Scheduled Maintenance Services........................7-6
Normal Maintenance Schedule (Nu 2.0 MPI) .............7-7
Maintenance Under Severe Usage Conditions
(Nu 2.0 MPI)......................................................................7-\
10
Severe Driving Conditions .............................................7-11
Normal Maintenance Schedule (Gamma 1.6 T-GDI) ..7-12
Maintenance Under Severe Usage Conditions
(Gamma 1.6 T-GDI) .........................................................7-15
Severe Driving Conditions .............................................7-16
Explanation of Scheduled Maintenance Items.. 7-17
Engine Oil ..............................................................7-19
Checking the Engine Oil Level .....................................7-19
Checking the Engine Oil and Filter .............................7-20
Engine Coolant .....................................................7-21
Checking the Engine Coolant Level ............................7-21
Changing Engine Coolant ..............................................7-23
Brake/Clutch Fluid ...............................................7-23
Checking the Brake/Clutch Fluid Level .....................7-23
Washer Fluid .........................................................7-24
Checking the Washer Fluid Level................................7-24
Parking Brake .......................................................7-25
Checking the Parking Brake .........................................7-25
Air Cleaner ............................................................7-25
Filter Replacement ..........................................................7-25
Climate Control Air Filter ....................................7-26
Filter Inspection ...............................................................7-26
Wiper Blades.........................................................7-28
Blade Inspection ..............................................................7-28
Blade Replacement .........................................................7-28
Battery...................................................................7-30
For Best Battery Service ..............................................7-31
Battery Recharging ........................................................7-31
Reset Features.................................................................7-32
7
Page 423 of 526
7-5
7
Maintenance
The following lists are vehicle checks and
inspections that should be performed by
the owner or an authorized HYUNDAI
dealer at the frequencies indicated to
help ensure safe, dependable operation
of your vehicle.
Any adverse conditions should be
brought to the attention of your dealer as
soon as possible.
These Owner Maintenance vehicle
checks are generally not covered by war-
ranties and you may be charged for
labor, parts and lubricants used.Owner Maintenance Schedule
When you stop for fuel:
Check the engine oil level.
Check coolant level in the enginecoolant reservoir.
Check the windshield washer fluid level.
Check for low or under-inflated tires.
While operating your vehicle:
Note any changes in the sound of the exhaust or any smell of exhaust fumes
in the vehicle.
Check for vibrations in the steering wheel. Notice if there is any increased
steering effort or looseness in the
steering wheel, or change in its
straight-ahead position.
Notice if your vehicle constantly turns slightly or "pulls" to one side when trav-
eling on smooth, level road.
When stopping, listen and check for unusual sounds, pulling to one side,
increased brake pedal travel or "hard-
to-push" brake pedal.
If any slipping or changes in the oper- ation of your transmission occurs,
check the transmission fluid level.
Check the automatic transmission/ dual clutch transmission P (Park) func-
tion.
Check the parking brake.
Check for fluid leaks under your vehicle (water dripping from the air condition-
ing system during or after use is nor-
mal).
Be careful when checking your
engine coolant level when the
engine is hot. This may result in
coolant being blown out of the
opening and cause serious burns
and other injuries.
WARNING
Page 426 of 526
7-8
Maintenance
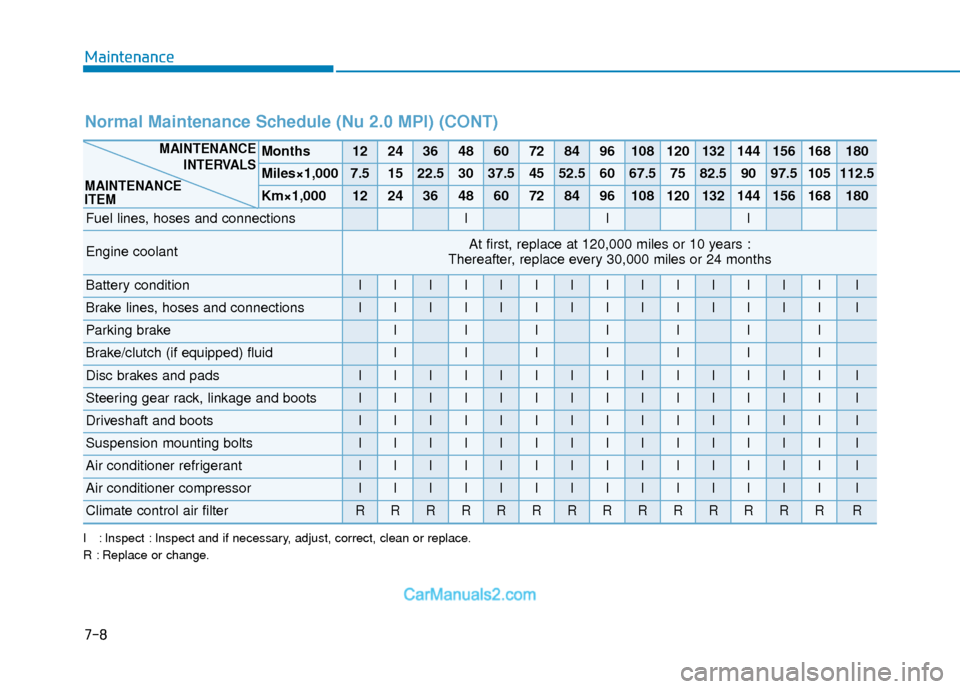
I : Inspect : Inspect and if necessary, adjust, correct, clean or replace.
R : Replace or change.
Normal Maintenance Schedule (Nu 2.0 MPI) (CONT)
Months1224364860728496108120132144156168180
Miles×1,0007.51522.53037.54552.56067.57582.59097.5105112.5
Km×1,0001224364860728496108120132144156168180
Fuel lines, hoses and connectionsIII
Engine coolantAt first, replace at 120,000 miles or 10 years :
Thereafter, replace every 30,000 miles or 24 months
Battery conditionIIIIIIIIIIIIIII
Brake lines, hoses and connectionsIIIIIIIIIIIIIII
Parking brakeIIIIIII
Brake/clutch (if equipped) fluidIIIIIII
Disc brakes and padsIIIIIIIIIIIIIII
Steering gear rack, linkage and bootsIIIIIIIIIIIIIII
Driveshaft and bootsIIIIIIIIIIIIIII
Suspension mounting boltsIIIIIIIIIIIIIII
Air conditioner refrigerantIIIIIIIIIIIIIII
Air conditioner compressorIIIIIIIIIIIIIII
Climate control air filterRRRRRRRRRRRRRRR
MAINTENANCE
INTERVALS
MAINTENANCE
ITEM
Page 431 of 526

7-13
7
Maintenance
I : Inspect : Inspect and if necessary, adjust, correct, clean or replace.
R : Replace or change.
*
3: Fuel filter & Fuel tank air filter are considered to be maintenance free\
but periodic inspection is recommended for this maintenance scheduledepends on fuel quality. If there are some important safety matters like fuel flow restriction, surging, loss of power, hard starting problem, etc.
replace the fuel filter immediately regardless of maintenance schedule a\
nd consult an authorized HYUNDAI dealer for details.
*
4: Inspect for excessive valve noise and/or engine vibration and adjust if necessary. Have an authorized HYUNDAI dealer perform th e opera-
tion.
Normal Maintenance Schedule (Gamma 1.6 T-GDI) (CONT)
Months1224364860728496108120132144156168180
Miles×1,00061218243036424854606672788490
Km×1,000102030405060708090100110120130140150
Fuel filter *3IIIIIII
Fuel lines, hoses and connectionsIII
Valve clearance *4Inspect every 60,000 miles or 72 months
Engine coolantAt first, replace at 120,000 miles or 10 years :
Thereafter, replace every 30,000 miles or 24 months
Battery conditionIIIIIIIIIIIIIII
Brake lines, hoses and connectionsIIIIIIIIIIIIIII
Parking brakeIIIIIII
Brake/clutch (if equipped) fluidIIIIIII
Disc brakes and padsIIIIIIIIIIIIIII
Steering gear rack, linkage and bootsIIIIIIIIIIIIIII
MAINTENANCE INTERVALS
MAINTENANCE
ITEM
Page 432 of 526
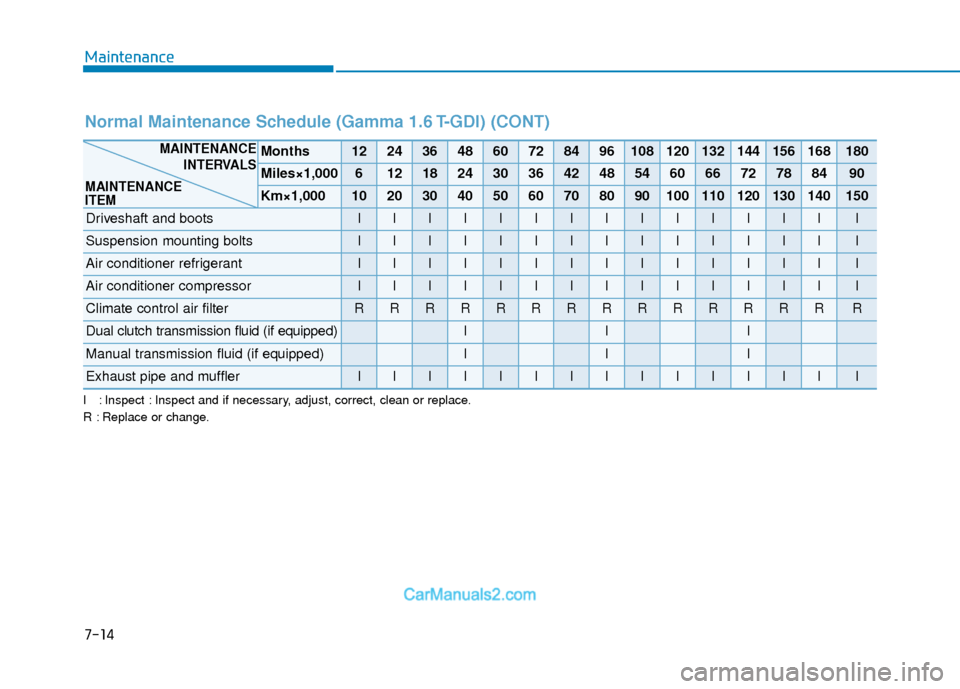
7-14
Maintenance
I : Inspect : Inspect and if necessary, adjust, correct, clean or replace.
R : Replace or change.
Normal Maintenance Schedule (Gamma 1.6 T-GDI) (CONT)
Months1224364860728496108120132144156168180
Miles×1,00061218243036424854606672788490
Km×1,000102030405060708090100110120130140150
Driveshaft and bootsIIIIIIIIIIIIIII
Suspension mounting boltsIIIIIIIIIIIIIII
Air conditioner refrigerantIIIIIIIIIIIIIII
Air conditioner compressorIIIIIIIIIIIIIII
Climate control air filter RRRRRRRRRRRRRRR
Dual clutch transmission fluid (if equipped)III
Manual transmission fluid (if equipped)III
Exhaust pipe and mufflerIIIIIIIIIIIIIII
MAINTENANCEINTERVALS
MAINTENANCE
ITEM