Start Hyundai Elantra 2019 Owner's Manual
[x] Cancel search | Manufacturer: HYUNDAI, Model Year: 2019, Model line: Elantra, Model: Hyundai Elantra 2019Pages: 535, PDF Size: 16.83 MB
Page 9 of 535
F9
Introduction
For customers who do not use TOP
Tier Detergent Gasoline regularly,
and have problems starting or the
engine does not run smoothly, deter-
gent-based fuel additives that you
can purchase separately may be
added to the gasoline. If TOP TIER
Detergent Gasoline is not available,
one bottle of additive added to the
fuel tank according to the mainte-
nance schedule is recommended
(refer to the Maintenance Schedule
in chapter 7).
Additives are available from your
authorized HYUNDAI dealer along
with information on how to use them.
Do not mix other additives.
Operation in foreign countries
If you are going to drive your vehicle
in another country, be sure to:
Observe all regulations regarding registration and insurance.
Determine that acceptable fuel is available. This vehicle should not be modi-
fied. Modification of your vehicle
could affect its performance, safety
or durability and may even violate
governmental safety and emis-
sions regulations.
In addition, damage or perform-
ance problems resulting from any
modification may not be covered
under warranty.
If you use unauthorized electronic devices, it may cause the vehicle to
operate abnormally, wire damage,
battery discharge and fire. For your
safety, do not use unauthorized
electronic devices. By following a few simple precau-
tions for the first 600 miles (1,000
km) you may add to the perform-
ance, economy and life of your vehi-
cle.
Do not race the engine.
While driving, keep your engine
speed (rpm, or revolutions per
minute) between 2,000 rpm and
4,000 rpm.
Do not maintain a single speed for long periods of time, either fast or
slow. Varying engine speed is
needed to properly break-in the
engine.
Avoid hard stops, except in emer- gencies, to allow the brakes to seat
properly.
V VE
EH
H I
IC
C L
LE
E
B
B R
RE
EA
A K
K-
-I
IN
N
P
P R
R O
O C
CE
E S
SS
S
V
V E
EH
H I
IC
C L
LE
E
M
M O
OD
DI
IF
F I
IC
C A
A T
TI
IO
O N
NS
S
Page 16 of 535
I
IN
N S
ST
T R
R U
U M
M E
EN
N T
T
P
P A
A N
N E
EL
L
O
O V
VE
ER
R V
V I
IE
E W
W
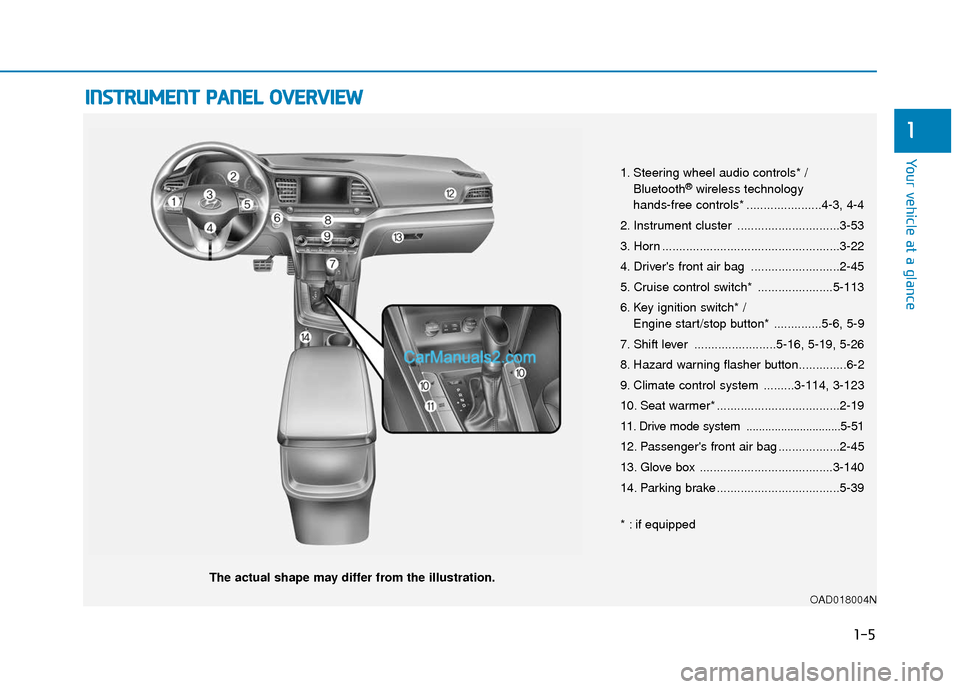
The actual shape may differ from the illustration.
1-5
Your vehicle at a glance
1
1. Steering wheel audio controls* /
Bluetooth®wireless technology
hands-free controls* ......................4-3, 4-4
2. Instrument cluster ..............................3-53
3. Horn ....................................................3-22
4. Driver's front air bag ..........................2-45
5. Cruise control switch* ......................5-113
6. Key ignition switch* / Engine start/stop button* ..............5-6, 5-9
7. Shift lever ........................5-16, 5-19, 5-26
8. Hazard warning flasher button..............6-2
9. Climate control system .........3-114, 3-123
10. Seat warmer* ....................................2-19
11. Drive mode system ..............................5-51
12. Passenger's front air bag ..................2-45
13. Glove box .......................................3-140
14. Parking brake ....................................5-39
* : if equipped
OAD018004N
Page 23 of 535
2-6
Safety system of your vehicle
Seat belts
Always fasten your seat belt before
starting any trip.
At all times, passengers should sit
upright and be properly restrained.
Infants and small children must be
restrained in appropriate child
restraint systems. Adults and chil-
dren who have outgrown a booster
seat must be restrained using the
seat belts.
Front Seats
Take the following precautions
when adjusting your seat:
NEVER attempt to adjust the
seat while the vehicle is mov-
ing. The seat could respond
with unexpected movement
and may cause loss of vehicle
control resulting in an acci-
dent.
Do not place anything under
the front seats. Loose objects
in the driver's foot area could
interfere with the operation of
the foot pedals, causing an
accident.
Do not allow anything to inter-
fere with the normal position
and proper locking of the
seatback.
Do not place a cigarette
lighter on the floor or seat.
When you operate the seat,
gas may exit out of the lighter
causing a fire.
WARNING
Take the following precautions
when adjusting your seat belt:
NEVER use one seat belt for
more than one occupant.
Always position the seatback
upright with the lap portion of
the seat belt snug and low
across the hips.
NEVER allow children or
small infants to ride in a pas-
senger's lap.
Do not route the seat belt
across your neck, across
sharp edges, or reroute the
shoulder strap away from
your body.
Do not allow the seat belt to
become caught or jammed.
WARNING
Page 32 of 535
2-15
Safety system of your vehicle
2
Head Restraints
The vehicle's front and rear seats
have adjustable head restraints. The
head restraints provide comfort for
passengers, but more importantly
they are designed to help protect
passengers from whiplash and other
neck and spinal injuries during an
accident, especially in a rear impact
collision.
Be careful when loading
cargo through the rear pas-
senger seats to prevent dam-
age to the vehicle interior.
When cargo is loaded through
the rear passenger seats,
ensure the cargo is properly
secured to prevent it from
moving while driving.
Unsecured cargo in the pas-
senger compartment can
cause damage to the vehicle
or injury to it's occupants.
CAUTION
To reduce the risk of serious
injury or death in an accident,
take the following precautions
when adjusting your head
restraints:
Always properly adjust the
head restraints for all passen-
gers BEFORE starting the
vehicle.
NEVER let anyone ride in a
seat with the head restraints
removed or reversed.
WARNING
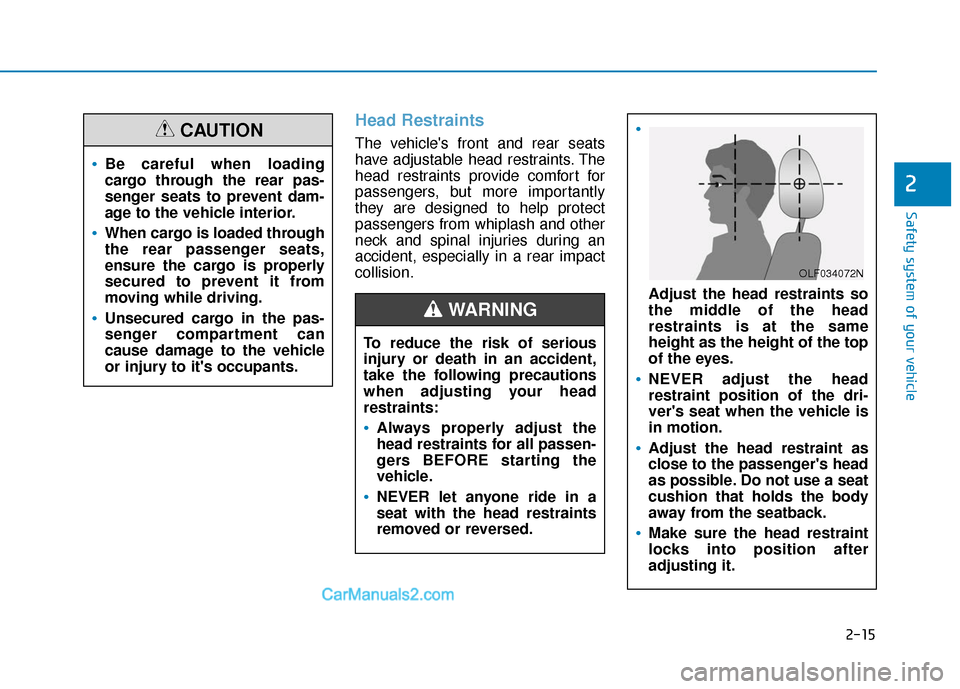
Adjust the head restraints so
the middle of the head
restraints is at the same
height as the height of the top
of the eyes.
NEVER adjust the head
restraint position of the dri-
ver's seat when the vehicle is
in motion.
Adjust the head restraint as
close to the passenger's head
as possible. Do not use a seat
cushion that holds the body
away from the seatback.
Make sure the head restraint
locks into position after
adjusting it.
OLF034072N
Page 37 of 535
2-20
Safety system of your vehicle
Automatic temperature control The seat warmer starts to auto-
matically control the seat tempera-
ture in order to prevent low-tem-
perature burns after being manual-
ly turned ON.
If HIGH temperature is manually
selected again, the temperature
will be controlled automatically.
When pressing the switch for more than 1.5 seconds with the seat
warmer operating, the seat warmer
will turn OFF.
The seat warmer defaults to the OFF position whenever the ignition
switch is in the ON position.
Information
With the seat warmer switch in the
ON position, the heating system in the
seat turns off or on automatically
depending on the seat temperature.
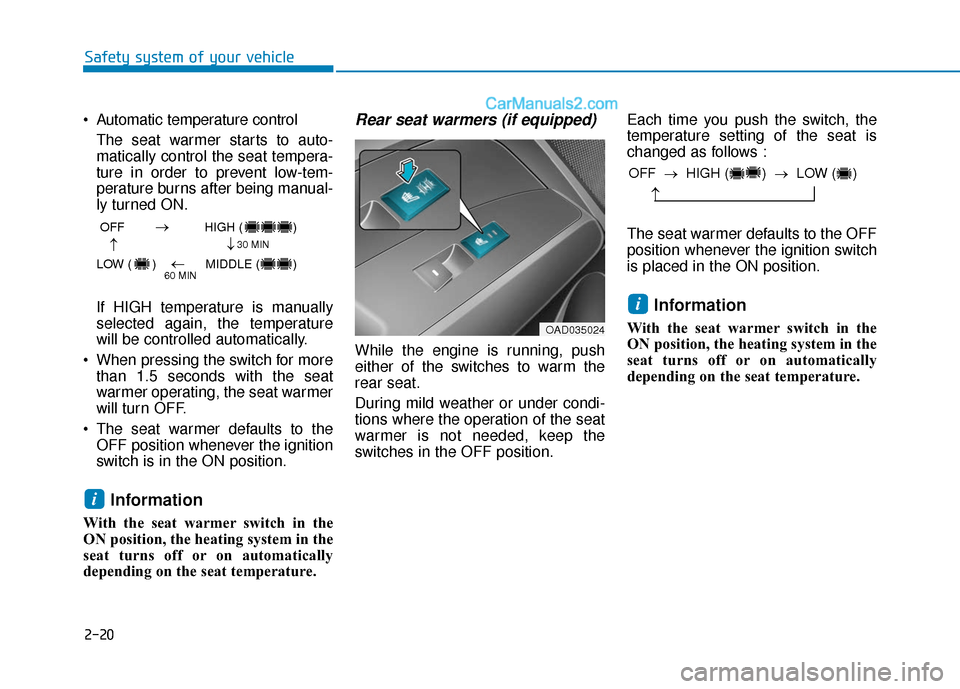
Rear seat warmers (if equipped)
While the engine is running, push
either of the switches to warm the
rear seat.
During mild weather or under condi-
tions where the operation of the seat
warmer is not needed, keep the
switches in the OFF position. Each time you push the switch, the
temperature setting of the seat is
changed as follows :
The seat warmer defaults to the OFF
position whenever the ignition switch
is placed in the ON position.
Information
With the seat warmer switch in the
ON position, the heating system in the
seat turns off or on automatically
depending on the seat temperature.
i
i
OFF
HIGH ( )
LOW ( ) MIDDLE ( )
→→
→
→
30 MIN
60 MIN
OAD035024
OFF → HIGH ( ) → LOW ( )
→
Page 38 of 535
2-21
Safety system of your vehicle
2
This section describes how to use
the seat belts properly. It also
describes some of the things not to
do when using seat belts.
Seat Belt Safety Precautions
Always fasten your seat belt and
make sure all passengers have fas-
tened their seat belts before starting
any trip. Air bags are designed to
supplement the seat belt as an addi-
tional safety device, but they are not
a substitute. Most states require all
occupants of a vehicle to wear seat
belts.
S SE
E A
A T
T
B
B E
EL
LT
T S
S
Seat belts must be used by ALL
passengers whenever the vehi-
cle is moving. Take the following
precautions when adjusting
and wearing seat belts:
ALWAYS properly restrain
children under age 13 in the
rear seats.
WARNING
NEVER allow children to ride
in the front passenger seat. If
a child age 13 or older must be
seated in the front seat, move
the seat as far back as possi-
ble and properly restrain them
in the seat.
NEVER allow an infant or
child to be carried on an occu-
pant’s lap.
NEVER ride with the seatback
reclined when the vehicle is
moving.
Do not allow children to share
a seat or seat belt.
Do not wear the shoulder belt
under your arm or behind
your back.
Always wear both the shoul-
der portion and lap portion of
the lap/shoulder belt.
Do not use the seat belt if it is
twisted. A twisted seat belt
will not protect you properly
in an accident.
Do not use a seat belt if the
webbing or hardware is dam-
aged.
Do not latch the seat belt into
the buckles of other seats.
NEVER unfasten the seat belt
while driving. This may cause
loss of vehicle control result-
ing in an accident.
Make sure there is nothing in
the buckle interfering with the
seat belt latch mechanism.
This may prevent the seat belt
from fastening securely.
No modifications or additions
should be made by the user
which will either prevent the
seat belt adjusting devices
from operating to remove
slack, or prevent the seat belt
assembly from being adjusted
to remove slack.
Page 70 of 535
2-53
Safety system of your vehicle
2
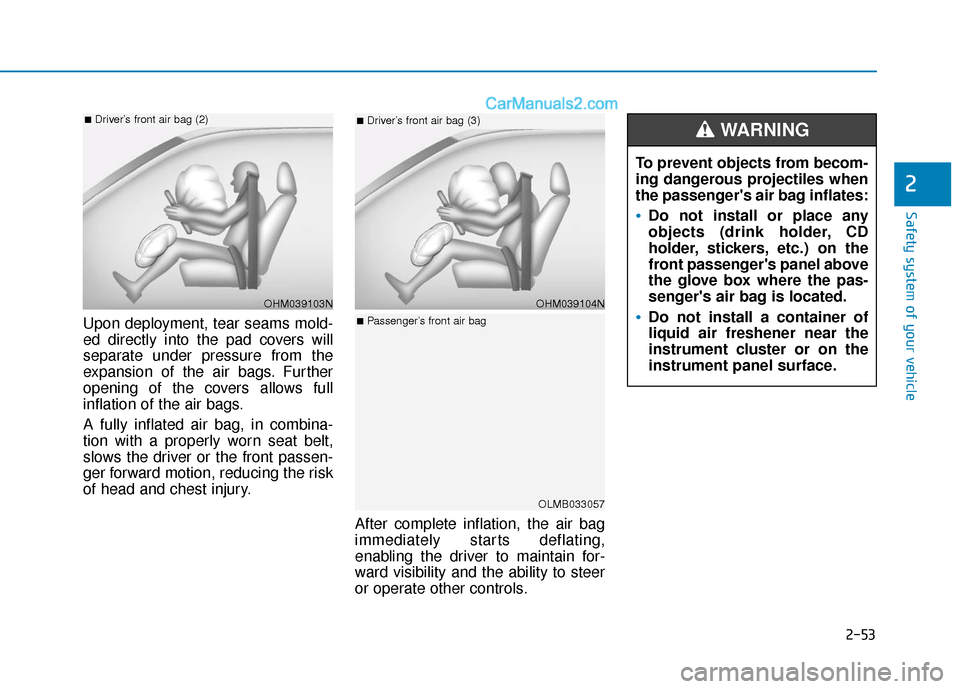
Upon deployment, tear seams mold-
ed directly into the pad covers will
separate under pressure from the
expansion of the air bags. Further
opening of the covers allows full
inflation of the air bags.
A fully inflated air bag, in combina-
tion with a properly worn seat belt,
slows the driver or the front passen-
ger forward motion, reducing the risk
of head and chest injury.After complete inflation, the air bag
immediately starts deflating,
enabling the driver to maintain for-
ward visibility and the ability to steer
or operate other controls.
OHM039103N
■Driver’s front air bag (2)
OHM039104N
■Driver’s front air bag (3)
OLMB033057
■Passenger’s front air bag
To prevent objects from becom-
ing dangerous projectiles when
the passenger's air bag inflates:
Do not install or place any
objects (drink holder, CD
holder, stickers, etc.) on the
front passenger's panel above
the glove box where the pas-
senger's air bag is located.
Do not install a container of
liquid air freshener near the
instrument cluster or on the
instrument panel surface.
WARNING
Page 76 of 535
2-59
Safety system of your vehicle
2
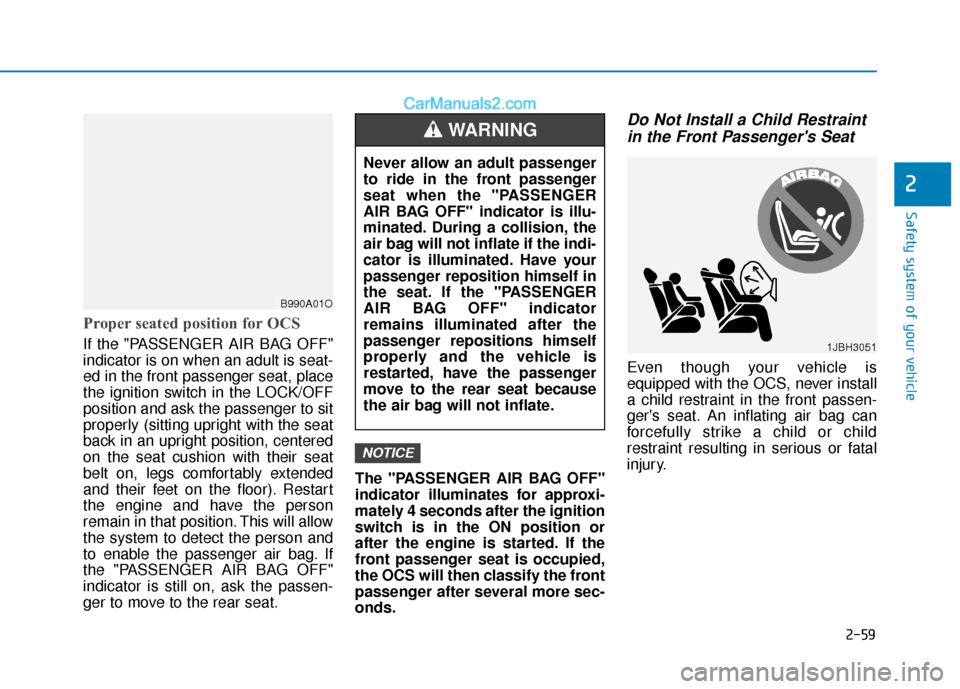
Proper seated position for OCS
If the "PASSENGER AIR BAG OFF"
indicator is on when an adult is seat-
ed in the front passenger seat, place
the ignition switch in the LOCK/OFF
position and ask the passenger to sit
properly (sitting upright with the seat
back in an upright position, centered
on the seat cushion with their seat
belt on, legs comfortably extended
and their feet on the floor). Restart
the engine and have the person
remain in that position. This will allow
the system to detect the person and
to enable the passenger air bag. If
the "PASSENGER AIR BAG OFF"
indicator is still on, ask the passen-
ger to move to the rear seat.The "PASSENGER AIR BAG OFF"
indicator illuminates for approxi-
mately 4 seconds after the ignition
switch is in the ON position or
after the engine is started. If the
front passenger seat is occupied,
the OCS will then classify the front
passenger after several more sec-
onds.
Do Not Install a Child Restraint
in the Front Passenger's Seat
Even though your vehicle is
equipped with the OCS, never install
a child restraint in the front passen-
ger's seat. An inflating air bag can
forcefully strike a child or child
restraint resulting in serious or fatal
injury.
NOTICE
B990A01O
Never allow an adult passenger
to ride in the front passenger
seat when the "PASSENGER
AIR BAG OFF" indicator is illu-
minated. During a collision, the
air bag will not inflate if the indi-
cator is illuminated. Have your
passenger reposition himself in
the seat. If the "PASSENGER
AIR BAG OFF" indicator
remains illuminated after the
passenger repositions himself
properly and the vehicle is
restarted, have the passenger
move to the rear seat because
the air bag will not inflate.
WARNING
1JBH3051
Page 87 of 535
3-3
Convenient features of your vehicle
3
Remote Key (if equipped)
Your HYUNDAI uses a remote key,
which you can use to lock or unlock
a door (and trunk) and even start the
engine.
1. Door Lock
2. Door Unlock
3. Trunk Unlock
4. Panic
Locking
To lock :
1. Close all doors, engine hood andtrunk.
2. Press the Door Lock button (1) on the remote key.
3. The hazard warning lights will blink and the chime will sound
once if the lock button is pressed
once more within four seconds.
4. Make sure the doors are locked by checking the position of the door
lock button inside the vehicle.
Unlocking
To unlock:
1. Press the Door Unlock button (2)on the remote key.
2. The driver’s door will unlock. The hazard warning lights will blink two
times.
Two Press Unlock Feature
The priority for unlocking the driver
door only, or unlocking all the doors
with one press may be adjusted in
the User Settings mode in the cluster
LCD display (if equipped).
The Two Press Unlock feature, when
enabled, will require the user to
press the door unlock button once for
driver door only and twice for unlock-
ing all the doors.
Select or Deselect the Two Press
Unlock feature in the User Settings
mode in the cluster LCD display. The
option can be found under the follow-
ing menu:
User Settings ➞ Door ➞Two Press
Unlock
A A C
CC
CE
E S
SS
SI
IN
N G
G
Y
Y O
O U
UR
R
V
V E
EH
H I
IC
C L
LE
E
OHG040006
Do not leave the keys in your
vehicle with unsupervised chil-
dren. Unattended children
could place the key in the igni-
tion switch and may operate
power windows or other con-
trols, or even make the vehicle
move, which could result in
serious injury or death.
WARNING
Page 88 of 535
3-4
The Two Press Unlock feature can
also be enabled or disabled by
pressing the door lock and unlock
buttons simultaneously on the Key
FOB:
Press and hold both the Door Lock
button and the Door Unlock button
simultaneously until the hazard
warning lights blink.
This will enable or disable the Two
Press Unlock feature. Repeat this
procedure to enable/disable the
mode again.
Information
After unlocking the doors, the doors
will lock automatically after 30 sec-
onds unless a door is opened.
Trunk unlocking
To unlock:
1. Press and hold the Trunk Unlockbutton (3) on the remote key for
more than one second.
2. The hazard warning lights will blink two times.
3. Once the trunk is opened and then closed, the trunk will lock
automatically.
Information
The word "HOLD" is written on the
button to inform you that you must
press and hold the button for more
than one second.
Panic button (if equipped)
Press and hold the Panic button (4)
for more than one second. The horn
sounds and hazard warning lights
flash for about 30 seconds.
To cancel the panic mode, press any
button on the remote key.
Start-up
For more details, refer to the "Key
Ignition Switch" section in chapter 5.
To prevent damaging the remote
key:
• Keep the remote key away fromwater or any liquid and fire. If the
inside of the remote key gets
damp (due to drinks or mois-
ture), or is heated, internal cir-
cuit may malfunction, excluding
the car from the warranty.
Avoid dropping or throwing the remote key.
Protect the remote key from extreme temperatures.
NOTICE
i
i
Convenient features of your vehicle