Wire Hyundai Elantra 2019 Owner's Manual
[x] Cancel search | Manufacturer: HYUNDAI, Model Year: 2019, Model line: Elantra, Model: Hyundai Elantra 2019Pages: 535, PDF Size: 16.83 MB
Page 9 of 535
F9
Introduction
For customers who do not use TOP
Tier Detergent Gasoline regularly,
and have problems starting or the
engine does not run smoothly, deter-
gent-based fuel additives that you
can purchase separately may be
added to the gasoline. If TOP TIER
Detergent Gasoline is not available,
one bottle of additive added to the
fuel tank according to the mainte-
nance schedule is recommended
(refer to the Maintenance Schedule
in chapter 7).
Additives are available from your
authorized HYUNDAI dealer along
with information on how to use them.
Do not mix other additives.
Operation in foreign countries
If you are going to drive your vehicle
in another country, be sure to:
Observe all regulations regarding registration and insurance.
Determine that acceptable fuel is available. This vehicle should not be modi-
fied. Modification of your vehicle
could affect its performance, safety
or durability and may even violate
governmental safety and emis-
sions regulations.
In addition, damage or perform-
ance problems resulting from any
modification may not be covered
under warranty.
If you use unauthorized electronic devices, it may cause the vehicle to
operate abnormally, wire damage,
battery discharge and fire. For your
safety, do not use unauthorized
electronic devices. By following a few simple precau-
tions for the first 600 miles (1,000
km) you may add to the perform-
ance, economy and life of your vehi-
cle.
Do not race the engine.
While driving, keep your engine
speed (rpm, or revolutions per
minute) between 2,000 rpm and
4,000 rpm.
Do not maintain a single speed for long periods of time, either fast or
slow. Varying engine speed is
needed to properly break-in the
engine.
Avoid hard stops, except in emer- gencies, to allow the brakes to seat
properly.
V VE
EH
H I
IC
C L
LE
E
B
B R
RE
EA
A K
K-
-I
IN
N
P
P R
R O
O C
CE
E S
SS
S
V
V E
EH
H I
IC
C L
LE
E
M
M O
OD
DI
IF
F I
IC
C A
A T
TI
IO
O N
NS
S
Page 16 of 535
I
IN
N S
ST
T R
R U
U M
M E
EN
N T
T
P
P A
A N
N E
EL
L
O
O V
VE
ER
R V
V I
IE
E W
W
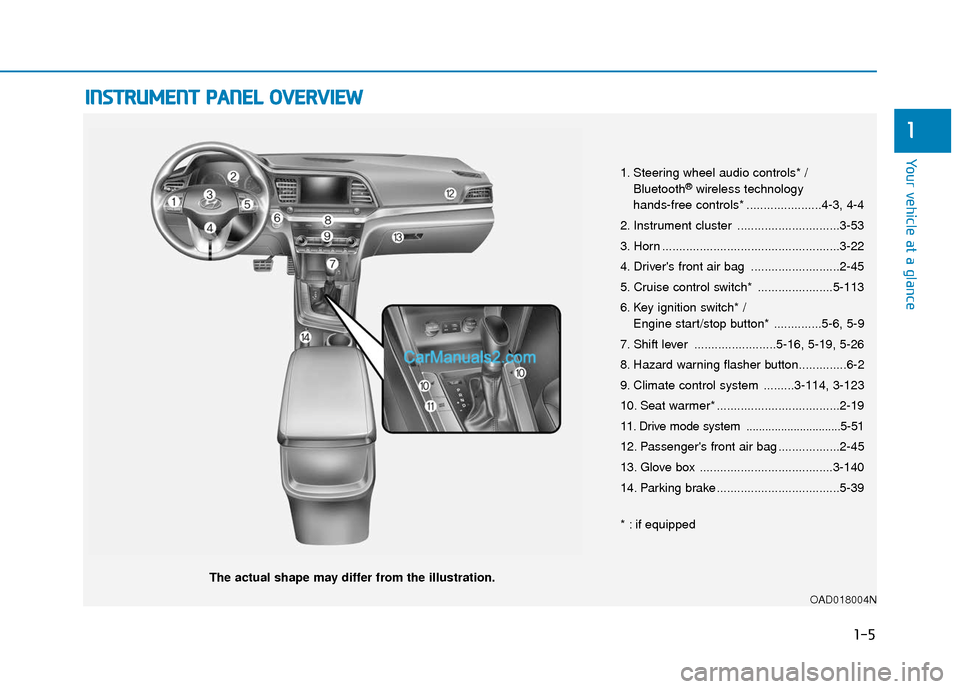
The actual shape may differ from the illustration.
1-5
Your vehicle at a glance
1
1. Steering wheel audio controls* /
Bluetooth®wireless technology
hands-free controls* ......................4-3, 4-4
2. Instrument cluster ..............................3-53
3. Horn ....................................................3-22
4. Driver's front air bag ..........................2-45
5. Cruise control switch* ......................5-113
6. Key ignition switch* / Engine start/stop button* ..............5-6, 5-9
7. Shift lever ........................5-16, 5-19, 5-26
8. Hazard warning flasher button..............6-2
9. Climate control system .........3-114, 3-123
10. Seat warmer* ....................................2-19
11. Drive mode system ..............................5-51
12. Passenger's front air bag ..................2-45
13. Glove box .......................................3-140
14. Parking brake ....................................5-39
* : if equipped
OAD018004N
Page 86 of 535
Trip Computer .......................................................3-91
Conventional Cluster.......................................................3\
-91
Supervision Cluster .........................................................3-95
Light .......................................................................3\
-99
Exterior Lights .................................................................3-99
Interior Lights ................................................................3-106
Welcome System ...........................................................3-108
Wipers and Washers..........................................3-110
Windshield Wipers ........................................................3-110
Windshield Washers .....................................................3-111
Driver Assist System .........................................3-112
Rear View Monitor .......................................................3-112
Defroster .............................................................3-113
Rear Window Defroster ..............................................3-113
Manual Climate Control System.......................3-114
Heating and Air Conditioning .....................................3-115
System Operation .........................................................3-119
System Maintenance....................................................3-121
Automatic Climate Control System ..................3-123
Automatic Heating and Air Conditioning.................3-124
Manual Heating and Air Conditioning......................3-125
System Operation .........................................................3-131
System Maintenance....................................................3-133
Windshield Defrosting and Defogging ............3-134
Auto Defogging System ..............................................3-137
Climate Control Additional Features ...............3-139
Automatic Ventilation ...................................................3-139
Sunroof Inside Air Recirculation ...............................3-139
Storage Compartment .......................................3-139
Center Console Storage ..............................................3-140
Sliding Armrest ..............................................................3-140
Glove Box ........................................................................\
3-140
Sunglass Holder.............................................................3-141
Interior Features ................................................3-142
Cup Holder ........................................................................\
..3-142Sunvisor ........................................................................\
...3-143
Power Outlet ..................................................................3-144
Wireless Cellular Phone Charging System..............3-145
USB Charger ...................................................................3-147\
Clock ........................................................................\
.........3-147
Clothes Hanger ..............................................................3-147
Floor Mat Anchor(s).....................................................3-148
3
Page 108 of 535
3-24
Convenient features of your vehicle
Blue Link®center (if equipped)
For details, refer to the Blue Link®
Owner's Guide, Navigation Manual
or Audio Manual.
Electric chromic mirror (ECM)with HomeLink®system and
Blue Link®(if equipped)
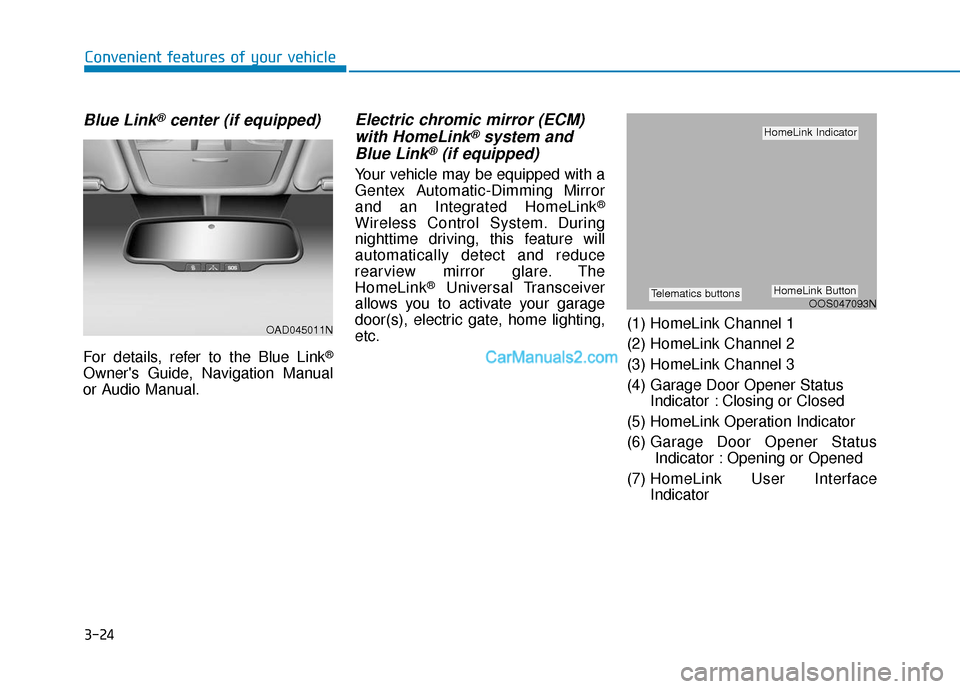
Your vehicle may be equipped with a
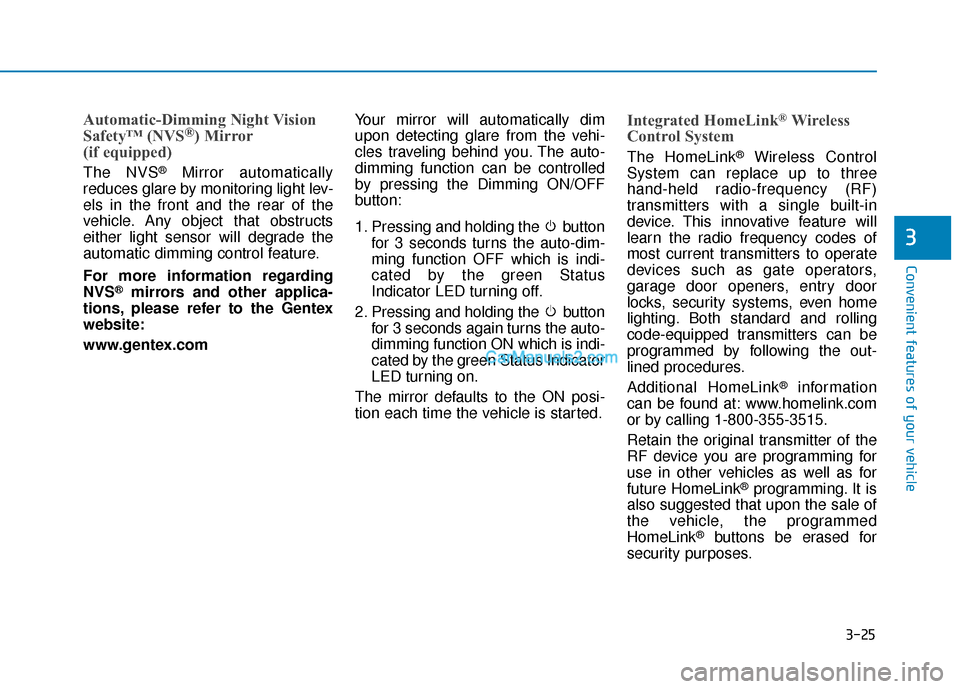
Gentex Automatic-Dimming Mirror
and an Integrated HomeLink
®
Wireless Control System. During
nighttime driving, this feature will
automatically detect and reduce
rearview mirror glare. The
HomeLink
®Universal Transceiver
allows you to activate your garage
door(s), electric gate, home lighting,
etc. (1) HomeLink Channel 1
(2) HomeLink Channel 2
(3) HomeLink Channel 3
(4) Garage Door Opener Status
Indicator : Closing or Closed
(5) HomeLink Operation Indicator
(6) Garage Door Opener Status Indicator : Opening or Opened
(7) HomeLink User Interface Indicator
OAD045011N
OOS047093N
HomeLink Indicator
HomeLink ButtonTelematics buttons
Page 109 of 535
3-25
Convenient features of your vehicle
3
Automatic-Dimming Night Vision
Safety™ (NVS®) Mirror
(if equipped)
The NVS®Mirror automatically
reduces glare by monitoring light lev-
els in the front and the rear of the
vehicle. Any object that obstructs
either light sensor will degrade the
automatic dimming control feature.
For more information regarding
NVS
®mirrors and other applica-
tions, please refer to the Gentex
website:
www.gentex.com Your mirror will automatically dim
upon detecting glare from the vehi-
cles traveling behind you. The auto-
dimming function can be controlled
by pressing the Dimming ON/OFF
button:
1. Pressing and holding the button
for 3 seconds turns the auto-dim-
ming function OFF which is indi-
cated by the green Status
Indicator LED turning off.
2. Pressing and holding the button for 3 seconds again turns the auto-
dimming function ON which is indi-
cated by the green Status Indicator
LED turning on.
The mirror defaults to the ON posi-
tion each time the vehicle is started.
Integrated HomeLink®Wireless
Control System
The HomeLink®Wireless Control
System can replace up to three
hand-held radio-frequency (RF)
transmitters with a single built-in
device. This innovative feature will
learn the radio frequency codes of
most current transmitters to operate
devices such as gate operators,
garage door openers, entry door
locks, security systems, even home
lighting. Both standard and rolling
code-equipped transmitters can be
programmed by following the out-
lined procedures.
Additional HomeLink
®information
can be found at: www.homelink.com
or by calling 1-800-355-3515.
Retain the original transmitter of the
RF device you are programming for
use in other vehicles as well as for
future HomeLink
®programming. It is
also suggested that upon the sale of
the vehicle, the programmed
HomeLink
®buttons be erased for
security purposes.
Page 111 of 535
3-27
Convenient features of your vehicle
3
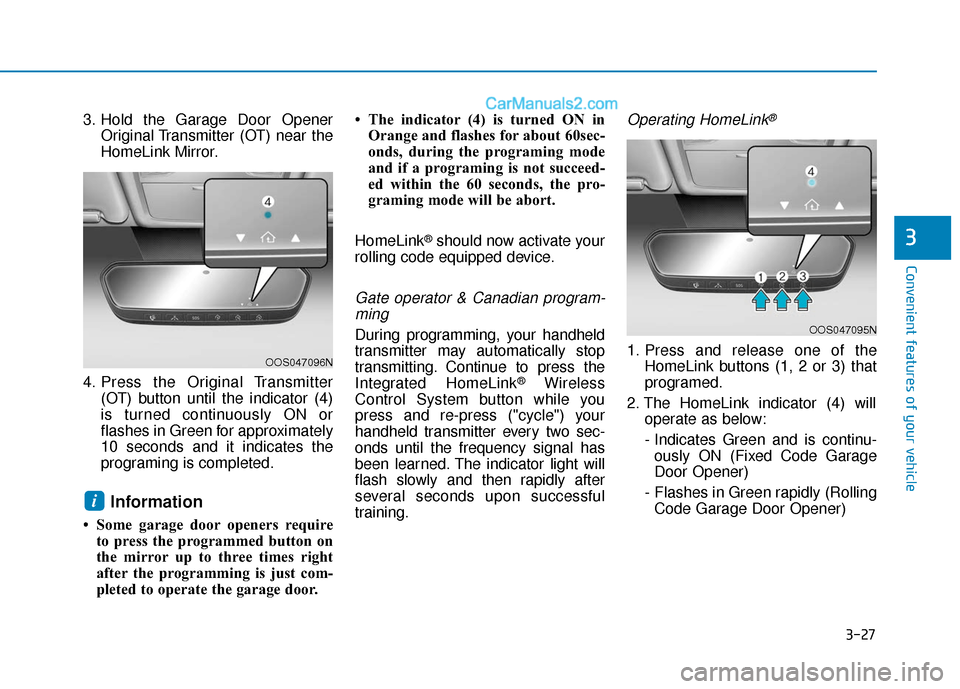
3. Hold the Garage Door OpenerOriginal Transmitter (OT) near the
HomeLink Mirror.
4. Press the Original Transmitter (OT) button until the indicator (4)
is turned continuously ON or
flashes in Green for approximately
10 seconds and it indicates the
programing is completed.
Information
• Some garage door openers requireto press the programmed button on
the mirror up to three times right
after the programming is just com-
pleted to operate the garage door. • The indicator (4) is turned ON in
Orange and flashes for about 60sec-
onds, during the programing mode
and if a programing is not succeed-
ed within the 60 seconds, the pro-
graming mode will be abort.
HomeLink
®should now activate your
rolling code equipped device.
Gate operator & Canadian program- ming
During programming, your handheld
transmitter may automatically stop
transmitting. Continue to press the
Integrated HomeLink
®Wireless
Control System button while you
press and re-press ("cycle") your
handheld transmitter every two sec-
onds until the frequency signal has
been learned. The indicator light will
flash slowly and then rapidly after
several seconds upon successful
training.
Operating HomeLink®
1. Press and release one of the HomeLink buttons (1, 2 or 3) that
programed.
2. The HomeLink indicator (4) will operate as below:
- Indicates Green and is continu- ously ON (Fixed Code Garage
Door Opener)
- Flashes in Green rapidly (Rolling Code Garage Door Opener)
i
OOS047096N
OOS047095N
Page 172 of 535
3-88
Convenient features of your vehicle
ItemsExplanation
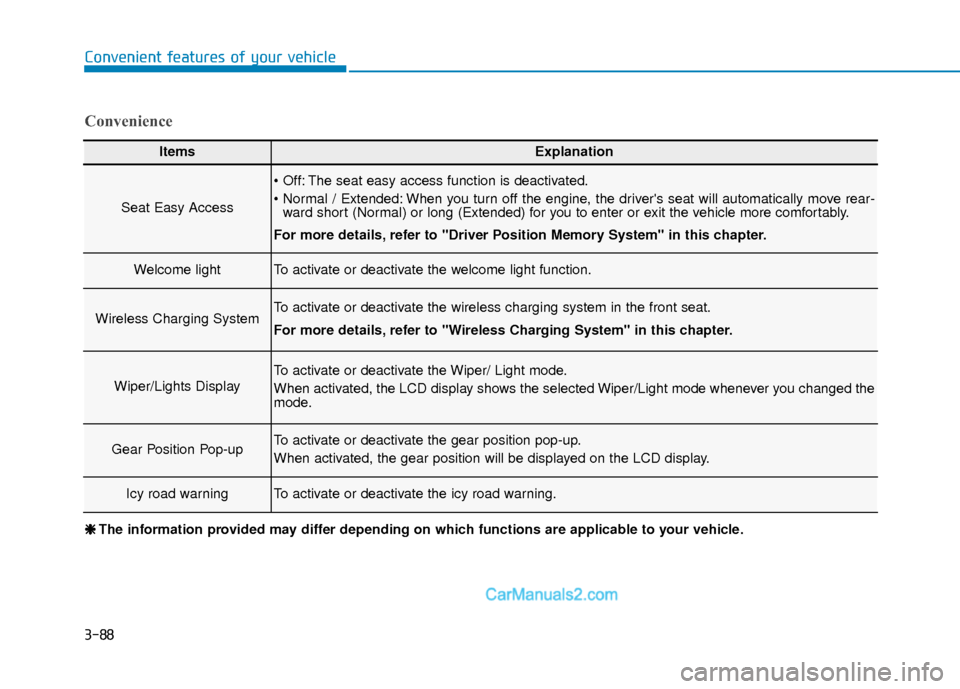
Seat Easy Access
The seat easy access function is deactivated.
When you turn off the engine, the driver's seat will automatically move rear-ward short (Normal) or long (Extended) for you to enter or exit the vehicle more comfortably.
For more details, refer to "Driver Position Memory System" in this chapter.
Welcome lightTo activate or deactivate the welcome light function.
Wireless Charging SystemTo activate or deactivate the wireless charging system in the front seat.
For more details, refer to "Wireless Charging System" in this chapter.
Wiper/Lights Display
To activate or deactivate the Wiper/ Light mode.
When activated, the LCD display shows the selected Wiper/Light mode whenever you changed the
mode.
Gear Position Pop-upTo activate or deactivate the gear position pop-up.
When activated, the gear position will be displayed on the LCD display.
Icy road warningTo activate or deactivate the icy road warning.
Convenience
❈ ❈ The information provided may differ depending on which functions are applicable to your vehicle.
Page 229 of 535
![Hyundai Elantra 2019 Owners Manual 3-145
Convenient features of your vehicle
3
Wireless Cellular Phone
Charging System (if equipped)
[A]: Indicator light, [B]: Charging pad
On certain models, the vehicle
comes equipped with a wireless Hyundai Elantra 2019 Owners Manual 3-145
Convenient features of your vehicle
3
Wireless Cellular Phone
Charging System (if equipped)
[A]: Indicator light, [B]: Charging pad
On certain models, the vehicle
comes equipped with a wireless](/img/35/14536/w960_14536-228.png)
3-145
Convenient features of your vehicle
3
Wireless Cellular Phone
Charging System (if equipped)
[A]: Indicator light, [B]: Charging pad
On certain models, the vehicle
comes equipped with a wireless cel-
lular phone charger.
The system is available when all
doors are closed, and when the igni-
tion switch is ON.
To charge a cellular phone
The wireless cellular phone charging
system charges only the Qi-enabled
cellular phones ( ). Read the label
on the cellular phone accessory
cover or visit your cellular phone
manufacturer's website to check
whether your cellular phone supports
the Qi technology.
The wireless charging process starts
when you put a Qi-enabled cellular
phone on the wireless charging unit.
1. Remove other items, including thesmart key, from the wireless charg-
ing unit. If not, the wireless charg-
ing process may be interrupted.
Place the cellular phone on the
center of the charging pad ( ).
2. The indicator light is orange when the cellular phone is charging. The
indicator light turns green when
phone charging is complete.
3. You can turn ON or OFF the wire- less charging function in the user
settings mode on the instrument
cluster. For further information,
refer to the "LCD Display Modes"
in this chapter. If your cellular phone is not charging:
- Slightly change the position of the
cellular phone on the charging
pad.
- Make sure the indicator light is orange.
The indicator light will blink orange for
10 seconds if there is a malfunction in
the wireless charging system.
In this case, temporarily stop the
charging process, and re-attempt to
charge your cellular phone again.
The system warns you with a mes-
sage on the LCD display if the cellular
phone is still on the wireless charging
unit after the engine is turned OFF
and the front door is opened.
Information
For some manufacturers' cellular
phones, the system may not warn you
even though the cellular phone is left
on the wireless charging unit. This is
due to the particular characteristic of
the cellular phone and not a malfunc-
tion of the wireless charging.
i
OAD048575L
Page 230 of 535
3-146
Convenient features of your vehicle
The wireless cellular phone charging system may not sup-
port certain cellular phones,
which are not verified for the Qi
specification ( ).
When placing your cellular phone on the charging mat,
position the phone in the middle
of the mat for optimal charging
performance. If your cell phone
is off to the side, the charging
rate may be less and in some
cases the cell phone may experi-
ence higher heat conduction.
In some cases, the wireless charging may stop temporarily
when the Remote Key or Smart
Key is used, either when starting
the vehicle or locking/unlocking
the doors, etc.
When charging certain cellular phones, the charging indicator
may not change to green when
the cell phone is fully charged.
The wireless charging process may temporarily stop, when tem-
perature abnormally increases/
decreases inside the wireless cel-
lular phone charging system. Stop
the charging cellular phone and
wait until temperature falls to a
certain level.
The wireless charging process may temporarily stop when there
is any metallic item, such as a
coin, between the wireless cellular
phone charging system and the
cellular phone.
When charging some cellular phones with a self-protection fea-
ture, the wireless charging speed
may decrease and the wireless
charging may stop.
If the cellular phone has a thick cover, the wireless charging may
not be possible.
If the cell phone is not completely contacting the charging pad, wire-
less charging may not operate
properly.
Some magnetic items like credit cards, phone cards or rail tickets
may be damaged if left with the
cellular phone during the charging
process. When any cellular phone without a
wireless charging function or a
metallic object is placed on the
charging pad, a small noise may
sound. This small sound is due to
the vehicle discerning compatibil-
ity of the object placed on the
charging pad. It does not affect
your vehicle or the cellular phone
in any way.
Information
If the ignition switch is in the LOCK/
OFF position, the charging also stops.
Information
This device complies with part 15 of
the FCC Rules.
Operation is subject to the following
two conditions:
1. This device may not cause harmful interference, and
2. This device must accept any inter- ference received, including inter-
ference that may cause undesired
operation.
i
i
NOTICE
Page 233 of 535
Multimedia System
Multimedia System.................................................4-2
AUX, USB and iPod®port ...............................................4-2
Antenna ........................................................................\
.......4-2
Steering Wheel Audio Controls ......................................4-3
Bluetooth®Wireless Technology Hands-Free ...........4-4
Audio (Display Audio) / Video /
Navigation System (AVN).................................................4-4
4