lamp Hyundai Elantra 2020 Owner's Guide
[x] Cancel search | Manufacturer: HYUNDAI, Model Year: 2020, Model line: Elantra, Model: Hyundai Elantra 2020Pages: 535, PDF Size: 16.8 MB
Page 424 of 535
7
Tire Maintenance ............................................................7-44
Tire Sidewall Labeling ....................................................7-44
Tire Terminology and Definitions................................7-48
All Season Tires ...............................................................7-51
Summer Tires ...................................................................7-51
Snow Tires ........................................................................\
7-51
Radial-Ply Tires ...............................................................7-51
Low Aspect Ratio Tires..................................................7-52
Fuses ......................................................................7-\
53
Instrument Panel Fuse Replacement..........................7-54
Engine Compartment Panel Fuse Replacement.......7-56
Fuse/Relay Panel Description ......................................7-58
Light Bulbs ............................................................7-64
Headlamp, Parking Lamp, Turn Signal Lamp and
Side Marker ......................................................................7-\
64
Side Repeater Lamp Replacement ..............................7-68
Rear Combination Light Bulb Replacement ..............7-69
High Mounted Stop Light Replacement ....................7-72
License Plate Light Bulb Replacement ......................7-73
Interior Light Bulb Replacement .................................7-74
Appearance Care..................................................7-75
Exterior Care ....................................................................7-75\
Interior Care .....................................................................7-8\
0
Emission Control System ....................................7-83
Crankcase Emission Control System ..........................7-83
Evaporative Emission Control System Including
Onboard Refueling Vapor Recovery (ORVR)............7-83
Exhaust Emission Control System ..............................7-84
California Perchlorate Notice.............................7-87
Page 429 of 535
At least twice a year:(i.e., every Spring and Fall)
Check radiator, heater and air con-
ditioning hoses for leaks or dam-
age.
Check windshield washer spray and wiper operation. Clean wiper
blades with clean cloth dampened
with washer fluid.
Check headlamp alignment.
Check muffler, exhaust pipes, shields and clamps.
Check the seat belts for wear and function.
At least once a year:
Clean body and door drain holes.
Lubricate door hinges and hoodhinges.
Lubricate door and hood locks and latches.
Lubricate door rubber weather strips.
Lubricate door checker.
Check the air conditioning system.
Inspect and lubricate transmission linkage and controls.
Clean the battery and terminals.
Check the brake fluid level. Follow Normal Maintenance
Schedule if the vehicle is usually
operated where none of the following
conditions apply. If any of the follow-
ing conditions apply, you must follow
the Maintenance Under Severe
Usage Conditions.
Repeated short distance driving.
Driving in dusty conditions or
sandy areas.
Extensive use of brakes.
Driving in areas where salt or other corrosive materials are used.
Driving on rough or muddy roads.
Driving in mountainous areas.
Extended periods of idling or low speed operation.
Driving for a prolonged period in cold temperatures and/or extreme-
ly humid climates.
More than 50% driving in heavy city traffic during hot weather
above 90°F (32°C).
For additional information or assis-
tance see your authorized HYUNDAI
dealer.
7-7
7
Maintenance
S S C
C H
H E
ED
D U
U L
LE
E D
D
M
M A
AI
IN
N T
TE
EN
N A
AN
N C
CE
E
S
S E
E R
R V
V I
IC
C E
E S
S
Page 440 of 535
7-18
Maintenance
E
EX
X P
PL
LA
A N
N A
AT
TI
IO
O N
N
O
O F
F
S
S C
C H
H E
ED
D U
U L
LE
E D
D
M
M A
AI
IN
N T
TE
EN
N A
AN
N C
CE
E
I
IT
T E
EM
M S
S
Engine Oil and Filter
The engine oil and filter should be
changed at the intervals specified in
the maintenance schedule. If the car
is being driven in severe conditions,
more frequent oil and filter changes
are required.
Drive Belts
Inspect all drive belts for evidence of
cuts, cracks, excessive wear or oil
saturation and replace if necessary.
Drive belts should be checked peri-
odically for proper tension and
adjusted as necessary.
Fuel Filter
A clogged-up fuel filter may limit the
vehicle driving speed, damage the
emission system, and cause the
hard starting. When a considerable
amount of foreign substances are
accumulated in the fuel tank, the fuel
filter should be replaced. Upon installing a new fuel filter, oper-
ate the engine for several minutes,
and check the connections for any
leakages. Fuel filters should be
installed by an authorized HYUNDAI
dealer.
Fuel Lines, Fuel Hoses and
Connections
Check the fuel lines, fuel hoses and
connections for leakage and dam-
age. Have an authorized HYUNDAI
dealer replace any damaged or leak-
ing parts immediately.
Vapor Hose and Fuel Filler
Cap
The vapor hose and fuel filler cap
should be inspected at those inter-
vals specified in the maintenance
schedule. Make sure a new vapor
hose or fuel filler cap is correctly
replaced.
Vacuum Crankcase Ventilation
Hoses (if equipped)
Inspect the surface of hoses for evi-
dence of heat and/or mechanical
damage. Hard and brittle rubber,
cracking, tears, cuts, abrasions, and
excessive swelling indicate deterio-
ration. Particular attention should be
paid to examine those hose surfaces
nearest to high heat sources, such
as the exhaust manifold.
Inspect the hose routing to assure
that the hoses do not come in con-
tact with any heat source, sharp
edges or moving component which
might cause heat damage or
mechanical wear.
Inspect all hose connections, such
as clamps and couplings, to make
sure they are secure, and that no
leaks are present. Hoses should be
replaced immediately if there is any
evidence of deterioration or damage.
Page 442 of 535
7-20
Maintenance
Dual Clutch Transmission
Fluid (if equipped)
Inspect the dual clutch transmission
fluid according to the maintenance
schedule.
Manual Transmission Fluid
(if equipped)
Inspect the manual transmission
fluid according to the maintenance
schedule.
Brake Hoses and Lines
Visually check for proper installation,
chafing, cracks, deterioration and
any leakage. Replace any deteriorat-
ed or damaged parts immediately.
Brake/Clutch Fluid
Check brake/clutch fluid level in the
brake/clutch fluid reservoir. The level
should be between the MIN and the
MAX marks on the side of the reser-
voir. Use only hydraulic brake/clutch
fluid conforming to DOT 3 or DOT 4
specification.
Parking Brake
Inspect the parking brake system
including the parking brake pedal
and cables.
Brake Discs, Pads, Calipers
and Rotors
Check the pads for excessive wear,
discs for run out and wear, and
calipers for fluid leakage.
Exhaust Pipe and Muffler
Visually inspect the exhaust pipes,
muffler and hangers for cracks, dete-
rioration, or damage. Start the
engine and listen carefully for any
exhaust gas leakage. Tighten con-
nections or replace parts as neces-
sary.
Suspension Mounting Bolts
Check the suspension connections
for looseness or damage. Retighten
to the specified torque.
Steering Gear Box, Linkage &
Boots/Lower Arm Ball Joint
With the vehicle stopped and the
engine off, check for excessive free-
play in the steering wheel. Check the
linkage for bends or damage. Check
the dust boots and ball joints for
deterioration, cracks, or damage.
Replace any damaged parts.
Drive Shafts and Boots
Check the drive shafts, boots and
clamps for cracks, deterioration, or
damage. Replace any damaged
parts and, if necessary, repack the
grease.
Air Conditioning Refrigerant
Check the air conditioning lines and
connections for leakage and dam-
age.
Page 452 of 535
7-30
Maintenance
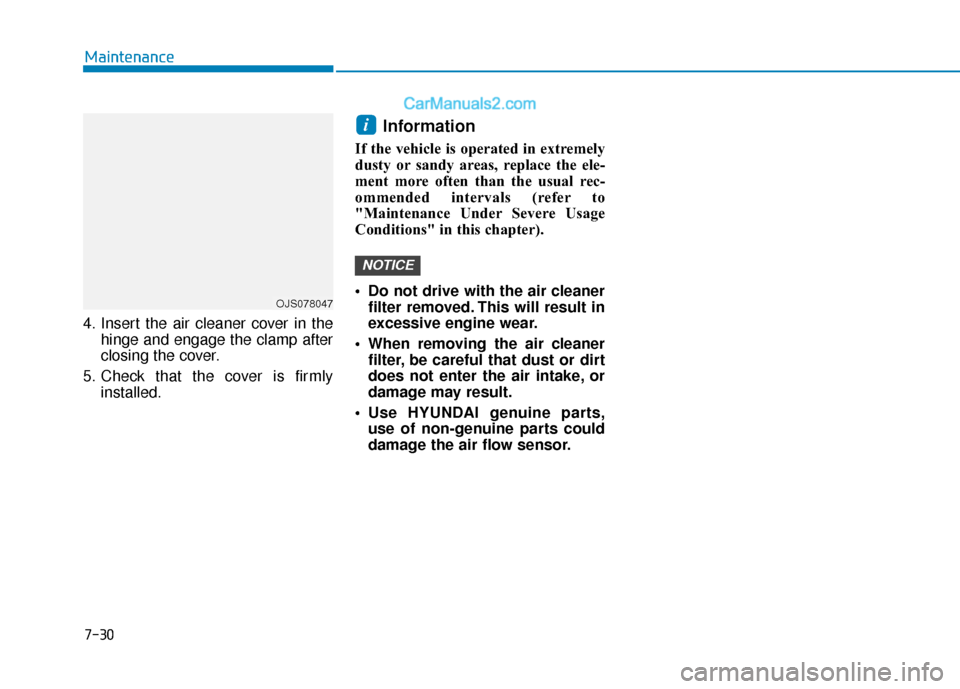
4. Insert the air cleaner cover in the hinge and engage the clamp after
closing the cover.
5. Check that the cover is firmly installed.
Information
If the vehicle is operated in extremely
dusty or sandy areas, replace the ele-
ment more often than the usual rec-
ommended intervals (refer to
"Maintenance Under Severe Usage
Conditions" in this chapter).
Do not drive with the air cleanerfilter removed. This will result in
excessive engine wear.
When removing the air cleaner filter, be careful that dust or dirt
does not enter the air intake, or
damage may result.
Use HYUNDAI genuine parts, use of non-genuine parts could
damage the air flow sensor.
NOTICE
i
OJS078047
Page 459 of 535
7-37
7
Maintenance
By jump starting
After a jump start from a good bat-
tery, drive the vehicle for 20-30 min-
utes before it is shutoff. The vehicle
may not restart if you shut it off
before the battery had a chance to
adequately recharge. See "Jump
Starting" in chapter 6 for more infor-
mation on jump starting procedures.
Information
An inappropriately disposedbattery can be harmful to
the environment and human
health.
Dispose the battery according to your
local law(s) or regulation.
Reset Features
The following items may need to be
reset after the battery has been dis-
charged or the battery has been dis-
connected.
Power Windows
Trip Computer
Climate Control System
Clock
Audio System
Sunroof
i
Watch the battery during
charging, and stop or reduce
the charging rate if the battery
cells begin boiling violently.
The negative battery cable
must be removed first and
installed last when the battery
is disconnected. Disconnect
the battery charger in the fol-
lowing order:
(1) Turn off the battery charg- er main switch.
(2) Unhook the negative
clamp from the negative
battery terminal.
(3) Unhook the positive clamp from the positive battery
terminal.
Always use a genuine
HYUNDAI approved battery
when you replace the battery.
Page 476 of 535
7-54
Maintenance
Instrument Panel Fuse
Replacement
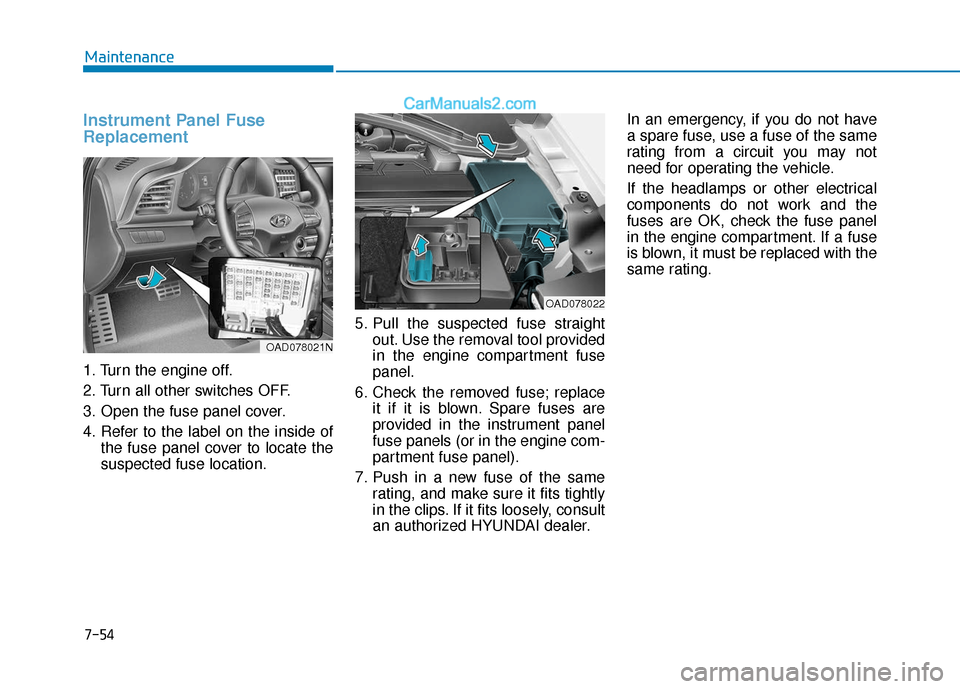
1. Turn the engine off.
2. Turn all other switches OFF.
3. Open the fuse panel cover.
4. Refer to the label on the inside ofthe fuse panel cover to locate the
suspected fuse location. 5. Pull the suspected fuse straight
out. Use the removal tool provided
in the engine compartment fuse
panel.
6. Check the removed fuse; replace it if it is blown. Spare fuses are
provided in the instrument panel
fuse panels (or in the engine com-
partment fuse panel).
7. Push in a new fuse of the same rating, and make sure it fits tightly
in the clips. If it fits loosely, consult
an authorized HYUNDAI dealer. In an emergency, if you do not have
a spare fuse, use a fuse of the same
rating from a circuit you may not
need for operating the vehicle.
If the headlamps or other electrical
components do not work and the
fuses are OK, check the fuse panel
in the engine compartment. If a fuse
is blown, it must be replaced with the
same rating.
OAD078022
OAD078021N
Page 481 of 535
7-59
7
Maintenance
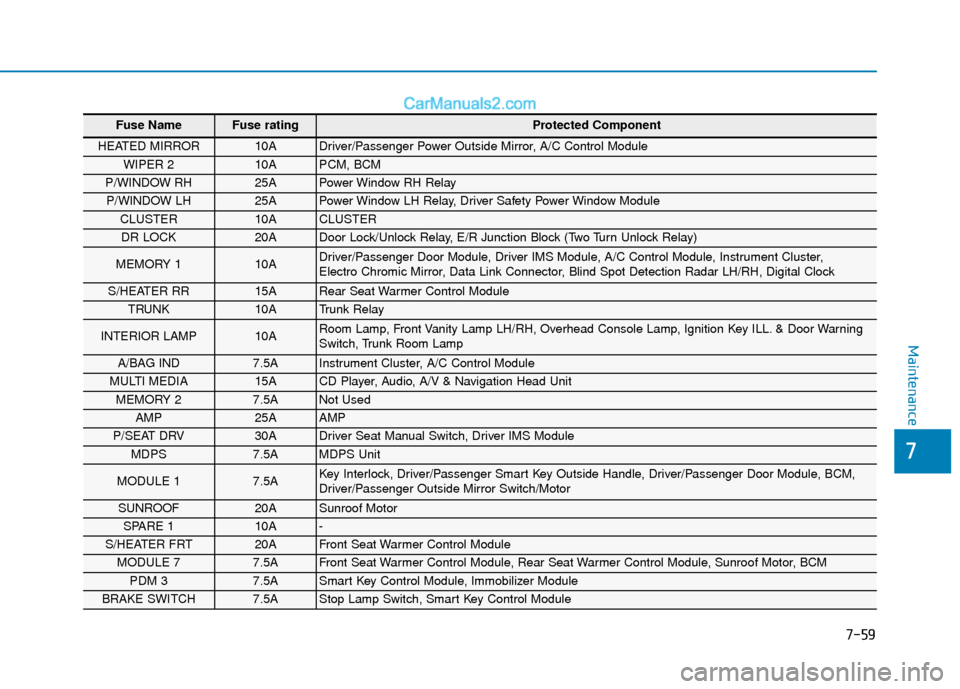
Fuse Name Fuse rating Protected Component
HEATED MIRROR 10A Driver/Passenger Power Outside Mirror, A/C Control Module
WIPER 2 10A PCM, BCM
P/WINDOW RH 25A Power Window RH Relay
P/WINDOW LH 25A Power Window LH Relay, Driver Safety Power Window Module
CLUSTER 10A CLUSTER
DR LOCK 20A Door Lock/Unlock Relay, E/R Junction Block (Two Turn Unlock Relay)
MEMORY 1 10A Driver/Passenger Door Module, Driver IMS Module, A/C Control Module, Instrument Cluster,
Electro Chromic Mirror, Data Link Connector, Blind Spot Detection Radar LH/RH, Digital Clock
S/HEATER RR 15A Rear Seat Warmer Control Module
TRUNK 10A Trunk Relay
INTERIOR LAMP 10A Room Lamp, Front Vanity Lamp LH/RH, Overhead Console Lamp, Ignition Key ILL. & Door Warning
Switch, Trunk Room Lamp
A/BAG IND 7.5A Instrument Cluster, A/C Control Module
MULTI MEDIA 15A CD Player, Audio, A/V & Navigation Head Unit
MEMORY 2 7.5A Not Used
AMP 25A AMP
P/SEAT DRV 30A Driver Seat Manual Switch, Driver IMS Module
MDPS 7.5A MDPS Unit
MODULE 1 7.5A Key Interlock, Driver/Passenger Smart Key Outside Handle, Driver/Passenger Door Module, BCM,
Driver/Passenger Outside Mirror Switch/Motor
SUNROOF 20A Sunroof Motor
SPARE 1 10A -
S/HEATER FRT 20A Front Seat Warmer Control Module
MODULE 7 7.5A Front Seat Warmer Control Module, Rear Seat Warmer Control Module, Sunroof Motor, BCM
PDM 3 7.5A Smart Key Control Module, Immobilizer Module
BRAKE SWITCH 7.5A Stop Lamp Switch, Smart Key Control Module
Page 482 of 535
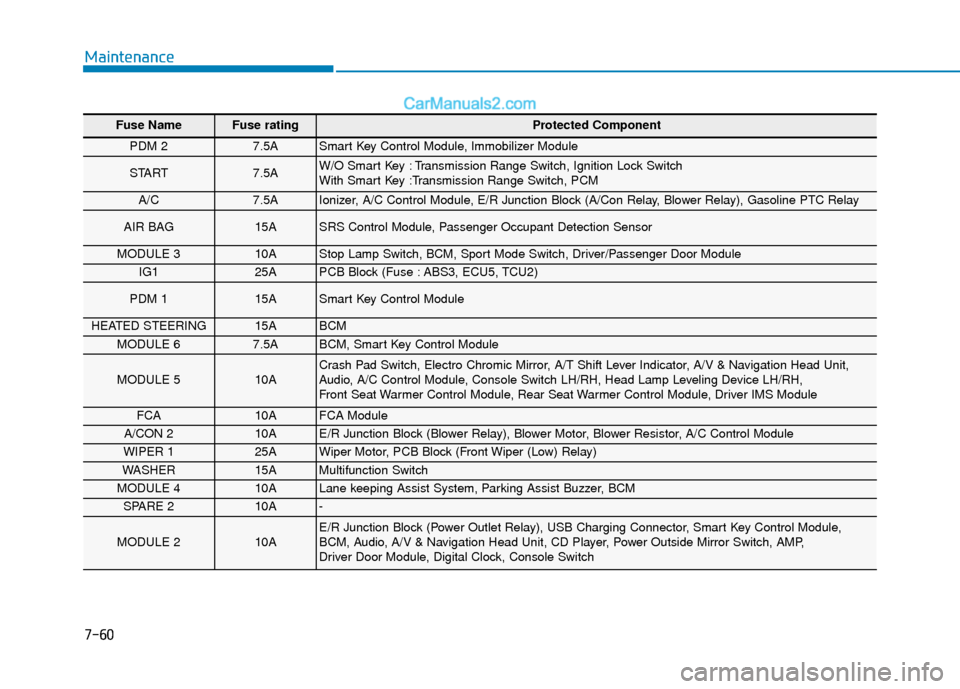
7-60
Maintenance
Fuse Name Fuse rating Protected Component
PDM 2 7.5A Smart Key Control Module, Immobilizer Module
START 7.5A W/O Smart Key : Transmission Range Switch, Ignition Lock Switch
With Smart Key :Transmission Range Switch, PCM
A/C7.5A Ionizer, A/C Control Module, E/R Junction Block (A/Con Relay, Blower Relay), Gasoline PTC Relay
AIR BAG 15A SRS Control Module, Passenger Occupant Detection Sensor
MODULE 3 10A Stop Lamp Switch, BCM, Sport Mode Switch, Driver/Passenger Door Module
IG1 25A PCB Block (Fuse : ABS3, ECU5, TCU2)
PDM 1 15A Smart Key Control Module
HEATED STEERING 15A BCM
MODULE 6 7.5A BCM, Smart Key Control Module
MODULE 5 10A Crash Pad Switch, Electro Chromic Mirror, A/T Shift Lever Indicator, A/V & Navigation Head Unit,
Audio, A/C Control Module, Console Switch LH/RH, Head Lamp Leveling Device LH/RH,
Front Seat Warmer Control Module, Rear Seat Warmer Control Module, Driver IMS Module
FCA10A FCA Module
A/CON 2 10A E/R Junction Block (Blower Relay), Blower Motor, Blower Resistor, A/C Control Module
WIPER 1 25A Wiper Motor, PCB Block (Front Wiper (Low) Relay)
WASHER 15A Multifunction Switch
MODULE 4 10A Lane keeping Assist System, Parking Assist Buzzer, BCM
SPARE 2 10A -
MODULE 2 10A E/R Junction Block (Power Outlet Relay), USB Charging Connector, Smart Key Control Module,
BCM, Audio, A/V & Navigation Head Unit, CD Player, Power Outside Mirror Switch, AMP,
Driver Door Module, Digital Clock, Console Switch
Page 484 of 535
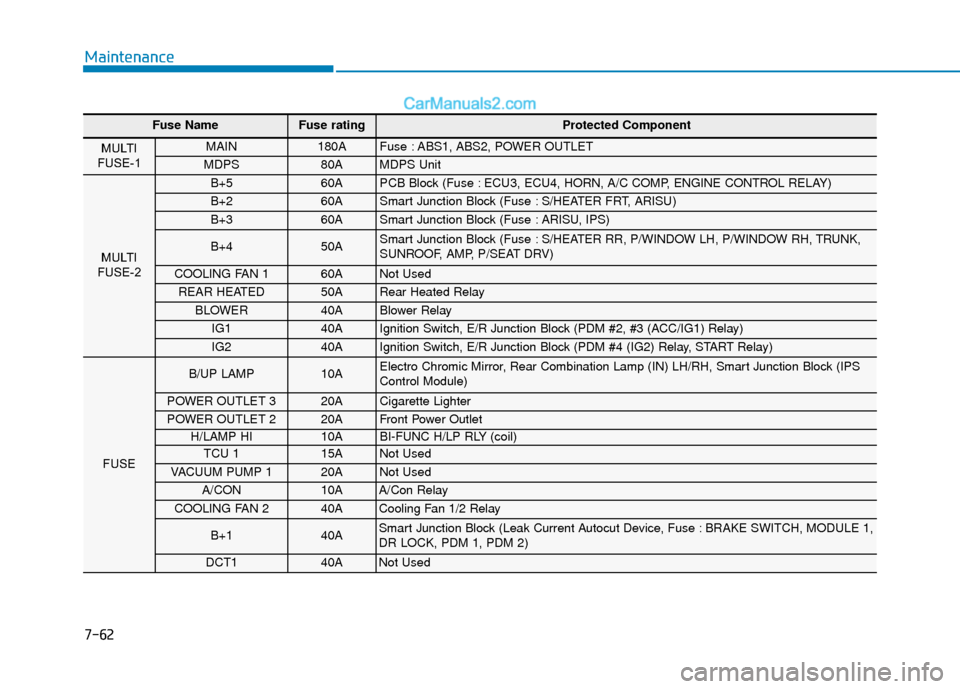
7-62
Maintenance
Fuse NameFuse rating Protected Component
MULTI
FUSE-1 MAIN 180A Fuse : ABS1, ABS2, POWER OUTLET
MDPS 80A MDPS Unit
MULTI
FUSE-2
B+5 60A PCB Block (Fuse : ECU3, ECU4, HORN, A/C COMP, ENGINE CONTROL RELAY)
B+2 60A Smart Junction Block (Fuse : S/HEATER FRT, ARISU)
B+3 60A Smart Junction Block (Fuse : ARISU, IPS)
B+4 50A Smart Junction Block (Fuse : S/HEATER RR, P/WINDOW LH, P/WINDOW RH, TRUNK,
SUNROOF, AMP, P/SEAT DRV)
COOLING FAN 1 60A Not Used
REAR HEATED 50A Rear Heated Relay
BLOWER 40A Blower Relay
IG1 40A Ignition Switch, E/R Junction Block (PDM #2, #3 (ACC/IG1) Relay)
IG2 40A Ignition Switch, E/R Junction Block (PDM #4 (IG2) Relay, START Relay)
FUSE
B/UP LAMP 10A Electro Chromic Mirror, Rear Combination Lamp (IN) LH/RH, Smart Junction Block (IPS
Control Module)
POWER OUTLET 3 20A Cigarette Lighter
POWER OUTLET 2 20A Front Power Outlet
H/LAMP HI 10A BI-FUNC H/LP RLY (coil)
TCU 1 15A Not Used
VACUUM PUMP 1 20A Not Used
A/CON 10A A/Con Relay
COOLING FAN 2 40A Cooling Fan 1/2 Relay
B+1 40A Smart Junction Block (Leak Current Autocut Device, Fuse : BRAKE SWITCH, MODULE 1,
DR LOCK, PDM 1, PDM 2)
DCT1 40A Not Used