length HYUNDAI ELANTRA 2021 Owners Manual
[x] Cancel search | Manufacturer: HYUNDAI, Model Year: 2021, Model line: ELANTRA, Model: HYUNDAI ELANTRA 2021Pages: 570, PDF Size: 52.21 MB
Page 22 of 570
02
2-7
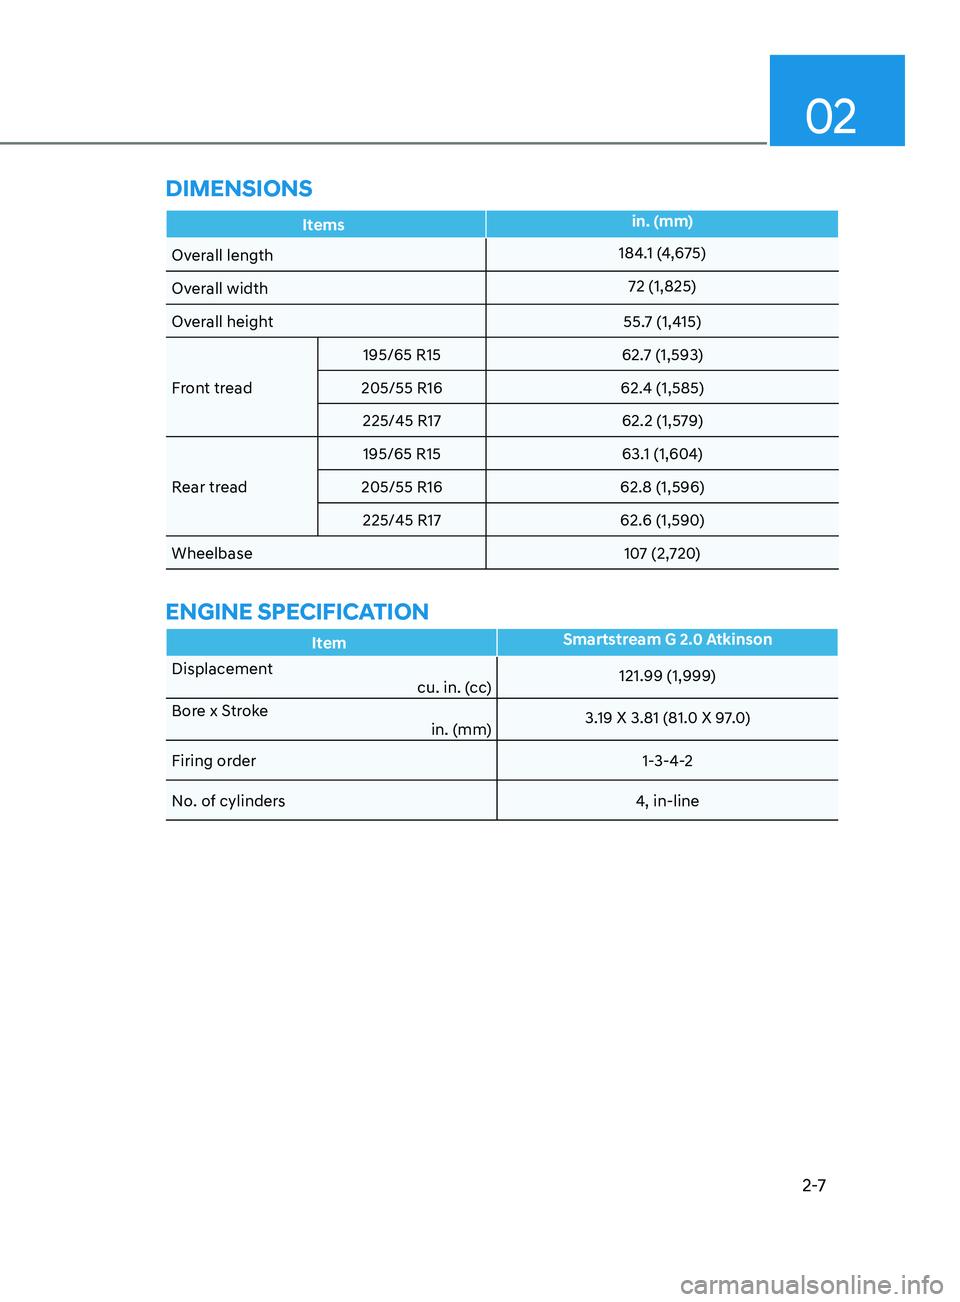
DimEnsions
Itemsin. (mm)
Overall length 184.1 (4,675)
Overall width 72 (1,825)
Overall height 55.7 (1,415)
Front tread 195/65 R15
62.7 (1,593)
205/55 R16 62.4 (1,585)
225/45 R17 62.2 (1,579)
Rear tread 195/65 R15
63.1 (1,604)
205/55 R16 62.8 (1,596)
225/45 R17 62.6 (1,590)
Wheelbase 107 (2,720)
EnginE sPECifiCation
ItemSmartstream G 2.0 Atkinson
Displacement cu. in. (cc) 121.99 (1,999)
Bore x Stroke in. (mm)3.19 X 3.81 (81.0 X 97.0)
Firing order 1-3-4-2
No. of cylinders 4, in-line
Page 50 of 570
03
3-19
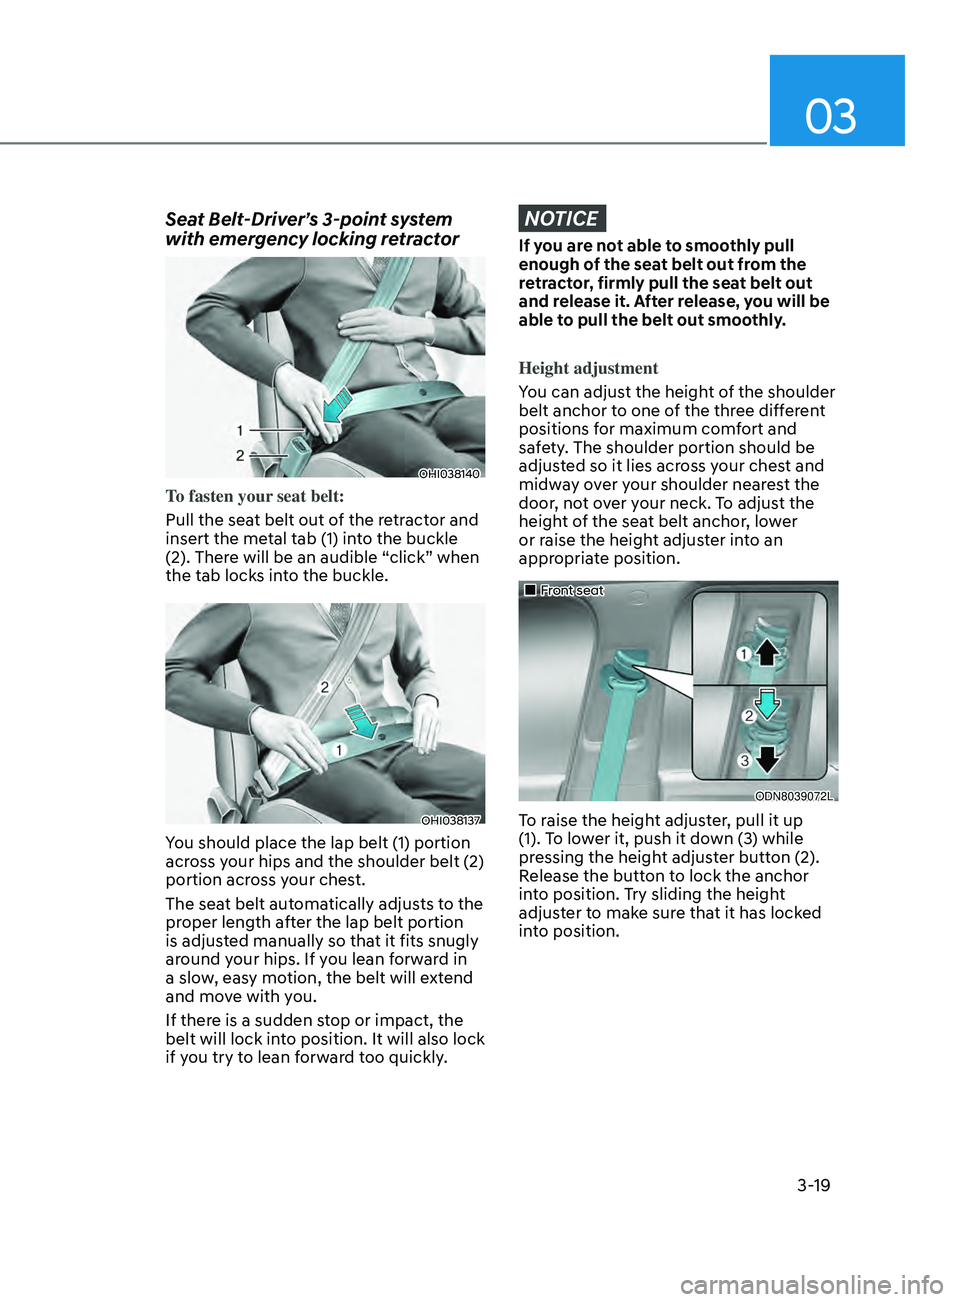
Seat Belt-Driver’s 3-point system
with emergency locking retractor
OHI038140
To fasten your seat belt:
Pull the seat belt out of the retractor and
insert the metal tab (1) into the buckle
(2). There will be an audible “click” when
the tab locks into the buckle.
OHI038137
You should place the lap belt (1) portion
across your hips and the shoulder belt (2)
portion across your chest.
The seat belt automatically adjusts to the
proper length after the lap belt portion
is adjusted manually so that it fits snugly
around your hips. If you lean forward in
a slow, easy motion, the belt will extend
and move with you.
If there is a sudden stop or impact, the
belt will lock into position. It will also lock
if you try to lean forward too quickly.
NOTICE
If you are not able to smoothly pull
enough of the seat belt out from the
retractor, firmly pull the seat belt out
and release it. After release, you will be
able to pull the belt out smoothly.
Height adjustment
You can adjust the height of the shoulder
belt anchor to one of the three different
positions for maximum comfort and
safety. The shoulder portion should be
adjusted so it lies across your chest and
midway over your shoulder nearest the
door, not over your neck. To adjust the
height of the seat belt anchor, lower
or raise the height adjuster into an
appropriate position.
„„Front seat
ODN8039072L
To raise the height adjuster, pull it up
(1). To lower it, push it down (3) while
pressing the height adjuster button (2).
Release the button to lock the anchor
into position. Try sliding the height
adjuster to make sure that it has locked
into position.
Page 51 of 570
3-20
OHI038142
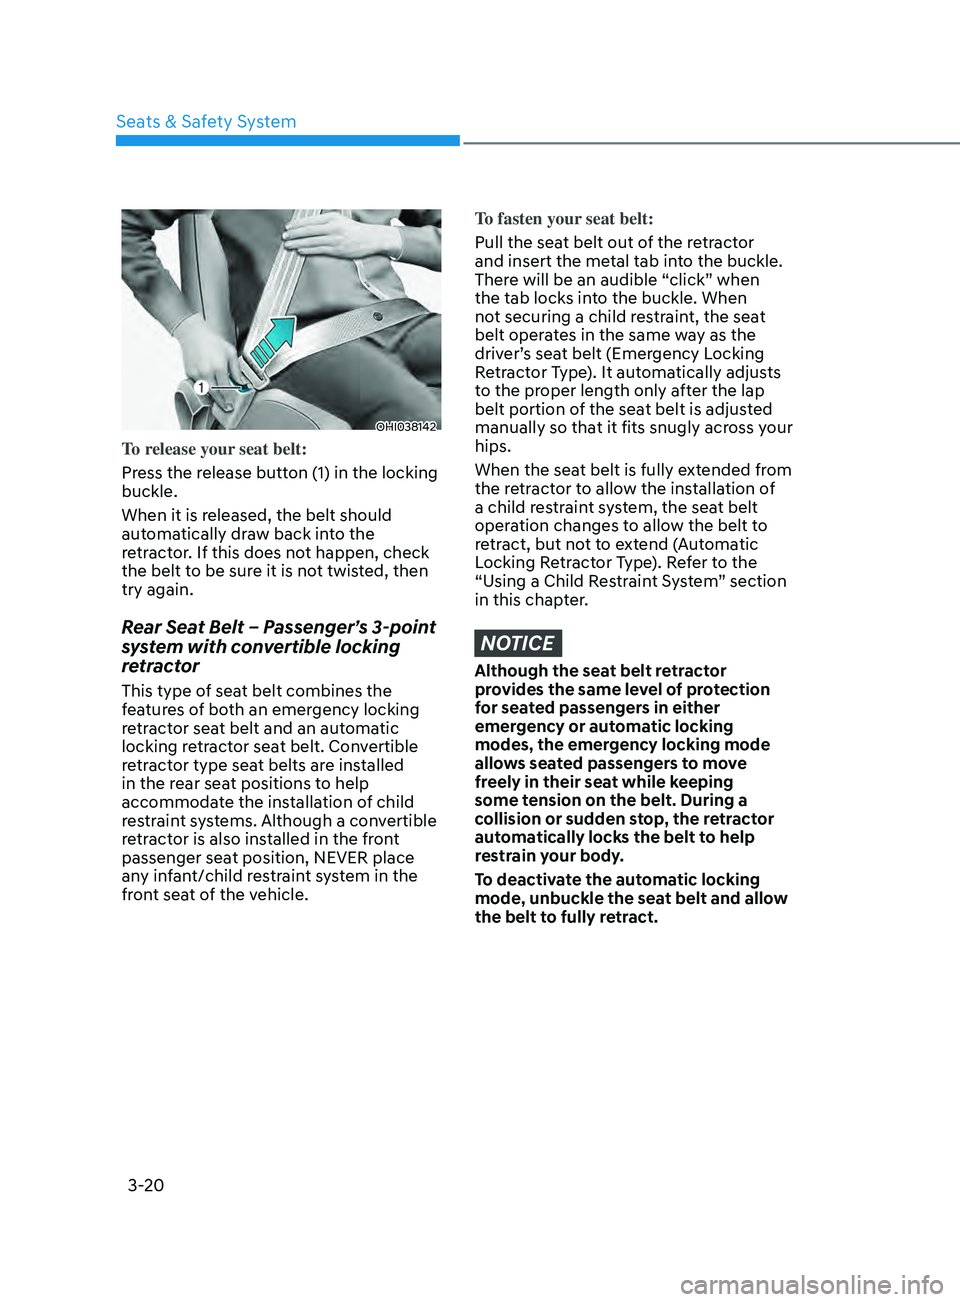
To release your seat belt:
Press the release button (1) in the locking
buckle.
When it is released, the belt should
automatically draw back into the
retractor. If this does not happen, check
the belt to be sure it is not twisted, then
try again.
Rear Seat Belt – Passenger’s 3-point
system with convertible locking
retractor
This type of seat belt combines the
features of both an emergency locking
retractor seat belt and an automatic
locking retractor seat belt. Convertible
retractor type seat belts are installed
in the rear seat positions to help
accommodate the installation of child
restraint systems. Although a convertible
retractor is also installed in the front
passenger seat position, NEVER place
any infant/child restraint system in the
front seat of the vehicle.
To fasten your seat belt:
Pull the seat belt out of the retractor
and insert the metal tab into the buckle.
There will be an audible “click” when
the tab locks into the buckle. When
not securing a child restraint, the seat
belt operates in the same way as the
driver’s seat belt (Emergency Locking
Retractor Type). It automatically adjusts
to the proper length only after the lap
belt portion of the seat belt is adjusted
manually so that it fits snugly across your
hips.
When the seat belt is fully extended from
the retractor to allow the installation of
a child restraint system, the seat belt
operation changes to allow the belt to
retract, but not to extend (Automatic
Locking Retractor Type). Refer to the
“Using a Child Restraint System” section
in this chapter.
NOTICE
Although the seat belt retractor
provides the same level of protection
for seated passengers in either
emergency or automatic locking
modes, the emergency locking mode
allows seated passengers to move
freely in their seat while keeping
some tension on the belt. During a
collision or sudden stop, the retractor
automatically locks the belt to help
restrain your body.
To deactivate the automatic locking
mode, unbuckle the seat belt and allow
the belt to fully retract.
Seats & Safety System
Page 299 of 570
6-40
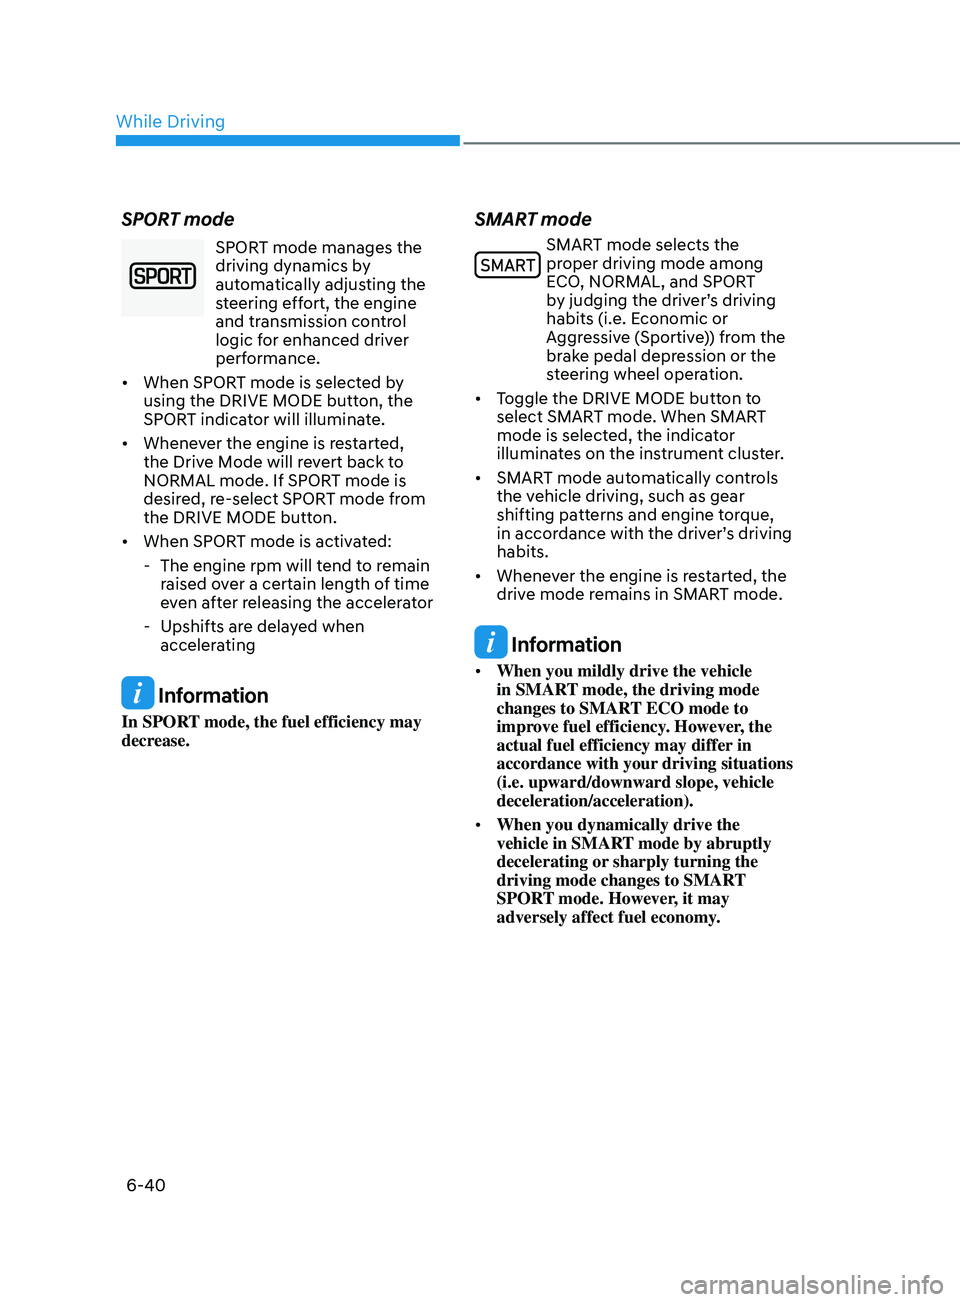
SPORT mode
SPORT mode manages the
driving dynamics by
automatically adjusting the
steering effort, the engine
and transmission control
logic for enhanced driver
performance.
• When SPORT mode is selected by
using the DRIVE MODE button, the
SPORT indicator will illuminate.
• Whenever the engine is restarted,
the Drive Mode will revert back to
NORMAL mode. If SPORT mode is
desired, re-select SPORT mode from
the DRIVE MODE button.
• When SPORT mode is activated:
- The engine rpm will tend t
o remain
raised over a certain length of time
even after releasing the accelerator
- Upshifts are dela
yed when
accelerating
Information
In SPORT mode, the fuel efficiency may
decrease.
SMART mode
SMART mode selects the
proper driving mode among
ECO, NORMAL, and SPORT
by judging the driver’s driving
habits (i.e. Economic or
Aggressive (Sportive)) from the
brake pedal depression or the
steering wheel operation.
• Toggle the DRIVE MODE button to
select SMART mode. When SMART
mode is selected, the indicator
illuminates on the instrument cluster.
• SMART mode automatically controls
the vehicle driving, such as gear
shifting patterns and engine torque,
in accordance with the driver’s driving
habits.
• Whenever the engine is restarted, the
drive mode remains in SMART mode.
Information
• When you mildly drive the vehicle
in SMART mode, the driving mode
changes to SMART ECO mode to
improve fuel efficiency. However, the
actual fuel efficiency may differ in
accordance with your driving situations
(i.e. upward/downward slope, vehicle
deceleration/acceleration).
• When you dynamically drive the
vehicle in SMART mode by abruptly
decelerating or sharply turning the
driving mode changes to SMART
SPORT mode. However, it may
adversely affect fuel economy.
While Driving
Page 454 of 570
07
7-141
WARNING
• Reverse Parking Distance Warning
is a supplemental system. The
operation of the system can be
affected by several factors (including
environmental conditions). It is the
responsibility of the driver to always
check the rear view before and while
parking.
• Your new vehicle warranty does not
cover any accidents or damage to
the vehicle.
• Pay close attention when driving
near objects, pedestrians, and
especially children. Some objects
may not be detected by the
ultrasonic sensors, due to the objects
distance, size or material, all of
which can limit the effectiveness of
the sensor.
Limitations of the system
• Reverse Parking Distance Warning
may not operate normally when:
- Mois
ture is frozen to the sensor
- Sensor is cov
ered with foreign
material, such as snow or water
(The system will operate normally
when such foreign material are
removed.)
- The w
eather is extremely hot or cold
- The sensor or sensor assembly is disassembled
- The surface o
f the sensor is pressed
hard or an impact is applied with a
hard object
- The surface o
f the sensor is
scratched with a sharp object
- The sensors or its surr
ounding
area is directly sprayed with high
pressure washer •
Reverse Parking Distance Warning
may malfunction when:
- Hea
vy rain or water spray is present
- Wa
ter flows on the surface of the
sensor
- Aff
ected
b
y
ano
ther
v
ehicle’s
sensors
- The sensor is cov
ered with snow
- Driving on unev
en road, gravel
roads or bushes
- Objects that gener
ates ultrasonic
waves are near the sensor
- Installing the license pla
te
differently from the original location
- The vehicle bumper heigh
t or
ultrasonic sensor installation has
been modified
• The following objects may not be
detected:
-Sharp or slim objects, such as ropes,
chains or small poles.
- Objects, which tend t
o absorb
sensor frequency, such as clothes,
spongy material or snow.
- Objects smaller than 40 in. (100 cm) in length and narr
ower than 6 in. (14
cm) in diameter.
• Parking Distance Warning Indicators
may be displayed differently from
the actual detected location when
the obstacle is located between the
sensors.
• Parking Distance Warning indicator
may not occur sequentially depending
on vehicle speed or obstacle shape.
• If Reverse Parking Distance Warning
needs repair, we recommend that the
system be inspected by an authorized
HYUNDAI dealer.