trip computer HYUNDAI ELANTRA 2021 Owners Manual
[x] Cancel search | Manufacturer: HYUNDAI, Model Year: 2021, Model line: ELANTRA, Model: HYUNDAI ELANTRA 2021Pages: 570, PDF Size: 52.21 MB
Page 89 of 570
LCD Display (Type A) ........................................................................\
............4-25LCD Display Control ........................................................................\
....................... 4-25
L CD display modes........................................................................\
......................... 4-26Trip computer mode
........................................................................\
.................... 4-
27
Turn By Turn (TBT) mode
........................................................................\
............ 4-
27
Driving Assist mode
........................................................................\
..................... 4-
27
Master warning mode
........................................................................\
................. 4-
28
User settings mode
........................................................................\
........................ 4-
29
Trip Computer........................................................................\
................................. 4-36 Trip modes
........................................................................\
.................................... 4-
36
Average fuel economy/Instant fuel economy
................................................... 4-
36
Accumulated Info display
........................................................................\
............ 4-
37
Drive Info display
........................................................................\
......................... 4-
38
Digital speedometer
........................................................................\
.................... 4-
38
Auto Stop accumulated time
........................................................................\
...... 4-
38
Smart shift
........................................................................\
.................................... 4-
39
LCD display (Type B) ........................................................................\
...........4-40LCD Display Control ........................................................................\
....................... 4-40
View modes ........................................................................\
..................................... 4-4
1
Utility group
........................................................................\
.................................... 4-42
Utility It
ems
........................................................................\
.................................. 4-42
Driving Assis
t group
........................................................................\
..................... 4-43
Na
vigation group
........................................................................\
......................... 4-43
Driving in
fo. group
........................................................................\
....................... 4-43
W
arning message group
........................................................................\
............. 4-44
U
ser settings mode
........................................................................\
........................ 4-44
Cruise Indicator Light ........................................................................\
................... 4-18
SPORT Mode Indicator Light ........................................................................\
........ 4-18
SMART Mode Indicator Light ........................................................................\
....... 4-18
Icy Road Warning Light ........................................................................\
................ 4-19
LCD Display Messages ........................................................................\
.................... 4-19
Shift to P or N to start engine (for smart key system) ........................................ 4-19
Shift to P (for smart key system and intelligent variable transmission) ............ 4-19
Low key battery (for smart key system)...............................................................4-19
Press brake pedal to start engine (for smart key system and intelligent
variable transmission)......................................................................\
.....................4-19
Key not in vehicle (for smart key system) ...........................................................4-20
Key not detected (for smart key system)............................................................ 4-20
Press START button again (for smart key system) ............................................. 4-20
Battery discharging due to external electrical devices ..................................... 4-20
Press START button with key (for smart key system) ........................................ 4-20
Check BRAKE SWITCH fuse (for smart key system and automatic
transmission/intelligent variable transmission)................................................. 4-20
Door, Hood, Trunk Open Indicator....................................................................... 4-21
Sunroof Open ........................................................................\
................................ 4-21
Low Pressure ........................................................................\
................................. 4-21
Lights Mode........................................................................\
................................... 4-21
Wiper ........................................................................\
............................................ 4-22
Heated Steering Wheel turned off ...................................................................... 4-22
Low fuel ........................................................................\
........................................ 4-22
Engine Overheated ........................................................................\
...................... 4-22
Check headlight ........................................................................\
........................... 4-22
Check headlight (Low) ........................................................................\
................ 4-23
Check turn signal ........................................................................\
......................... 4-23
Check brake light ........................................................................\
......................... 4-23
Check daytime running light ........................................................................\
....... 4-23
Check high mounted stop lamp ........................................................................\
. 4-23
Check headlight LED ........................................................................\
................... 4-23
Check Forward Collision-Avoidance Assist system ........................................... 4-24
Check Lane Keeping Assist system .................................................................... 4-24
Check Blind-Spot Collision Warning system...................................................... 4-24
Check Driver Attention Warning system ............................................................ 4-24
Check High Beam Assist system ........................................................................\
. 4-24
Check Smart Cruise Control system ................................................................... 4-24
4. Instrument Cluster
4
Page 90 of 570
4-4
Instrument Cluster
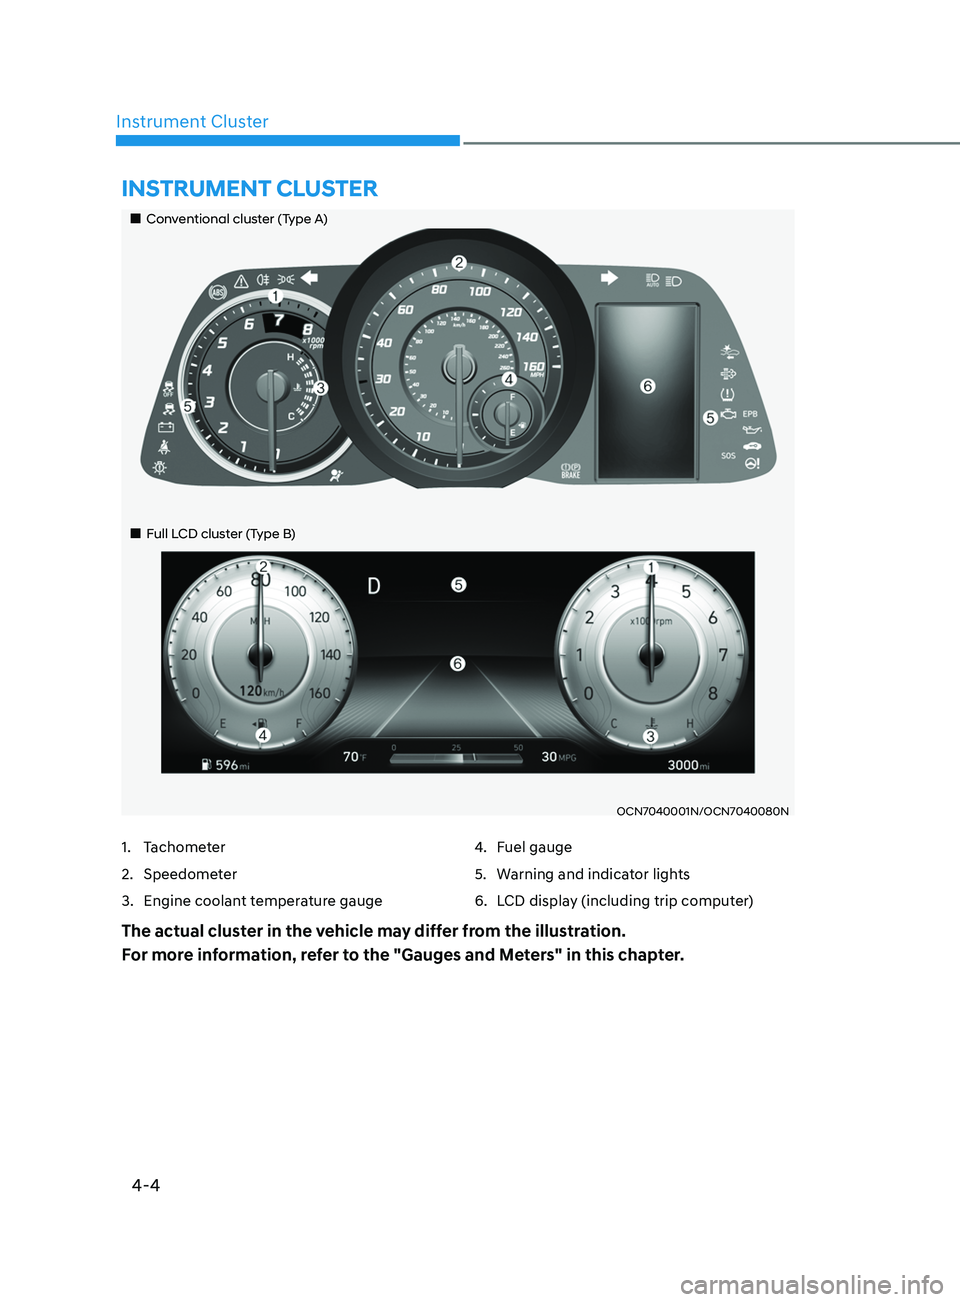
OCN7040001N/OCN7040080N
Instrument Cluster
1. Tachometer
2.
Speedomet
er
3.
Engine coolan
t temperature gauge 4. Fuel gauge
5.
Warning and indica
tor lights
6.
LCD displa
y (including trip computer)
The actual cluster in the vehicle may differ from the illustration.
For more information, refer to the "Gauges and Meters" in this chapter.
„„Conventional cluster (Type A)
„
„Full LCD cluster (Type B)
Page 94 of 570
Instrument Cluster
4-8
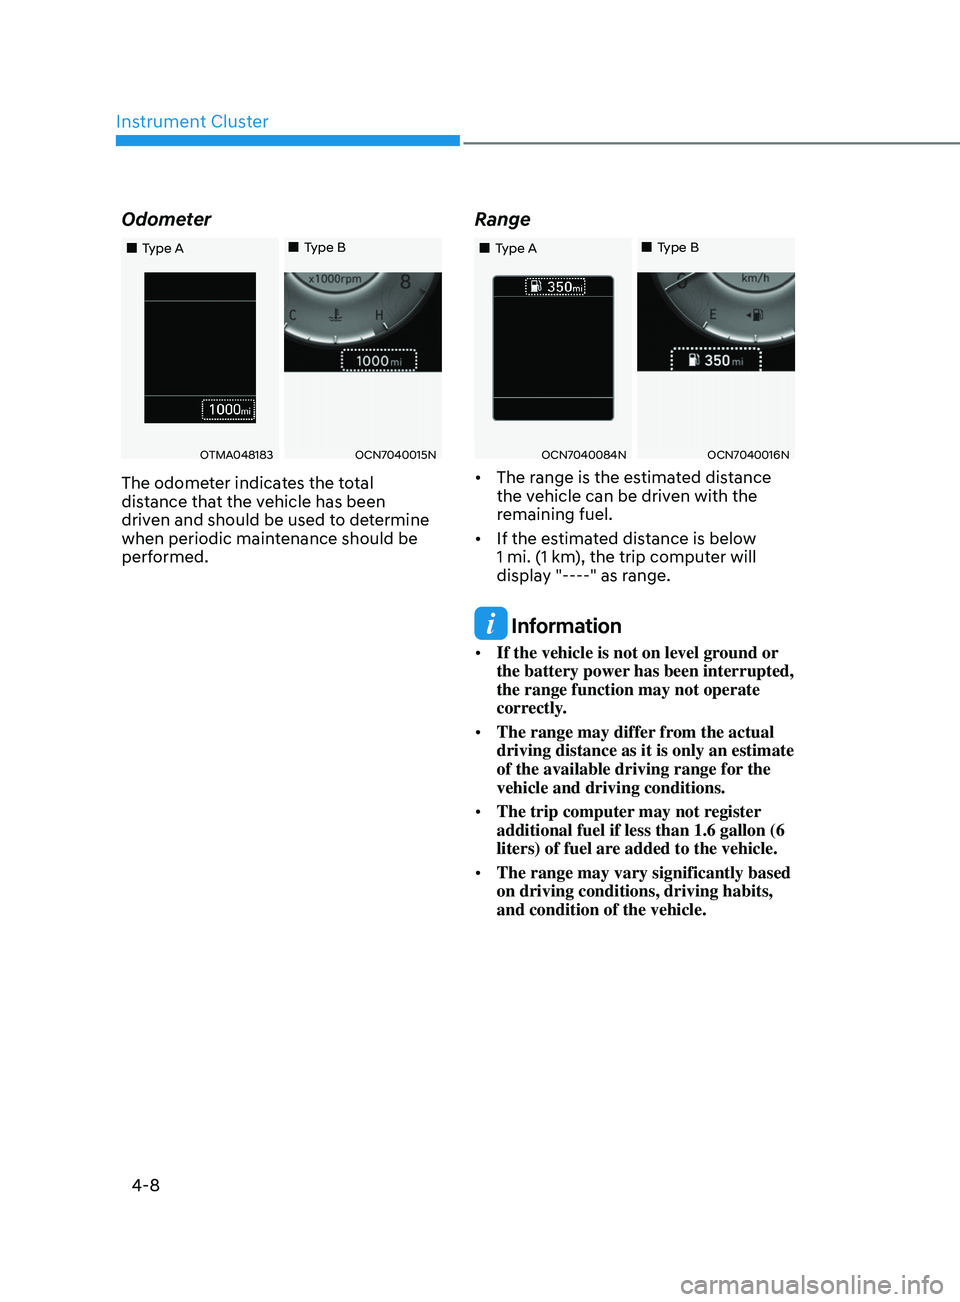
Odometer
OTMA048183OCN7040015N
„„Type A„„Type B
The odometer indicates the total
distance that the vehicle has been
driven and should be used to determine
when periodic maintenance should be
performed.
Range
OCN7040084NOCN7040016N
„„Type A„„Type B
•
The range is the estimated distance
the vehicle can be driven with the
remaining fuel.
• If the estimated distance is below
1 mi. (1 km), the trip computer will
display "----" as range.
Information
• If the vehicle is not on level ground or
the battery power has been interrupted,
the range function may not operate
correctly.
• The range may differ from the actual
driving distance as it is only an estimate
of the available driving range for the
vehicle and driving conditions.
• The trip computer may not register
additional fuel if less than 1.6 gallon (6
liters) of fuel are added to the vehicle.
• The range may vary significantly based
on driving conditions, driving habits,
and condition of the vehicle.
Page 112 of 570
Instrument Cluster4-26
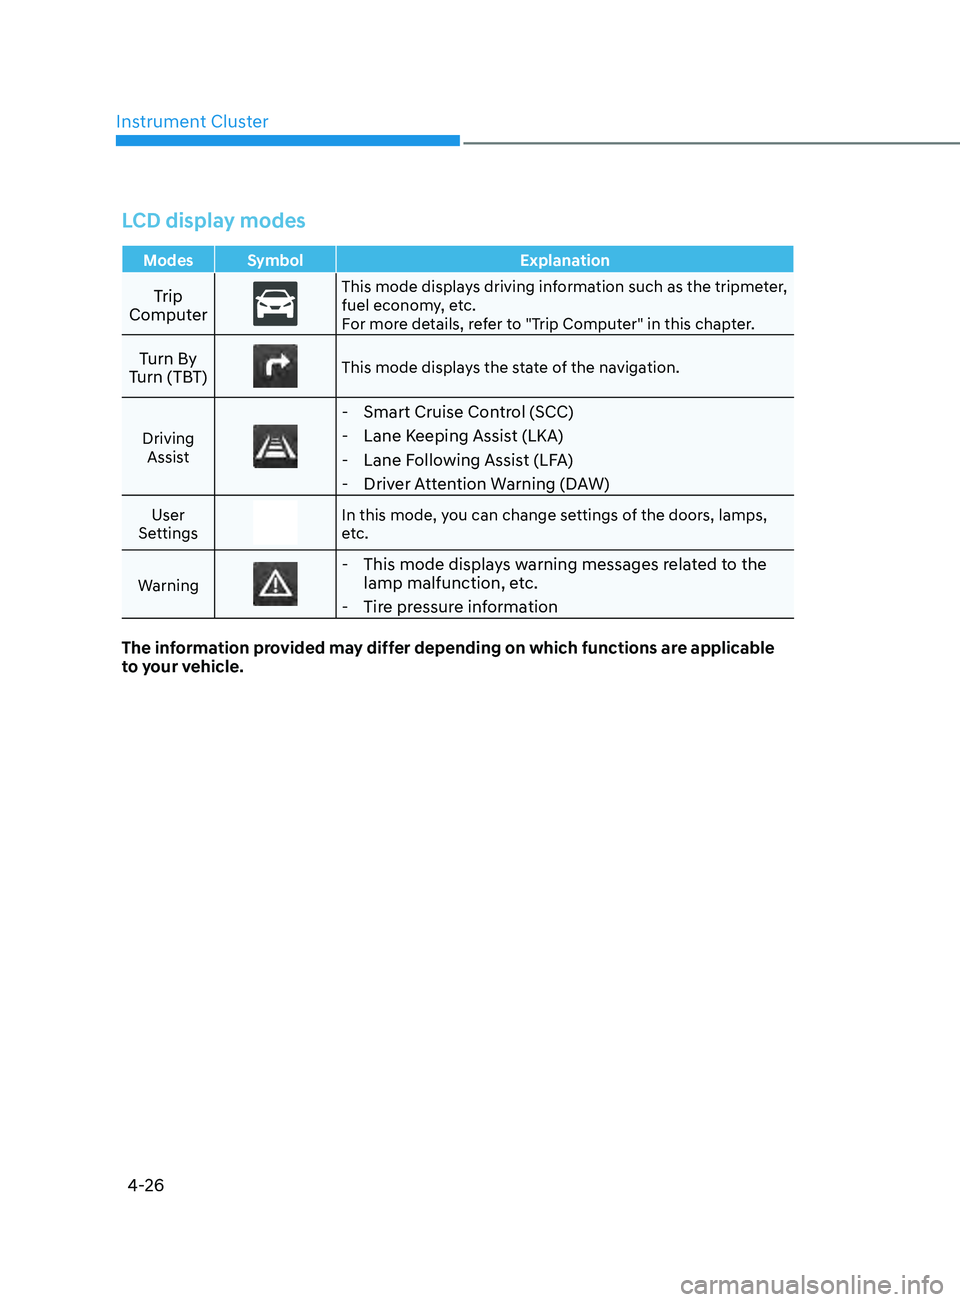
LCD display modes
Modes Symbol Explanation
Trip
ComputerThis mode displays driving information such as the tripmeter,
fuel economy, etc.
For more details, refer to "Trip Computer" in this chapter.
Turn By
Turn (TBT)This mode displays the state of the navigation.
Driving Assist
- Smart Cruise Control (SCC)
- Lane Keeping Assist (LKA)
- Lane Following Assist (LFA)
- Driver Attention Warning (DAW)
User
SettingsIn this mode, you can change settings of the doors, lamps,
etc.
Warning
- This mode displays warning messages related to the lamp malfunction, etc.
- Tire pressure information
The information provided may differ depending on which functions are applicable
to your vehicle.
Page 113 of 570
04
4-27
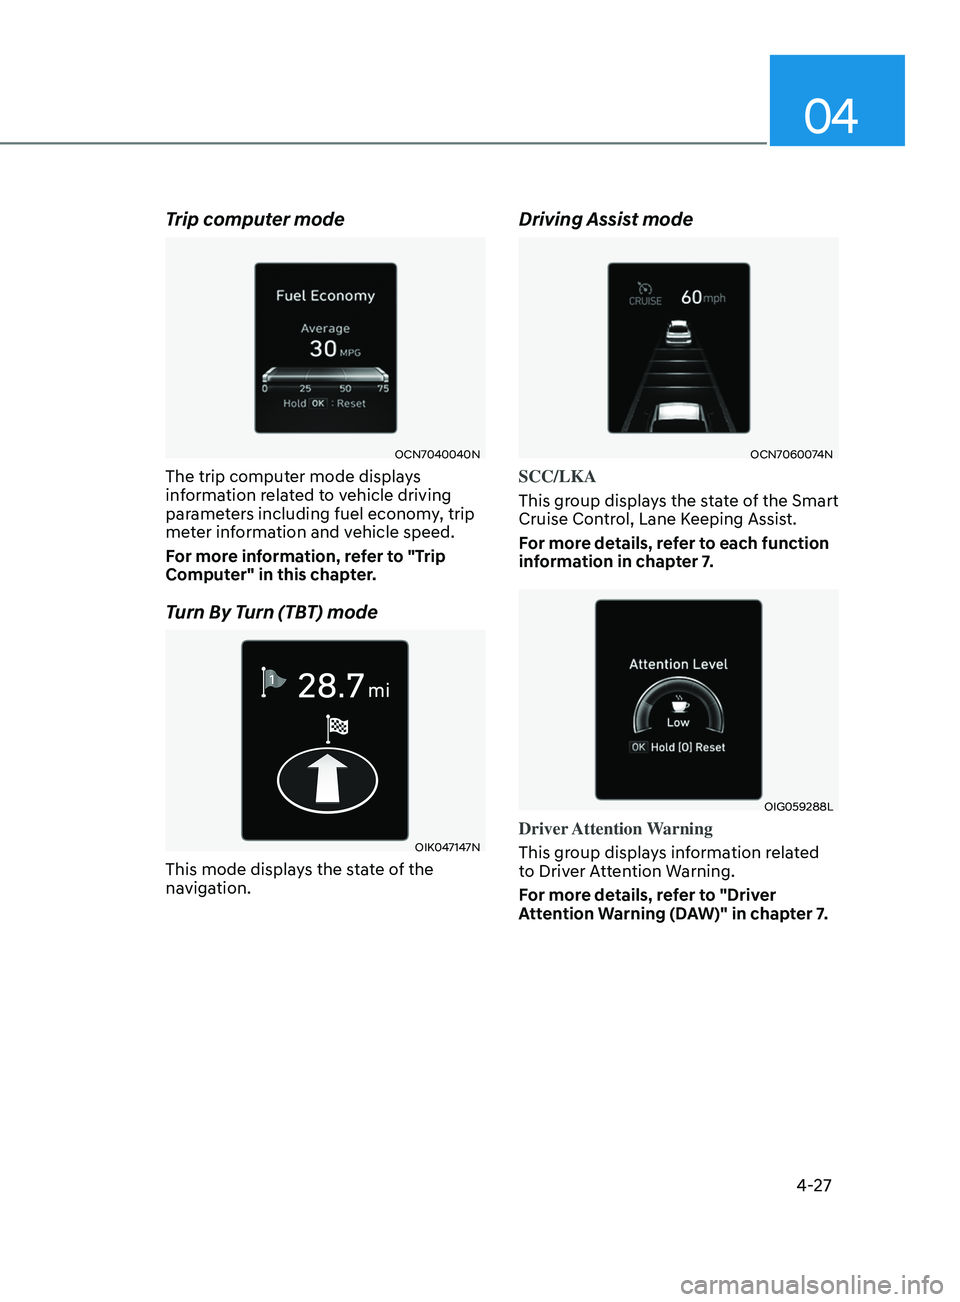
Trip computer mode
OCN7040040N
The trip computer mode displays
information related to vehicle driving
parameters including fuel economy, trip
meter information and vehicle speed.
For more information, refer to "Trip
Computer" in this chapter.
Turn By Turn (TBT) mode
OIK047147N
This mode displays the state of the
navigation.
Driving Assist mode
OCN7060074N
SCC/LKA
This group displays the state of the Smart
Cruise Control, Lane Keeping Assist.
For more details, refer to each function
information in chapter 7.
OIG059288L
Driver Attention Warning
This group displays information related
to Driver Attention Warning.
For more details, refer to "Driver
Attention Warning (DAW)" in chapter 7.
Page 121 of 570
04
4-35
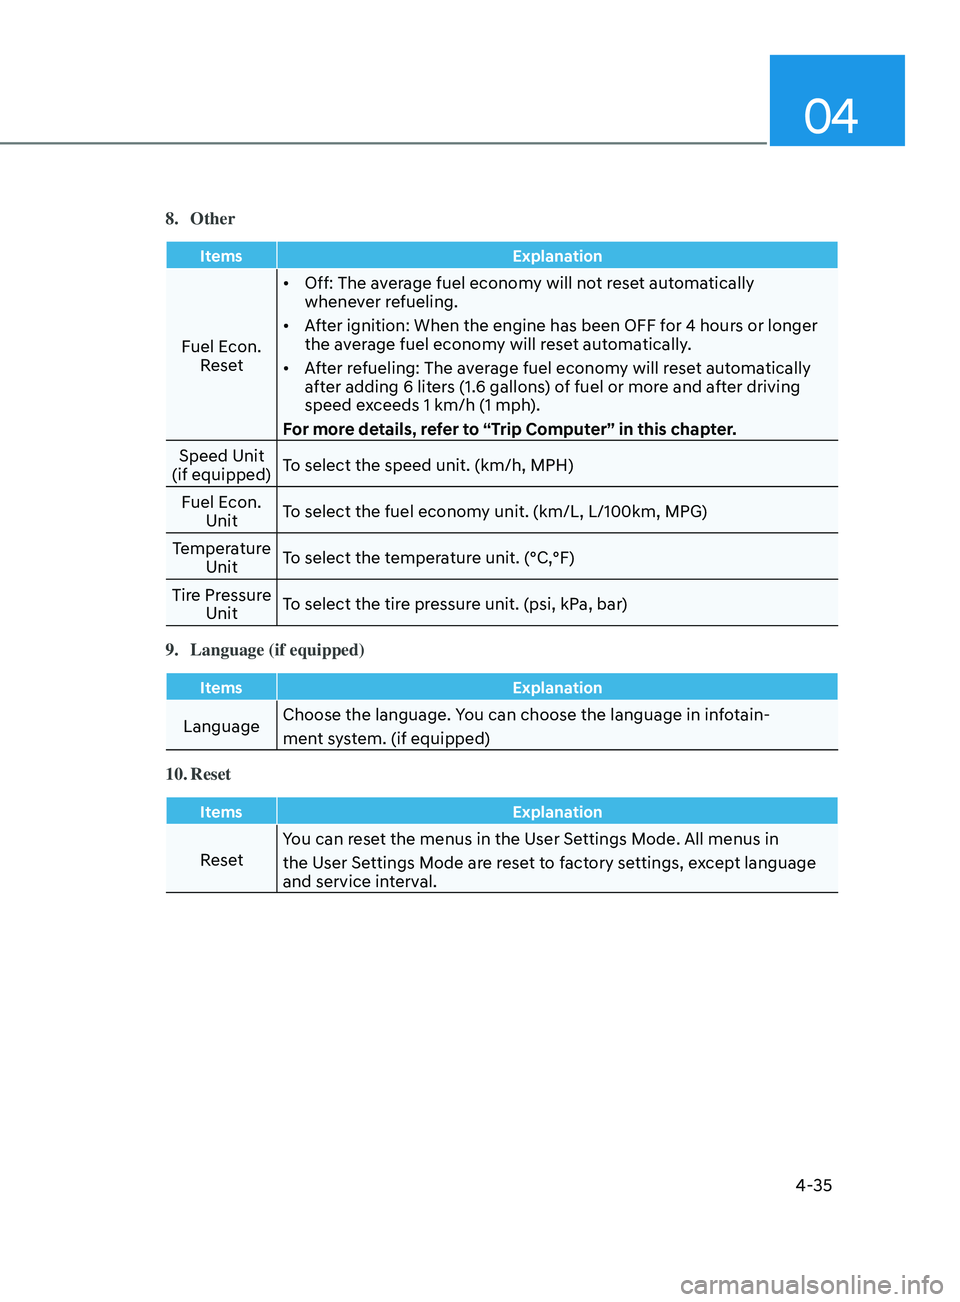
8. Other
ItemsExplanation
Fuel Econ.
Reset •
Off: The average fuel economy will not reset automatically
whenever refueling.
• After ignition: When the engine has been OFF for 4 hours or longer
the average fuel economy will reset automatically.
• After refueling: The average fuel economy will reset automatically
after adding 6 liters (1.6 gallons) of fuel or more and after driving
speed exceeds 1 km/h (1 mph).
For more details, refer to “Trip Computer” in this chapter.
Speed Unit
(if equipped) To select the speed unit. (km/h, MPH)
Fuel Econ. Unit To select the fuel economy unit. (km/L, L/100km, MPG)
Temperature Unit To select the temperature unit. (°C,°F)
Tire Pressure Unit To select the tire pressure unit. (psi, kPa, bar)
9.
Language (if equipped)
Items Explanation
LanguageChoose the language. You can choose the language in infotain-
ment system. (if equipped)
10.
Reset
Items Explanation
ResetYou can reset the menus in the User Settings Mode. All menus in
the User Settings Mode are reset to factory settings, except language
and service interval.
Page 122 of 570
Instrument Cluster
4-36
Trip Computer
The trip computer is a microcomputer-
controlled driver information system that
displays information related to driving.
Information
Some driving information stored in the
trip computer (for example Average
Vehicle Speed) resets if the battery is
disconnected.
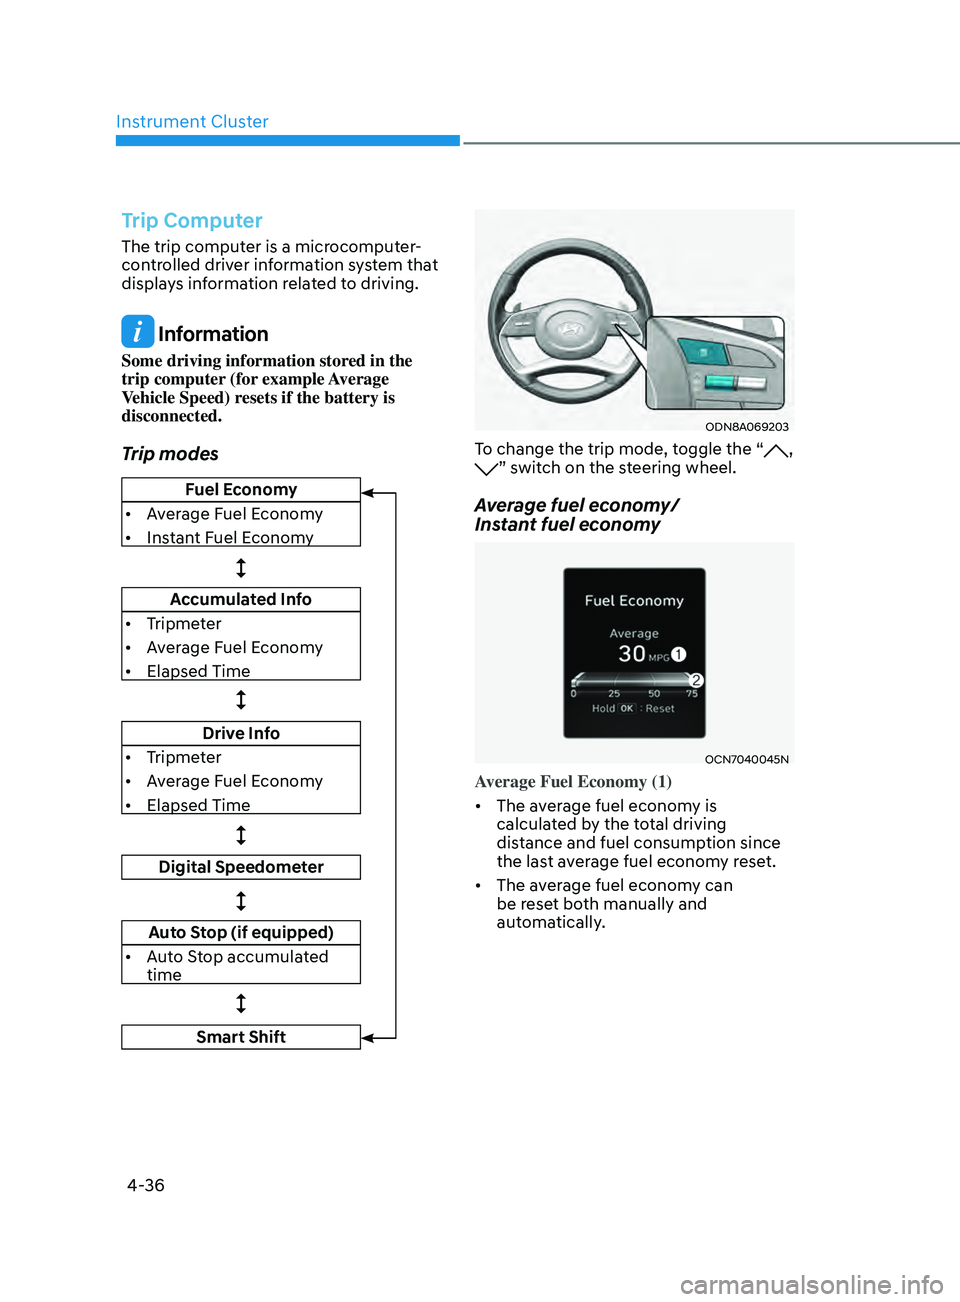
Trip modes
Fuel Economy
• Average Fuel Economy
• Instant Fuel Economy
Accumulated Info
• Tripmeter
• Average Fuel Economy
• Elapsed Time
Drive Info
• Tripmeter
• Average Fuel Economy
• Elapsed Time
Digital Speedometer
Auto Stop (if equipped)
• Auto Stop accumulated
time
Smart Shift
ODN8A069203
To change the trip mode, toggle the “, ” switch on the steering wheel.
Average fuel economy/
Instant fuel economy
OCN7040045N
Average Fuel Economy (1)
• The average fuel economy is
calculated by the total driving
distance and fuel consumption since
the last average fuel econ
omy r
eset.
• The average fuel economy can
be reset both manually and
automatically.
Page 136 of 570
Instrument Cluster
4-50
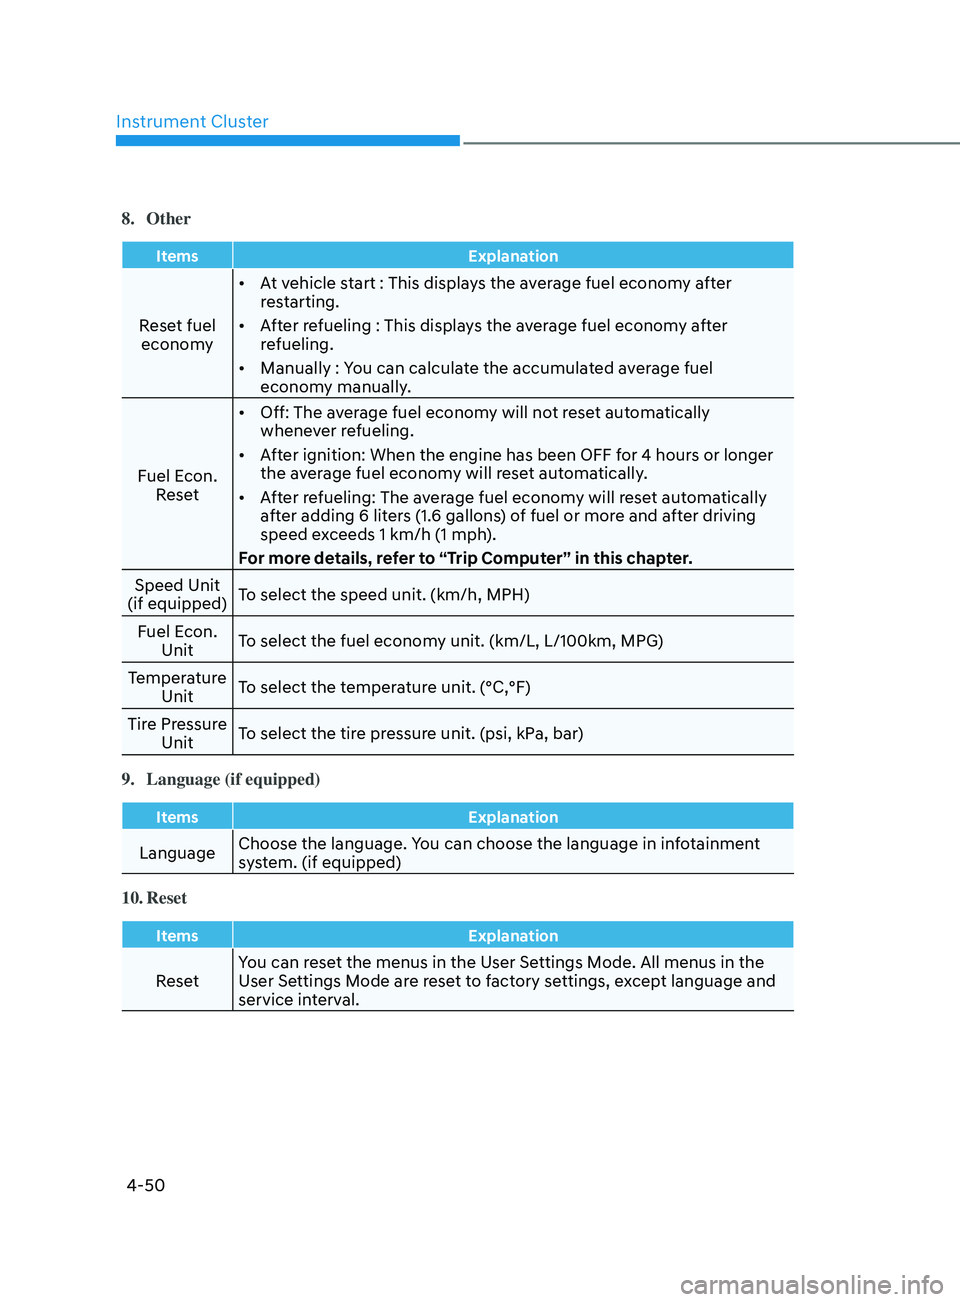
8. Other
ItemsExplanation
Reset fuel
economy •
At vehicle start : This displays the average fuel economy after
restarting.
• After refueling : This displays the average fuel economy after
refueling.
• Manually : You can calculate the accumulated average fuel
economy manually.
Fuel Econ. Reset •
Off: The average fuel economy will not reset automatically
whenever refueling.
• After ignition: When the engine has been OFF for 4 hours or longer
the average fuel economy will reset automatically.
• After refueling: The average fuel economy will reset automatically
after adding 6 liters (1.6 gallons) of fuel or more and after driving
speed exceeds 1 km/h (1 mph).
For more details, refer to “Trip Computer” in this chapter.
Speed Unit
(if equipped) To select the speed unit. (km/h, MPH)
Fuel Econ. Unit To select the fuel economy unit. (km/L, L/100km, MPG)
Temperature Unit To select the temperature unit. (°C,°F)
Tire Pressure Unit To select the tire pressure unit. (psi, kPa, bar)
9.
Language (if equipped)
Items Explanation
LanguageChoose the language. You can choose the language in infotainment
system. (if equipped)
10.
Reset
Items Explanation
ResetYou can reset the menus in the User Settings Mode. All menus in the
User Settings Mode are reset to factory settings, except language and
service interval.
Page 301 of 570
While Driving6-42
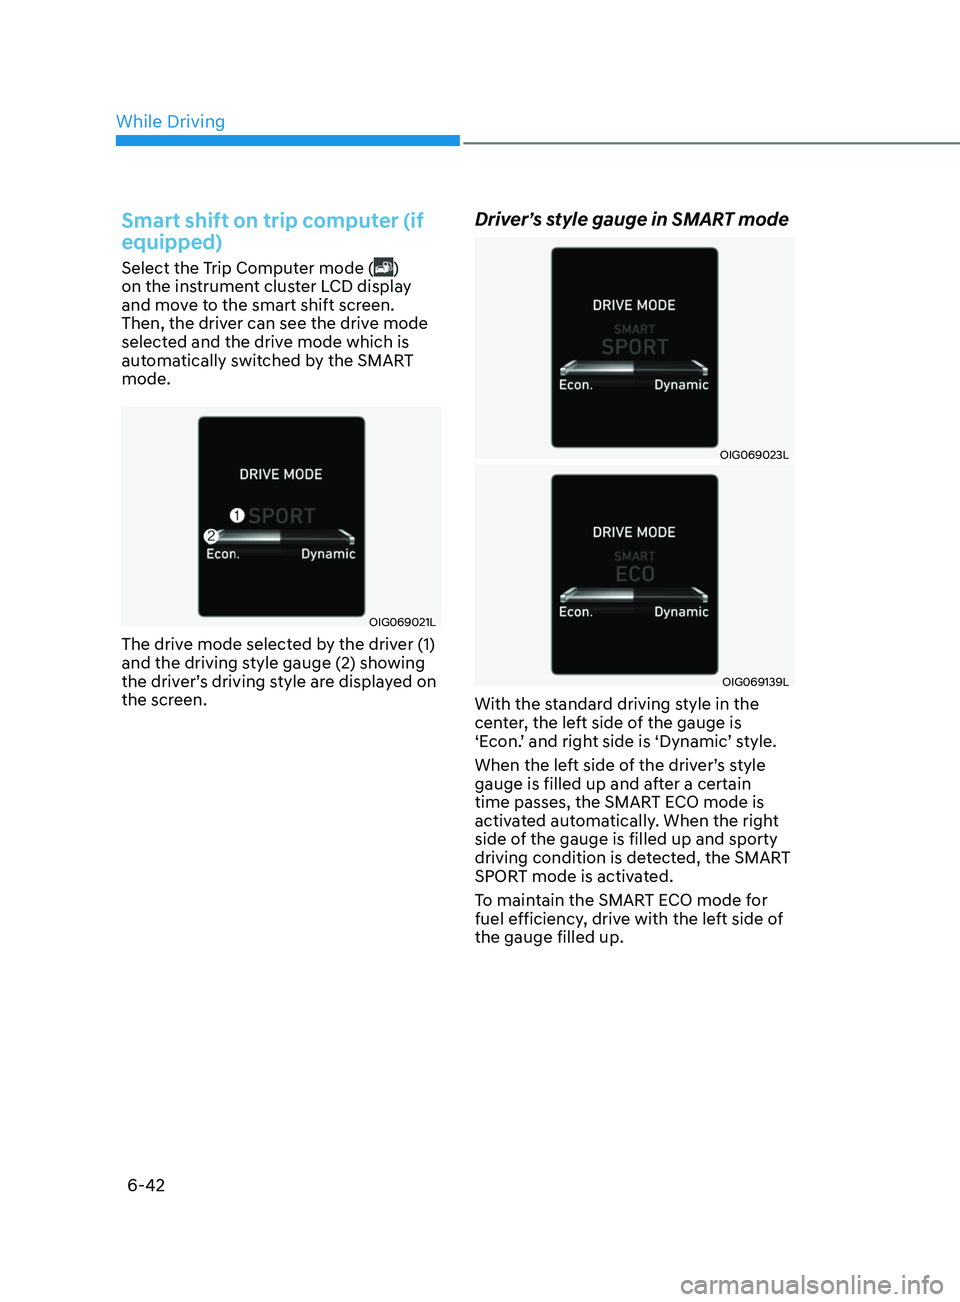
Smart shift on trip computer (if
equipped)
Select the Trip Computer mode ()
on the instrument cluster LCD display
and move to the smart shift screen.
Then, the driver can see the drive mode
selected and the drive mode which is
automatically switched by the SMART
mode.
OIG069021L
The drive mode selected by the driver (1)
and the driving style gauge (2) showing
the driver’s driving style are displayed on
the screen.
Driver’s style gauge in SMART mode
OIG069023L
OIG069139L
With the standard driving style in the
center, the left side of the gauge is
‘Econ.’ and right side is ‘Dynamic’ style.
When the left side of the driver’s style
gauge is filled up and after a certain
time passes, the SMART ECO mode is
activated automatically. When the right
side of the gauge is filled up and sporty
driving condition is detected, the SMART
SPORT mode is activated.
To maintain the SMART ECO mode for
fuel efficiency, drive with the left side of
the gauge filled up.
Page 512 of 570
Maintenance9-26
Battery Recharging
WARNING
Always follow these instructions when
recharging your vehicle’s battery to
avoid the risk of SERIOUS INJURY or
DEATH from explosions or acid burns:
• Before performing maintenance or
recharging the battery, turn off all
accessories and place the ignition
switch to the LOCK/OFF position.
• Keep all flames, sparks, or smoking
materials away from the battery.
• Always work outdoors or in an area
with plenty of ventilation.
• Wear eye protection when checking
the battery during charging.
• The battery must be removed from
the vehicle and placed in a well
ventilated area.
• Watch the battery during charging,
and stop or reduce the charging
rate if the battery cells begin boiling
violently.
• Vehicle is equipped with the
Absorbent Glass Mat (AGM) battery.
Do not charge the AGM battery with
a general charger. It may damage
or explode the AGM battery. Only
charge the AGM battery with a
charger that has AGM battery
setting.
• The negative battery cable must
be removed first and installed last
when the battery is disconnected.
Disconnect the battery charger in the
following order:
1.
Turn o
ff the battery charger main
switch.
2.
Unhook the nega
tive clamp from
the negative battery terminal.
3.
Unhook the positiv
e clamp from
the positive battery terminal.
• Always use a genuine HYUNDAI
approved battery when you replace
the battery.
NOTICE
AGM battery (if equipped)
• Absorbent Glass Matt (AGM)
batteries are maintenance-free
and we recommend that the AGM
battery be serviced by an authorized
HYUNDAI dealer. For charging
your AGM battery, use only fully
automatic battery chargers that
are specially developed for AGM
batteries.
• When replacing the AGM battery,
we recommend that you use parts
for replacement from an authorized
HYUNDAI dealer.
• Do not open or remove the cap on
top of the battery. This may cause
leaks of internal electrolyte that
could result in severe injury.
By jump starting
After a jump start from a good battery,
drive the vehicle for 20-30 minutes
before it is shutoff. The vehicle may
not restart if you shut it off before the
battery had a chance to adequately
recharge. See “Jump Starting” in chapter
7 for more information on jump starting
procedures.
Information
An inappropriately disposed
battery can be harmful to
the environment and human
health. Dispose of the battery
according to your local law(s) or
regulations.
Reset items
Items should be reset after the battery
has been discharged or the battery has
been disconnected.
• Auto up/down window (See chapter 5)
• Sunroof (See chapter 5)
• Trip computer (See chapter 4)
• Climate control system (See chapter 5)