sensor Hyundai Elantra Coupe 2014 User Guide
[x] Cancel search | Manufacturer: HYUNDAI, Model Year: 2014, Model line: Elantra Coupe, Model: Hyundai Elantra Coupe 2014Pages: 550, PDF Size: 45.11 MB
Page 195 of 550
4109
Features of your vehicle
If your vehicle is equipped with the
auto defogging system, it is automat-
ically activated when the conditions
are met. However, if you would like to
cancel the auto defogging system,
press the front defroster button for 3
seconds. The indicator will blink 3
times to notify you that the system is
cancelled. To use the auto defogging
system again, follow the procedures
mentioned above.
If the battery has been disconnected
or discharged, it resets to the auto
defogging status.✽ ✽
NOTICE
• When the air conditioning is
turned on by Auto defogging sys-
tem, if you try to turn off the air
conditioning, the indicator will
blink 3 times and the air condi-
tioning will not be turned off.
• For efficiency, do not select recir-
culated air position while Auto
defogging system is operating.
CAUTION
Do not remove the sensor cover
located on the upper end of the
driver side windshield glass.
Damage to system parts could
occur and may not be covered
by your vehicle warranty.
Page 412 of 550
What to do in an emergency
12 6
The Low Tire Pressure Telltale will
remain on and the TPMS Malfunction
Indicator may blink for one minute
and then remain illuminated (when
the vehicle is driven approximately
20 minutes at speed above 15.5 mph
(25 km/h)) until you have the low
pressure tire repaired and replaced
on the vehicle.
✽ ✽
NOTICE
The spare tire (if equipped) does not
come with a tire pressure sensor.
CAUTION
In winter or cold weather, the
Low Tire Pressure Telltale may
be illuminated if the tire pres-
sure was adjusted to the recom-
mended tire inflation pressure
in warm weather. It does not
mean your TPMS is malfunction-
ing because the decreased tem-
perature leads to a proportional
lowering of tire pressure.
When you drive your vehicle
from a warm area to a cold area
or from a cold area to a warm
area, or the outside temperature
is greatly higher or lower, you
should check the tire inflation
pressure and adjust the tires to
the recommended tire inflation
pressure.
WARNING
Significantly low tire pressure
makes the vehicle unstable
and can contribute to loss of
vehicle control and increased
braking distances.
Continued driving on low
pressure tires can cause the
tires to overheat and fail.
Page 414 of 550
Changing a Tire with TPMS
If you have a flat tire, the Low Tire
Pressure Telltale will illuminate. If you
believe you have a flat tire or feel any
vehicle instability, take your foot off
the accelerator pedal and let the
vehicle slow down while driving
straight ahead. Do not apply the
brakes immediately or attempt to pull
off the road as this may cause a loss
of control resulting in an accident.
When the vehicle has slowed to such
a speed that it is safe to do so, brake
carefully and pull off the road. Drive
off the road as far as possible and
park on firm, level ground. If you are
on a divided highway, do not park in
the median area between the two
traffic lanes. Replace the flat tire with
the spare tire (if equipped).The spare tire (if equipped) does not
come with a tire pressure monitoring
sensor. When the low pressure tire or
the flat tire is replaced with the spare
tire, the Low Tire Pressure Telltale
will remain on. Also, the TPMS
Malfunction Indicator will illuminate
after blinking for one minute if the
vehicle is driven at speed above 15.5
mph (25 km/h) for approximately 20
minutes.
Once the original tire equipped with
a tire pressure monitoring sensor is
reinflated to the recommended pres-
sure and reinstalled on the vehicle,
the Low Tire Pressure Telltale and
TPMS Malfunction Indicator will go
off within a few minutes.
If the indicators do not extinguish
after a few minutes, please visit an
authorized HYUNDAI dealer.
Each wheel is equipped with a tire
pressure sensor mounted inside the
tire behind the valve stem (except for
the spare tire). You must use TPMS
specific wheels. It is recommended
that you always have your tires serv-
iced by an authorized HYUNDAI
dealer as soon as possible.
What to do in an emergency
14 6
CAUTION
To prevent damaging your tire
pressure sensor, never use a
puncture-repairing agents or
tire sealants to repair and/or
inflate a low pressure tire. If
used, you will have to replace
the tire pressure sensor.
Page 425 of 550
Distributing the sealant
11. Immediately drive approximately
4~6miles (7~10km or about 10
minutes) to evenly distribute the
sealant in the tire.
Do not exceed a speed of 50 mph
(80 km/h). If possible, do not fall
below a speed of 12 mph (20 km/h).
While driving, if you experience any
unusual vibration, ride disturbance or
noise, reduce your speed and drive
with caution until you can safely pull
off of the side of the road.
Call for road side service or towing.
When you use the Tire Mobility Kit,
the tire pressure sensors and wheel
may be damaged by sealant, remove
the sealant stained with tire pressure
sensors and wheel and inspect at an
authorized dealer.Checking the tire inflation pres-
sure
1.After driving approximately
4~6miles (7~10km or about
10 minutes), stop at a safety loca-
tion.
2.Connect connection hose (9) of the
compressor directly to the tire
valve.
3.Plug the compressor power cord
into the vehicle power outlet.
4.Adjust the tire inflation pressure to
the recommended tire inflation.
With the ignition on, proceed as fol-
lows.
- To increase the inflation pressure:
Switch on the compressor, posi-
tion I. To check the current infla-
tion pressure setting, briefly
switch off the compressor.
✽ ✽
NOTICE
The pressure gauge may show high-
er than actual reading when the
compressor is running. To get an
accurate tire pressure, the compres-
sor needs to be turned off.
- To reduce the inflation pressure:
Loosen the screw cap (8) on the
compressor hose.
625
What to do in an emergency
Page 426 of 550
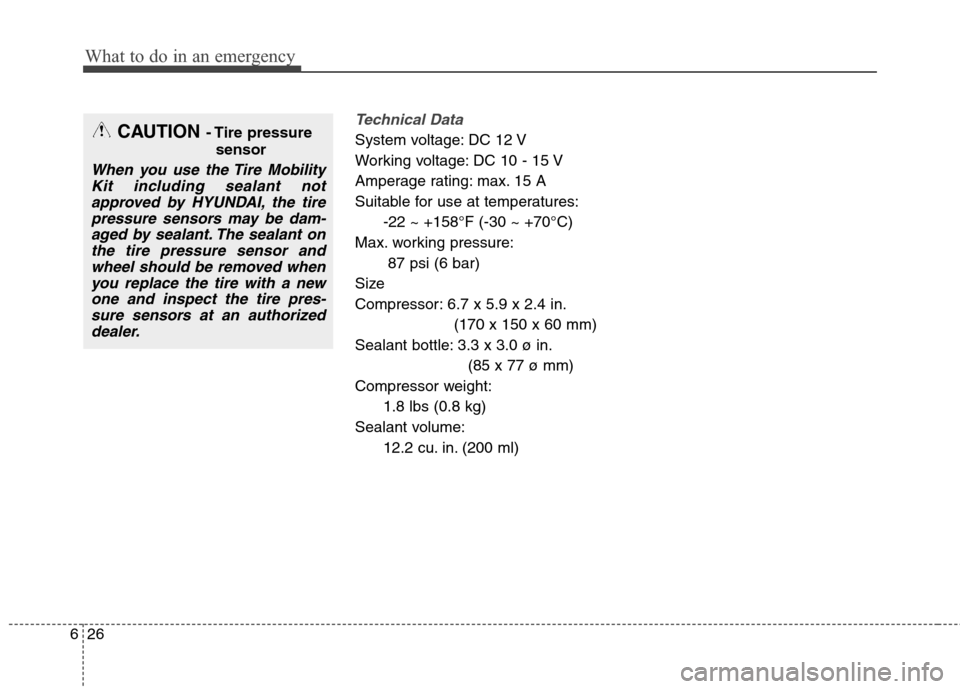
Technical Data
System voltage: DC 12 V
Working voltage: DC 10 - 15 V
Amperage rating: max. 15 A
Suitable for use at temperatures:
-22 ~ +158°F (-30 ~ +70°C)
Max. working pressure:
87 psi (6 bar)
Size
Compressor: 6.7 x 5.9 x 2.4 in.
(170 x 150 x 60 mm)
Sealant bottle: 3.3 x 3.0 ø in.
(85 x 77 ø mm)
Compressor weight:
1.8 lbs (0.8 kg)
Sealant volume:
12.2 cu. in. (200 ml)
What to do in an emergency
26 6
CAUTION - Tire pressure
sensor
When you use the Tire Mobility
Kit including sealant not
approved by HYUNDAI, the tire
pressure sensors may be dam-
aged by sealant. The sealant on
the tire pressure sensor and
wheel should be removed when
you replace the tire with a new
one and inspect the tire pres-
sure sensors at an authorized
dealer.
Page 499 of 550
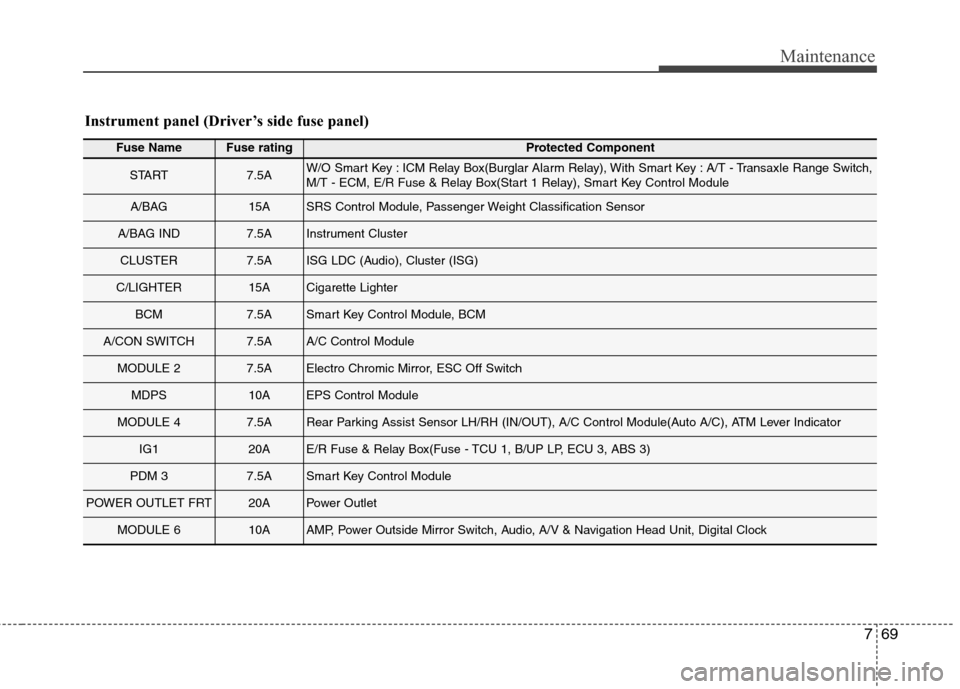
769
Maintenance
Fuse NameFuse ratingProtected Component
START7.5AW/O Smart Key : ICM Relay Box(Burglar Alarm Relay), With Smart Key : A/T - Transaxle Range Switch,
M/T - ECM, E/R Fuse & Relay Box(Start 1 Relay), Smart Key Control Module
A/BAG15ASRS Control Module, Passenger Weight Classification Sensor
A/BAG IND7.5AInstrument Cluster
CLUSTER7.5AISG LDC (Audio), Cluster (ISG)
C/LIGHTER15ACigarette Lighter
BCM7.5ASmart Key Control Module, BCM
A/CON SWITCH7.5AA/C Control Module
MODULE 27.5AElectro Chromic Mirror, ESC Off Switch
MDPS10AEPS Control Module
MODULE 47.5ARear Parking Assist Sensor LH/RH (IN/OUT), A/C Control Module(Auto A/C), ATM Lever Indicator
IG120AE/R Fuse & Relay Box(Fuse - TCU 1, B/UP LP, ECU 3, ABS 3)
PDM 37.5ASmart Key Control Module
POWER OUTLET FRT20APower Outlet
MODULE 610AAMP, Power Outside Mirror Switch, Audio, A/V & Navigation Head Unit, Digital Clock
Instrument panel (Driver’s side fuse panel)
Page 501 of 550
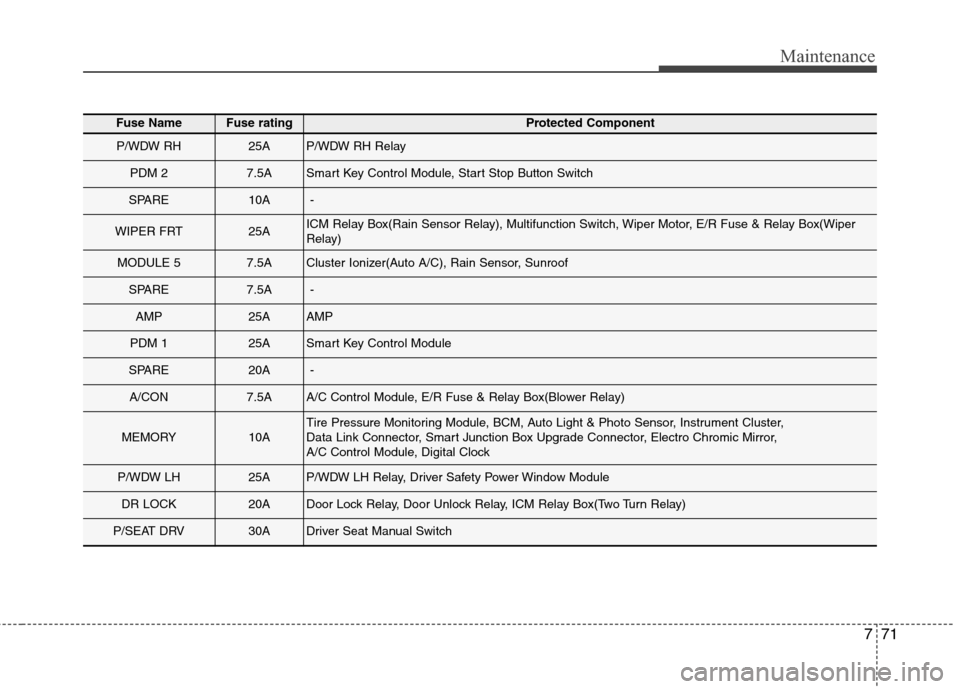
771
Maintenance
Fuse NameFuse ratingProtected Component
P/WDW RH25AP/WDW RH Relay
PDM 27.5ASmart Key Control Module, Start Stop Button Switch
SPARE10A-
WIPER FRT25AICM Relay Box(Rain Sensor Relay), Multifunction Switch, Wiper Motor, E/R Fuse & Relay Box(Wiper
Relay)
MODULE 57.5ACluster Ionizer(Auto A/C), Rain Sensor, Sunroof
SPARE7.5A-
AMP25AAMP
PDM 125ASmart Key Control Module
SPARE20A-
A/CON7.5AA/C Control Module, E/R Fuse & Relay Box(Blower Relay)
MEMORY10ATire Pressure Monitoring Module, BCM, Auto Light & Photo Sensor, Instrument Cluster,
Data Link Connector, Smart Junction Box Upgrade Connector, Electro Chromic Mirror,
A/C Control Module, Digital Clock
P/WDW LH25AP/WDW LH Relay, Driver Safety Power Window Module
DR LOCK20ADoor Lock Relay, Door Unlock Relay, ICM Relay Box(Two Turn Relay)
P/SEAT DRV30ADriver Seat Manual Switch
Page 503 of 550
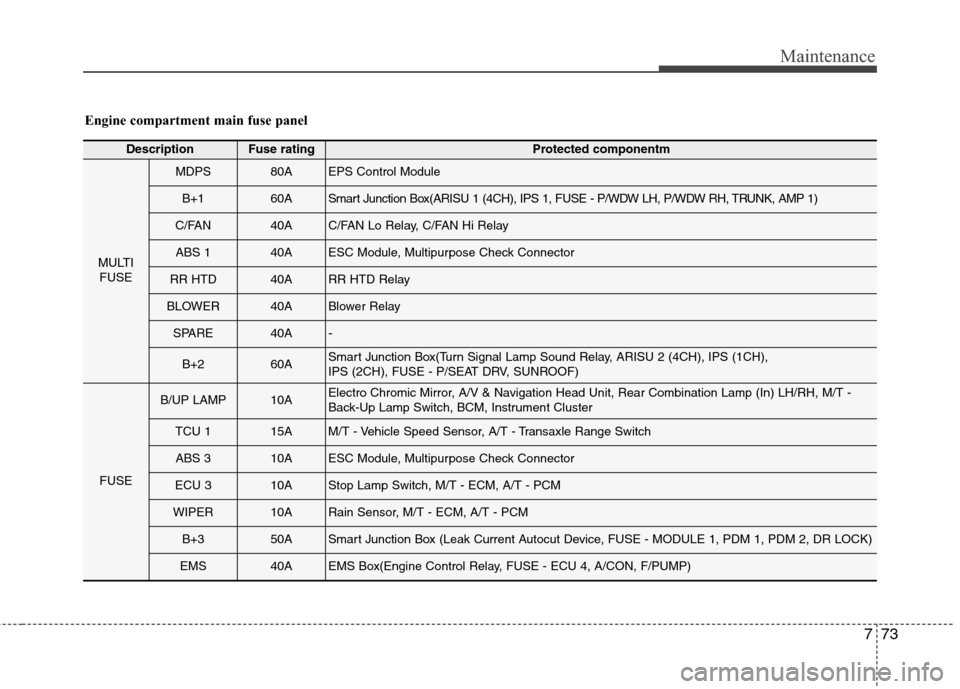
773
Maintenance
Engine compartment main fuse panel
DescriptionFuse ratingProtected componentm
MULTI
FUSE
MDPS80AEPS Control Module
B+160ASmart Junction Box(ARISU 1 (4CH), IPS 1, FUSE - P/WDW LH, P/WDW RH, TRUNK, AMP 1)
C/FAN40AC/FAN Lo Relay, C/FAN Hi Relay
ABS 140AESC Module, Multipurpose Check Connector
RR HTD40ARR HTD Relay
BLOWER40ABlower Relay
SPARE40A-
B+260ASmart Junction Box(Turn Signal Lamp Sound Relay, ARISU 2 (4CH), IPS (1CH),
IPS (2CH), FUSE - P/SEAT DRV, SUNROOF)
FUSE
B/UP LAMP10AElectro Chromic Mirror, A/V & Navigation Head Unit, Rear Combination Lamp (In) LH/RH, M/T -
Back-Up Lamp Switch, BCM, Instrument Cluster
TCU 115AM/T - Vehicle Speed Sensor, A/T - Transaxle Range Switch
ABS 310AESC Module, Multipurpose Check Connector
ECU 310AStop Lamp Switch, M/T - ECM, A/T - PCM
WIPER10ARain Sensor, M/T - ECM, A/T - PCM
B+350ASmart Junction Box (Leak Current Autocut Device, FUSE - MODULE 1, PDM 1, PDM 2, DR LOCK)
EMS40AEMS Box(Engine Control Relay, FUSE - ECU 4, A/CON, F/PUMP)
Page 504 of 550
Maintenance
74 7
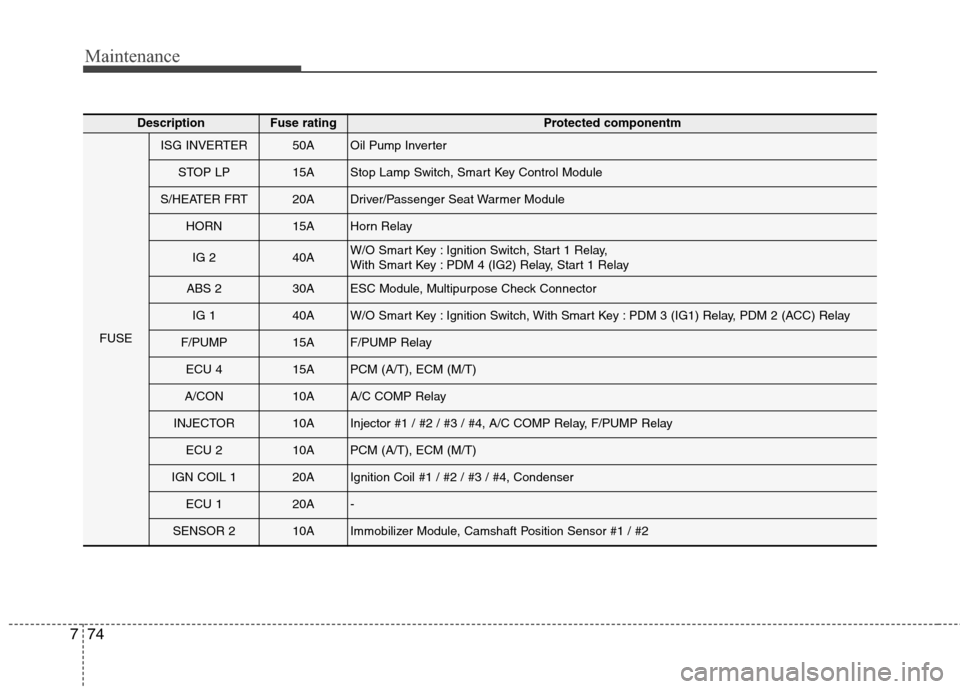
DescriptionFuse ratingProtected componentm
FUSE
ISG INVERTER50AOil Pump Inverter
STOP LP15AStop Lamp Switch, Smart Key Control Module
S/HEATER FRT20ADriver/Passenger Seat Warmer Module
HORN15AHorn Relay
IG 240AW/O Smart Key : Ignition Switch, Start 1 Relay,
With Smart Key : PDM 4 (IG2) Relay, Start 1 Relay
ABS 230AESC Module, Multipurpose Check Connector
IG 140AW/O Smart Key : Ignition Switch, With Smart Key : PDM 3 (IG1) Relay, PDM 2 (ACC) Relay
F/PUMP15AF/PUMP Relay
ECU 415APCM (A/T), ECM (M/T)
A/CON10AA/C COMP Relay
INJECTOR10AInjector #1 / #2 / #3 / #4, A/C COMP Relay, F/PUMP Relay
ECU 210APCM (A/T), ECM (M/T)
IGN COIL 120AIgnition Coil #1 / #2 / #3 / #4, Condenser
ECU 120A-
SENSOR 210AImmobilizer Module, Camshaft Position Sensor #1 / #2
Page 505 of 550
775
Maintenance
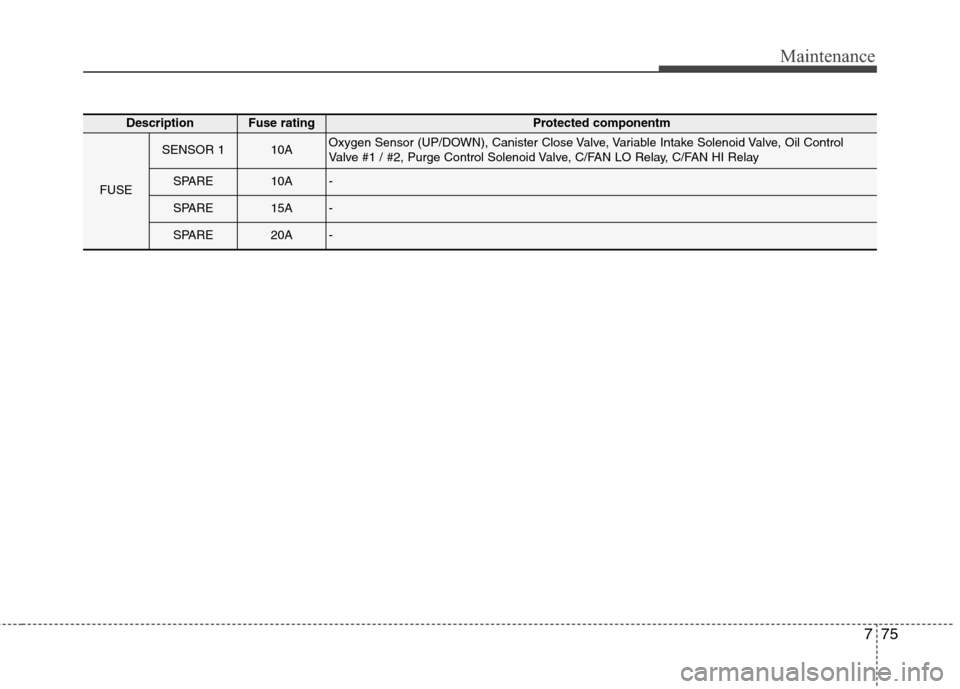
DescriptionFuse ratingProtected componentm
FUSE
SENSOR 110AOxygen Sensor (UP/DOWN), Canister Close Valve, Variable Intake Solenoid Valve, Oil Control
Valve #1 / #2, Purge Control Solenoid Valve, C/FAN LO Relay, C/FAN HI Relay
SPARE10A-
SPARE15A-
SPARE20A-