spare tire Hyundai Elantra Coupe 2014 User Guide
[x] Cancel search | Manufacturer: HYUNDAI, Model Year: 2014, Model line: Elantra Coupe, Model: Hyundai Elantra Coupe 2014Pages: 550, PDF Size: 45.11 MB
Page 477 of 550
747
Maintenance
TIRES AND WHEELS
Tire care
For proper maintenance, safety, and
maximum fuel economy, you must
always maintain recommended tire
inflation pressures and stay within
the load limits and weight distribution
recommended for your vehicle.WARNING
Tire failure may cause loss of
vehicle control resulting in an
accident. To reduce risk of
SERIOUS INJURY or DEATH,
take the following precautions:
Inspect your tires monthly for
proper inflation as well as
wear and damage.
The recommended cold tire
pressure for your vehicle can
be found in this manual and
on the tire label located on the
driver’s side center pillar.
Always use a tire pressure
gauge to measure tire pres-
sure. Tires with too much or
too little pressure wear
unevenly causing poor han-
dling.
Check the pressure of the
spare (if equipped) every time
you check the pressure of the
other tires on your vehicle.
(Continued)
(Continued)
Replace tires that are worn,
show uneven wear, or are
damaged. Worn tires can
cause loss of braking effec-
tiveness, steering) control, or
traction.
ALWAYS replace tires with the
same size as each tire that
was originally supplied with
this vehicle. Using tires and
wheels other than the recom-
mended sizes could cause
unusual handling characteris-
tics, poor vehicle control, or
negatively affect your vehi-
cle’s Anti-Lock Brake System
(ABS) resulting in a serious
accident.
Page 478 of 550
Maintenance
48 7
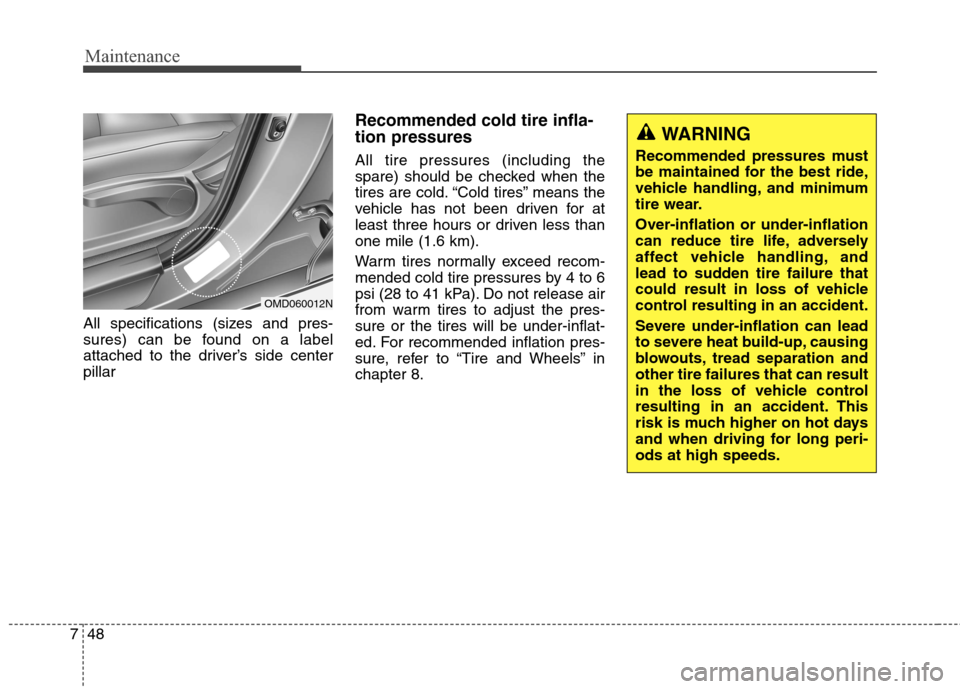
All specifications (sizes and pres-
sures) can be found on a label
attached to the driver’s side center
pillar
Recommended cold tire infla-
tion pressures
All tire pressures (including the
spare) should be checked when the
tires are cold. “Cold tires” means the
vehicle has not been driven for at
least three hours or driven less than
one mile (1.6 km).
Warm tires normally exceed recom-
mended cold tire pressures by 4 to 6
psi (28 to 41 kPa). Do not release air
from warm tires to adjust the pres-
sure or the tires will be under-inflat-
ed. For recommended inflation pres-
sure, refer to “Tire and Wheels” in
chapter 8.
OMD060012N
WARNING
Recommended pressures must
be maintained for the best ride,
vehicle handling, and minimum
tire wear.
Over-inflation or under-inflation
can reduce tire life, adversely
affect vehicle handling, and
lead to sudden tire failure that
could result in loss of vehicle
control resulting in an accident.
Severe under-inflation can lead
to severe heat build-up, causing
blowouts, tread separation and
other tire failures that can result
in the loss of vehicle control
resulting in an accident. This
risk is much higher on hot days
and when driving for long peri-
ods at high speeds.
Page 479 of 550
749
Maintenance
Check tire inflation pressure
Check your tires, including the spare
tire, once a month or more.
How to check
Use a good quality tire pressure
gauge to check tire pressure. You
can not tell if your tires are properly
inflated simply by looking at them.
Radial tires may look properly inflat-
ed when they are under-inflated.
Remove the valve cap from the tire
valve stem. Press the tire gauge firm-
ly onto the valve to get a pressure
measurement. If the cold tire inflation
pressure matches the recommended
pressure on the tire and loading
information label, no further adjust-
ment is necessary. If the pressure is
low, add air until you reach the rec-
ommended pressure. Make sure to
put the valve caps back on the valve
stems. Without the valve cap, dirt or
moisture could get into the valve
core and cause air leakage. If a valve
cap is missing, install a new one as
soon as possible.If you overfill the tire, release air by
pushing on the metal stem in the
center of the tire valve. Recheck the
tire pressure with the tire gauge. Be
sure to put the valve caps back on
the valve stems. Without the valve
cap, dirt or moisture could get into
the valve core and cause air leakage.
If a valve cap is missing, install a new
one as soon as possible.
CAUTION
Under-inflation results in exces-
sive wear, poor handling and
reduced fuel economy. Wheel
deformation is also possible.
Keep your tire pressures at the
proper levels. If a tire frequently
needs refilling, have it checked
by an authorized HYUNDAI deal-
er.
Over-inflation produces a harsh
ride, excessive wear at the cen-
ter of the tire tread, and a
greater possibility of damage
from road hazards.
Page 480 of 550
Maintenance
50 7
Tire rotation
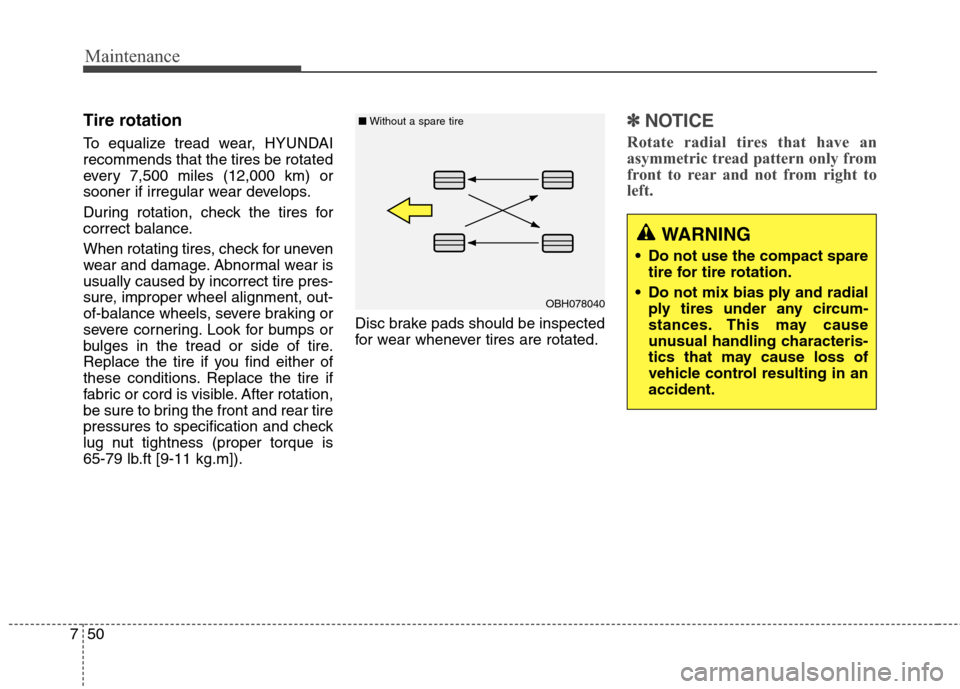
To equalize tread wear, HYUNDAI
recommends that the tires be rotated
every 7,500 miles (12,000 km) or
sooner if irregular wear develops.
During rotation, check the tires for
correct balance.
When rotating tires, check for uneven
wear and damage. Abnormal wear is
usually caused by incorrect tire pres-
sure, improper wheel alignment, out-
of-balance wheels, severe braking or
severe cornering. Look for bumps or
bulges in the tread or side of tire.
Replace the tire if you find either of
these conditions. Replace the tire if
fabric or cord is visible. After rotation,
be sure to bring the front and rear tire
pressures to specification and check
lug nut tightness (proper torque is
65-79 lb.ft [9-11 kg.m]).Disc brake pads should be inspected
for wear whenever tires are rotated.
✽ ✽
NOTICE
Rotate radial tires that have an
asymmetric tread pattern only from
front to rear and not from right to
left.
OBH078040 ■Without a spare tire
WARNING
Do not use the compact spare
tire for tire rotation.
Do not mix bias ply and radial
ply tires under any circum-
stances. This may cause
unusual handling characteris-
tics that may cause loss of
vehicle control resulting in an
accident.
Page 482 of 550
Maintenance
52 7
Compact spare tire replacement
A compact spare tire has a shorter
tread life than a regular size tire.
Replace it when you can see the
tread wear indicator bars on the tire.
The replacement compact spare tire
should be the same size and design
tire as the one provided with your
new vehicle and should be mounted
on the same compact spare tire
wheel. The compact spare tire is not
designed to be mounted on a regular
size wheel, and the compact spare
tire wheel is not designed for mount-
ing a regular size tire.
Wheel replacement
When replacing the metal wheels for
any reason, make sure the new
wheels are equivalent to the original
factory units in diameter, rim width
and offset.
Tire traction
Tire traction can be reduced if you
drive on worn tires, tires that are
improperly inflated or on slippery
road surfaces. Tires should be
replaced when tread wear indicators
appear. To reduce the possibility of
losing control, slow down whenever
there is rain, snow or ice on the road.
(Continued)
Heat caused by hot climates or
frequent high loading condi-
tions can accelerate the aging
process. Failure to follow this
warning may cause sudden tire
failure, which could lead to a
loss of vehicle control resulting
in an accident.
WARNING
The original tire should be
repaired or replaced as soon as
possible to avoid failure of the
spare and loss of vehicle con-
trol resulting in an accident. The
compact spare tire is for emer-
gency use only. Do not operate
your vehicle over 50 mph (80
km/h) when using the compact
spare tire.
Page 484 of 550
Maintenance
54 7
Wheel size designation
Wheels are also marked with impor-
tant information that you need if you
ever have to replace one. The follow-
ing explains what the letters and
numbers in the wheel size designa-
tion mean.
Example wheel size designation:
6.0JX15
6.0 - Rim width in inches.
J - Rim contour designation.
15 - Rim diameter in inches.
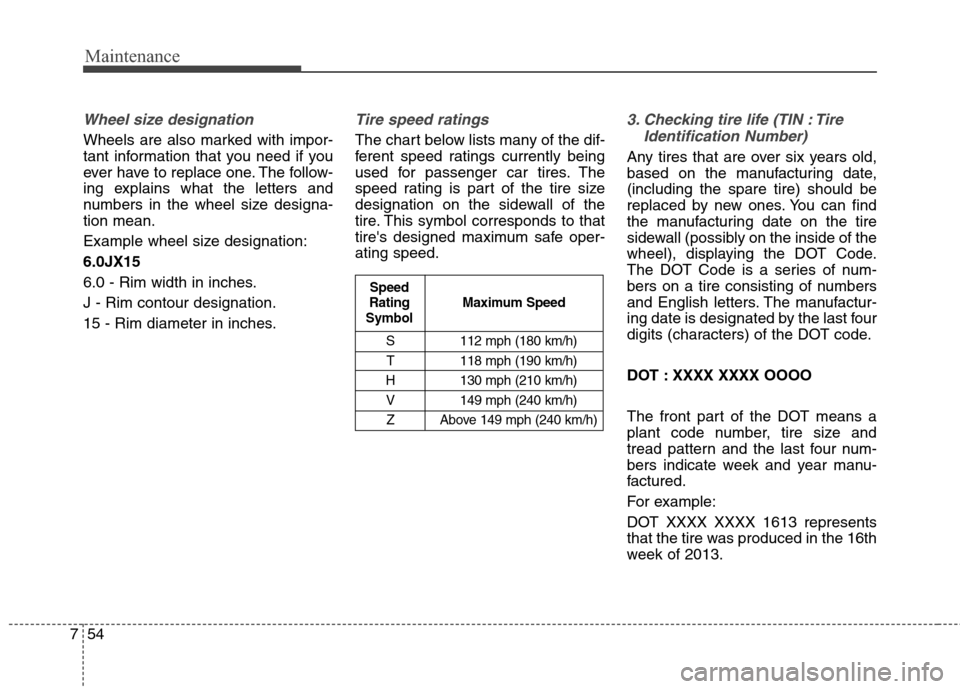
Tire speed ratings
The chart below lists many of the dif-
ferent speed ratings currently being
used for passenger car tires. The
speed rating is part of the tire size
designation on the sidewall of the
tire. This symbol corresponds to that
tire's designed maximum safe oper-
ating speed.
3. Checking tire life (TIN : Tire
Identification Number)
Any tires that are over six years old,
based on the manufacturing date,
(including the spare tire) should be
replaced by new ones. You can find
the manufacturing date on the tire
sidewall (possibly on the inside of the
wheel), displaying the DOT Code.
The DOT Code is a series of num-
bers on a tire consisting of numbers
and English letters. The manufactur-
ing date is designated by the last four
digits (characters) of the DOT code.
DOT : XXXX XXXX OOOO
The front part of the DOT means a
plant code number, tire size and
tread pattern and the last four num-
bers indicate week and year manu-
factured.
For example:
DOT XXXX XXXX 1613 represents
that the tire was produced in the 16th
week of 2013.
S 112 mph (180 km/h)
T 118 mph (190 km/h)
H 130 mph (210 km/h)
V 149 mph (240 km/h)
Z Above 149 mph (240 km/h)
Maximum Speed Speed
Rating
Symbol
Page 500 of 550
Maintenance
70 7
Fuse NameFuse ratingProtected Component
HTD MIRR10ADriver/Passenger Power Outside Mirror, A/C Control Module
MODULE 37.5AAudio, Tire Pressure Monitoring Module, Digital Clock, BCM, Instrument Cluster,
Driver/Passenger Seat Warmer Module
BRAKE SWITCH10A-
SPARE15A-
SUNROOF15ASunroof
SPARE15A-
SPARE15A-
BLOWER10AManual A/C - A/C Control Module, ECM/PCM, Blower Resistor
INTERIOR LAMP10ALuggage Lamp, Vanity Lamp LH/RH, Room Lamp, Overhead Console Lamp,
Ignition Key Ill. & Door Warning Switch(W/O Smart Key)
TRUNK10ATrunk Relay
MODULE 17.5ASport Mode Switch(A/T), Key Solenoid(W/O Smart Key)
SPARE15A-
S/HEATER RR15ARear Seat Warmer Switch LH/RH
MODULE 77.5ASmart Key Control Module, BCM
MULTIMEDIA15AAudio, A/V & Navigation Head Unit
Page 501 of 550
771
Maintenance
Fuse NameFuse ratingProtected Component
P/WDW RH25AP/WDW RH Relay
PDM 27.5ASmart Key Control Module, Start Stop Button Switch
SPARE10A-
WIPER FRT25AICM Relay Box(Rain Sensor Relay), Multifunction Switch, Wiper Motor, E/R Fuse & Relay Box(Wiper
Relay)
MODULE 57.5ACluster Ionizer(Auto A/C), Rain Sensor, Sunroof
SPARE7.5A-
AMP25AAMP
PDM 125ASmart Key Control Module
SPARE20A-
A/CON7.5AA/C Control Module, E/R Fuse & Relay Box(Blower Relay)
MEMORY10ATire Pressure Monitoring Module, BCM, Auto Light & Photo Sensor, Instrument Cluster,
Data Link Connector, Smart Junction Box Upgrade Connector, Electro Chromic Mirror,
A/C Control Module, Digital Clock
P/WDW LH25AP/WDW LH Relay, Driver Safety Power Window Module
DR LOCK20ADoor Lock Relay, Door Unlock Relay, ICM Relay Box(Two Turn Relay)
P/SEAT DRV30ADriver Seat Manual Switch
Page 531 of 550
83
Specifications, Consumer information, Reporting safety defects
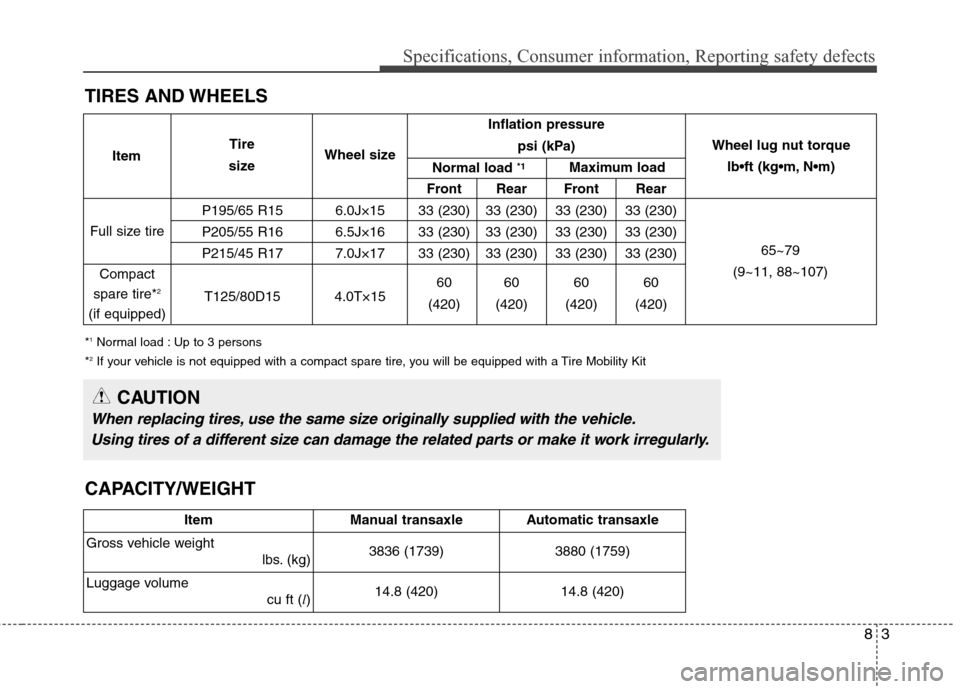
TIRES AND WHEELS
*1Normal load : Up to 3 persons
*2If your vehicle is not equipped with a compact spare tire, you will be equipped with a Tire Mobility Kit
Inflation pressure
psi (kPa)
Front Rear Front Rear
P195/65 R15 6.0J×15 33 (230) 33 (230) 33 (230) 33 (230)
P205/55 R16 6.5J×16 33 (230) 33 (230) 33 (230) 33 (230)
P215/45 R17 7.0J×17 33 (230) 33 (230) 33 (230) 33 (230)
60 60 60 60
T125/80D15 4.0T×15
(420) (420) (420) (420)
Full size tire
Compact
spare tire*
2
(if equipped)Wheel lug nut torque
lb•ft (kg N
65~79
(9~11, 88~107) ItemTire
sizeWheel size
Normal load
*1Maximum load
CAUTION
When replacing tires, use the same size originally supplied with the vehicle.
Using tires of a different size can damage the related parts or make it work irregularly.
CAPACITY/WEIGHT
Item Manual transaxle Automatic transaxle
Gross vehicle weight
lbs. (kg)3836 (1739) 3880 (1759)
Luggage volume
cu ft (l)14.8 (420) 14.8 (420)
Page 541 of 550
Index
4I
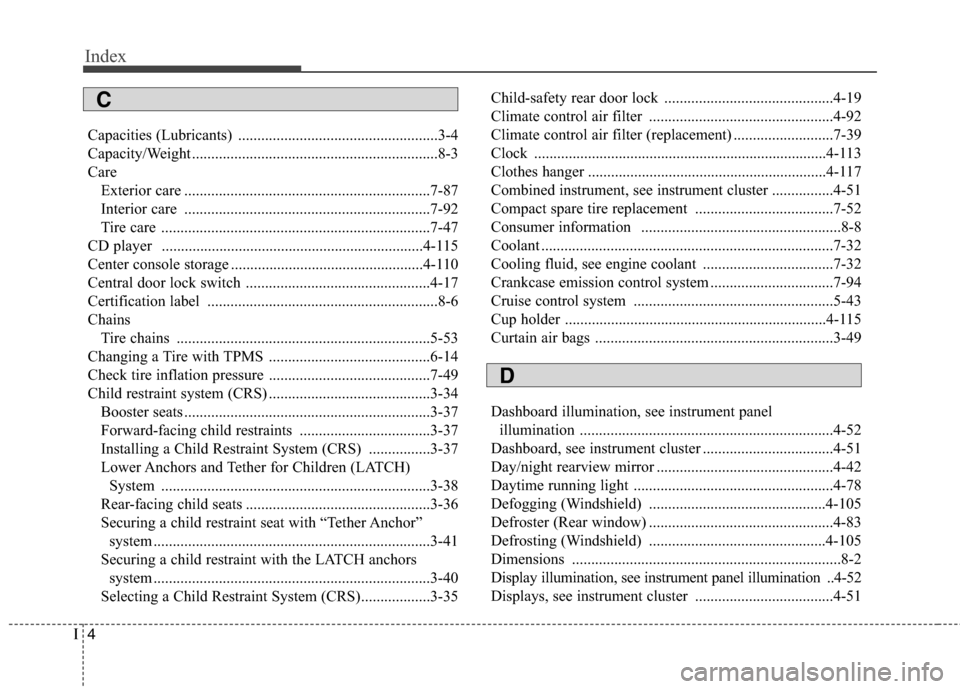
Capacities (Lubricants) ....................................................3-4
Capacity/Weight ................................................................8-3
Care
Exterior care ................................................................7-87
Interior care ................................................................7-92
Tire care ......................................................................7-47
CD player ....................................................................4-115
Center console storage ..................................................4-110
Central door lock switch ................................................4-17
Certification label ............................................................8-6
Chains
Tire chains ..................................................................5-53
Changing a Tire with TPMS ..........................................6-14
Check tire inflation pressure ..........................................7-49
Child restraint system (CRS) ..........................................3-34
Booster seats ................................................................3-37
Forward-facing child restraints ..................................3-37
Installing a Child Restraint System (CRS) ................3-37
Lower Anchors and Tether for Children (LATCH)
System ......................................................................3-38
Rear-facing child seats ................................................3-36
Securing a child restraint seat with “Tether Anchor”
system ........................................................................3-41
Securing a child restraint with the LATCH anchors
system ........................................................................3-40
Selecting a Child Restraint System (CRS)..................3-35Child-safety rear door lock ............................................4-19
Climate control air filter ................................................4-92
Climate control air filter (replacement) ..........................7-39
Clock ............................................................................4-113
Clothes hanger ..............................................................4-117
Combined instrument, see instrument cluster ................4-51
Compact spare tire replacement ....................................7-52
Consumer information ....................................................8-8
Coolant ............................................................................7-32
Cooling fluid, see engine coolant ..................................7-32
Crankcase emission control system ................................7-94
Cruise control system ....................................................5-43
Cup holder ....................................................................4-115
Curtain air bags ..............................................................3-49
Dashboard illumination, see instrument panel
illumination ..................................................................4-52
Dashboard, see instrument cluster ..................................4-51
Day/night rearview mirror ..............................................4-42
Daytime running light ....................................................4-78
Defogging (Windshield) ..............................................4-105
Defroster (Rear window) ................................................4-83
Defrosting (Windshield) ..............................................4-105
Dimensions ......................................................................8-2
Display illumination, see instrument panel illumination ..4-52
Displays, see instrument cluster ....................................4-51
D
C