rear view mirror HYUNDAI ELANTRA GT 2014 Owners Manual
[x] Cancel search | Manufacturer: HYUNDAI, Model Year: 2014, Model line: ELANTRA GT, Model: HYUNDAI ELANTRA GT 2014Pages: 476, PDF Size: 31.71 MB
Page 15 of 476
Your vehicle at a glance
2 2
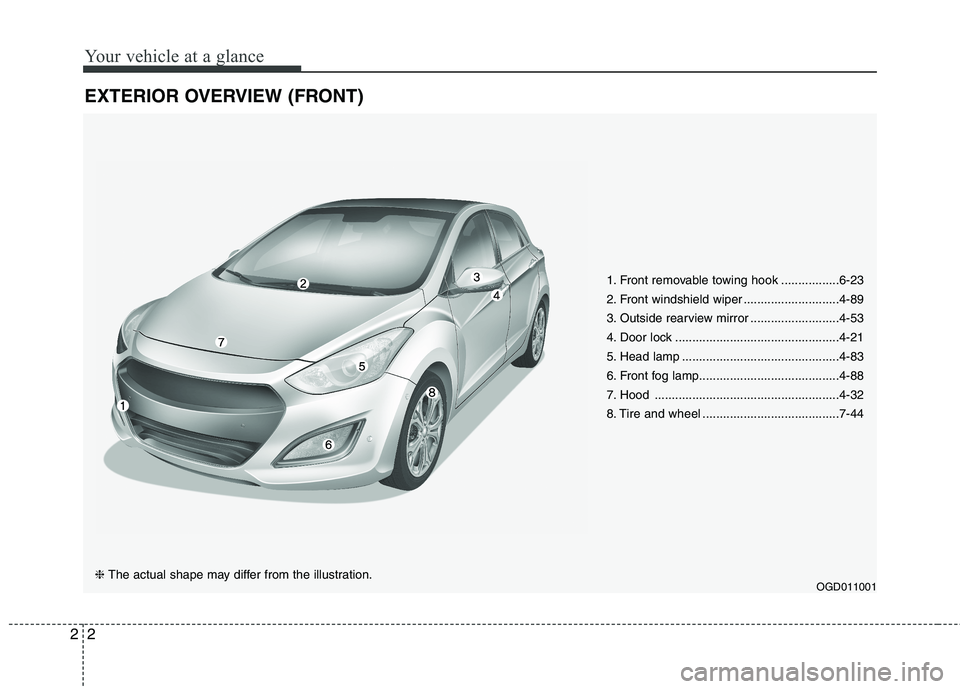
EXTERIOR OVERVIEW (FRONT)
1. Front removable towing hook .................6-23
2. Front windshield wiper ............................4-89
3. Outside rearview mirror ..........................4-53
4. Door lock ................................................4-21
5. Head lamp ..............................................4-83
6. Front fog lamp.........................................4-88
7. Hood ......................................................4-32
8. Tire and wheel ........................................7-44
OGD011001❈ The actual shape may differ from the illustration.
Page 17 of 476
Your vehicle at a glance
4 2
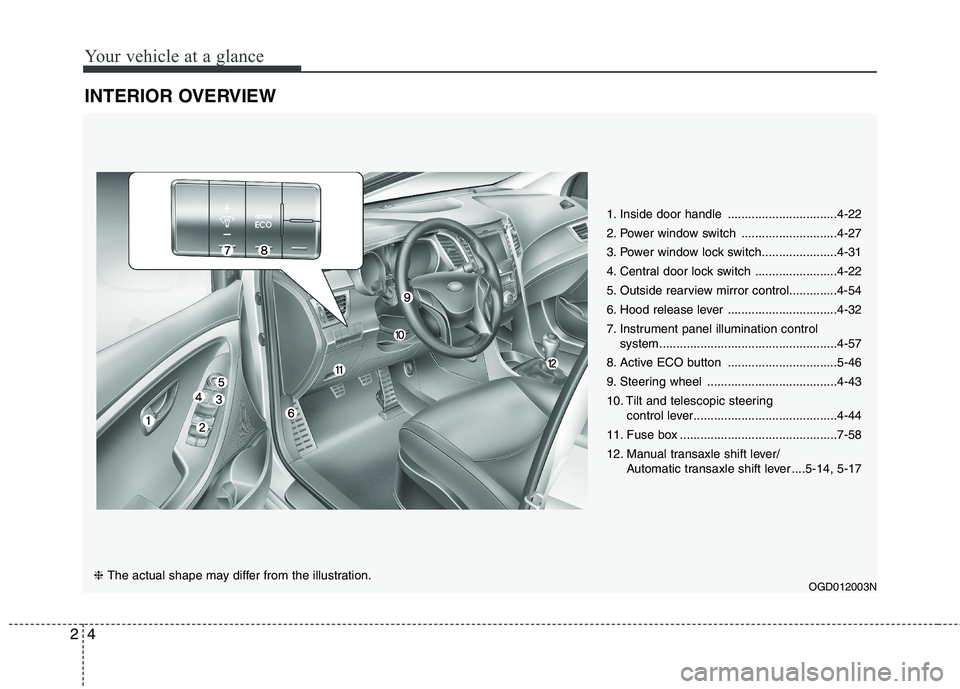
INTERIOR OVERVIEW
1. Inside door handle ................................4-22
2. Power window switch ............................4-27
3. Power window lock switch......................4-31
4. Central door lock switch ........................4-22
5. Outside rearview mirror control..............4-54
6. Hood release lever ................................4-32
7. Instrument panel illumination control
system....................................................4-57
8. Active ECO button ................................5-46
9. Steering wheel ......................................4-43
10. Tilt and telescopic steering
control lever..........................................4-44
11. Fuse box ..............................................7-58
12. Manual transaxle shift lever/
Automatic transaxle shift lever ....5-14, 5-17
OGD012003N❈ The actual shape may differ from the illustration.
Page 87 of 476
Mirrors ....................................................................4-48
................................................4-48
- Day/night rearview mirror ........................................4-48
- Blue Link
®center ......................................................4-48
- Electric chromic mirror (ECM) with
homelink system ........................................................4-49
..............................................4-53
Instrument cluster ..................................................4-56
....................................4-57
..........................................................................4-57
....................................................4-60
................................4-60
..............................................................4-61
..............................................4-67
..........................................4-78
Rearview camera ....................................................4-82
Lighting ....................................................................4-83
............................................4-83
......................................4-84
..................................................4-84
............................................................4-84
................................................4-86
........................4-87
..............................................................4-88
Wipers and washers ................................................4-89
............................................4-89
........................................4-90
....................4-91
Interior light ............................................................4-92
..............................................4-92
......................................................................4-92
....................................................................4-93
....................................................4-94
......................................................4-94
Welcome system ......................................................4-95
......................................................4-95
Defroster ..................................................................4-96
................................................4-96
........................................................4-96
Manual climate control system ..............................4-97
......................................4-98
........................................................4-103
............................................4-105
refrigerant and compressor lubricant ......................4-105
Automatic climate control system........................4-106
..................4-107
......................4-108
4
Page 133 of 476
Features of your vehicle
48 4
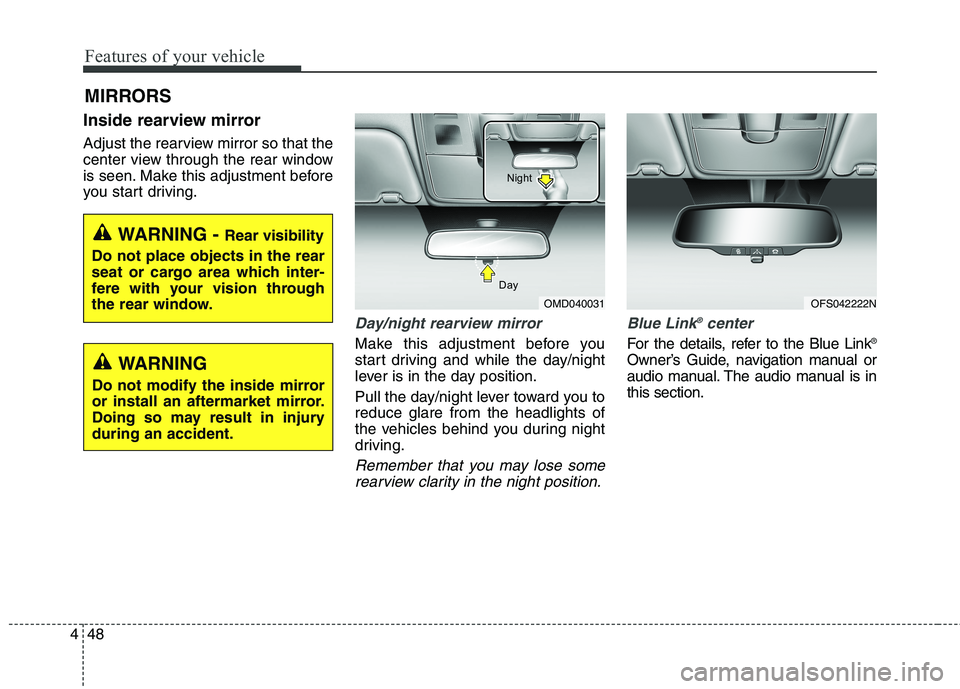
Inside rearview mirror
Adjust the rearview mirror so that the
center view through the rear window
is seen. Make this adjustment before
you start driving.
Day/night rearview mirror
Make this adjustment before you
start driving and while the day/night
lever is in the day position.
Pull the day/night lever toward you to
reduce glare from the headlights of
the vehicles behind you during night
driving.
Remember that you may lose some
rearview clarity in the night position.Blue Link
®center
For the details, refer to the Blue Link®
Owner’s Guide, navigation manual or
audio manual. The audio manual is in
this section.
MIRRORS
WARNING - Rear visibility
Do not place objects in the rear
seat or cargo area which inter-
fere with your vision through
the rear window.
OMD040031 DayNight
WARNING
Do not modify the inside mirror
or install an aftermarket mirror.
Doing so may result in injury
during an accident.
OFS042222N
Page 134 of 476
449
Features of your vehicle
Electric chromic mirror with
homelink system (if equipped)
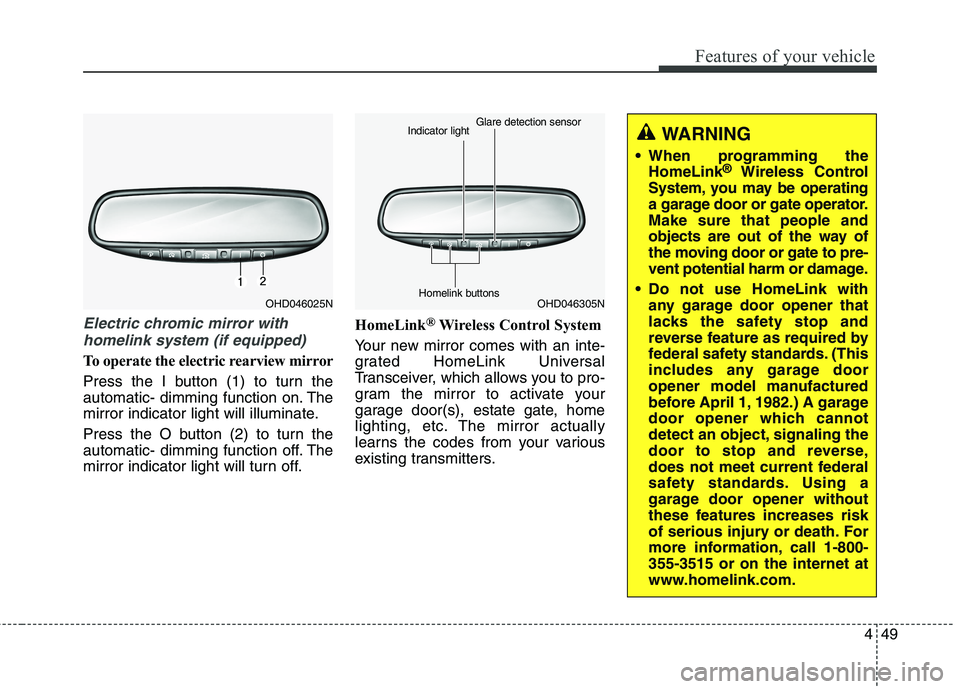
To operate the electric rearview mirror
Press the I button (1) to turn the
automatic- dimming function on. The
mirror indicator light will illuminate.
Press the O button (2) to turn the
automatic- dimming function off. The
mirror indicator light will turn off.HomeLink
®Wireless Control System
Your new mirror comes with an inte-
grated HomeLink Universal
Transceiver, which allows you to pro-
gram the mirror to activate your
garage door(s), estate gate, home
lighting, etc. The mirror actually
learns the codes from your various
existing transmitters.
OHD046025NOHD046305N Glare detection sensor
Indicator light
Homelink buttons
WARNING
When programming the
HomeLink®Wireless Control
System, you may be operating
a garage door or gate operator.
Make sure that people and
objects are out of the way of
the moving door or gate to pre-
vent potential harm or damage.
Do not use HomeLink with
any garage door opener that
lacks the safety stop and
reverse feature as required by
federal safety standards. (This
includes any garage door
opener model manufactured
before April 1, 1982.) A garage
door opener which cannot
detect an object, signaling the
door to stop and reverse,
does not meet current federal
safety standards. Using a
garage door opener without
these features increases risk
of serious injury or death. For
more information, call 1-800-
355-3515 or on the internet at
www.homelink.com.
Page 138 of 476
453
Features of your vehicle
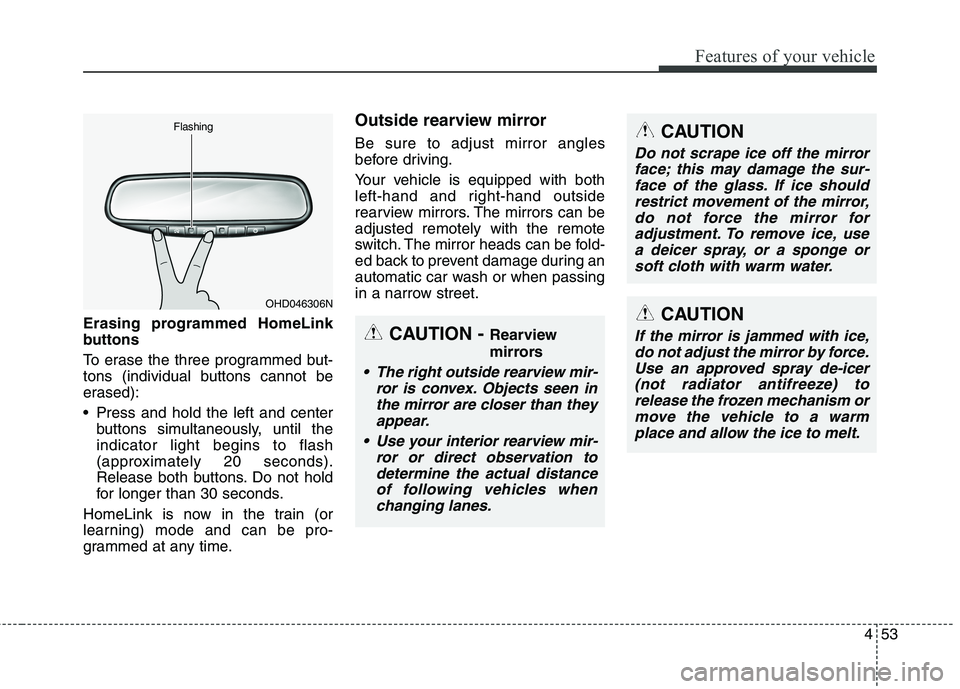
Erasing programmed HomeLink
buttons
To erase the three programmed but-
tons (individual buttons cannot be
erased):
Press and hold the left and center
buttons simultaneously, until the
indicator light begins to flash
(approximately 20 seconds).
Release both buttons. Do not hold
for longer than 30 seconds.
HomeLink is now in the train (or
learning) mode and can be pro-
grammed at any time.
Outside rearview mirror
Be sure to adjust mirror angles
before driving.
Your vehicle is equipped with both
left-hand and right-hand outside
rearview mirrors. The mirrors can be
adjusted remotely with the remote
switch. The mirror heads can be fold-
ed back to prevent damage during an
automatic car wash or when passing
in a narrow street.
OHD046306N Flashing
CAUTION - Rearview
mirrors
The right outside rearview mir-
ror is convex. Objects seen in
the mirror are closer than they
appear.
Use your interior rearview mir-
ror or direct observation to
determine the actual distance
of following vehicles when
changing lanes.
CAUTION
Do not scrape ice off the mirror
face; this may damage the sur-
face of the glass. If ice should
restrict movement of the mirror,
do not force the mirror for
adjustment. To remove ice, use
a deicer spray, or a sponge or
soft cloth with warm water.
CAUTION
If the mirror is jammed with ice,
do not adjust the mirror by force.
Use an approved spray de-icer
(not radiator antifreeze) to
release the frozen mechanism or
move the vehicle to a warm
place and allow the ice to melt.
Page 139 of 476
Features of your vehicle
54 4
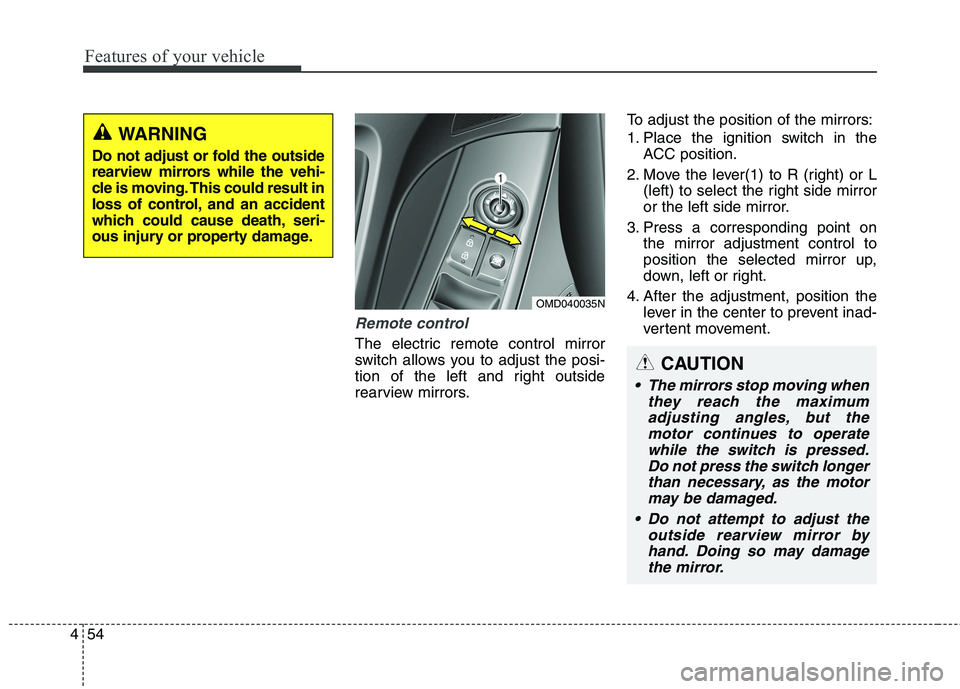
Remote control
The electric remote control mirror
switch allows you to adjust the posi-
tion of the left and right outside
rearview mirrors.To adjust the position of the mirrors:
1. Place the ignition switch in the
ACC position.
2. Move the lever(1) to R (right) or L
(left) to select the right side mirror
or the left side mirror.
3. Press a corresponding point on
the mirror adjustment control to
position the selected mirror up,
down, left or right.
4. After the adjustment, position the
lever in the center to prevent inad-
vertent movement.
WARNING
Do not adjust or fold the outside
rearview mirrors while the vehi-
cle is moving. This could result in
loss of control, and an accident
which could cause death, seri-
ous injury or property damage.
OMD040035N
CAUTION
The mirrors stop moving when
they reach the maximum
adjusting angles, but the
motor continues to operate
while the switch is pressed.
Do not press the switch longer
than necessary, as the motor
may be damaged.
Do not attempt to adjust the
outside rearview mirror by
hand. Doing so may damage
the mirror.
Page 140 of 476
455
Features of your vehicle
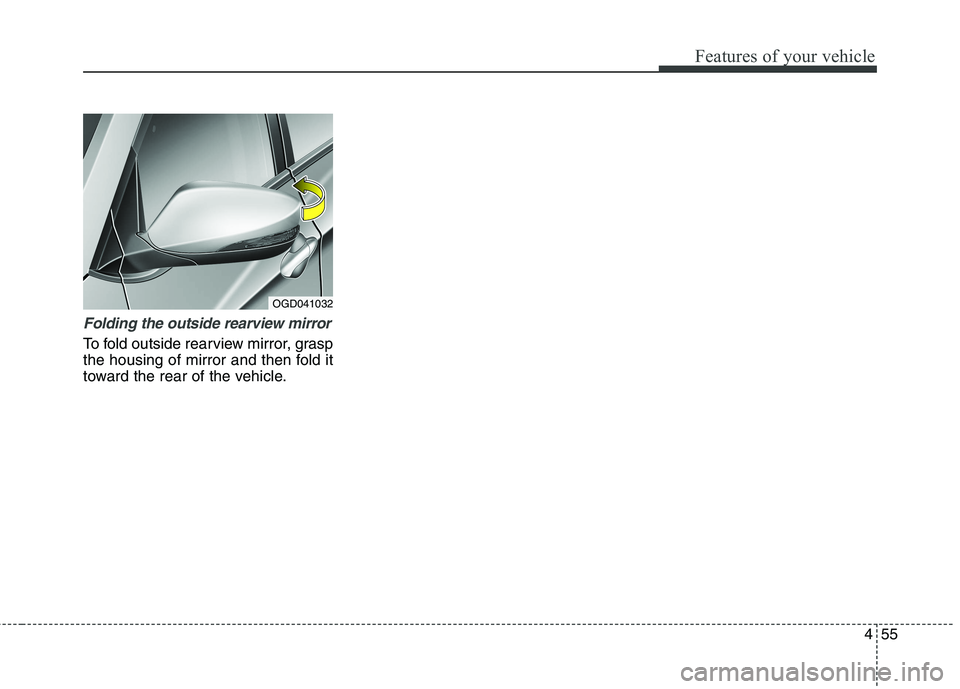
Folding the outside rearview mirror
To fold outside rearview mirror, grasp
the housing of mirror and then fold it
toward the rear of the vehicle.
OGD041032
Page 167 of 476
Features of your vehicle
82 4
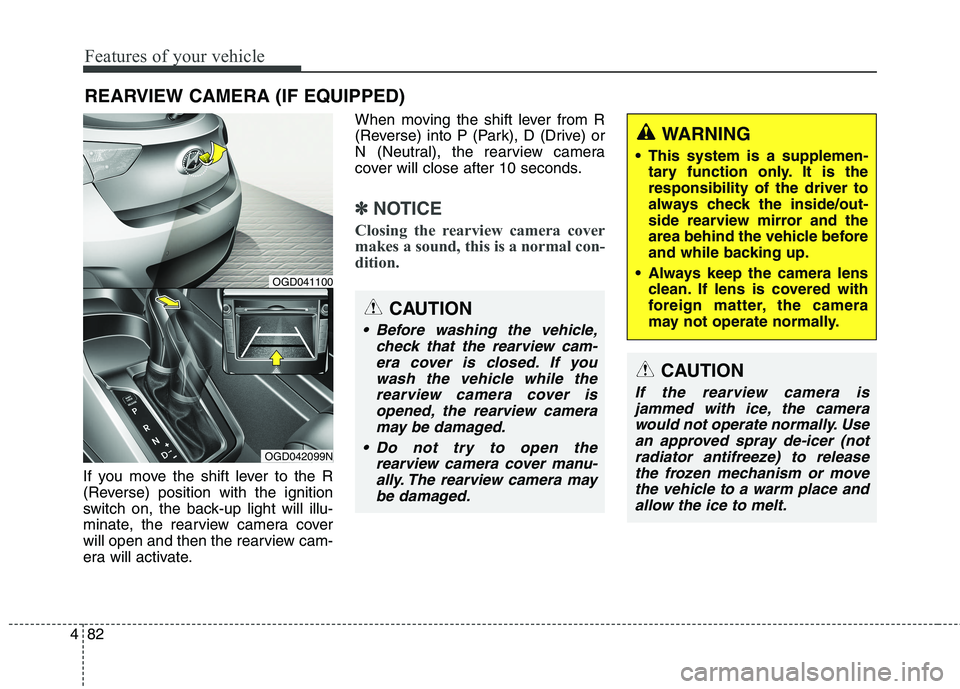
If you move the shift lever to the R
(Reverse) position with the ignition
switch on, the back-up light will illu-
minate, the rearview camera cover
will open and then the rearview cam-
era will activate.When moving the shift lever from R
(Reverse) into P (Park), D (Drive) or
N (Neutral), the rearview camera
cover will close after 10 seconds.
✽ ✽
NOTICE
Closing the rearview camera cover
makes a sound, this is a normal con-
dition.
REARVIEW CAMERA (IF EQUIPPED)
OGD042099N
OGD041100
CAUTION
Before washing the vehicle,
check that the rearview cam-
era cover is closed. If you
wash the vehicle while the
rearview camera cover is
opened, the rearview camera
may be damaged.
Do not try to open the
rearview camera cover manu-
ally. The rearview camera may
be damaged.
WARNING
This system is a supplemen-
tary function only. It is the
responsibility of the driver to
always check the inside/out-
side rearview mirror and the
area behind the vehicle before
and while backing up.
Always keep the camera lens
clean. If lens is covered with
foreign matter, the camera
may not operate normally.
CAUTION
If the rearview camera is
jammed with ice, the camera
would not operate normally. Use
an approved spray de-icer (not
radiator antifreeze) to release
the frozen mechanism or move
the vehicle to a warm place and
allow the ice to melt.
Page 181 of 476
Features of your vehicle
96 4
✽
✽
NOTICE
If you want to defrost and defog the
front windshield, refer to
“Windshield defrosting and defog-
ging” in this section.
Rear window defroster
The defroster heats the window to
remove frost, fog and thin ice from
the rear window, while the engine is
running.
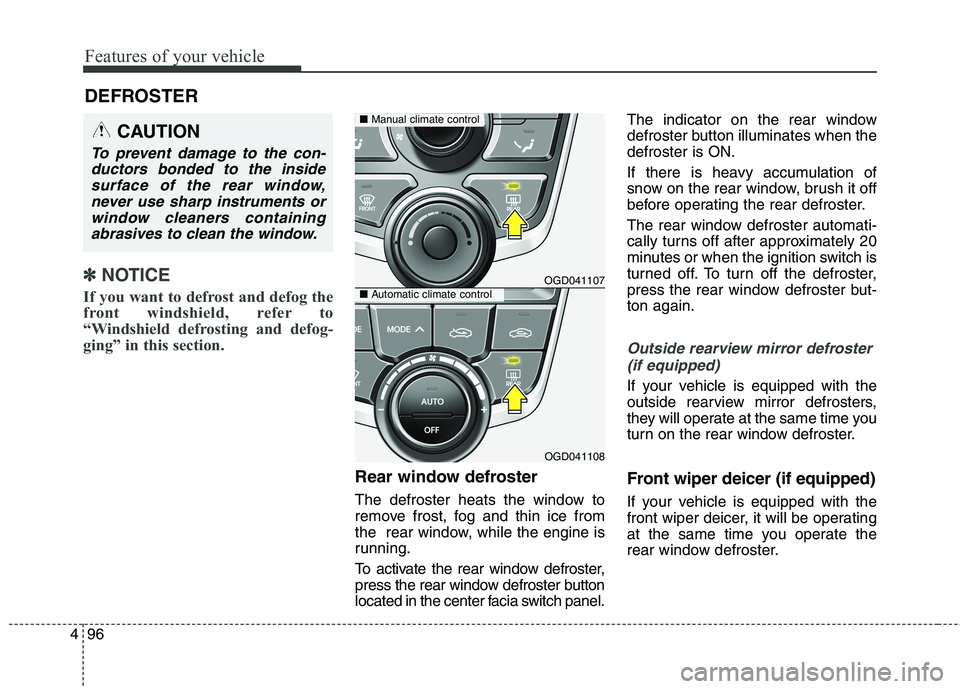
To activate the rear window defroster,
press the rear window defroster button
located in the center facia switch panel.The indicator on the rear window
defroster button illuminates when the
defroster is ON.
If there is heavy accumulation of
snow on the rear window, brush it off
before operating the rear defroster.
The rear window defroster automati-
cally turns off after approximately 20
minutes or when the ignition switch is
turned off. To turn off the defroster,
press the rear window defroster but-
ton again.
Outside rearview mirror defroster
(if equipped)
If your vehicle is equipped with the
outside rearview mirror defrosters,
they will operate at the same time you
turn on the rear window defroster.
Front wiper deicer (if equipped)
If your vehicle is equipped with the
front wiper deicer, it will be operating
at the same time you operate the
rear window defroster.
DEFROSTER
OGD041107
OGD041108
■Manual climate control
■Automatic climate control
CAUTION
To prevent damage to the con-
ductors bonded to the inside
surface of the rear window,
never use sharp instruments or
window cleaners containing
abrasives to clean the window.