climate control Hyundai Elantra GT 2016 User Guide
[x] Cancel search | Manufacturer: HYUNDAI, Model Year: 2016, Model line: Elantra GT, Model: Hyundai Elantra GT 2016Pages: 546, PDF Size: 14.04 MB
Page 200 of 546
4113
Features of your vehicle
✽
✽NOTICE
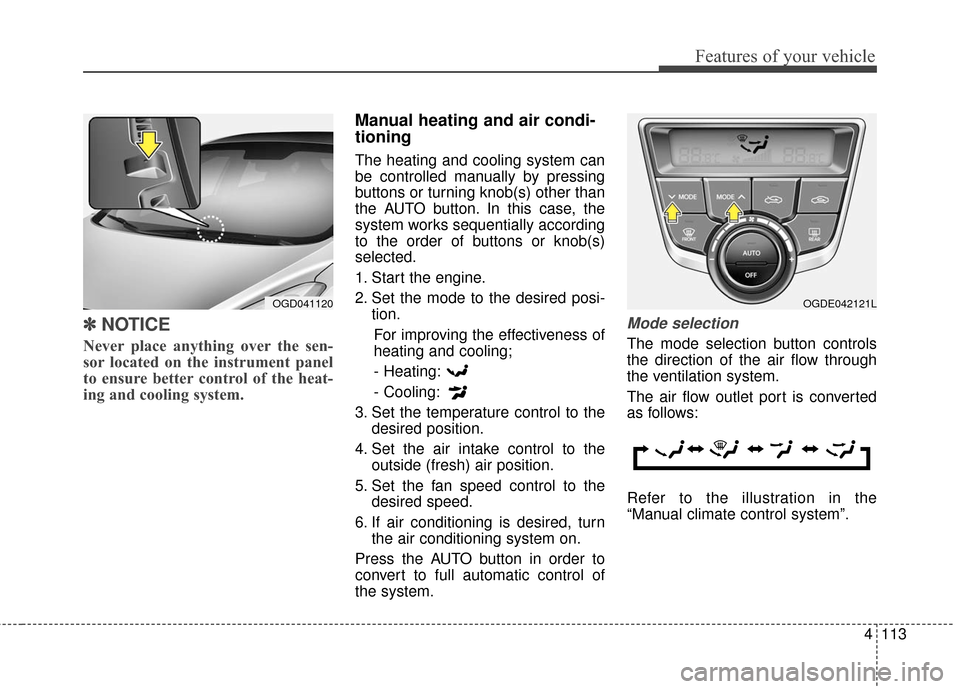
Never place anything over the sen-
sor located on the instrument panel
to ensure better control of the heat-
ing and cooling system.
Manual heating and air condi-
tioning
The heating and cooling system can
be controlled manually by pressing
buttons or turning knob(s) other than
the AUTO button. In this case, the
system works sequentially according
to the order of buttons or knob(s)
selected.
1. Start the engine.
2. Set the mode to the desired posi-
tion.
For improving the effectiveness of
heating and cooling;- Heating:
- Cooling:
3. Set the temperature control to the desired position.
4. Set the air intake control to the outside (fresh) air position.
5. Set the fan speed control to the desired speed.
6. If air conditioning is desired, turn the air conditioning system on.
Press the AUTO button in order to
convert to full automatic control of
the system.
Mode selection
The mode selection button controls
the direction of the air flow through
the ventilation system.
The air flow outlet port is converted
as follows:
Refer to the illustration in the
“Manual climate control system”.
OGDE042121LOGD041120
Page 203 of 546
Features of your vehicle
116
4
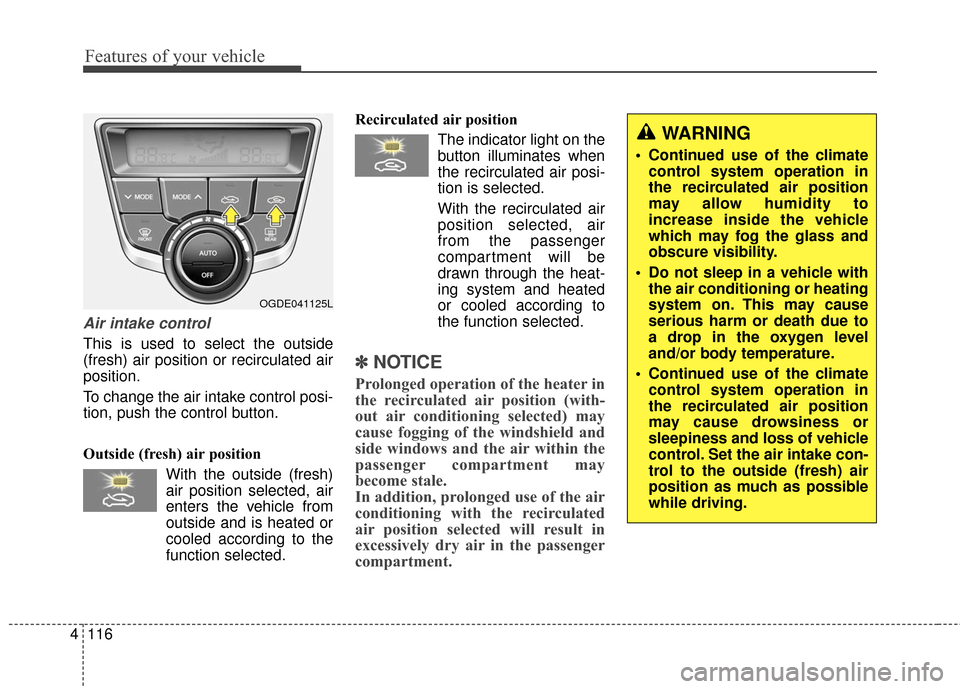
Air intake control
This is used to select the outside
(fresh) air position or recirculated air
position.
To change the air intake control posi-
tion, push the control button.
Outside (fresh) air position
With the outside (fresh)
air position selected, air
enters the vehicle from
outside and is heated or
cooled according to the
function selected. Recirculated air position
The indicator light on the
button illuminates when
the recirculated air posi-
tion is selected.
With the recirculated air position selected, air
from the passenger
compartment will be
drawn through the heat-
ing system and heated
or cooled according to
the function selected.
✽ ✽ NOTICE
Prolonged operation of the heater in
the recirculated air position (with-
out air conditioning selected) may
cause fogging of the windshield and
side windows and the air within the
passenger compartment may
become stale.
In addition, prolonged use of the air
conditioning with the recirculated
air position selected will result in
excessively dry air in the passenger
compartment.
WARNING
Continued use of the climate
control system operation in
the recirculated air position
may allow humidity to
increase inside the vehicle
which may fog the glass and
obscure visibility.
Do not sleep in a vehicle with the air conditioning or heating
system on. This may cause
serious harm or death due to
a drop in the oxygen level
and/or body temperature.
Continued use of the climate control system operation in
the recirculated air position
may cause drowsiness or
sleepiness and loss of vehicle
control. Set the air intake con-
trol to the outside (fresh) air
position as much as possible
while driving.
OGDE041125L
Page 204 of 546
4117
Features of your vehicle
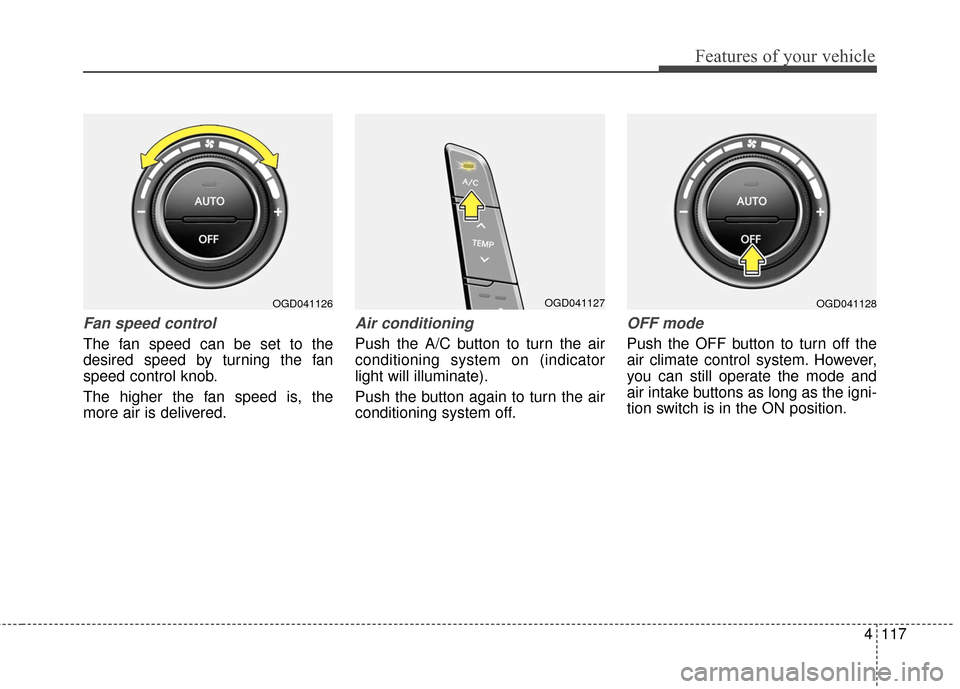
Fan speed control
The fan speed can be set to the
desired speed by turning the fan
speed control knob.
The higher the fan speed is, the
more air is delivered.
Air conditioning
Push the A/C button to turn the air
conditioning system on (indicator
light will illuminate).
Push the button again to turn the air
conditioning system off.
OFF mode
Push the OFF button to turn off the
air climate control system. However,
you can still operate the mode and
air intake buttons as long as the igni-
tion switch is in the ON position.
OGD041126OGD041127OGD041128
Page 205 of 546
Features of your vehicle
118
4
For maximum defrosting, set the
temperature control to the extreme
right/hot position and the fan speed
control to the highest speed.
If warm air to the floor is desired while defrosting or defogging, set
the mode to the floor-defrost posi-
tion.
Before driving, clear all snow and ice from the windshield, rear win-
dow, outside rear view mirrors, and
all side windows.
Clear all snow and ice from the hood and air inlet in the cowl grill to
improve heater and defroster effi-
ciency and to reduce the probabili-
ty of fogging up the inside of the
windshield.
✽ ✽ NOTICE
Be sure to keep the interior surface
of the windshield clean by wiping it
with a clean cloth and glass cleaner.
This will help reduce the tendency of
the glass fogging and also improve
visibility.
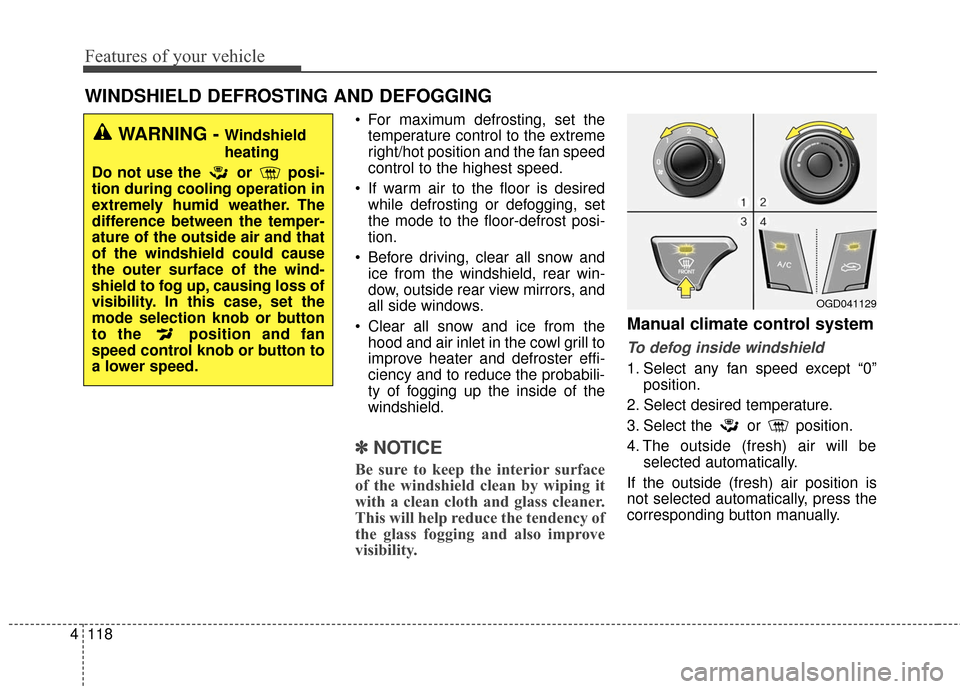
Manual climate control system
To defog inside windshield
1. Select any fan speed except “0”
position.
2. Select desired temperature.
3. Select the or position.
4. The outside (fresh) air will be selected automatically.
If the outside (fresh) air position is
not selected automatically, press the
corresponding button manually.
WINDSHIELD DEFROSTING AND DEFOGGING
WARNING - Windshield
heating
Do not use the or posi-
tion during cooling operation in
extremely humid weather. The
difference between the temper-
ature of the outside air and that
of the windshield could cause
the outer surface of the wind-
shield to fog up, causing loss of
visibility. In this case, set the
mode selection knob or button
to the position and fan
speed control knob or button to
a lower speed.
OGD041129
Page 206 of 546
4119
Features of your vehicle
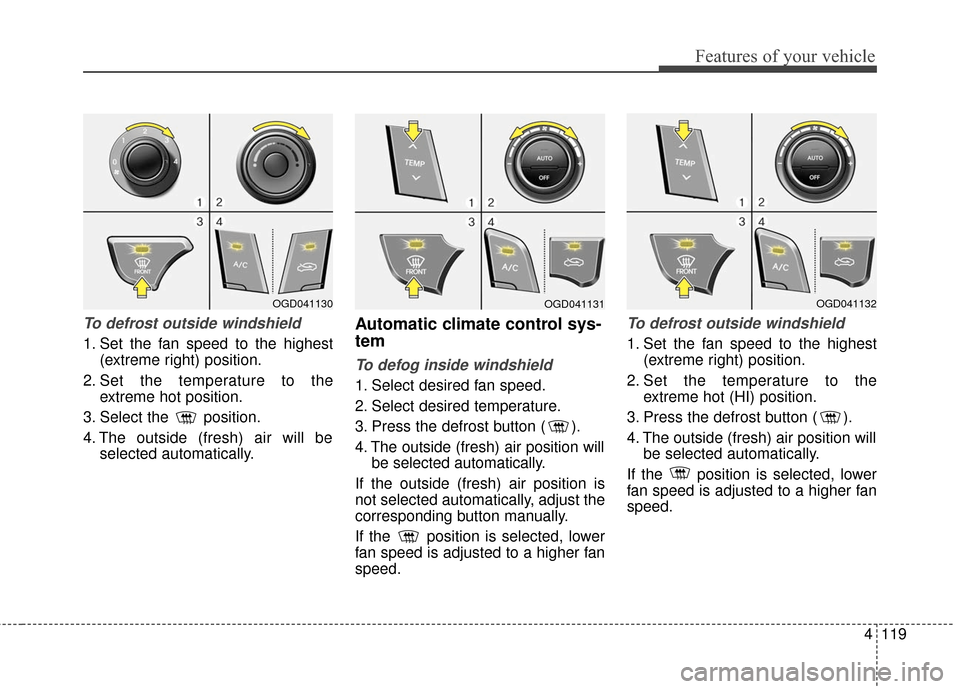
To defrost outside windshield
1. Set the fan speed to the highest(extreme right) position.
2. Set the temperature to the extreme hot position.
3. Select the position.
4. The outside (fresh) air will be selected automatically.
Automatic climate control sys-
tem
To defog inside windshield
1. Select desired fan speed.
2. Select desired temperature.
3. Press the defrost button ( ).
4. The outside (fresh) air position willbe selected automatically.
If the outside (fresh) air position is
not selected automatically, adjust the
corresponding button manually.
If the position is selected, lower
fan speed is adjusted to a higher fan
speed.
To defrost outside windshield
1. Set the fan speed to the highest (extreme right) position.
2. Set the temperature to the extreme hot (HI) position.
3. Press the defrost button ( ).
4. The outside (fresh) air position will be selected automatically.
If the position is selected, lower
fan speed is adjusted to a higher fan
speed.
OGD041130OGD041131OGD041132
Page 370 of 546
525
Driving your vehicle
In the event of brake failure
If service brakes fail to operate while
the vehicle is in motion, you can
make an emergency stop with the
parking brake. The stopping dis-
tance, however, will be greater than
normal.
Disc brakes wear indicator
Your vehicle has disc brakes.
When your brake pads are worn and
new pads are required, you will hear
a high-pitched warning sound from
your front brakes or rear brakes. You
may hear this sound come and go or
it may occur whenever you depress
the brake pedal.
Please remember that some driving
conditions or climates may cause a
brake squeal when you first apply (or
lightly apply) the brakes. This is nor-
mal and does not indicate a problem
with your brakes.
WARNING- Parking brake
Applying the parking brake
while the vehicle is moving at
normal speeds can cause a
sudden loss of control of the
vehicle. If you must use the
parking brake to stop the vehi-
cle, use great caution in apply-
ing the brake.WARNING- Brake wear
This brake wear warning sound
means your vehicle needs serv-
ice. If you ignore this audible
warning, you will eventually
lose braking performance,
which could lead to a serious
accident.
CAUTION
To avoid costly brake repairs, do not continue to drive withworn brake pads.
Always replace the front or rear brake pads in pairs.
Page 430 of 546
Maintenance
Engine compartment . . . . . . . . . . . . . . . . . . . . . . . . 7-3
Maintenance services . . . . . . . . . . . . . . . . . . . . . . . . 7-4
• Owner’s responsibility . . . . . . . . . . . . . . . . . . . . . . . . . 7-4
. . . . . . . . . . . . . . . . . 7-5
Owner maintenance . . . . . . . . . . . . . . . . . . . . . . . . . 7-6
Scheduled maintenance service. . . . . . . . . . . . . . . . 7-8
Explanation of scheduled maintenance items . . . 7-23
Engine oil. . . . . . . . . . . . . . . . . . . . . . . . . . . . . . . . . 7-27
. . . . . . . . . . . . . . . . . . . 7-27
. . . . . . . . . . . . . . . 7-28
Engine coolant . . . . . . . . . . . . . . . . . . . . . . . . . . . . 7-29
. . . . . . . . . . . . . . . . . . . . . 7-29
. . . . . . . . . . . . . . . . . . . . . . . . . 7-31
Brake/clutch fluid . . . . . . . . . . . . . . . . . . . . . . . . . . 7-32
. . . . . . . . . . . . . . . . . . 7-32
Washer fluid . . . . . . . . . . . . . . . . . . . . . . . . . . . . . . 7-33
. . . . . . . . . . . . . . . . . 7-33
Parking brake - hand type . . . . . . . . . . . . . . . . . . 7-33
Air cleaner. . . . . . . . . . . . . . . . . . . . . . . . . . . . . . . . 7-34
. . . . . . . . . . . . . . . . . . . . . . . . . . . . 7-34
Climate control air filter . . . . . . . . . . . . . . . . . . . . 7-36
. . . . . . . . . . . . . . . . . . . . . . . . . . . . . . 7-36
. . . . . . . . . . . . . . . . . . . . . . . . . . . . 7-36
Wiper blades . . . . . . . . . . . . . . . . . . . . . . . . . . . . . . 7-38
. . . . . . . . . . . . . . . . . . . . . . . . . . . . . . 7-38
. . . . . . . . . . . . . . . . . . . . . . . . . . . . 7-38
Battery . . . . . . . . . . . . . . . . . . . . . . . . . . . . . . . . . . . 7-\
41
. . . . . . . . . . . . . . . . . . . . . . . 7-41
. . . . . . . . . . . . . . . . . . . . . . . . . . . 7-42
. . . . . . . . . . . . . . . . . . . . . . . . . . . . . . . . . . 7-43\
Tires and wheels . . . . . . . . . . . . . . . . . . . . . . . . . . . 7-44
. . . . . . . . . . . . . . . . . . . . . . . . . . . . . . . . . . . . \
7-44
. . . . . . . 7-44
. . . . . . . . . . . . . . . . . . . . . . . . . . . . . . . . . 7-46
. . . . . . . . . . . . . . . 7-47
. . . . . . . . . . . . . . . . . . . . . . . . . . . . . 7-48
. . . . . . . . . . . . . . . . . . . . . . . . . . . 7-49
. . . . . . . . . . . . . . . . . . . . . . . . . . . . . . . . . 7-49
. . . . . . . . . . . . . . . . . . . . . . . . . . . . . 7-49
. . . . . . . . . . . . . . . . . . . . . . . . . 7-50
. . . . . . . . . . . . . . . . . . . . . . . . . . 7-58
Fuses . . . . . . . . . . . . . . . . . . . . . . . . . . . . . . . . . . . . \
7-59
7
Page 438 of 546
79
Maintenance
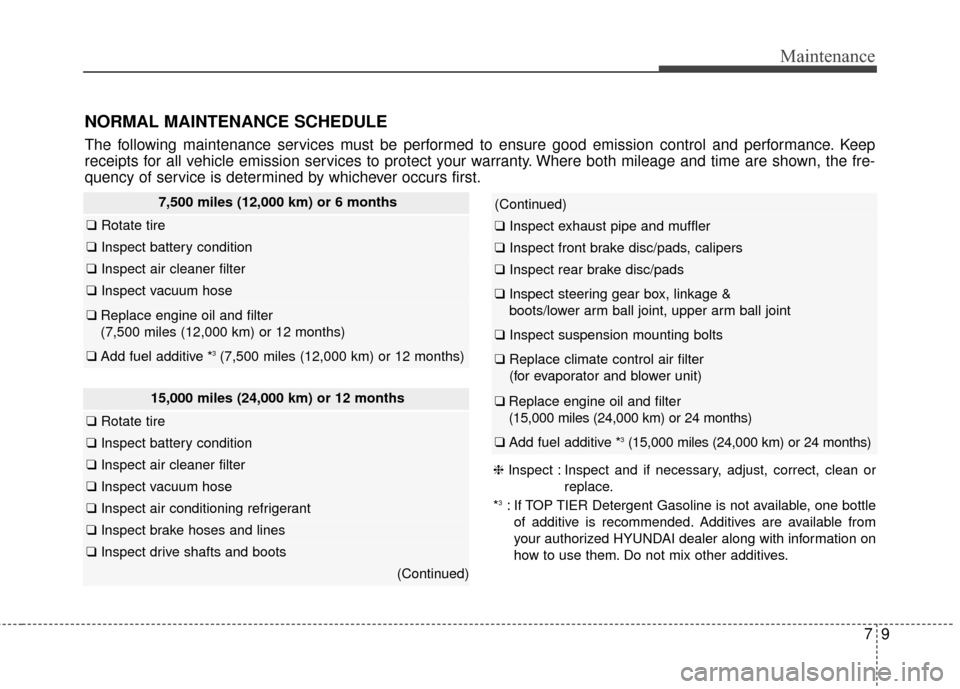
NORMAL MAINTENANCE SCHEDULE
The following maintenance services must be performed to ensure good emission control and performance. Keep
receipts for all vehicle emission services to protect your warranty. Where both mileage and time are shown, the fre-
quency of service is determined by whichever occurs first.
15,000 miles (24,000 km) or 12 months
❑ Rotate tire
❑ Inspect battery condition
❑Inspect air cleaner filter
❑Inspect vacuum hose
❑Inspect air conditioning refrigerant
❑Inspect brake hoses and lines
❑Inspect drive shafts and boots
(Continued)
7,500 miles (12,000 km) or 6 months
❑ Rotate tire
❑ Inspect battery condition
❑Inspect air cleaner filter
❑Inspect vacuum hose
❑Replace engine oil and filter
(7,500 miles (12,000 km) or 12 months)
❑Add fuel additive *3(7,500 miles (12,000 km) or 12 months)
(Continued)
❑ Inspect exhaust pipe and muffler
❑Inspect front brake disc/pads, calipers
❑Inspect rear brake disc/pads
❑Inspect steering gear box, linkage &
boots/lower arm ball joint, upper arm ball joint
❑ Inspect suspension mounting bolts
❑Replace climate control air filter
(for evaporator and blower unit)
❑Replace engine oil and filter
(15,000 miles (24,000 km) or 24 months)
❑ Add fuel additive *3(15,000 miles (24,000 km) or 24 months)
❈ Inspect : Inspect and if necessary, adjust, correct, clean or
replace.
*
3: If TOP TIER Detergent Gasoline is not available, one bottle of additive is recommended. Additives are available from
your authorized HYUNDAI dealer along with information on
how to use them. Do not mix other additives.
Page 440 of 546
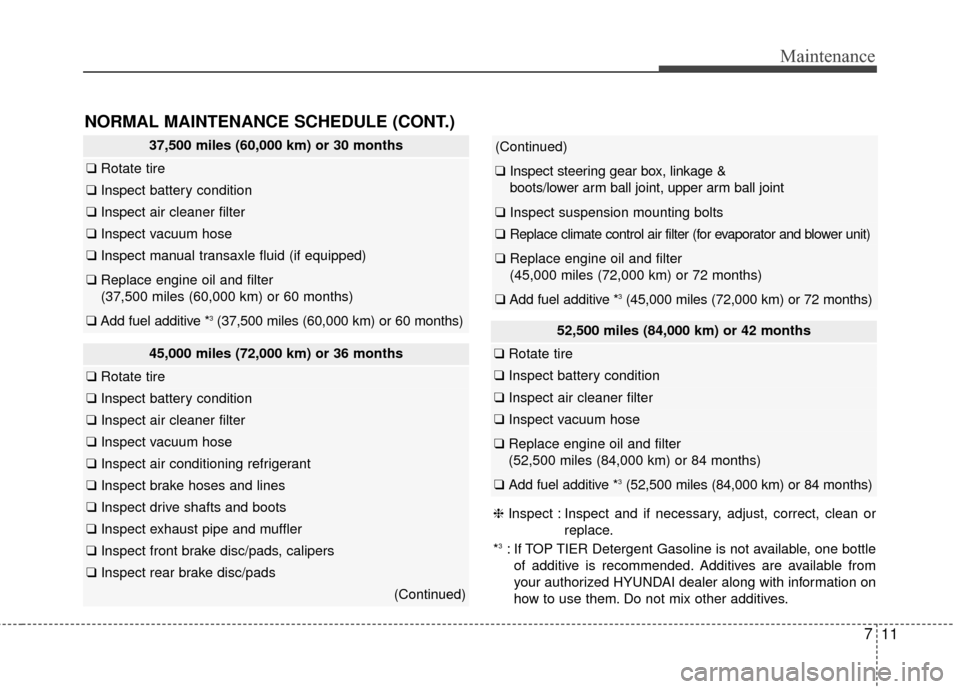
711
Maintenance
37,500 miles (60,000 km) or 30 months
❑Rotate tire
❑Inspect battery condition
❑Inspect air cleaner filter
❑Inspect vacuum hose
❑Inspect manual transaxle fluid (if equipped)
❑Replace engine oil and filter
(37,500 miles (60,000 km) or 60 months)
❑Add fuel additive *3(37,500 miles (60,000 km) or 60 months)
NORMAL MAINTENANCE SCHEDULE (CONT.)
45,000 miles (72,000 km) or 36 months
❑ Rotate tire
❑Inspect battery condition
❑ Inspect air cleaner filter
❑Inspect vacuum hose
❑Inspect air conditioning refrigerant
❑Inspect brake hoses and lines
❑Inspect drive shafts and boots
❑Inspect exhaust pipe and muffler
❑Inspect front brake disc/pads, calipers
❑Inspect rear brake disc/pads
(Continued)
(Continued)
❑Inspect steering gear box, linkage &
boots/lower arm ball joint, upper arm ball joint
❑ Inspect suspension mounting bolts
❑Replace climate control air filter (for evaporator and blower unit)
❑Replace engine oil and filter
(45,000 miles (72,000 km) or 72 months)
❑Add fuel additive *3(45,000 miles (72,000 km) or 72 months)
❈ Inspect : Inspect and if necessary, adjust, correct, clean or
replace.
*
3: If TOP TIER Detergent Gasoline is not available, one bottle of additive is recommended. Additives are available from
your authorized HYUNDAI dealer along with information on
how to use them. Do not mix other additives.
52,500 miles (84,000 km) or 42 months
❑ Rotate tire
❑Inspect battery condition
❑ Inspect air cleaner filter
❑Inspect vacuum hose
❑Replace engine oil and filter
(52,500 miles (84,000 km) or 84 months)
❑Add fuel additive *3(52,500 miles (84,000 km) or 84 months)
Page 441 of 546
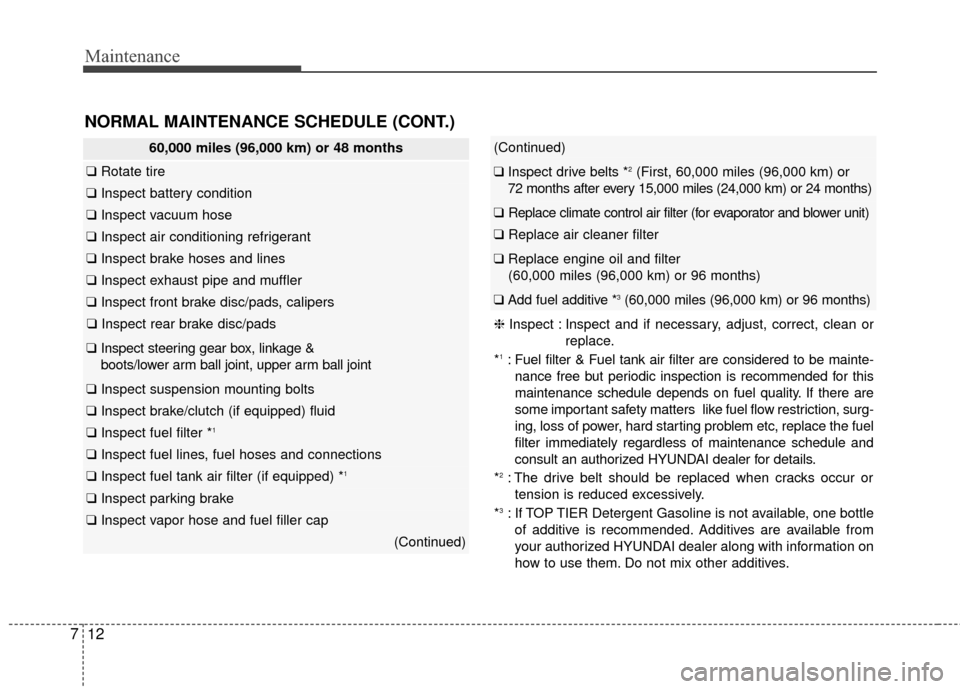
Maintenance
12
7
NORMAL MAINTENANCE SCHEDULE (CONT.)
❈ Inspect : Inspect and if necessary, adjust, correct, clean or
replace.
*
1: Fuel filter & Fuel tank air filter are considered to be mainte- nance free but periodic inspection is recommended for this
maintenance schedule depends on fuel quality. If there are
some important safety matters like fuel flow restriction, surg-
ing, loss of power, hard starting problem etc, replace the fuel
filter immediately regardless of maintenance schedule and
consult an authorized HYUNDAI dealer for details.
*
2: The drive belt should be replaced when cracks occur or tension is reduced excessively.
*
3: If TOP TIER Detergent Gasoline is not available, one bottle of additive is recommended. Additives are available from
your authorized HYUNDAI dealer along with information on
how to use them. Do not mix other additives.
60,000 miles (96,000 km) or 48 months
❑ Rotate tire
❑Inspect battery condition
❑Inspect vacuum hose
❑Inspect air conditioning refrigerant
❑Inspect brake hoses and lines
❑Inspect exhaust pipe and muffler
❑Inspect front brake disc/pads, calipers
❑Inspect rear brake disc/pads
❑Inspect steering gear box, linkage &
boots/lower arm ball joint, upper arm ball joint
❑ Inspect suspension mounting bolts
❑Inspect brake/clutch (if equipped) fluid
❑Inspect fuel filter *1
❑Inspect fuel lines, fuel hoses and connections
❑Inspect fuel tank air filter (if equipped) *1
❑Inspect parking brake
❑Inspect vapor hose and fuel filler cap
(Continued)
(Continued)
❑Inspect drive belts *2(First, 60,000 miles (96,000 km) or
72 months after every 15,000 miles (24,000 km) or 24 months)
❑ Replace climate control air filter (for evaporator and blower unit)
❑Replace air cleaner filter
❑Replace engine oil and filter
(60,000 miles (96,000 km) or 96 months)
❑Add fuel additive *3(60,000 miles (96,000 km) or 96 months)