charging HYUNDAI ELANTRA GT 2019 Owners Manual
[x] Cancel search | Manufacturer: HYUNDAI, Model Year: 2019, Model line: ELANTRA GT, Model: HYUNDAI ELANTRA GT 2019Pages: 486, PDF Size: 78.59 MB
Page 17 of 486
1-6
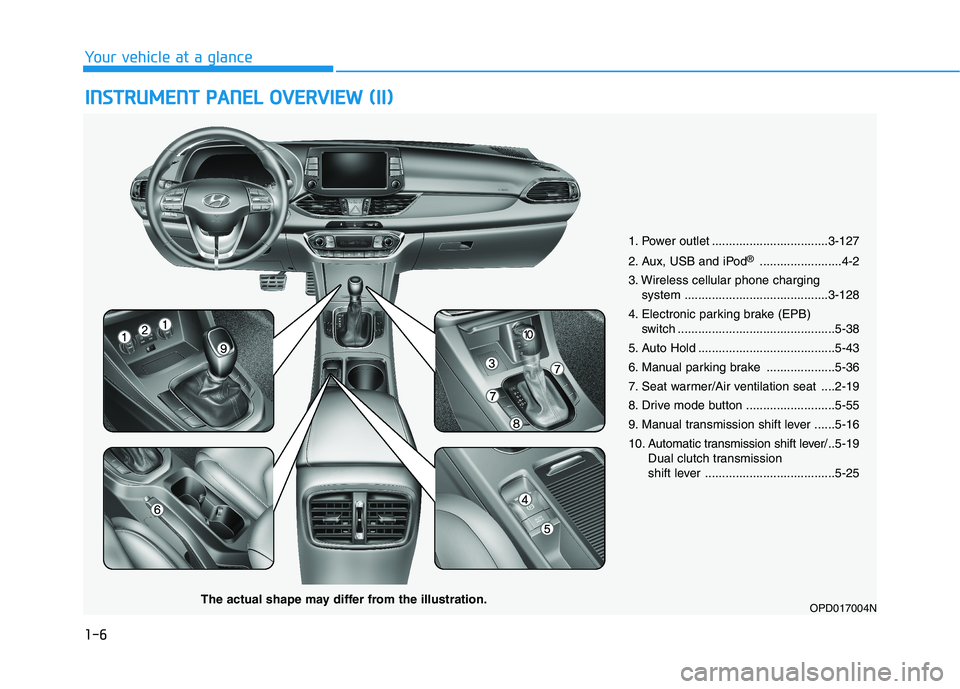
IINN SSTT RR UU MM EENN TT PP AA NN EELL OO VVEERR VV IIEE WW (( IIII))
Your vehicle at a glance
1. Power outlet ..................................3-127
2. Aux, USB and iPod ®
........................4-2
3. Wireless cellular phone charging system ..........................................3-128
4. Electronic parking brake (EPB) switch ..............................................5-38
5. Auto Hold ........................................5-43
6. Manual parking brake ....................5-36
7. Seat warmer/Air ventilation seat ....2-19
8. Drive mode button ..........................5-55
9. Manual transmission shift lever ......5-16
10. Automatic transmission shift lever/ .. 5-19
Dual clutch transmission
shift lever ......................................5-25
OPD017004N
The actual shape may differ from the illustration.
Page 75 of 486
2-57
Safety system of your vehicle
2
Always be sure that you and all vehi-
cle occupants are seated properly
and wearing the seat belt properly for
the most effective protection by theair bag and the seat belt.
The OCS may not function properly if
the passenger takes actions which
can affect the classification system.These include:
Failing to sit in an upright position.
Leaning against the door or centerconsole.
Sitting towards the sides of the front of the seat.
Putting their legs on the dashboard or resting them on other locations which reduce the passenger
weight on the front seat.
Wearing the seat belt improperly.
Reclining the seatback.
Wearing a thick cloth like ski wear or hip protection wear.
Putting an additional thick cushion on the seat.
Putting electrical devices (e.g. notebook, satellite radio) on the
seat with inverter charging.Condition and operation in the front passenger Occupant Classification System
Condition detected by the
occupant classification system
Indicator/Warning lightDevices
"PASSENGER
AIR BAG OFF" indicator lightSRS
warning lightFront passenger
air bag
1. Adult * 1OffOffActivated
2. Infant * 2
or child restraint
system with 12 months old * 3
*4 OnOffDeactivated
3. Unoccupied OnOffDeactivated
4. Malfunction in the systemOffOnActivated
*
1
The system judges a person of adult size as an adult. When a smaller adult sits in the front
passenger seat, the system may recognize him/her as a child depending on his/her physique
and posture.
* 2
Do not allow children to ride in the front passenger seat. When a larger child who has out-
grown a child restraint system sits in the front passenger seat, the system may recognize
him/her as an adult depending upon his/her physique or sitting position.
* 3
Never install a child restraint system on the front passenger seat.
* 4
The PASSENGER AIR BAG "OFF" indicator may turn on or off when a child above 12 months
to 12 years old (with or without child restraint system) sits in the front passenger seat. This is
a normal condition.
Page 87 of 486
Lighting..................................................................3-83Exterior Lights .................................................................3-83
Interior Lights...................................................................3-89
Welcome System .............................................................3-92
Wipers and Washers ............................................3-93 Windshield Wipers...........................................................3-93
Windshield Washers .......................................................3-94
Rear Window Wiper and Washer ................................3-95
Driver Assist System ...........................................3-96 Rear View Monitor..........................................................3-96
Manual Climate Control System.........................3-97 Heating and Air Conditioning .......................................3-98
System Operation .........................................................3-102
System Maintenance....................................................3-104
Automatic Climate Control System ..................3-106 Automatic Heating and Air Conditioning.................3-107
Manual Heating and Air Conditioning......................3-108
System Operation .........................................................3-114
System Maintenance....................................................3-116
Windshield Defrosting and Defogging ............3-117 Auto Defogging System ..............................................3-120Rear Window Defroster ..............................................3-121 Climate Control Additional Features ...............3-122
Cluster ionizer ................................................................3-122
Automatic Ventilation ...................................................3-122
Sunroof Inside Air Recirculation ...............................3-122
Storage Compartment .......................................3-123 Center Console Storage ..............................................3-123
Glove Box ........................................................................3-123
Sunglass Holder.............................................................3-124
Multi Box (with a cover) .............................................3-124
Interior Features ................................................3-125 Cup Holder ......................................................................3-125
Sliding Armrest ..............................................................3-126
Sunvisor ...........................................................................3-126
Power Outlet ..................................................................3-127
Wireless Cellular Phone Charging System..............3-128
Clock .................................................................................3-130
Clothes Hanger ..............................................................3-130
Floor Mat Anchor(s).....................................................3-131
Luggage Net Holder .....................................................3-132
Cargo Area Cover..........................................................3-132
3
Page 142 of 486
3-57
Convenient features of your vehicle
3
Malfunction IndicatorLamp (MIL)
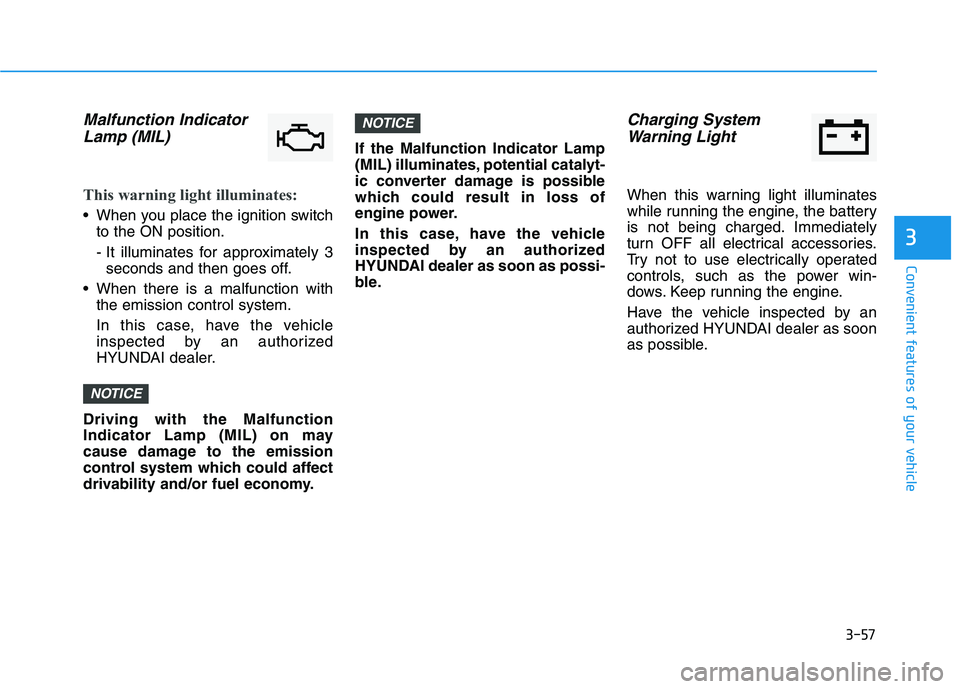
This warning light illuminates:
When you place the ignition switch to the ON position.
- It illuminates for approximately 3seconds and then goes off.
When there is a malfunction with the emission control system.
In this case, have the vehicle
inspected by an authorized
HYUNDAI dealer.
Driving with the Malfunction
Indicator Lamp (MIL) on may
cause damage to the emission
control system which could affect
drivability and/or fuel economy. If the Malfunction Indicator Lamp
(MIL) illuminates, potential catalyt-
ic converter damage is possible
which could result in loss of
engine power.
In this case, have the vehicle
inspected by an authorized
HYUNDAI dealer as soon as possi-
ble.
Charging System
Warning Light
When this warning light illuminates
while running the engine, the battery
is not being charged. Immediately
turn OFF all electrical accessories.
Try not to use electrically operated
controls, such as the power win-
dows. Keep running the engine.
Have the vehicle inspected by an
authorized HYUNDAI dealer as soon
as possible.
NOTICE
NOTICE
Page 162 of 486
3-77
Convenient features of your vehicle
3
3. Lights
One Touch Turn Signal
- Off: The one touch turn signal func-tion will be deactivated.
- 3, 5, 7 Flashes: The turn signal indicator will blink 3, 5, or 7 times
when the turn signal lever is moved
slightly.
For more information, refer to
"Lighting" in this chapter.
Head Lamp Delay
To activate or deactivate the head-
light delay function.
For more information, refer to
"Lighting" in this chapter
4. Sound
Blind-spot Collision Warning Sound
To activate or deactivate the Blind-
spot Collision Warning sound.
For more information, refer to
"Blind-spot Collision Warning" in
chapter 5.
Welcome Sound
To activate or deactivate the wel- come sound function. 5. Convenience
Wireless Charging System
To activate or deactivate the wireless charging system in the front seat.
For more information, refer to
"Wireless Charging System" in
this chapter.
Wiper/Lights Display
To activate or deactivate the Wiper/
Light mode.
When activated, the LCD display
shows the selected Wiper/Light
mode whenever you change the
mode.
Auto Rear Wiper (reverse)
To activate or deactivate the rear
wiper while the vehicle is in reversewith the front wiper ON.
Gear Position Pop-up
To activate or deactivate the gear
position pop-up.
When activated, the gear position
will be displayed on the LCD display.
(if equipped with automatic transmis-
sion/dual clutch transmission)
6. Service
Service Interval
To activate or deactivate the service
interval function.
Adjust Interval
If the service interval menu is acti-
vated, you may adjust the time and
distance.
Information
To use the service interval menu, con-
sult an authorized HYUNDAI dealer.
If the service interval is activated and the time and distance is adjusted,
messages are displayed in the fol-
lowing situations each time the vehi-
cle is turned on.
- Service in : Displayed to inform the driver theremaining mileage and days to
service.
- Service required : Displayed when the mileage anddays to service has been reachedor passed.
i
Page 213 of 486
3-128
Convenient features of your vehicle
To prevent damage to the Power Outlets :
Use the power outlet only whenthe engine is running and
remove the accessory plug after
use. Using the accessory plug
for prolonged periods of timewith the engine off could cause
the battery to discharge.
Only use 12V electric acces- sories which are less than 180 W
(Watts) in electric capacity.
Adjust the air-conditioner or heater to the lowest operating
level when using the power outlet.
Close the cover when not in use. (Continued)(Continued)
Some electronic devices can
cause electronic interference
when plugged into a vehicle’s
power outlet. These devices may
cause excessive audio staticand malfunctions in other elec-
tronic systems or devices used
in your vehicle.
Push the plug in as far as it will go. If good contact is not made,
the plug may overheat and the
fuse may open.
Plug in battery equipped electri- cal/electronic devices with
reverse current protection. The
current from the battery may
flow into the vehicle's electri-
cal/electronic system and causesystem malfunction.
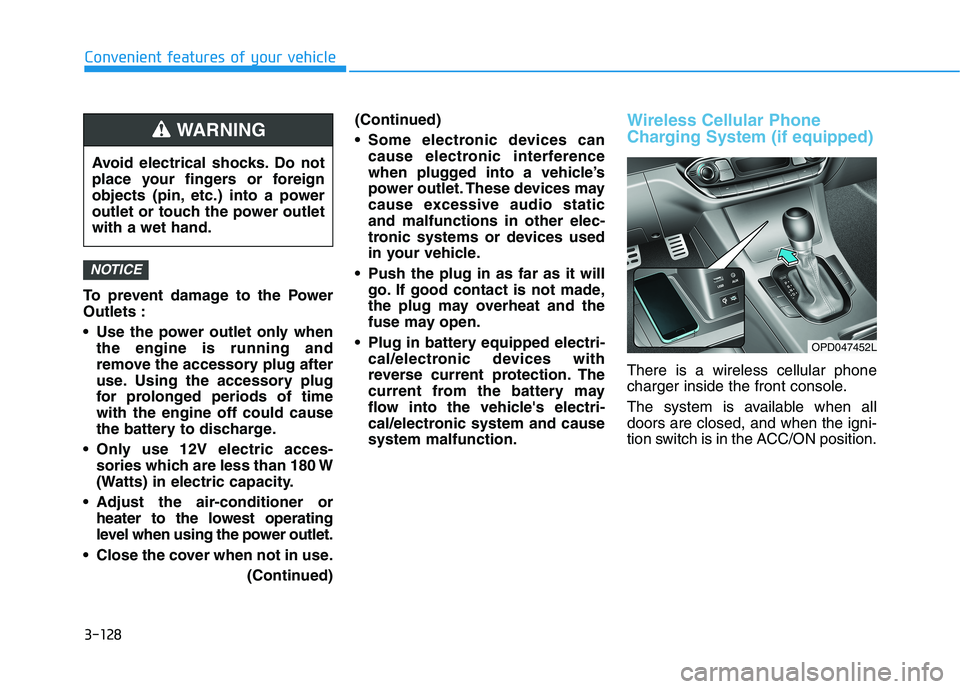
Wireless Cellular Phone
Charging System (if equipped)
There is a wireless cellular phone
charger inside the front console.
The system is available when all doors are closed, and when the igni-
tion switch is in the ACC/ON position.
NOTICE
Avoid electrical shocks. Do not
place your fingers or foreign
objects (pin, etc.) into a power
outlet or touch the power outletwith a wet hand.
WARNING
OPD047452L
Page 214 of 486
3-129
Convenient features of your vehicle
3
To charge a cellular phone
The wireless cellular phone charging
system charges only the Qi-enabled
cellular phones ( ). Read the label
on the cellular phone accessory
cover or visit your cellular phone
manufacturer’s website to check
whether your cellular phone supports
the Qi technology.
The wireless charging process starts
when you put a Qi-enabled cellularphone on the wireless charging unit.
1. Remove other items, including thesmart key, from the wireless
charging unit. If not, the wireless
charging process may be inter-
rupted.
2. The indicator light is orange when the phone is charging. The indica-
tor light turns green when phone
charging is complete.
3. You can turn ON or OFF the wire- less charging function in the user
settings mode on the instrument
cluster. For further information,
refer to the "LCD Display Modes"
in this chapter. If your phone is not charging:
- Slightly change the position of the
cellular phone on the charging pad.
- Make sure the indicator light is orange.
Depending on the cellular phone
type, the indicator light may not turn
green even though the charging is
complete.
The indicator light will blink orange
for 10 seconds if there is a malfunc-tion in the wireless charging system.
In this case, temporarily stop the
charging process, and re-attempt to
wirelessly charge your cellular phoneagain.
The system warns you with a mes-
sage on the LCD display if the cellu-lar phone is still on the wirelesscharging unit after the engine is
turned OFF and the front door isopened. The wireless cellular phone
charging system may not sup-
port certain cellular phones,
which are not verified for the Qi
specification ( ).
Locate your cell phone well in the middle of the wireless cellu-
lar phone charging system.
Even when your cell phone
locates slightly to one side, the
charging speed may decrease.
The wireless charging process may temporarily stop, when a
smart key function operates (i.e.
starting the vehicle, opening the
doors, closing the doors).
For certain cell phones, the indi- cator color may not change to
green, even when the wireless
charging process is properlycompleted.
(Continued)
NOTICE
Page 215 of 486
3-130
Convenient features of your vehicle
(Continued)
The wireless charging processmay temporarily stop, when tem-
perature abnormally increasesinside the wireless cellular
phone charging system. The
wireless charging process
restarts, when temperature falls
to a certain level.
The wireless charging process may temporarily stop when
there is any metallic item, such
as a coin, between the wireless
cellular phone charging system
and a cellular phone.Clock
Vehicles with Audio system
Select the [SETUP]button on the
audio system ➟Select [Date/Time].
Set time: Set the time displayed on the audio screen.
Time format: Choose between 12- hour and 24-hour time formats.
Vehicles with Navigation system
Select the Settings menu on the
Navigation system ➟Select
[Date/Time].
GPS time: Displays time according to the received GNSS time.
24-hour: Switches to 12 hour or 24 hour.
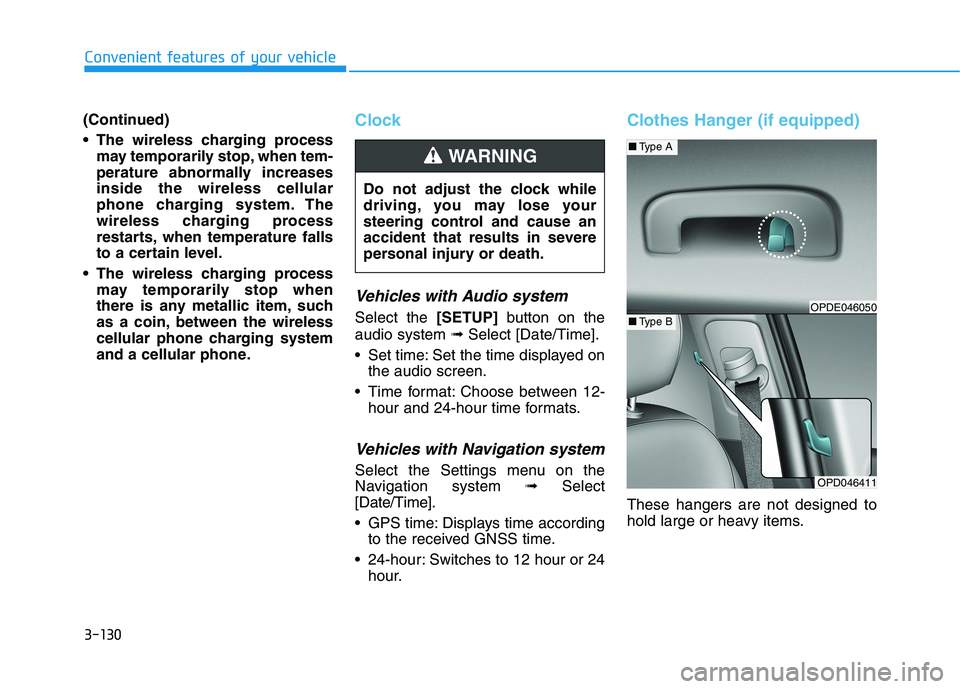
Clothes Hanger (if equipped)
These hangers are not designed to
hold large or heavy items.
Do not adjust the clock while
driving, you may lose your
steering control and cause an
accident that results in severe
personal injury or death.
WARNING
OPD046411
■
Type A
■Type BOPDE046050
Page 228 of 486
5-7
Driving your vehicle
5
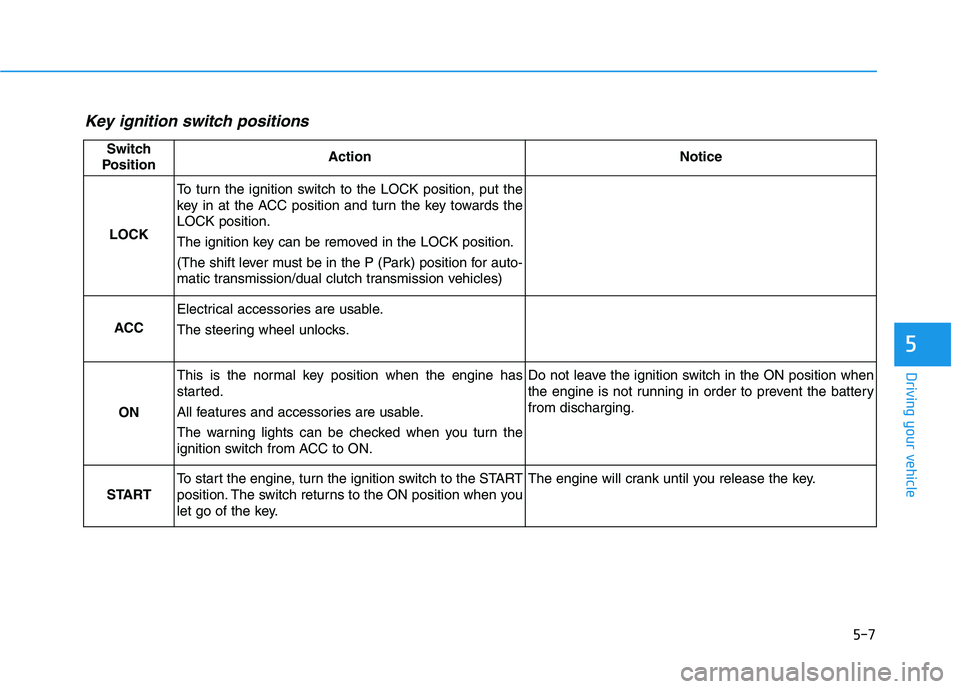
Key ignition switch positions
Switch
PositionActionNotice
LOCK
To turn the ignition switch to the LOCK position, put the
key in at the ACC position and turn the key towards theLOCK position.
The ignition key can be removed in the LOCK position.
(The shift lever must be in the P (Park) position for auto-
matic transmission/dual clutch transmission vehicles)
ACC
Electrical accessories are usable.
The steering wheel unlocks.
ON
This is the normal key position when the engine has
started.
All features and accessories are usable.
The warning lights can be checked when you turn the
ignition switch from ACC to ON.Do not leave the ignition switch in the ON position when
the engine is not running in order to prevent the batteryfrom discharging.
START
To start the engine, turn the ignition switch to the START
position. The switch returns to the ON position when you
let go of the key.The engine will crank until you release the key.
Page 231 of 486
5-10
Driving your vehicle
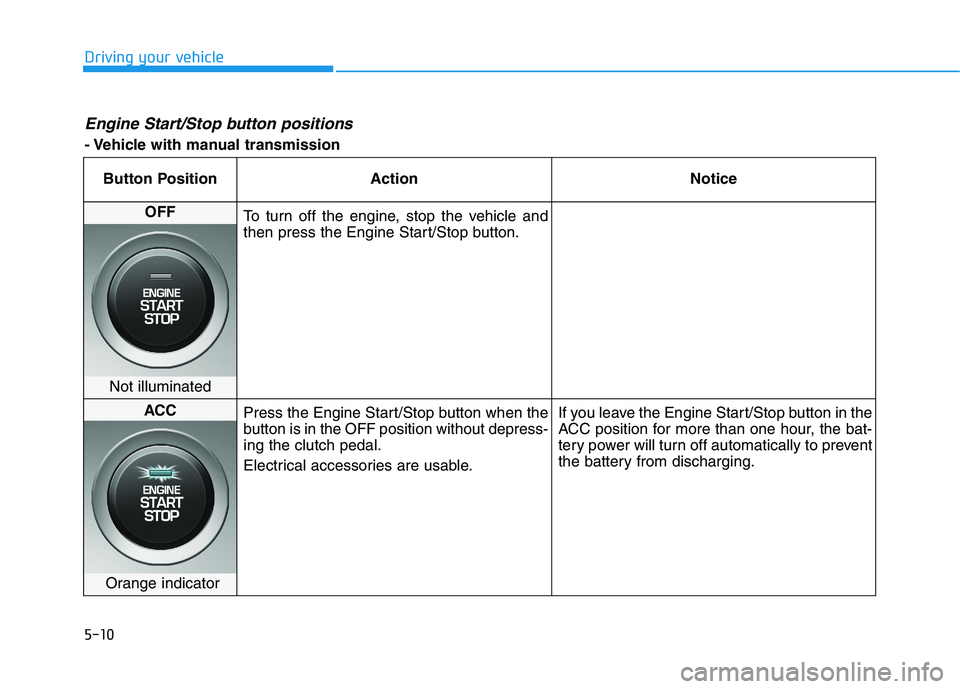
Engine Start/Stop button positions
- Vehicle with manual transmissionButton Position Action Notice
OFF
To turn off the engine, stop the vehicle and
then press the Engine Start/Stop button.
Not illuminated
ACC Press the Engine Start/Stop button when the
button is in the OFF position without depress-ing the clutch pedal.
Electrical accessories are usable. If you leave the Engine Start/Stop button in the
ACC position for more than one hour, the bat-
tery power will turn off automatically to prevent
the battery from discharging.
Orange indicator