rear view mirror HYUNDAI ELANTRA GT 2019 Owners Manual
[x] Cancel search | Manufacturer: HYUNDAI, Model Year: 2019, Model line: ELANTRA GT, Model: HYUNDAI ELANTRA GT 2019Pages: 486, PDF Size: 78.59 MB
Page 14 of 486
1-3
Your vehicle at a glance
1
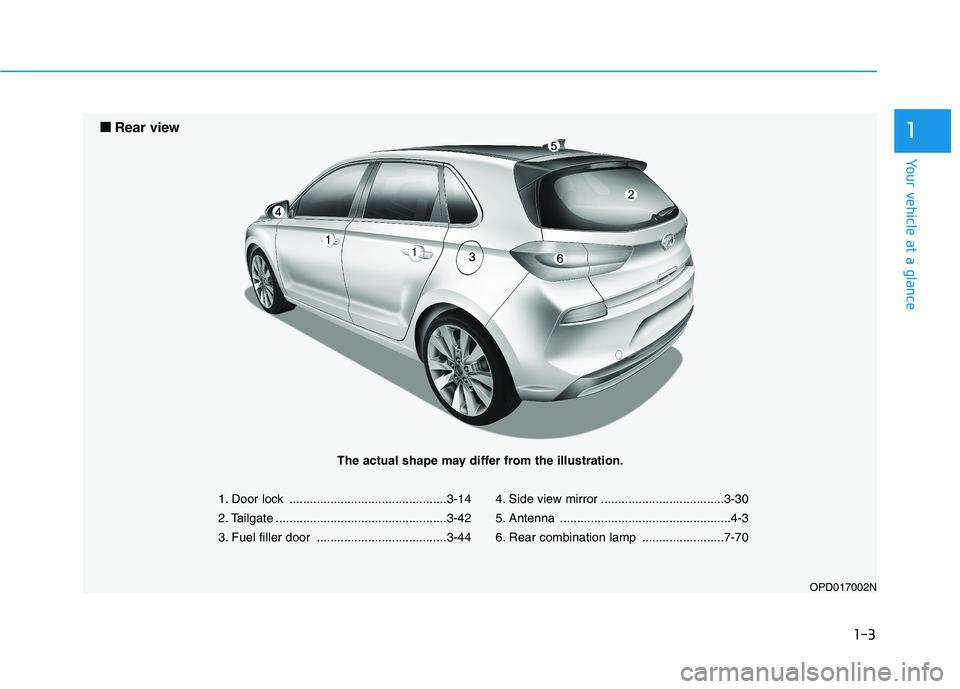
1. Door lock ..............................................3-14
2. Tailgate ..................................................3-42
3. Fuel filler door ......................................3-444. Side view mirror ....................................3-30
5. Antenna ..................................................4-3
6. Rear combination lamp ........................7-70
OPD017002N
■■
Rear view
The actual shape may differ from the illustration.
Page 86 of 486
Convenient features of your vehicle
Accessing Your Vehicle .........................................3-3Remote Key.........................................................................3-3
Smart Key ............................................................................3-6
Immobilizer System .........................................................3-11
Door Locks ............................................................3-14 Operating Door Locks from Outside the Vehicle ....3-14
Operating Door Locks from Inside the Vehicle .......3-16
Auto Door Lock/Unlock Features ...............................3-18
Child-Protector Rear Door Locks ...............................3-18
Theft-alarm System ............................................3-19
Steering Wheel .....................................................3-19 Electric Power Steering (EPS) .....................................3-19
Tilt Steering / Telescope Steering ..............................3-20
Horn ....................................................................................3-21
Heated Steering Wheel ..................................................3-21
Mirrors ...................................................................3-22 Inside Rearview Mirror ..................................................3-22
Side View Mirrors ...........................................................3-30
Windows ................................................................3-32 Power Windows ...............................................................3-33 Panoramic Sunroof ..............................................3-36
Sunshade ...........................................................................3-37
Sliding the Sunroof .........................................................3-37
Tilting the Sunroof .........................................................3-38
Closing the Sunroof........................................................3-38
Resetting the Sunroof ...................................................3-40
Sunroof Open Warning ..................................................3-40
Exterior Features .................................................3-41 Hood ...................................................................................3-41
Tailgate...............................................................................3-42
Fuel Filler Door ................................................................3-44
Instrument Cluster ...............................................3-47 Instrument Cluster Control............................................3-48
Gauges and Meters ........................................................3-49
Transmission Shift Indicator .........................................3-52
Warning and Indicator Lights .......................................3-54
LCD Display Messages ...................................................3-65
LCD Display ...........................................................3-71 LCD Display Control ........................................................3-71
LCD Display Modes .........................................................3-72
Trip Computer .......................................................3-79
3
Page 107 of 486
3-22
Convenient features of your vehicleM
M IIRR RROO RRSS
Inside Rearview Mirror
Before you start driving, adjust the
rearview mirror to the center on the
view through the rear window.
When cleaning the mirror, use a
paper towel or similar material
dampened with glass cleaner. Do
not spray glass cleaner directly on
the mirror as that may cause the
liquid cleaner to enter the mirrorhousing.
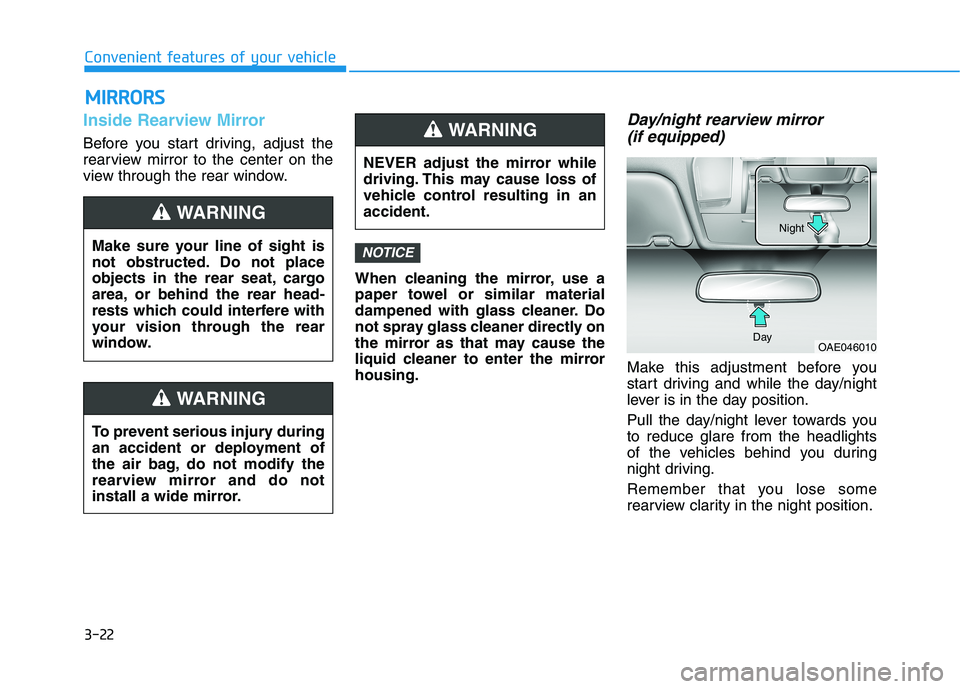
Day/night rearview mirror (if equipped)
Make this adjustment before you
start driving and while the day/night
lever is in the day position.
Pull the day/night lever towards you to reduce glare from the headlights
of the vehicles behind you during
night driving.
Remember that you lose some
rearview clarity in the night position.
NOTICE
OAE046010
Day Night
NEVER adjust the mirror while
driving. This may cause loss of
vehicle control resulting in anaccident.
WARNING
Make sure your line of sight is
not obstructed. Do not place
objects in the rear seat, cargo
area, or behind the rear head-
rests which could interfere with
your vision through the rear
window.
WARNING
To prevent serious injury during
an accident or deployment of
the air bag, do not modify the
rearview mirror and do not
install a wide mirror.
WARNING
Page 108 of 486
3-23
Convenient features of your vehicle
3
BlueLink®center (if equipped)
For details, refer to the BlueLink®
Owner's Guide, Navigation Manual
or Audio Manual.
Electric chromic mirror (ECM) with HomeLink®system,
compass and BlueLink®
(if equipped)
Your vehicle may be equipped with a
Gentex Automatic-Dimming Mirror
with a Z-Nav™ Electronic Compass
Display and an IntegratedHomeLink ®
Wireless Control
System.
During nighttime driving, this feature will automatically detect and reduce
rearview mirror glare while the com-
pass indicates the direction the vehi-
cle is pointed. The HomeLink ®
Universal Transceiver allows you to
activate your garage door(s), electric
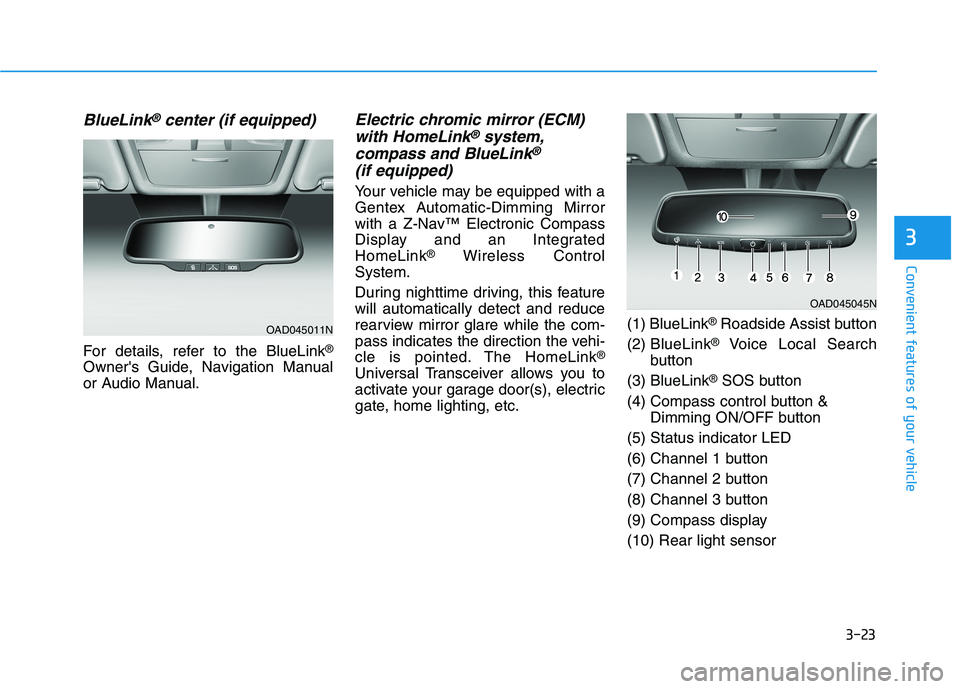
gate, home lighting, etc. (1) BlueLink
®
Roadside Assist button
(2) BlueLink ®
Voice Local Search
button
(3) BlueLink ®
SOS button
(4) Compass control button & Dimming ON/OFF button
(5) Status indicator LED
(6) Channel 1 button
(7) Channel 2 button
(8) Channel 3 button
(9) Compass display(10) Rear light sensor
OAD045045N
OAD045011N
Page 116 of 486
3-31
Convenient features of your vehicle
3
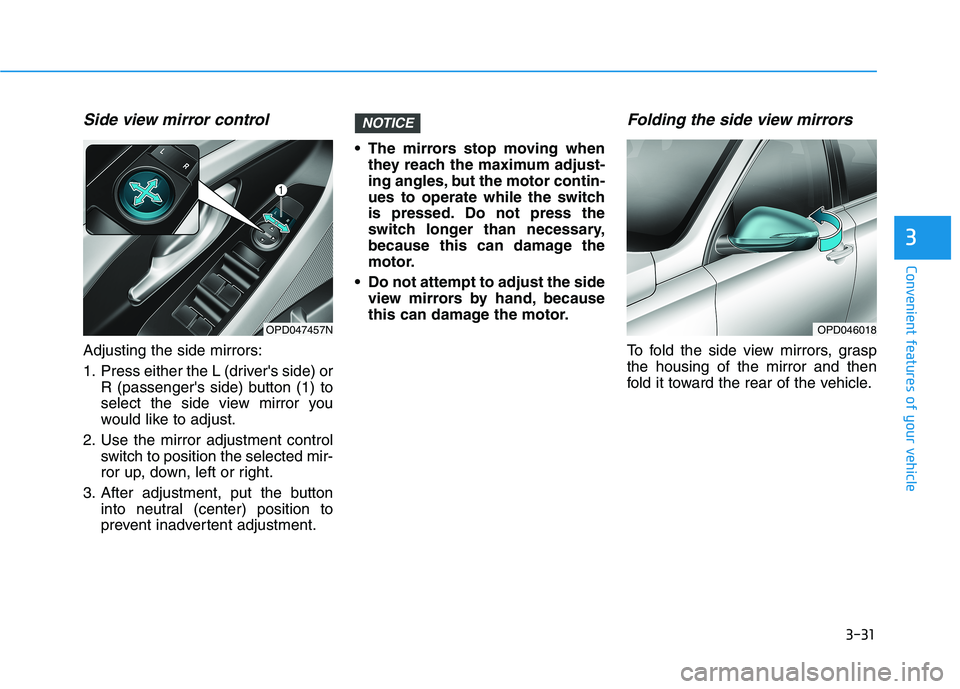
Side view mirror control
Adjusting the side mirrors:
1. Press either the L (driver's side) orR (passenger's side) button (1) to
select the side view mirror you
would like to adjust.
2. Use the mirror adjustment control switch to position the selected mir-
ror up, down, left or right.
3. After adjustment, put the button into neutral (center) position to
prevent inadvertent adjustment. The mirrors stop moving when
they reach the maximum adjust-
ing angles, but the motor contin-
ues to operate while the switch
is pressed. Do not press the
switch longer than necessary,
because this can damage the
motor.
Do not attempt to adjust the side view mirrors by hand, because
this can damage the motor.
Folding the side view mirrors
To fold the side view mirrors, graspthe housing of the mirror and then
fold it toward the rear of the vehicle.
NOTICE
OPD047457NOPD046018
Page 202 of 486
3-117
Convenient features of your vehicle
3
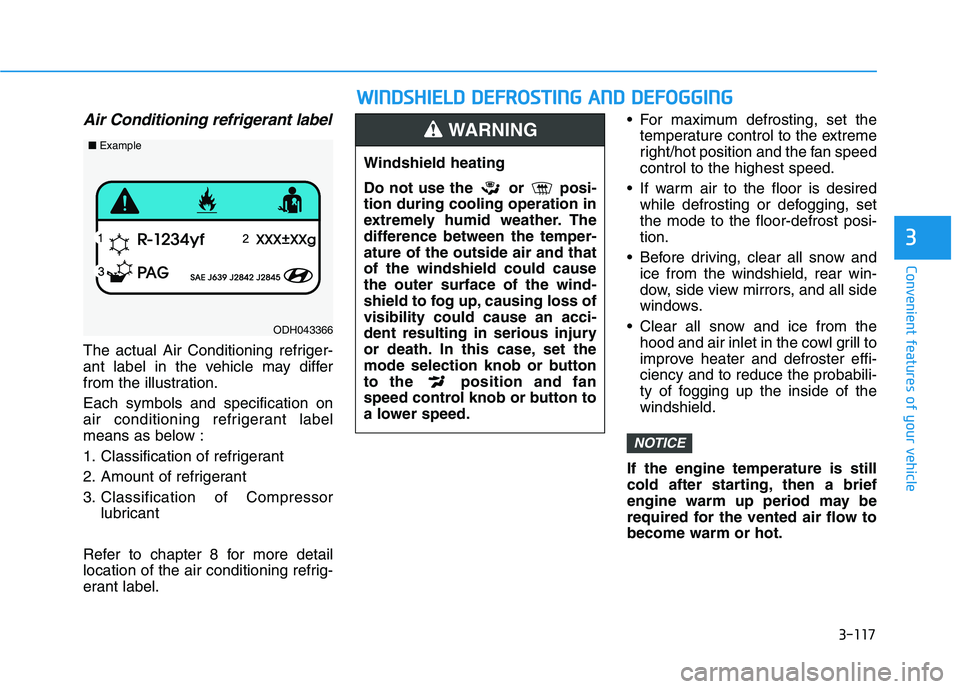
Air Conditioning refrigerant label
The actual Air Conditioning refriger-
ant label in the vehicle may differ
from the illustration. Each symbols and specification on
air conditioning refrigerant label
means as below :
1. Classification of refrigerant
2. Amount of refrigerant
3. Classification of Compressorlubricant
Refer to chapter 8 for more detail
location of the air conditioning refrig-
erant label. For maximum defrosting, set the
temperature control to the extreme
right/hot position and the fan speedcontrol to the highest speed.
If warm air to the floor is desired while defrosting or defogging, setthe mode to the floor-defrost posi-tion.
Before driving, clear all snow and ice from the windshield, rear win-
dow, side view mirrors, and all side
windows.
Clear all snow and ice from the hood and air inlet in the cowl grill to
improve heater and defroster effi-ciency and to reduce the probabili-
ty of fogging up the inside of thewindshield.
If the engine temperature is still
cold after starting, then a brief
engine warm up period may be
required for the vented air flow tobecome warm or hot.
NOTICE
ODH043366
■ Example
WW IINN DDSSHH IIEE LLDD DD EEFFRR OO SSTT IINN GG AA NN DD DD EEFFOO GGGGIINN GG
Windshield heating
Do not use the or posi- tion during cooling operation in
extremely humid weather. The
difference between the temper-ature of the outside air and thatof the windshield could causethe outer surface of the wind-
shield to fog up, causing loss ofvisibility could cause an acci-
dent resulting in serious injury
or death. In this case, set the
mode selection knob or button
to the position and fan
speed control knob or button to
a lower speed.
WARNING
Page 206 of 486
3-121
Convenient features of your vehicle
Rear Window Defroster
To prevent damage to the conduc-
tors bonded to the inside surface
of the rear window, never use
sharp instruments or window
cleaners containing abrasives to
clean the window.
If you want to defrost and defog
the front windshield, refer to the
"Windshield Defrosting and
Defogging" section in this chap-
ter.The defroster heats the window to
remove frost, fog and thin ice from
the interior and exterior of the rear
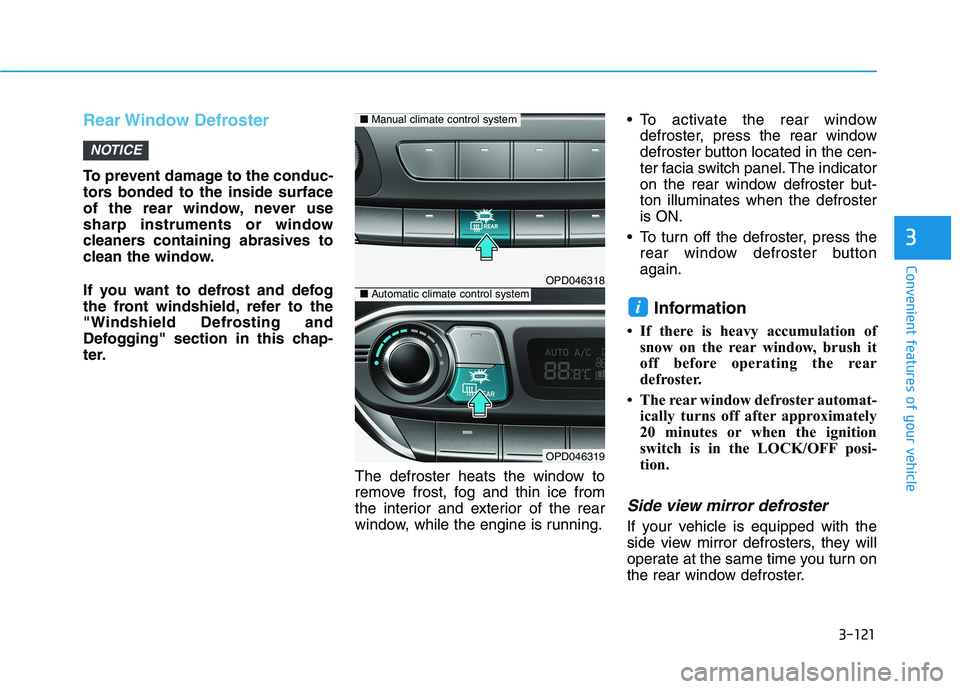
window, while the engine is running. To activate the rear window
defroster, press the rear window
defroster button located in the cen-
ter facia switch panel. The indicator
on the rear window defroster but-ton illuminates when the defrosteris ON.
To turn off the defroster, press the rear window defroster buttonagain.
Information
If there is heavy accumulation of snow on the rear window, brush it
off before operating the rear
defroster.
The rear window defroster automat- ically turns off after approximately
20 minutes or when the ignition
switch is in the LOCK/OFF posi-
tion.
Side view mirror defroster
If your vehicle is equipped with the
side view mirror defrosters, they will
operate at the same time you turn on
the rear window defroster.
i
NOTICE
33
OPD046318
OPD046319
■Manual climate control system
■Automatic climate control system
Page 209 of 486
3-124
Convenient features of your vehicle
Sunglass Holder
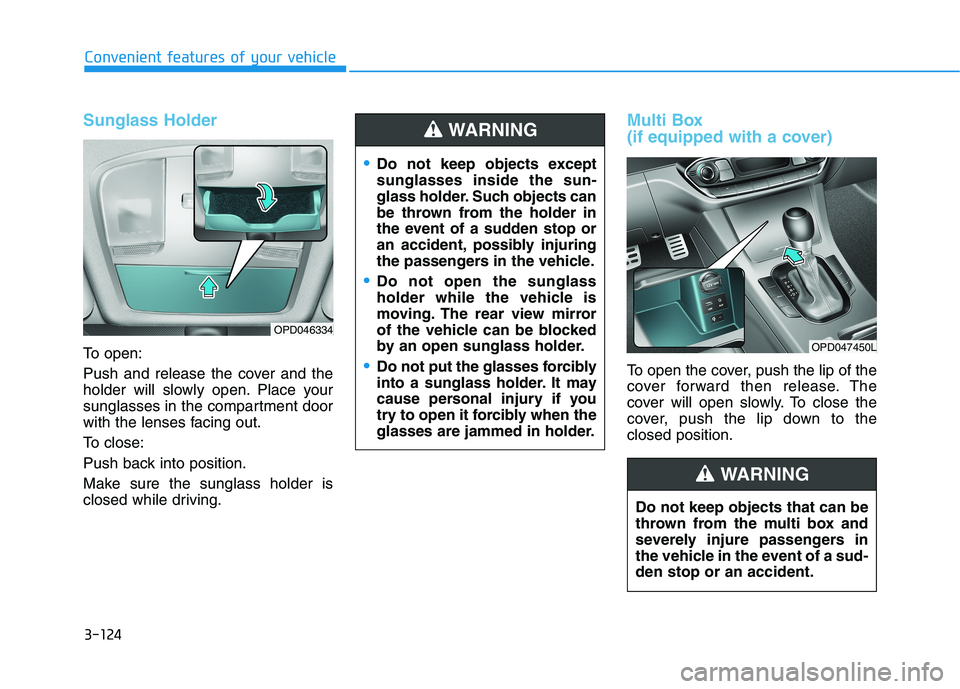
To open:
Push and release the cover and the
holder will slowly open. Place your
sunglasses in the compartment door
with the lenses facing out.
To close:
Push back into position.
Make sure the sunglass holder is
closed while driving.
Multi Box
(if equipped with a cover)
To open the cover, push the lip of the
cover forward then release. The
cover will open slowly. To close the
cover, push the lip down to theclosed position.
OPD046334
OPD047450L
Do not keep objects except sunglasses inside the sun-
glass holder. Such objects can
be thrown from the holder in
the event of a sudden stop or
an accident, possibly injuring
the passengers in the vehicle.
Do not open the sunglass
holder while the vehicle is
moving. The rear view mirror
of the vehicle can be blocked
by an open sunglass holder.
Do not put the glasses forcibly
into a sunglass holder. It may
cause personal injury if you
try to open it forcibly when the
glasses are jammed in holder.
WARNING
Do not keep objects that can be
thrown from the multi box and
severely injure passengers in
the vehicle in the event of a sud-den stop or an accident.
WARNING
Page 212 of 486
3-127
Convenient features of your vehicle
3
Close the vanity mirror cover
securely and return the sunvisor
to its original position after use.
Do not put several tickets in the
ticket holder at one time. This
could cause damage to the ticket
holder.
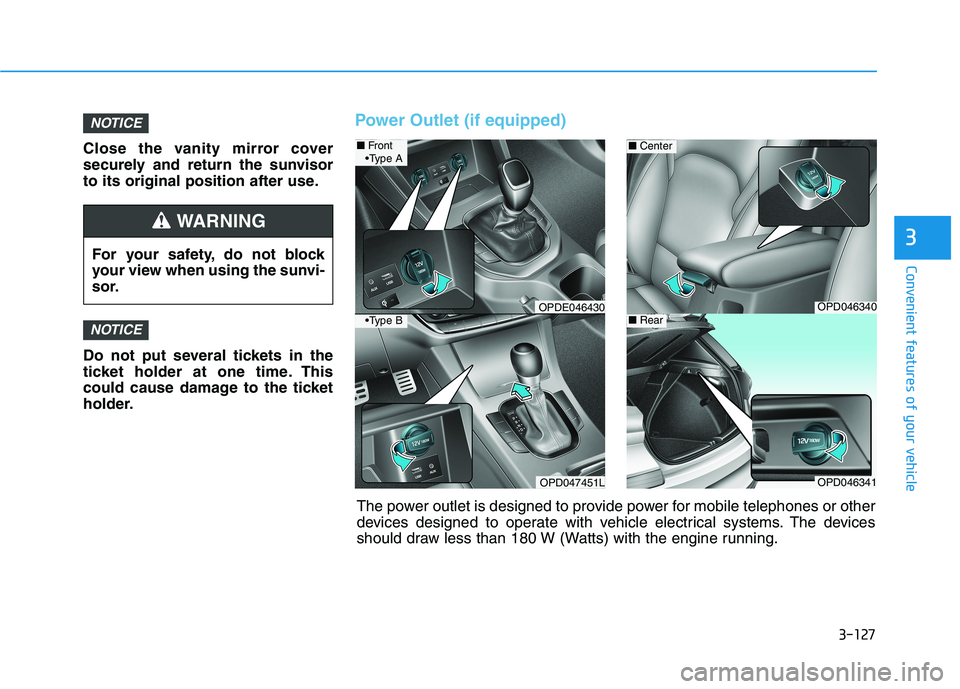
Power Outlet (if equipped)
NOTICE
NOTICE
For your safety, do not block
your view when using the sunvi-
sor.
WARNING
OPD046340
■Center
OPD046341
■Rear
OPD047451L
■Front
OPDE046430
A
B
The power outlet is designed to provide power for mobile telephones or other
devices designed to operate with vehicle electrical systems. The devices
should draw less than 180 W (Watts) with the engine running.
Page 225 of 486
5-4
Driving your vehicle
Before Entering the Vehicle
• Be sure all windows, outside mir-ror(s), and outside lights are clean
and unobstructed.
Remove frost, snow, or ice.
Visually check the tires for uneven wear and damage.
Check under the vehicle for any sign of leaks.
Be sure there are no obstacles behind you if you intend to back up.
Before Starting
Make sure the hood, the tailgate,and the doors are securely closed
and locked.
Adjust the position of the seat and steering wheel.
Adjust the inside and outside rearview mirrors.
Verify all the lights work.
Fasten your seatbelt. Check that all passengers have fastened their
seatbelts.
Check the gauges and indicators in the instrument panel and the mes-
sages on the instrument display
when the ignition switch is in theON position.
Check that any items you are car- rying are stored properly or fas-
tened down securely.
BBEEFFOO RREE DD RRIIVV IINN GG
To reduce the risk of SERIOUS
INJURY or DEATH, take the fol-
lowing precautions:
•ALWAYS wear your seat belt.
All passengers must be prop-
erly belted whenever the vehi-
cle is moving. For more infor-
mation, refer to "Seat Belts" in
chapter 2.
Always drive defensively.
Assume other drivers or pedes-
trians may be careless andmake mistakes.
Stay focused on the task of
driving. Driver distraction cancause accidents.
Leave plenty of space between
you and the vehicle in front of
you.
WARNING