HYUNDAI ELANTRA HYBRID 2022 Owners Manual
Manufacturer: HYUNDAI, Model Year: 2022, Model line: ELANTRA HYBRID, Model: HYUNDAI ELANTRA HYBRID 2022Pages: 529, PDF Size: 38.79 MB
Page 211 of 529
Convenient Features
5-64
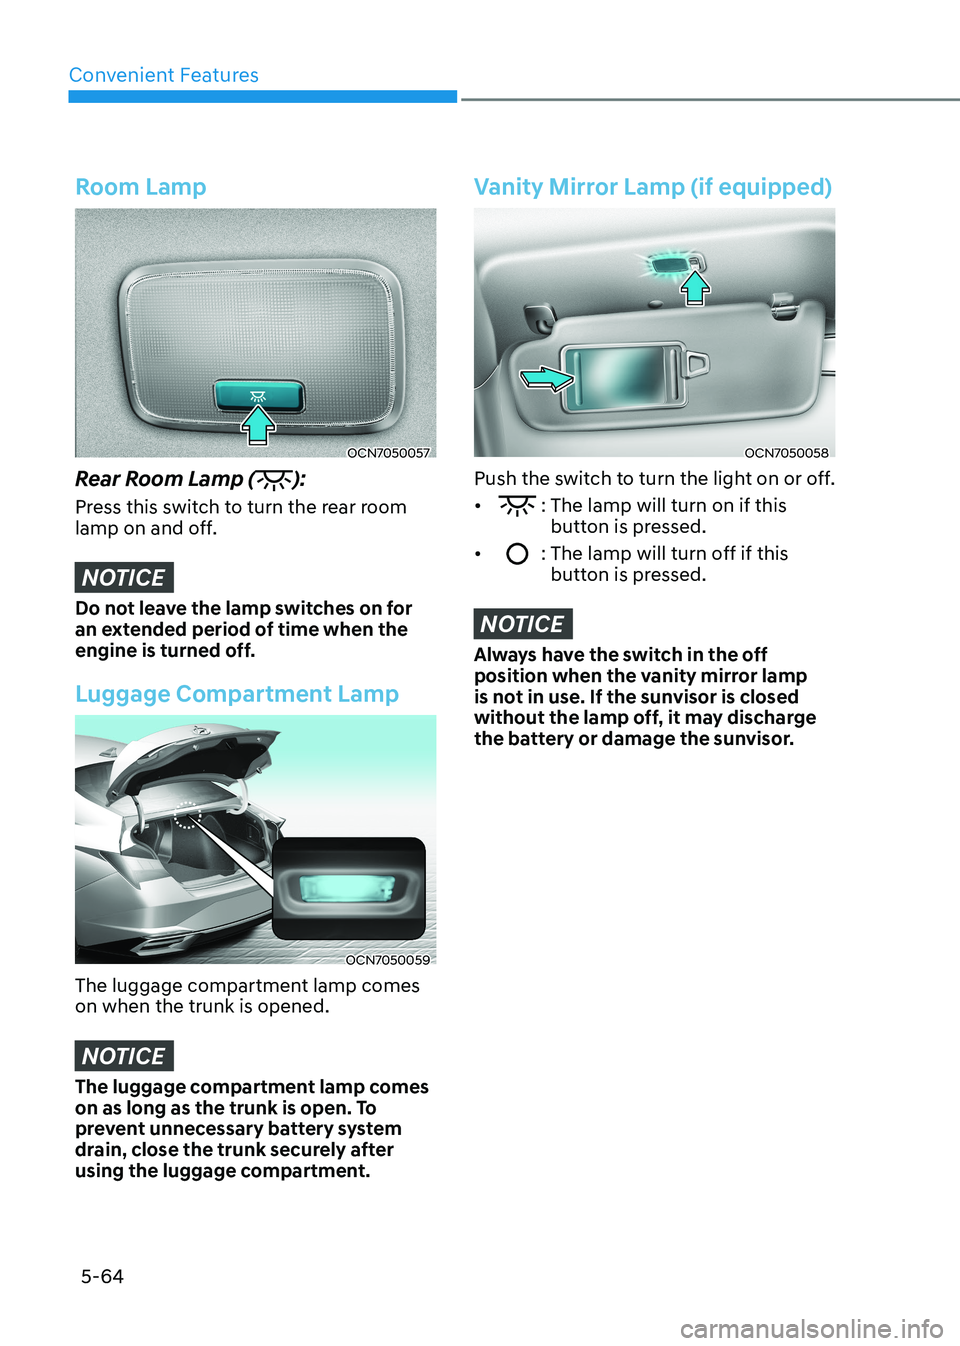
Room Lamp
OCN7050057
Rear Room Lamp (
):
Press this switch to turn the rear room
lamp on and off.
NOTICE
Do not leave the lamp switches on for
an extended period of time when the
engine is turned off.
Luggage Compartment Lamp
OCN7050059
The luggage compartment lamp comes on when the trunk is opened.
NOTICE
The luggage compartment lamp comes
on as long as the trunk is open. To
prevent unnecessary battery system
drain, close the trunk securely after
using the luggage compartment.
Vanity Mirror Lamp (if equipped)
OCN7050058
Push the switch to turn the light on or off. •
: The lamp will turn on if this button is pressed.
•
: The lamp will turn off if this button is pressed.
NOTICE
Always have the switch in the off
position when the vanity mirror lamp
is not in use. If the sunvisor is closed
without the lamp off, it may discharge
the battery or damage the sunvisor.
Page 212 of 529

05
5-65
Welcome System (if equipped)
Welcome light
OCN7H050010
Door handle lamp
When all the doors (and trunk) are closed
and locked, the door handle lamp will
come on for about 15 seconds if any of
the below is performed.
• When the door unlock button is pressed on the remote key or smart
key.
• When the button of the outside door handle is pressed.
• When the vehicle is approached with the smart key in possession.
Headlamp and parking lamp
When the headlamp (lamp switch in the
headlamp or AUTO position) is on and all
doors (and trunk) are locked and closed, the headlamp and parking lamp will
come on for 15 seconds if/or any of the
below is performed.
• When the door unlock button is pressed on the remote key or smart
key.
At this time, if you press the door lock or
unlock button, the headlamp and parking
lamp will turn off immediately. You can activate or deactivate the
Welcome Light from the User Settings
Mode on the LCD display.
For more information, refer to “LCD
Display” in chapter 4. If your vehicle is
equipped with additional navigation,
please refer to the infotainment system
manual separately supplied.
Interior lamp
When the interior lamp switch is in the
DOOR position and all doors (and trunk)
are closed and locked, the room lamp
will come on for 30 seconds if any of the
below is performed.
• When the door unlock button is pressed on the remote key or smart
key.
• When the button of the outside door handle is pressed.
At this time, if you press the door lock or
unlock button, the room lamp will turn
off immediately.
Page 213 of 529
Convenient Features
5-66
Wipers AnD WAshers
OCN7050090N
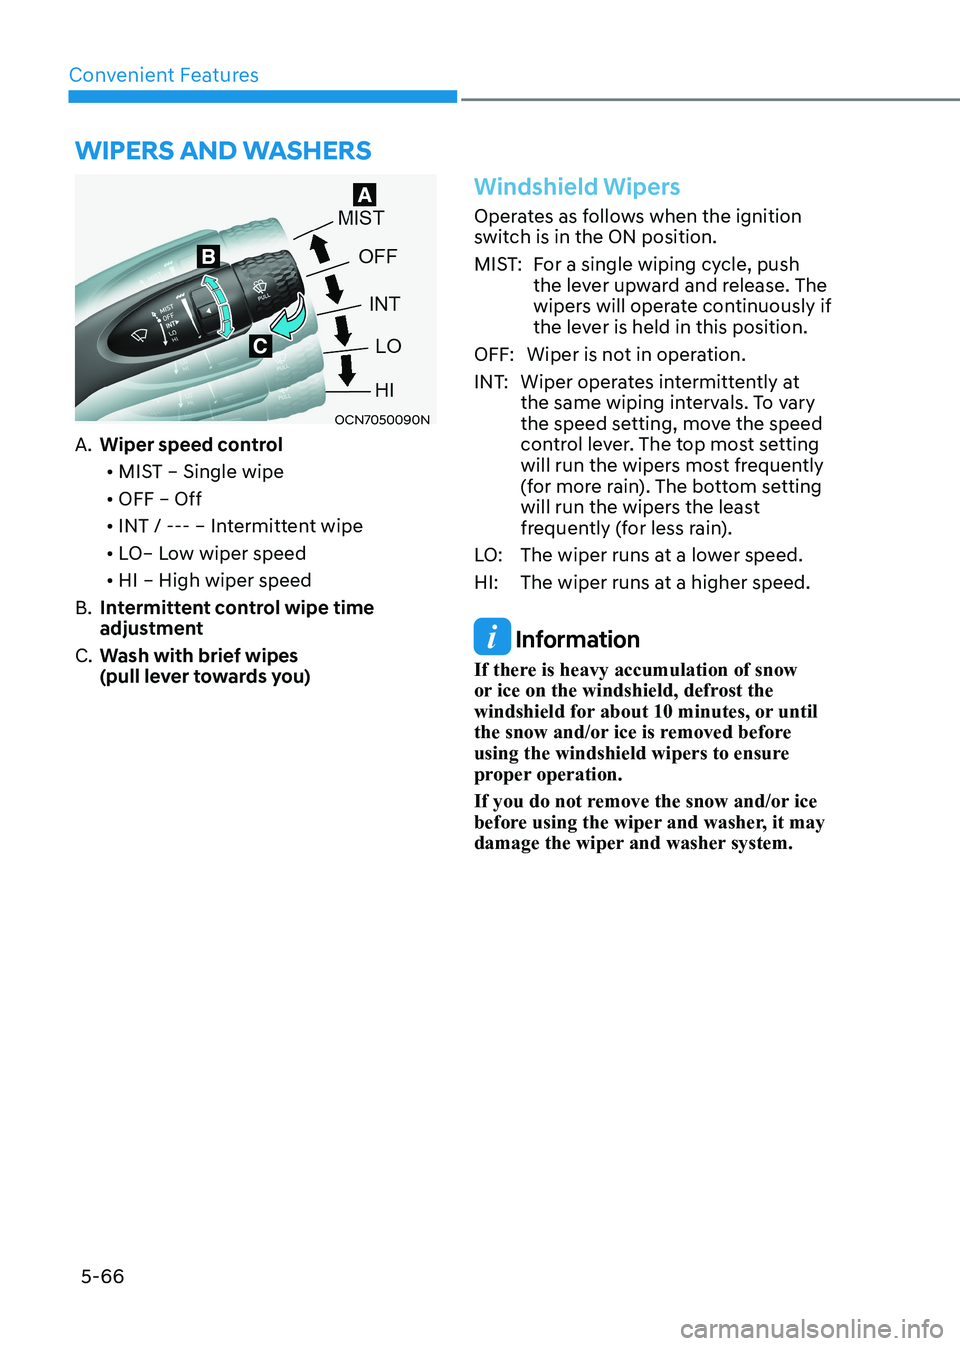
A. Wiper speed control
• MIST – Single wipe
• OFF – Off
• INT / --- – Intermittent wipe
• LO– Low wiper speed
• HI – High wiper speed
B. Intermittent control wipe time
adjustment
C. Wash with brief wipes
(pull lever towards you)
Windshield Wipers
Operates as follows when the ignition
switch is in the ON position.
MIST: For a single wiping cycle, push
the lever upward and release. The
wipers will operate continuously if
the lever is held in this position.
OFF: Wiper is not in operation.
INT: Wiper operates intermittently at the same wiping intervals. To vary
the speed setting, move the speed
control lever. The top most setting
will run the wipers most frequently
(for more rain). The bottom setting
will run the wipers the least
frequently (for less rain).
LO: The wiper runs at a lower speed.
HI: The wiper runs at a higher speed.
Information
If there is heavy accumulation of snow
or ice on the windshield, defrost the
windshield for about 10 minutes, or until
the snow and/or ice is removed before
using the windshield wipers to ensure
proper operation.
If you do not remove the snow and/or ice
before using the wiper and washer, it may
damage the wiper and washer system.
Page 214 of 529
05
5-67
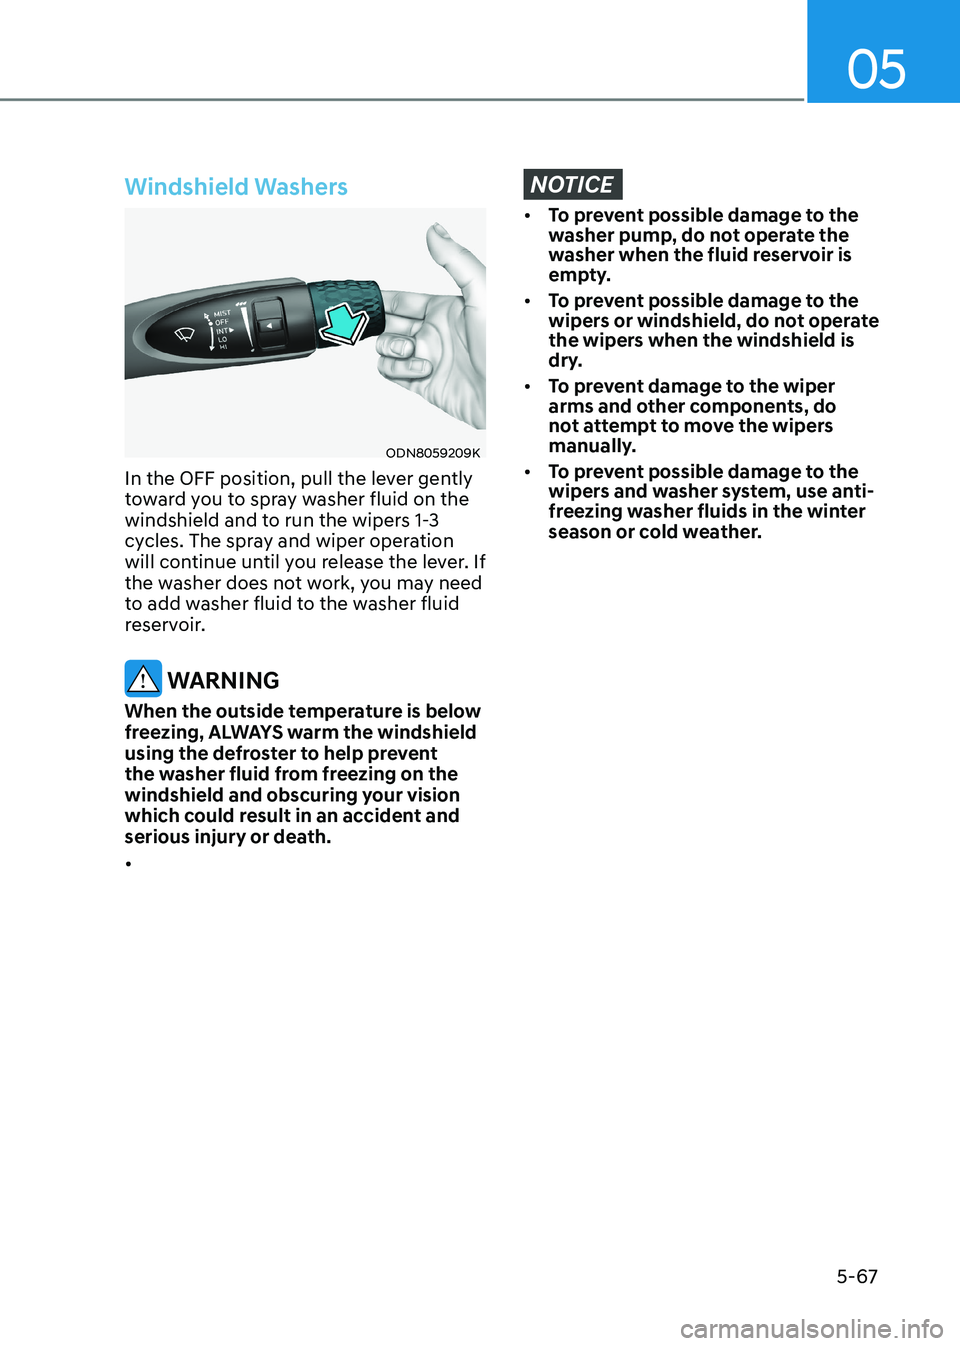
Windshield Washers
ODN8059209K
In the OFF position, pull the lever gently
toward you to spray washer fluid on the
windshield and to run the wipers 1-3
cycles. The spray and wiper operation
will continue until you release the lever. If
the washer does not work, you may need
to add washer fluid to the washer fluid
reservoir.
WARNING
When the outside temperature is below
freezing, ALWAYS warm the windshield
using the defroster to help prevent
the washer fluid from freezing on the
windshield and obscuring your vision
which could result in an accident and
serious injury or death. •
NOTICE
• To prevent possible damage to the
washer pump, do not operate the
washer when the fluid reservoir is
empty.
• To prevent possible damage to the
wipers or windshield, do not operate
the wipers when the windshield is
dry.
• To prevent damage to the wiper
arms and other components, do
not attempt to move the wipers
manually.
• To prevent possible damage to the
wipers and washer system, use anti-
freezing washer fluids in the winter
season or cold weather.
Page 215 of 529
5-68
Convenient Features
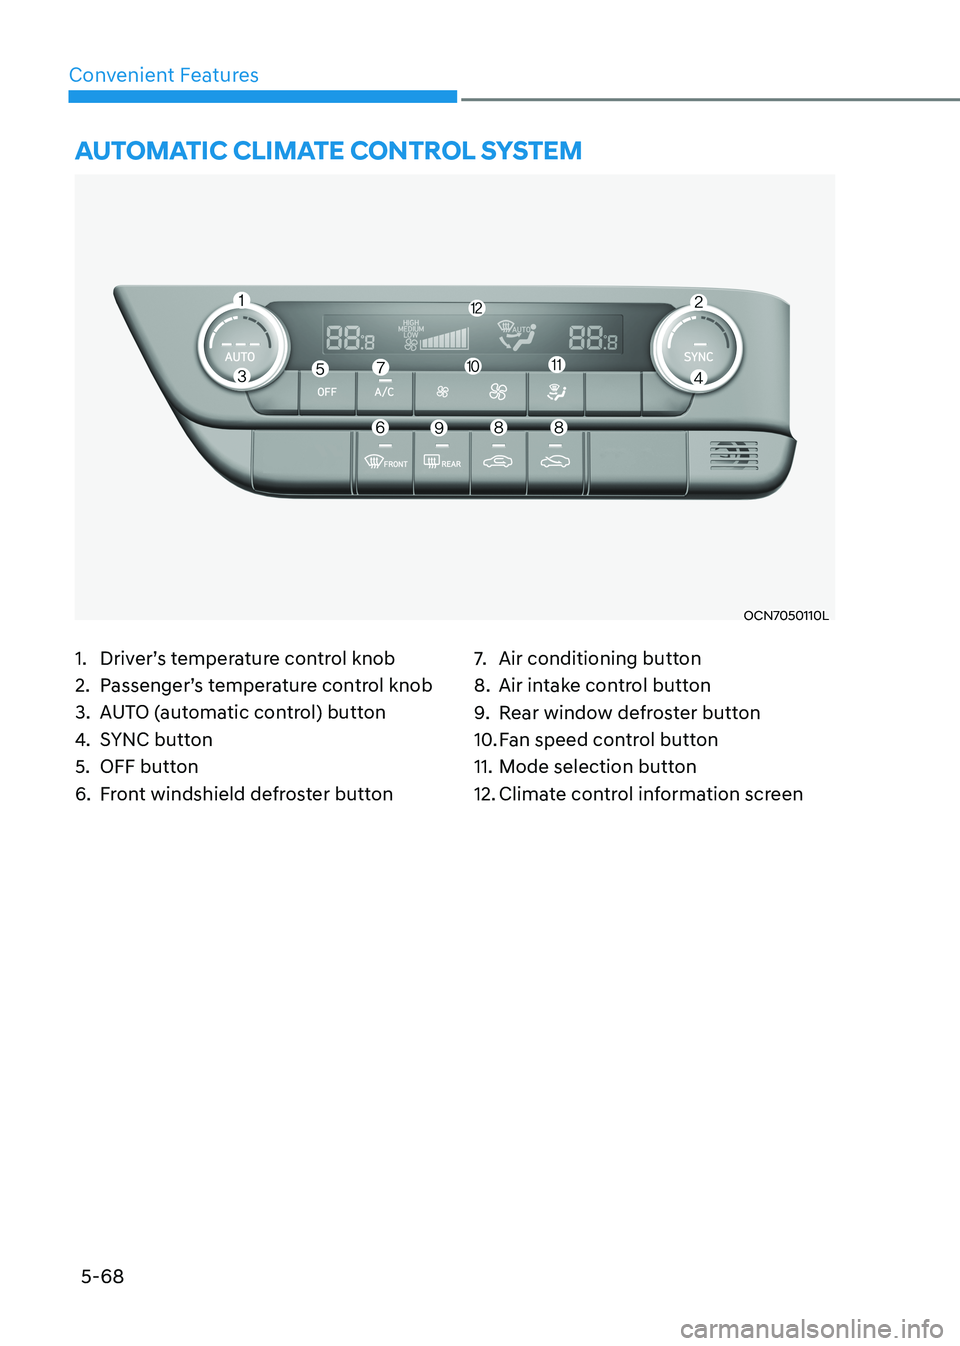
1. Driver’s temperature control knob
2. Passenger’s temperature control knob
3. AUTO (automatic control) button
4. SYNC button
5. OFF button
6. Front windshield defroster button 7.
Air conditioning button
8. Air intake control button
9. Rear window defroster button
10. Fan speed control button
11. Mode selection button
12. Climate control information screen
autOmatic climate cOntROl SyStem
OCN7050110L
Page 216 of 529
05
5-69
Automatic Heating and Air Conditioning
OCN7050112
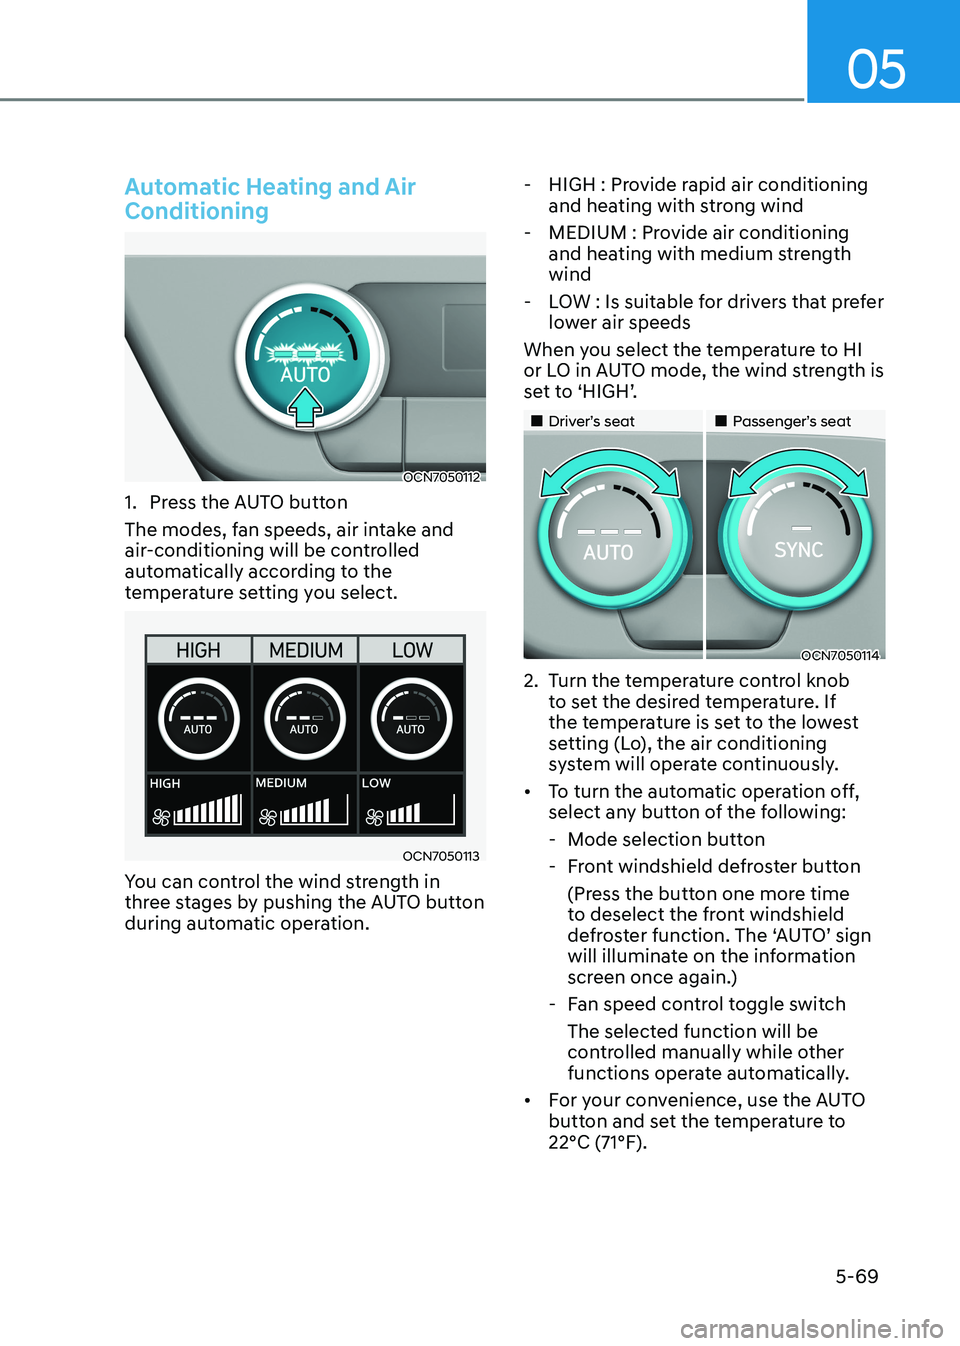
1. Press the AUTO button
The modes, fan speeds, air intake and
air-conditioning will be controlled
automatically according to the
temperature setting you select.
OCN7050113
You can control the wind strength in
three stages by pushing the AUTO button
during automatic operation. - HIGH : Provide rapid air conditioning
and heating with strong wind
- MEDIUM : Provide air conditioning and heating with medium strength wind
- LOW : Is suitable for drivers that prefer lower air speeds
When you select the temperature to HI
or LO in AUTO mode, the wind strength is
set to ‘HIGH’.
„„Driver’s seat „„Passenger’s seat
OCN7050114
2. Turn the temperature control knob to set the desired temperature. If
the temperature is set to the lowest
setting (Lo), the air conditioning
system will operate continuously.
• To turn the automatic operation off,
select any button of the following:
- Mode selection button
- Front windshield defroster button (Press the button one more time
to deselect the front windshield
defroster function. The ‘AUTO’ sign
will illuminate on the information
screen once again.)
- Fan speed control toggle switch The selected function will be
controlled manually while other
functions operate automatically.
• For your convenience, use the AUTO
button and set the temperature to 22°C (71°F).
Page 217 of 529

Convenient Features
5-70
OCN7050133
Information
Never place anything near the sensor to
ensure better control of the heating and cooling system.
Manual Heating and Air Conditioning
The heating and cooling system can be
controlled manually by pushing buttons
other than the AUTO button. In this case,
the system works sequentially according
to the order of buttons selected. When
pressing any button except the AUTO
button while using automatic operation,
the functions not selected will be
controlled automatically.
1. Start the engine.
2. Set the mode to the desired position. To improve the effectiveness of
heating and cooling, select the mode
according to the following: - Heating:
- Cooling:
3. Set the temperature control to the desired position.
4. Set the air intake control to fresh mode.
5. Set the fan speed control to the desired speed.
6. If air conditioning is desired, turn the air conditioning system on.
7. Press the AUTO button in order to
convert to full automatic control of
the system.
Page 218 of 529
05
5-71
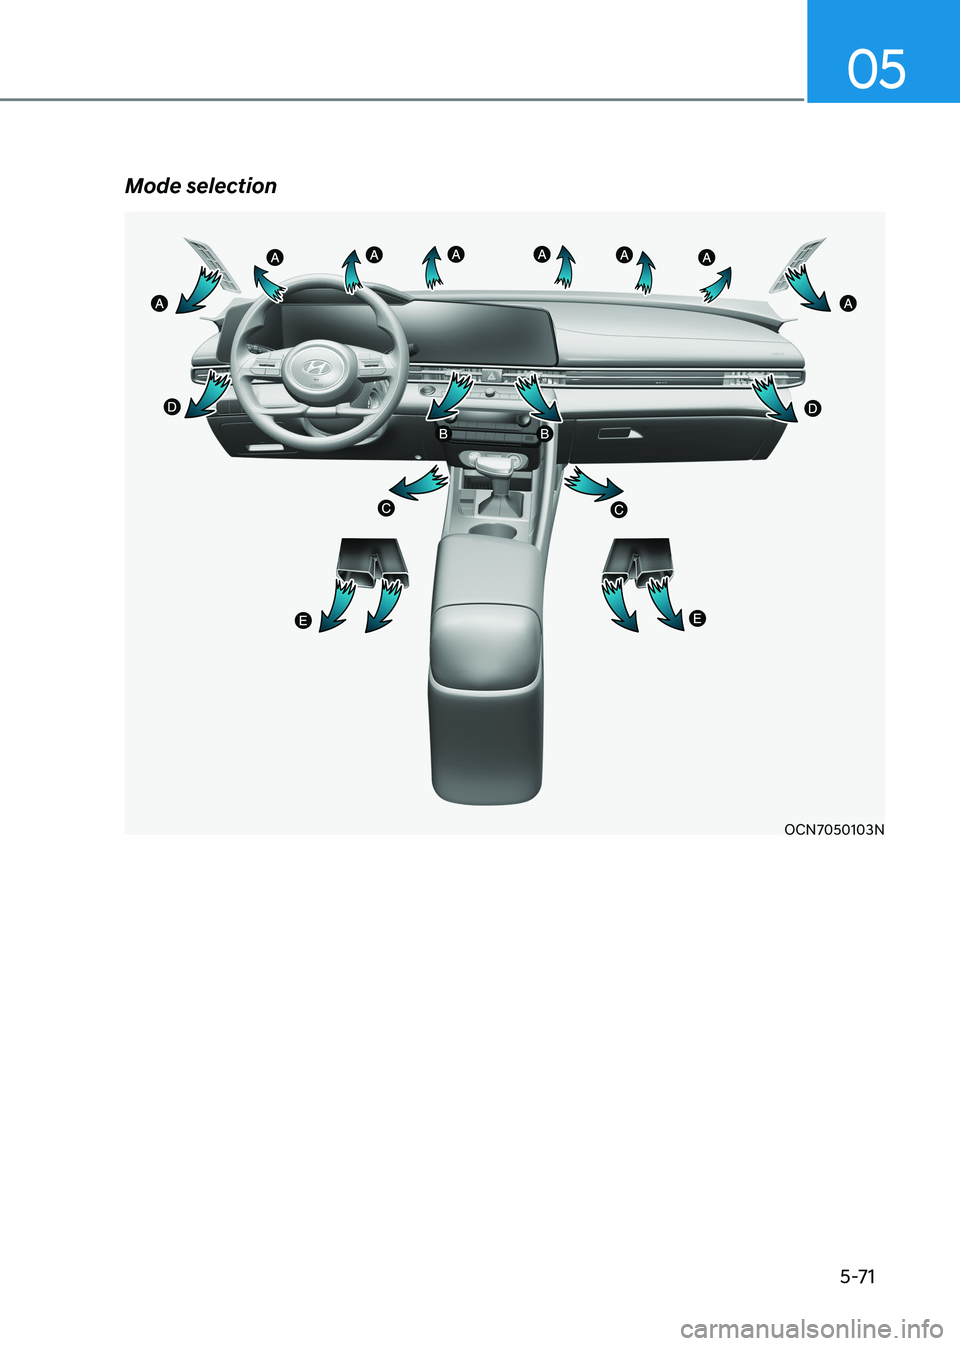
Mode selection
OCN7050103N
Page 219 of 529
Convenient Features
5-72
OCN7050115
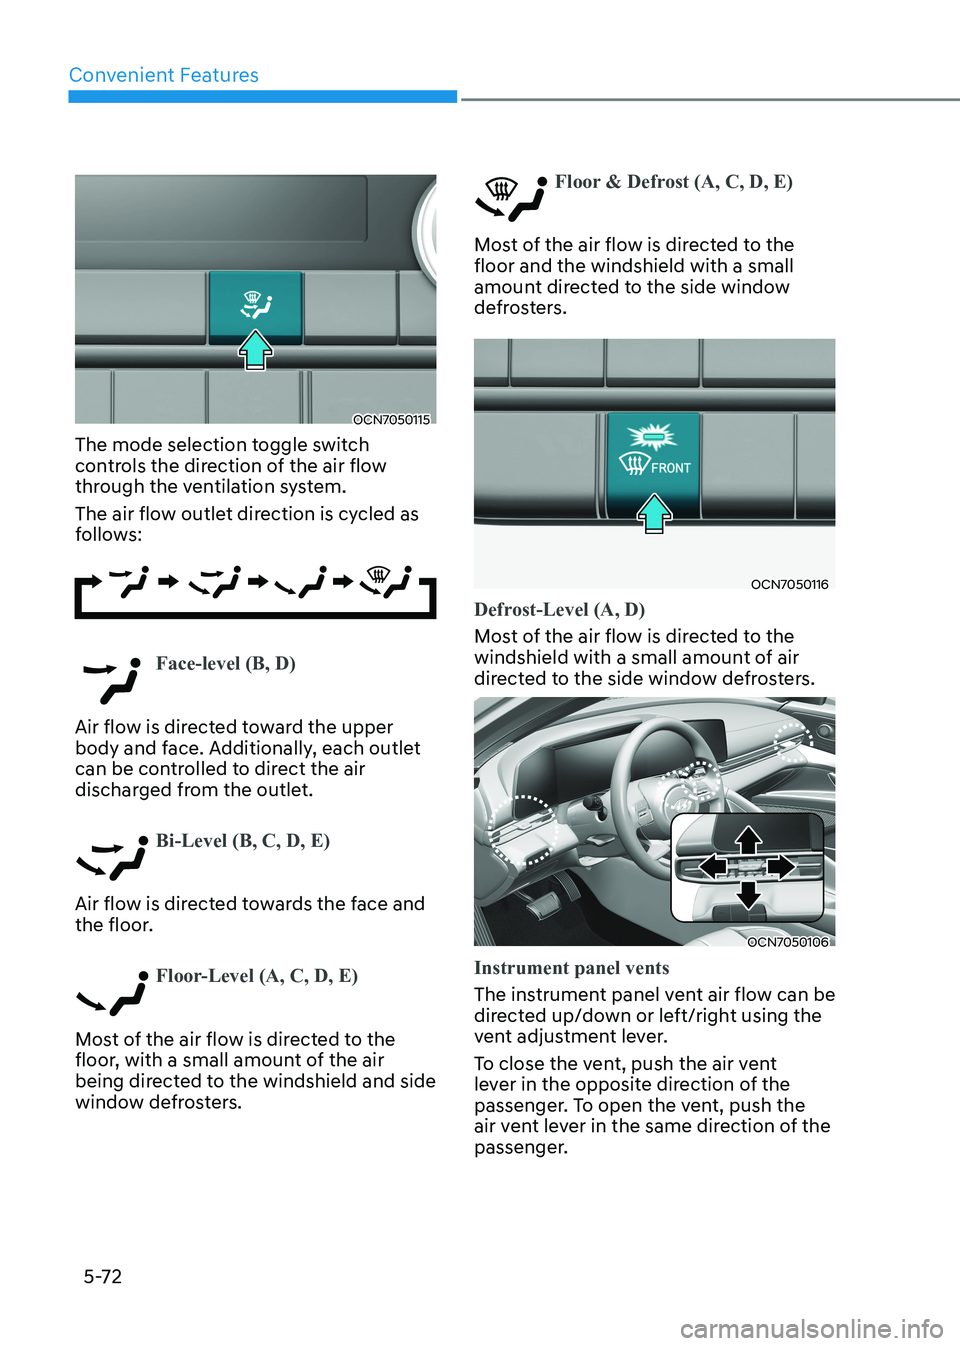
The mode selection toggle switch
controls the direction of the air flow
through the ventilation system.
The air flow outlet direction is cycled as
follows:
Face-level (B, D)
Air flow is directed toward the upper
body and face. Additionally, each outlet
can be controlled to direct the air
discharged from the outlet.
Bi-Level (B, C, D, E)
Air flow is directed towards the face and
the floor.
Floor-Level (A, C, D, E)
Most of the air flow is directed to the
floor, with a small amount of the air
being directed to the windshield and side
window defrosters.
Floor & Defrost (A, C, D, E)
Most of the air flow is directed to the floor and the windshield with a small
amount directed to the side window
defrosters.
OCN7050116
Defrost-Level (A, D)
Most of the air flow is directed to the
windshield with a small amount of air
directed to the side window defrosters.
OCN7050106
Instrument panel vents
The instrument panel vent air flow can be
directed up/down or left/right using the
vent adjustment lever.
To close the vent, push the air vent
lever in the opposite direction of the
passenger. To open the vent, push the
air vent lever in the same direction of the
passenger.
Page 220 of 529
05
5-73
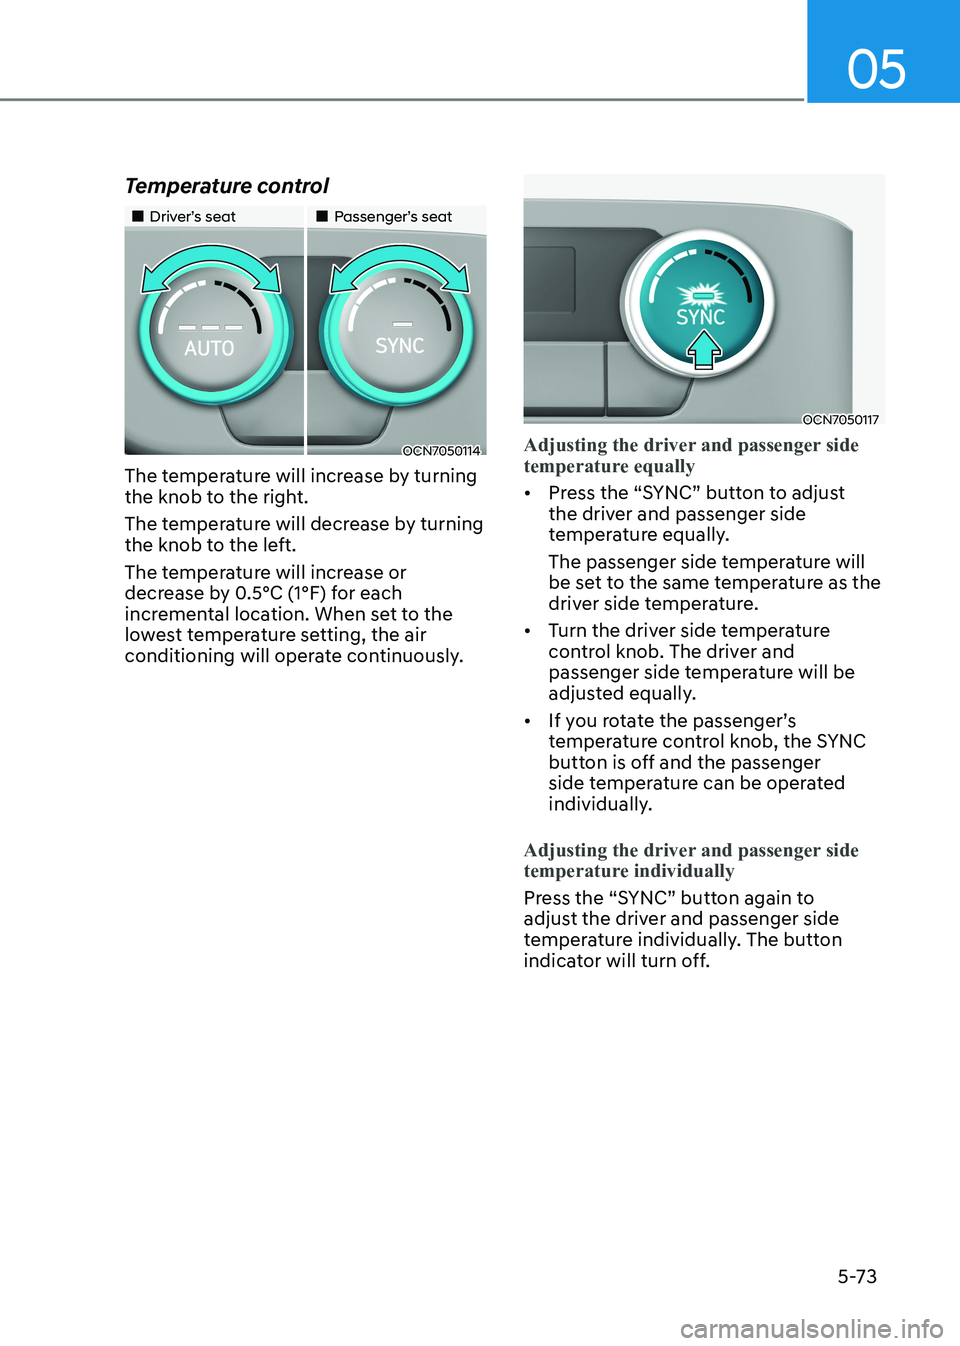
Temperature control
„„Driver’s seat
„„Passenger’s seat
OCN7050114
The temperature will increase by turning
the knob to the right.
The temperature will decrease by turning
the knob to the left.
The temperature will increase or
decrease by 0.5°C (1°F) for each
incremental location. When set to the
lowest temperature setting, the air
conditioning will operate continuously.
OCN7050117
Adjusting the driver and passenger side
temperature equally
• Press the “SYNC” button to adjust
the driver and passenger side
temperature equally.
The passenger side temperature will
be set to the same temperature as the
driver side temperature.
• Turn the driver side temperature
control knob. The driver and
passenger side temperature will be
adjusted equally.
• If you rotate the passenger’s
temperature control knob, the SYNC
button is off and the passenger
side temperature can be operated
individually.
Adjusting the driver and passenger side
temperature individually
Press the “SYNC” button again to
adjust the driver and passenger side
temperature individually. The button
indicator will turn off.