oil HYUNDAI ELANTRA HYBRID 2022 Owner's Manual
[x] Cancel search | Manufacturer: HYUNDAI, Model Year: 2022, Model line: ELANTRA HYBRID, Model: HYUNDAI ELANTRA HYBRID 2022Pages: 529, PDF Size: 38.79 MB
Page 452 of 529
9-3
09
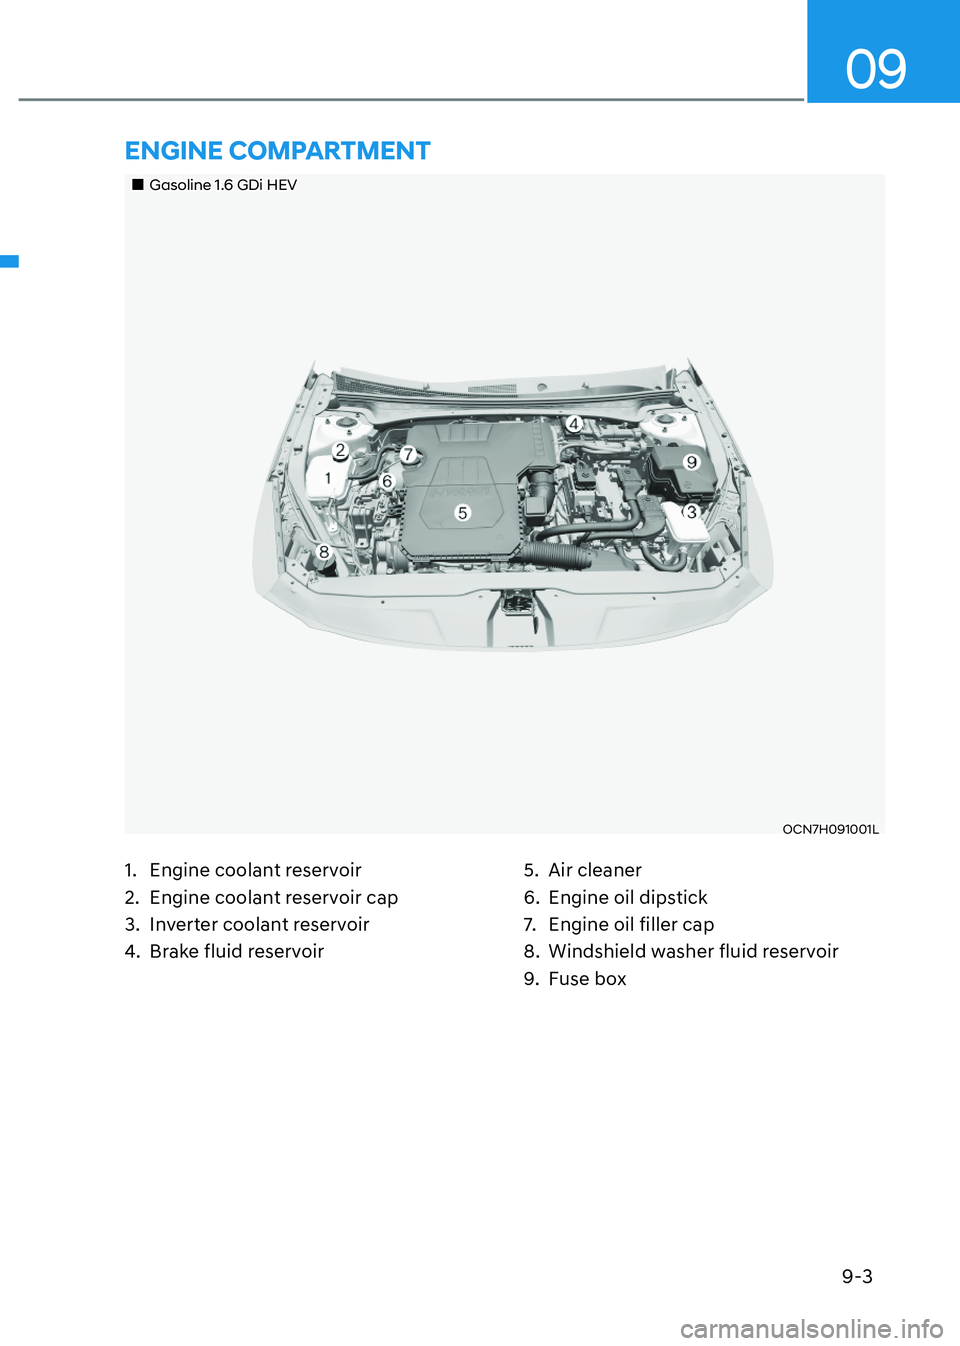
1. Engine coolant reservoir
2. Engine coolant reservoir cap
3. Inverter coolant reservoir
4. Brake fluid reservoir5. Air cleaner
6. Engine oil dipstick
7. Engine oil filler cap
8. Windshield washer fluid reservoir
9. Fuse box
ENGINE COMPARTMENT
Gasoline 1.6 GDi HEVGasoline 1.6 GDi HEV
OCN7H091001LOCN7H091001L
Page 456 of 529
09
9-7
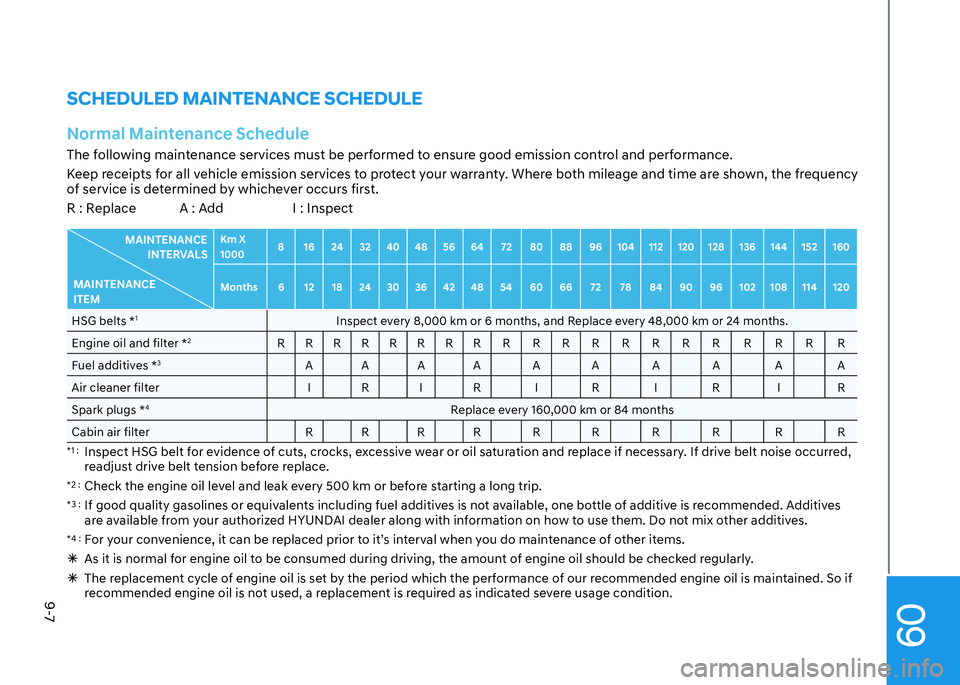
SCHEDULED MAINTENANCE SCHEDULENormal Maintenance ScheduleThe following maintenance services must be performed to ensure good emission control and performance.
Keep receipts for all vehicle emission services to protect your warranty. Where both mileage and time are shown, the frequency
of service is determined by whichever occurs first.
R : Replace A : Add I : Inspect
MAINTENANCE INTERVALS
MAINTENANCE ITEM Km X 1000
8 16 24 32 40 48 56 64 72 80 88 96 104 112 120 128 136 144 152 160
Months 6 12 18 24 30 36 42 48 54 60 66 72 78 84 90 96 102 108 114 120
HSG belts * 1
Inspect every 8,000 km or 6 months, and Replace every 48,000 km or 24 months.
Engine oil and filter * 2
RRRRRRRR R R R R R R R R R R R R
Fuel additives * 3
AAAA A A A A A A
Air cleaner filter I R I R I R I R I R Spark plugs * 4
Replace every 160,000 km or 84 months
Cabin air filter R R R R R R R R R R
*1 : Inspect HSG belt for evidence of cuts, crocks, excessive wear or oil saturation and replace if necessary. If drive belt noise occurred,
readjust drive belt tension before replace.
*2 : Check the engine oil level and leak every 500 km or before starting a long trip.
*3 : If good quality gasolines or equivalents including fuel additives is not available, one bottle of additive is recommended. Additives
are available from your authorized HYUNDAI dealer along with information on how to use them. Do not mix other additives.
*4 : For your convenience, it can be replaced prior to it’s interval when you do maintenance of other items.
As it is normal for engine oil to be consumed during driving, the amount of engine oil should be checked regularly.
The replacement cycle of engine oil is set by the period which the performance of our recommended engine oil is maintained. So if
recommended engine oil is not used, a replacement is required as indicated severe usage condition.
Page 460 of 529
09
9-11
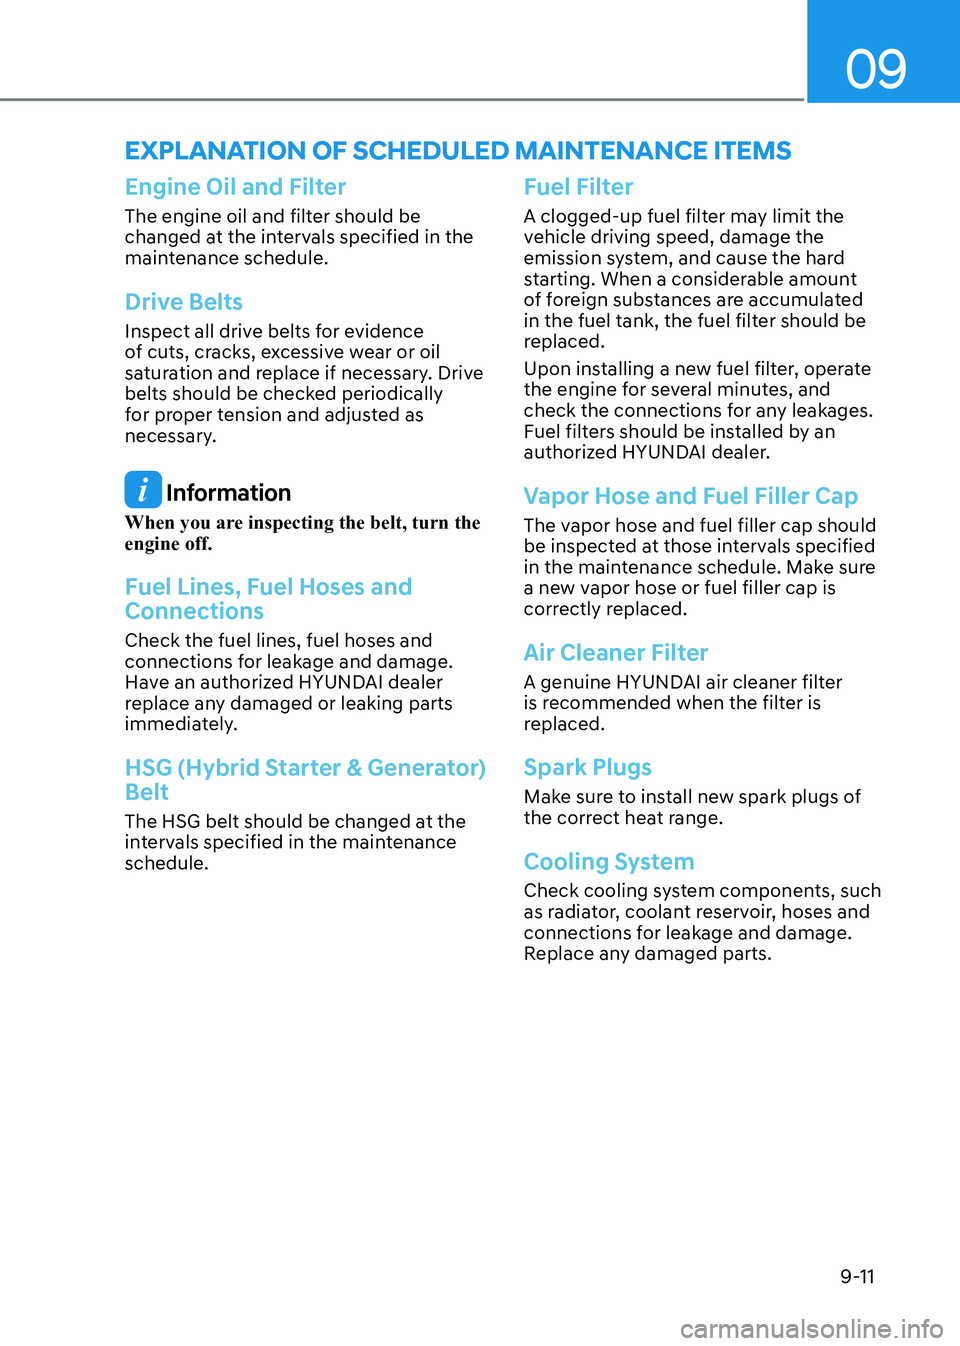
Engine Oil and Filter
The engine oil and filter should be
changed at the intervals specified in the
maintenance schedule.
Drive Belts
Inspect all drive belts for evidence
of cuts, cracks, excessive wear or oil
saturation and replace if necessary. Drive
belts should be checked periodically
for proper tension and adjusted as
necessary.
Information
When you are inspecting the belt, turn the engine off.
Fuel Lines, Fuel Hoses and Connections
Check the fuel lines, fuel hoses and
connections for leakage and damage.
Have an authorized HYUNDAI dealer
replace any damaged or leaking parts
immediately.
HSG (Hybrid Starter & Generator) Belt
The HSG belt should be changed at the
intervals specified in the maintenance schedule.
Fuel Filter
A clogged-up fuel filter may limit the
vehicle driving speed, damage the
emission system, and cause the hard
starting. When a considerable amount
of foreign substances are accumulated
in the fuel tank, the fuel filter should be
replaced.
Upon installing a new fuel filter, operate
the engine for several minutes, and
check the connections for any leakages.
Fuel filters should be installed by an
authorized HYUNDAI dealer.
Vapor Hose and Fuel Filler Cap
The vapor hose and fuel filler cap should
be inspected at those intervals specified
in the maintenance schedule. Make sure
a new vapor hose or fuel filler cap is
correctly replaced.
Air Cleaner Filter
A genuine HYUNDAI air cleaner filter
is recommended when the filter is
replaced.
Spark Plugs
Make sure to install new spark plugs of
the correct heat range.
Cooling System
Check cooling system components, such
as radiator, coolant reservoir, hoses and
connections for leakage and damage.
Replace any damaged parts.
EXPLANATION OF SCHEDULED MAINTENANCE ITEMS
Page 462 of 529
09
9-13
Checking the Engine Oil Level
Engine oil is used for lubricating,
cooling, and operating various hydraulic
components in the engine. Engine oil
consumption while driving is normal,
and it is necessary to check and refill the
engine oil regularly. Also, check and refill
the oil level within the recommended
maintenance schedule to prevent
deterioration of oil performance.
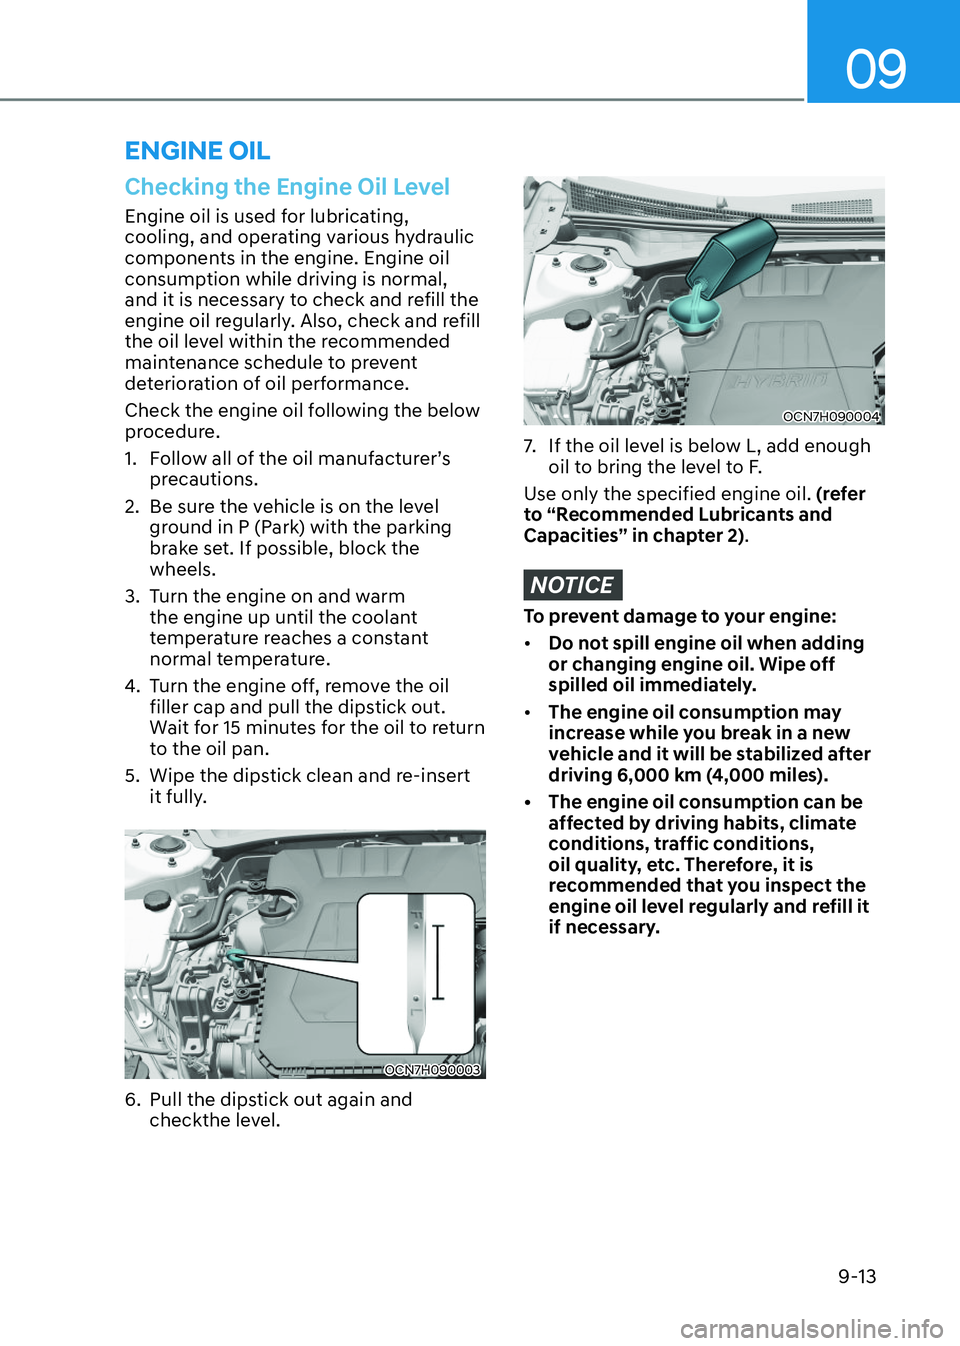
Check the engine oil following the below
procedure.
1. Follow all of the oil manufacturer’s precautions.
2. Be sure the vehicle is on the level ground in P (Park) with the parking
brake set. If possible, block the wheels.
3. Turn the engine on and warm the engine up until the coolant
temperature reaches a constant
normal temperature.
4. Turn the engine off, remove the oil filler cap and pull the dipstick out.
Wait for 15 minutes for the oil to return
to the oil pan.
5. Wipe the dipstick clean and re-insert it fully.
OCN7H090003OCN7H090003
6. Pull the dipstick out again and checkthe level.
OCN7H090004OCN7H090004
7. If the oil level is below L, add enough oil to bring the level to F.
Use only the specified engine oil. (refer
to “Recommended Lubricants and
Capacities” in chapter 2) .
NOTICE
To prevent damage to your engine:
Page 463 of 529
Maintenance
9-14
Checking the Engine Oil and
Filter
Page 471 of 529
Maintenance
9-22
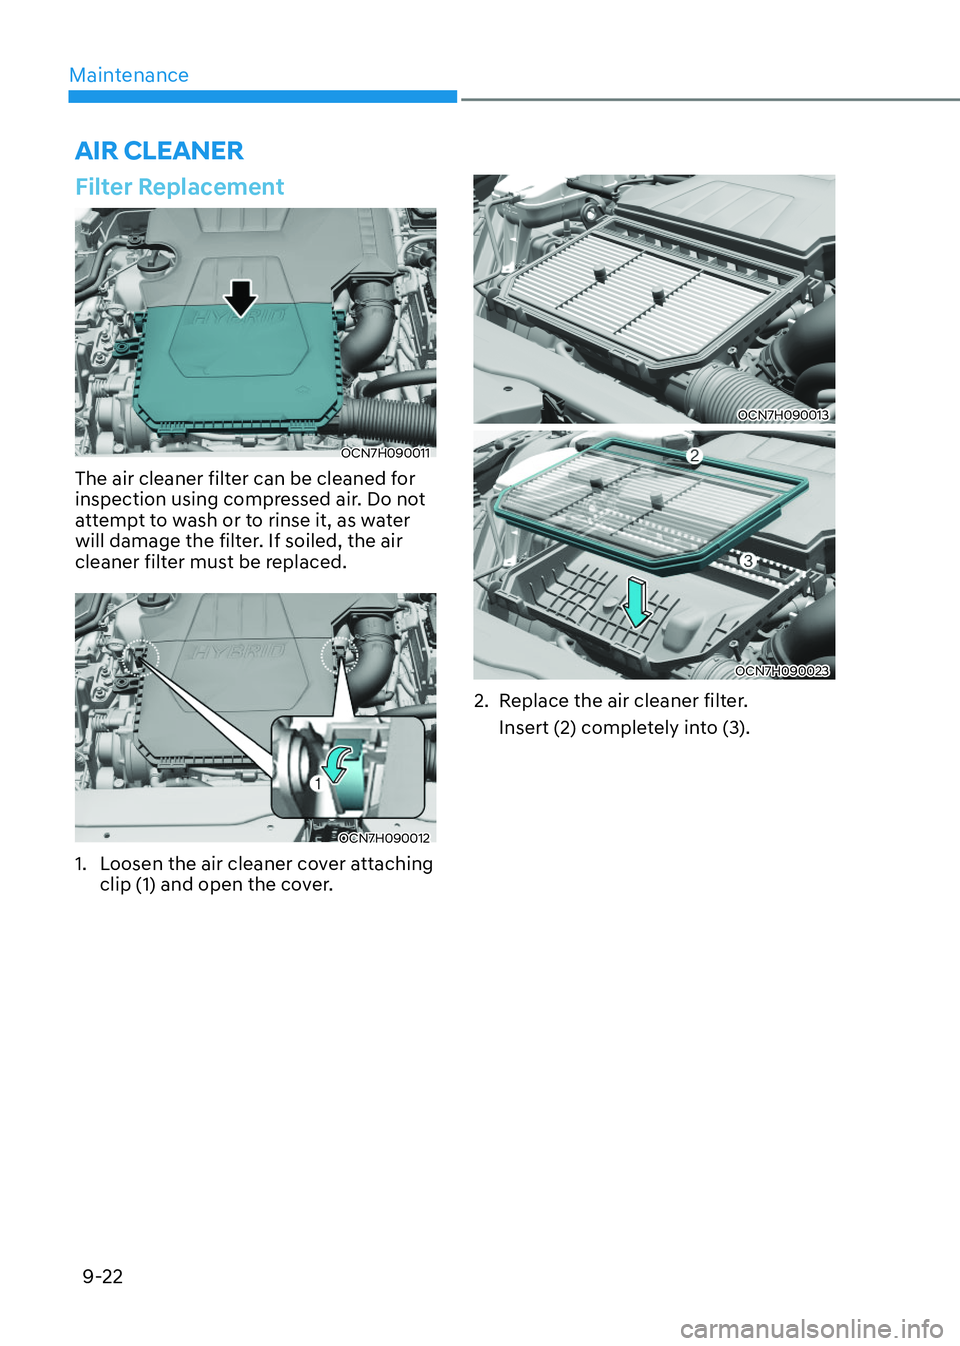
Filter Replacement
OCN7H090011OCN7H090011
The air cleaner filter can be cleaned for
inspection using compressed air. Do not
attempt to wash or to rinse it, as water
will damage the filter. If soiled, the air
cleaner filter must be replaced.
OCN7H090012OCN7H090012
1. Loosen the air cleaner cover attaching clip (1) and open the cover.
OCN7H090013OCN7H090013
OCN7H090023OCN7H090023
2. Replace the air cleaner filter. Insert (2) completely into (3).
AIR CLEANER
Page 485 of 529
Maintenance
9-36
WARNING
The traction grade assigned to this
tire is based on straight-ahead
braking traction tests, and does not
include acceleration, cornering,
hydroplaning, or peak traction
characteristics.
Temperature A, B & C
The temperature grades are A (the
highest), B and C representing the
tire’s resistance to the generation
of heat and its ability to dissipate
heat when tested under controlled conditions on a specified indoor
laboratory test wheel.
Sustained high temperature can
cause the material of the tire to
degenerate and reduce tire life, and
excessive temperature can lead to
sudden tire failure.
WARNING
The temperature grade for this
tire is established for a tire that
is properly inflated and not
overloaded. Excessive speed,
under-inflation, over-inflation, or
excessive loading, either separately
or in combination, can cause heat build-up and possible sudden
tire failure. This may cause loss
of vehicle control resulting in an accident.
Tire Terminology and Definitions
Air Pressure
The amount of air inside the tire
pressing outward on the tire. Air
pressure is expressed in kilopascal
(kPa) or pounds per square inch (psi).
Accessory Weight
This means the combined weight
of optional accessories. Some
examples of optional accessories
are automatic transmission, power
seats, and air conditioning.
Aspect Ratio
The relationship of a tire’s height to its width. Belt
A rubber coated layer of cords that
is located between the plies and the
tread. Cords may be made from steel
or other reinforcing materials. Bead
The tire bead contains steel wires
wrapped by steel cords that hold the
tire onto the rim.
Bias Ply Tire
A pneumatic tire in which the plies
are laid at alternate angles less than
90 degrees to the centerline of the
tread.
Cold Tire Pressure
The amount of air pressure in a tire,
measured in kilopascals (kPa) or
pounds per square inch (psi) before a
tire has built up heat from driving.
Curb Weight
This means the weight of a motor
vehicle with standard and optional equipment including the maximum
capacity of fuel, oil and coolant, but
without passengers and cargo.
Page 499 of 529

Maintenance
9-50
Fuse NameFuse Rating Circuit Protected
WIPER
25A Wiper Relay
HORN 15A Horn Relay
IGN COIL 20A Ignition Coil #1~#4
ECU 2 15A ECM
SENSOR 3 10A E/R Junction Block (Fuel Pump Relay)
SENSOR 2 10ACamshaft Position Sensor #1/#2 (Intake/Exhaust), Mass
Air Flow Sensor, ELCM, Oil Control Valve #1/#2 (Intake/
Exhaust), Purge Control Solenoid Valve
ECU 3 10A ECM, HPCU, Clutch Actuator
SENSOR 1 15A Oxygen Sensor (Up/Down)
IEB 4 10A IDB Unit, Multipurpose Check Connector
EWP 3 10A Auxiliary Electric Water Pump
ECU 1 20A ECM
TCU 2 15A Transaxle Range Switch, TCM
Page 510 of 529
09
9-61
Waxing
A good coat of wax provides a barrier
between your paint and environmental
contamination.
Keeping a good coat of wax on your
vehicle will help protect it.
Wax the vehicle when water will no
longer bead on the paint.
Always wash and dry the vehicle before
waxing. Use a good quality liquid or
paste wax, and follow the manufacturer’s
instructions. Wax all metal trim to protect
it and to maintain its luster.
Removing oil, tar, and similar materials
with a spot remover will usually strip the
wax from the finish. Be sure to re-wax
these areas even if the rest of the vehicle
does not yet need waxing.
NOTICE
Page 513 of 529
Maintenance
9-64
Interior Care
Interior general precautions
Prevent caustic solutions such as
perfume and cosmetic oil, from
contacting the interior parts because
they may cause damage or discoloration.
If they do contact the interior parts,
wipe them off immediately. See the
instructions for the proper way to clean
vinyl.
NOTICE