air condition HYUNDAI ELANTRA HYBRID 2022 Owner's Guide
[x] Cancel search | Manufacturer: HYUNDAI, Model Year: 2022, Model line: ELANTRA HYBRID, Model: HYUNDAI ELANTRA HYBRID 2022Pages: 529, PDF Size: 38.79 MB
Page 412 of 529

07
7-115
WARNINg
• Reverse Parking Distance Warning
is a supplemental function. The
operation of the system can be
affected by several factors (including
environmental conditions). It is the
responsibility of the driver to always
check the rear view before and while parking.
• Your new vehicle warranty does not
cover any accidents or damage to
the vehicle.
• Pay close attention when driving
near objects, pedestrians, and
especially children. Some objects
may not be detected by the
ultrasonic sensors, due to the objects
distance, size or material, all of
which can limit the effectiveness of
the sensor.
Limitations of the Reverse Parking
Distance Warning • Reverse Parking Distance Warning
may not operate properly when:
- Moisture is frozen to the sensor
- Sensor is covered with foreign material, such as snow or water
(The system will operate properly
when such foreign material are
removed.)
- The weather is extremely hot or cold
- The sensor or sensor assembly is disassembled
- The surface of the sensor is pressed hard or hit with a hard object
- The surface of the sensor is scratched with a sharp object
- The sensors or its surrounding area is directly sprayed with high
pressure washer •
Reverse Parking Distance Warning
may malfunction when:
- Heavy rain or water spray is present
- Water flows on the surface of the sensor
- Affected by another vehicle’s
sensors
- The sensor is covered with snow or ice
- Driving on uneven road, gravel roads or bushes
- Objects that generates ultrasonic waves are near the sensor
- License plate is installed in a different spot from the original
location
- The vehicle bumper height or ultrasonic sensor installation has been modified
- Attaching equipment or accessories next to the ultrasonic sensors
• The following objects may not be
detected:
- Sharp or slim objects, such as ropes, chains or small poles.
- Objects, which tend to absorb sensor frequency, such as clothes,
spongy material or snow.
- Objects smaller than 100 cm (40 in.) in length and narrower than 14 cm
(6 in.) in diameter.
• Parking Distance Warning Indicators
may be displayed differently from
the actual detected location when
the obstacle is located between the
sensors.
• Parking Distance Warning indicator
may not occur sequentially depending
on vehicle speed or obstacle shape.
• If Reverse Parking Distance Warning
needs repair, have the vehicle
inspected by an authorized HYUNDAI
dealer.
Page 427 of 529

Emergency Situations
8-6
NOTICE
External power source using 12V battery
The use of external power accessories
may reduce performance and function
of the vehicle. Especially, the use of
dash cameras may shut off the power of
the vehicle prior to the dash camera’s
automatic shut-down.
If the power of the vehicle is shut off,
start the vehicle as explained. (refer to
“Using the 12V Battery Reset Switch”)
Jump Starting
In the event vehicle still does not have a
functional 12V battery (check if interior
lights will not turn on) then you can try
a jump start to the engine compartment
jumper terminals using a 12V booster
pack or jumper cables from another
vehicle’s 12V battery according to the
following instructions.
CAUTION
Jump starting can be dangerous if
done incorrectly. Follow the jump
starting procedure in this section to
avoid serious injury or damage to
your vehicle. If in doubt about how to
properly jump start your vehicle, have a
service technician or towing service do
it for you.
1. Position the vehicles close enough that the jumper cables will reach, but
do not allow the vehicles to touch.
Avoid fans or any moving parts in the
engine compartment at all times, even
when the vehicles are turned off.
2. Turn off all electrical devices such as radios, lights, air conditioning, etc.
Put the vehicles in P (Park) and set the
parking brake. Turn both vehicles OFF.
OCN7H070001
3. Connect the jumper cables in the exact sequence shown in the
illustration. First connect one jumper
cable to the red, positive (+) jumper
terminal of your vehicle (1).
4. Connect the other end of the jumper
cable to the red, positive (+) battery/
jumper terminal of the assisting
vehicle (2).
5. Connect the second jumper cable to the black, negative (-) battery/chassis
ground of the assisting vehicle (3).
6. Connect the other end of the second jumper cable to the black, negative (-)
chassis ground of your vehicle (4).
Do not allow the jumper cables to
contact anything except the correct
battery or jumper terminals or the
correct ground. Do not lean over the
battery when making connections.
Page 429 of 529

Emergency Situations
8-8
If your temperature gauge indicates
overheating, you experience a loss of
power, or hear loud pinging or knocking,
the engine may be overheating. If this
happens, you should:
1. Pull off the road and stop as soon as it
is safe to do so.
2. Shift the gear to P (Park) and set the parking brake
3. Turn off the air conditioner.
4. When the coolant or hot steams gush
out of the reservoir, stop the engine
and call an authorized HYUNDAI
dealer for assistance. If the coolant
does not flow out, leave the engine
compartment opened, while running
the engine. Check the coolant
temperature gauge on the instrument
cluster and turn off the engine to
make sure the coolant temperature is
sufficiently cooled down. 5. Cool down the engine sufficiently
and check the coolant level. When it
is insufficient, check its connection
with the radiator, the heater hose,
and the water pump for any leakage.
When there is no leakage, add the
coolant. However, if the problems
persists, such as the coolant leakages,
the cooling-fan malfunction or the
water pump drive belt damages,
immediately stop the engine, and
have your vehicle checked by an
authorized HYUNDAI dealer.
• You should mix antifreeze and water in
a proper ratio to make coolant. If the
antifreeze ratio is too high or low, it
may cause overheating due to the lack
of cooling function.
(Refer to the Mix Ratio in “Checking
the coolant level” in chapter 9.)
• If overheating happens repeatedly,
have your vehicle to be checked by an
authorized HYUNDAI dealer.
WARNING
While the engine is running,
keep hands, clothing and tools
away from the moving parts
such as the cooling fan and
drive belt to prevent serious
injury.
iF tHe engine overHeats
Page 440 of 529

08
8-19
If you have a tire gauge, check the tire
pressure (see “Tires and Wheels” in
chapter 2 for tire pressure instructions.).
If the pressure is lower or higher than
recommended, drive slowly to the
nearest service station and adjust it to
the recommended pressure. Always
reinstall the valve cap after checking
or adjusting tire pressure. If the cap
is not replaced, air may leak from the
tire. If you lose a valve cap, buy another
and install it as soon as possible. After
changing tires, secure the flat tire and
return the jack and tools to their proper
storage locations. If it is hard to secure
the flat tire, put the flat tire in the
luggage compartment.
NOTICE
• Check the tire pressure as soon
as possible after installing a spare
tire. Adjust it to the recommended
pressure.
• Check and tighten the wheel lug nuts
after driving over 50 km (30 miles) if
tires are replaced. Recheck the tire
wheel lug nuts after driving over
1,000 km (620 miles).
CAUTION
Your vehicle has metric threads on the
studs and lug nuts. Make certain during
tire changing that the same nuts that
were removed are reinstalled. If you
have to replace your lug nuts make
sure they have metric threads to avoid
damaging the studs and ensure the
wheel is properly secured to the hub.
Consult an authorized HYUNDAI dealer
for assistance.
If any of the equipment such as the jack,
lug nuts, studs, or other equipment is
damaged or in poor condition, do not
attempt to change the tire and call for
assistance.
Use of compact spare tires (if equipped)
Compact spare tires are designed for
emergency use only. Drive carefully on
the compact spare tire and always follow
the safety precautions.
WARNING
To prevent compact spare tire failure
and loss of control possibly resulting in
an accident: • Use the compact spare tire only in an
emergency.
• NEVER operate your vehicle over 80
km/h (50 mph).
• Do not exceed the vehicle’s
maximum load rating or the load
carrying capacity shown on the
sidewall of the compact spare tire.
• Do not use the compact spare tire
continuously. Repair or replace the
original tire as soon as possible to
avoid failure of the compact spare
tire.
Page 441 of 529

Emergency Situations
8-20
When driving with the compact spare tire
mounted to your vehicle: • Check the tire pressure after installing
the compact spare tire. The compact
spare tire should be inflated to 420
kPa (60 psi).
• Do not take this vehicle through
an automatic car wash while the
compact spare tire is installed.
• Do not use the compact spare tire on
any other vehicle because this tire
has been designed especially for your
vehicle.
• The compact spare tire’s tread life is
shorter than a regular tire. Inspect
your compact spare tire regularly and
replace worn compact spare tires with
the same size and design, mounted on the same wheel.
• Do not use more than one compact
spare tire at a time.
NOTICE
When the original tire and wheel are
repaired and reinstalled on the vehicle,
the lug nut torque must be set correctly.
The correct lug nut tightening torque is
11~13 kgf·m (79~94 lbf·ft).
CAUTION
To prevent damaging the compact
spare tire and your vehicle: • Drive slowly enough for the road
conditions to avoid all hazards, such
as a potholes or debris.
• Avoid driving over obstacles. The
compact spare tire diameter is
smaller than the diameter of a
conventional tire and reduces the
ground clearance approximately 25
mm (1 inch).
• Do not use the compact spare tire
on any other wheels, nor should
standard tires, snow tires, wheel
covers or trim rings be used with the
compact spare wheel.
• Do not suddenly accelerate or
decelerate 0 ↔ 40 km/h (0 ↔ 25
mph) in any driving mode. It may
cause leakage of transfer oil.
Page 453 of 529

Maintenance
9-4
You should exercise the utmost care
to prevent damage to your vehicle and
injury to yourself whenever performing
any maintenance or inspection
procedures.
Have your vehicle maintained and
repaired by an authorized HYUNDAI
dealer. An authorized HYUNDAI dealer
meets HYUNDAI’s high service quality
standards and receives technical support
from HYUNDAI in order to provide you
with a high level of service satisfaction.
Owner’s Responsibility
Maintenance service and record
retention are the owner’s responsibility.
You should retain documents that show
proper maintenance has been performed
on your vehicle in accordance with
the scheduled maintenance service
charts shown on the following pages.
You need this information to establish
your compliance with the servicing
and maintenance requirements of your
vehicle warranties.
Detailed warranty information is
provided in your Service Passport..
Repairs and adjustments required as a
result of improper maintenance or a lack
of required maintenance are not covered.
Owner Maintenance Precautions
Inadequate, incomplete or insufficient
servicing may result in operational
problems with your vehicle that could
lead to vehicle damage, an accident, or
personal injury. This chapter provides
instructions only for the maintenance
items that are easy to perform. Several
procedures can be done only by an
authorized HYUNDAI dealer with special
tools.
Your vehicle should not be modified
in any way. Such modifications may
adversely affect the performance, safety
or durability of your vehicle and may, in
addition, violate conditions of the limited
warranties covering the vehicle.
NOTICE
Improper owner maintenance during
the warranty period may affect
warranty coverage. For details, read
the separate Service Passport provided
with the vehicle. If you’re unsure about
any service or maintenance procedure,
have it done by an authorized HYUNDAI
dealer.
MAINTENANCE SERVICES
Page 456 of 529
09
9-7
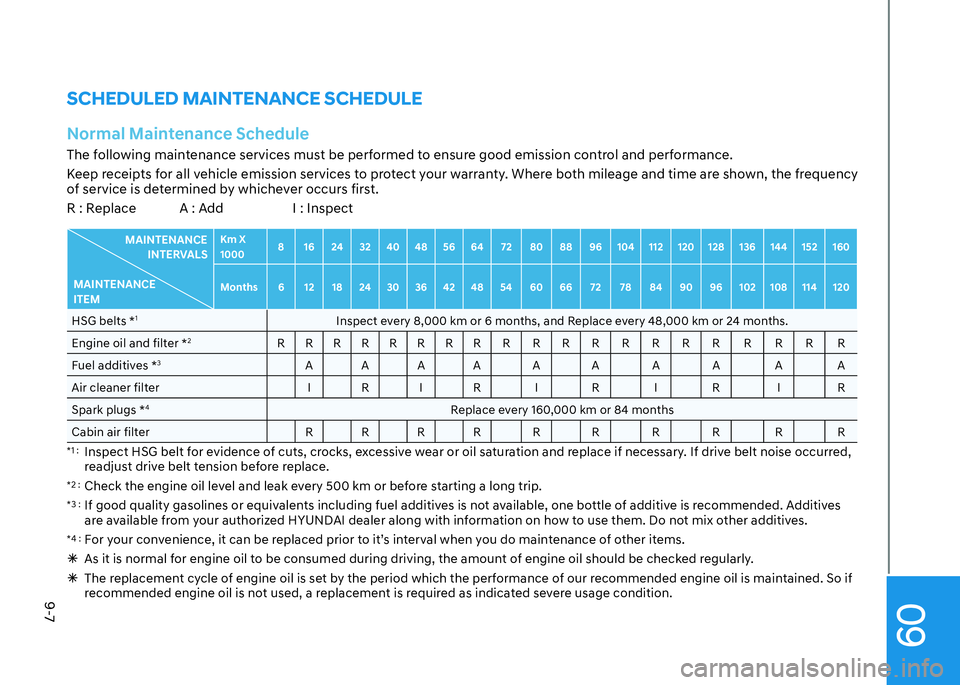
SCHEDULED MAINTENANCE SCHEDULENormal Maintenance ScheduleThe following maintenance services must be performed to ensure good emission control and performance.
Keep receipts for all vehicle emission services to protect your warranty. Where both mileage and time are shown, the frequency
of service is determined by whichever occurs first.
R : Replace A : Add I : Inspect
MAINTENANCE INTERVALS
MAINTENANCE ITEM Km X 1000
8 16 24 32 40 48 56 64 72 80 88 96 104 112 120 128 136 144 152 160
Months 6 12 18 24 30 36 42 48 54 60 66 72 78 84 90 96 102 108 114 120
HSG belts * 1
Inspect every 8,000 km or 6 months, and Replace every 48,000 km or 24 months.
Engine oil and filter * 2
RRRRRRRR R R R R R R R R R R R R
Fuel additives * 3
AAAA A A A A A A
Air cleaner filter I R I R I R I R I R Spark plugs * 4
Replace every 160,000 km or 84 months
Cabin air filter R R R R R R R R R R
*1 : Inspect HSG belt for evidence of cuts, crocks, excessive wear or oil saturation and replace if necessary. If drive belt noise occurred,
readjust drive belt tension before replace.
*2 : Check the engine oil level and leak every 500 km or before starting a long trip.
*3 : If good quality gasolines or equivalents including fuel additives is not available, one bottle of additive is recommended. Additives
are available from your authorized HYUNDAI dealer along with information on how to use them. Do not mix other additives.
*4 : For your convenience, it can be replaced prior to it’s interval when you do maintenance of other items.
As it is normal for engine oil to be consumed during driving, the amount of engine oil should be checked regularly.
The replacement cycle of engine oil is set by the period which the performance of our recommended engine oil is maintained. So if
recommended engine oil is not used, a replacement is required as indicated severe usage condition.
Page 458 of 529

09
9-9
Normal Maintenance Schedule (CONT.)R : Replace or change. I : Inspect and if necessary, adjust, correct, clean or replace.
MAINTENANCE INTERVALS
MAINTENANCE ITEM Km X 1000
8 16 24 32 40 48 56 64 72 80 88 96 104 112 120 128 136 144 152 160
Months 6 12 18 24 30 36 42 48 54 60 66 72 78 84 90 96 102 108 114 120
Brake discs and pads I I I I I I I I I I
Steering gear rack, linkage and
boots IIIIIIII I I I I I I I I I I I I
Drive shafts and boots I I I I I I I I I I I I I I I I I I I I
Suspension mounting bolts I I I I I I I I I I
Cooling system I I I I I I I I I I I I I I I I I I I I
Air conditioning refrigerant I I I I I I I I I I
Exhaust system I I I I I I I I I I
Page 461 of 529

Maintenance
9-12
Engine Coolant/Inverter Coolant
The coolant should be changed at the
intervals specified in the maintenance schedule.
Dual Clutch Transmission Fluid
Dual clutch transmission fluid should
not be checked under normal usage conditions.
Have the Intelligent variable transmission
fluid is changed by an authorized
HYUNDAI dealer according to the
maintenance schedule.
Brake Hoses and Lines
Visually check for proper installation,
chafing, cracks, deterioration and any
leakage. Replace any deteriorated or
damaged parts immediately.
Brake Fluid
Check the brake fluid level in the brake
fluid reservoir. The level should be
between the MIN and the MAX marks
on the side of the reservoir. Use only
hydraulic brake fluid conforming to DOT
4 specification.
Brake Discs, Pads, Calipers and
Rotors
Check the pads for excessive wear, discs
for run out and wear, and calipers for
fluid leakage.
Suspension Mounting Bolts
Check the suspension connections for
looseness or damage. Retighten to the
specified torque.
Steering Gear Box, Linkage &
Boots/Lower Arm Ball Joint
With the vehicle stopped and the engine
off, check for excessive freeplay in the
steering wheel. Check the linkage for
bends or damage. Check the dust boots
and ball joints for deterioration, cracks, or damage.
Replace any damaged parts.
Drive Shafts and Boots
Check the drive shafts, boots and clamps
for cracks, deterioration, or damage.
Replace any damaged parts and, if
necessary, repack the grease.
Air Conditioning Refrigerant
Check the air conditioning lines and
connections for leakage and damage.
Page 472 of 529

09
9-23
OCN7H090022OCN7H090022
OCN7H090021OCN7H090021
3. Insert the air cleaner cover in the hinge (4) and engage the clip (5) after
closing the cover.
4. Check that the cover is firmly installed
Information
If the vehicle is operated in extremely
dusty or sandy areas, replace the element
more often than the usual recommended
intervals (refer to “Maintenance Under
Severe Usage Conditions” in this chapter).
NOTICE