HYUNDAI ELANTRA SE 2017 Owners Manual
Manufacturer: HYUNDAI, Model Year: 2017, Model line: ELANTRA SE, Model: HYUNDAI ELANTRA SE 2017Pages: 586, PDF Size: 15.29 MB
Page 211 of 586
3-117
Convenient features of your vehicle
3
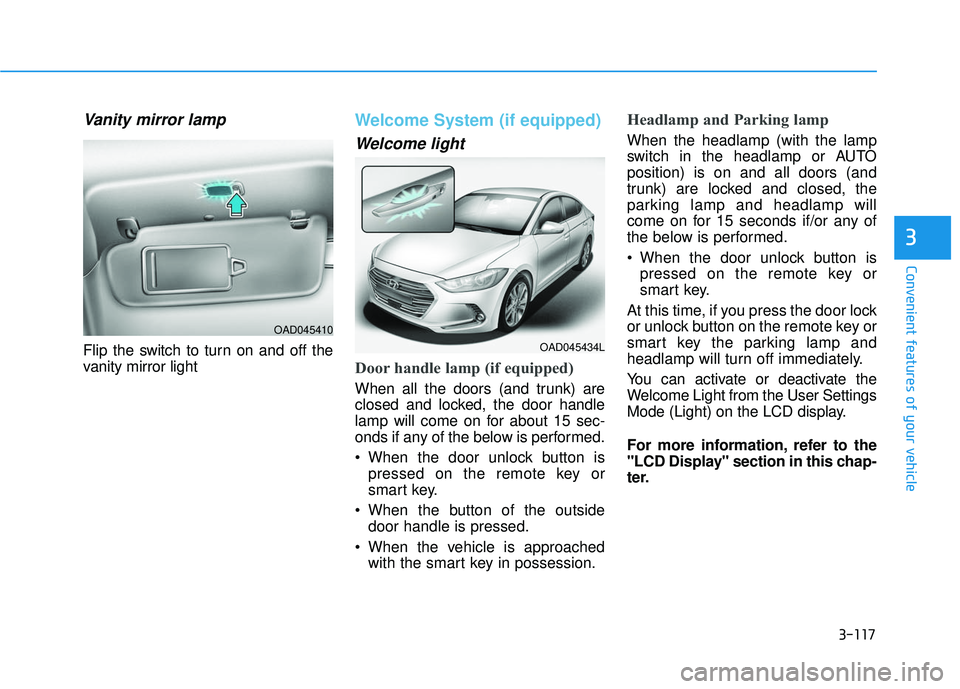
Vanity mirror lamp
Flip the switch to turn on and off the
vanity mirror light
Welcome System (if equipped)
Welcome light
Door handle lamp (if equipped)
When all the doors (and trunk) are
closed and locked, the door handle
lamp will come on for about 15 sec-
onds if any of the below is performed.
When the door unlock button ispressed on the remote key or
smart key.
When the button of the outside door handle is pressed.
When the vehicle is approached with the smart key in possession.
Headlamp and Parking lamp
When the headlamp (with the lamp
switch in the headlamp or AUTO
position) is on and all doors (and
trunk) are locked and closed, the
parking lamp and headlamp will
come on for 15 seconds if/or any of
the below is performed.
When the door unlock button ispressed on the remote key or
smart key.
At this time, if you press the door lock
or unlock button on the remote key or
smart key the parking lamp and
headlamp will turn off immediately.
You can activate or deactivate the
Welcome Light from the User Settings
Mode (Light) on the LCD display.
For more information, refer to the
"LCD Display" section in this chap-
ter.
OAD045410
OAD045434L
Page 212 of 586
3-118
Convenient features of your vehicle
Interior lamp
When the interior lamp switch is in
the DOOR position and all doors (and
trunk) are closed and locked, the
room lamp will come on for 30 sec-
onds if any of the below is performed.
When the door unlock button ispressed on the remote key or
smart key.
When the button of the outside door handle is pressed.
At this time, if you press the door lock
or unlock button on the remote key or
smart key the room lamp will turn off
immediately.
Page 213 of 586
3-119
Convenient features of your vehicle
3
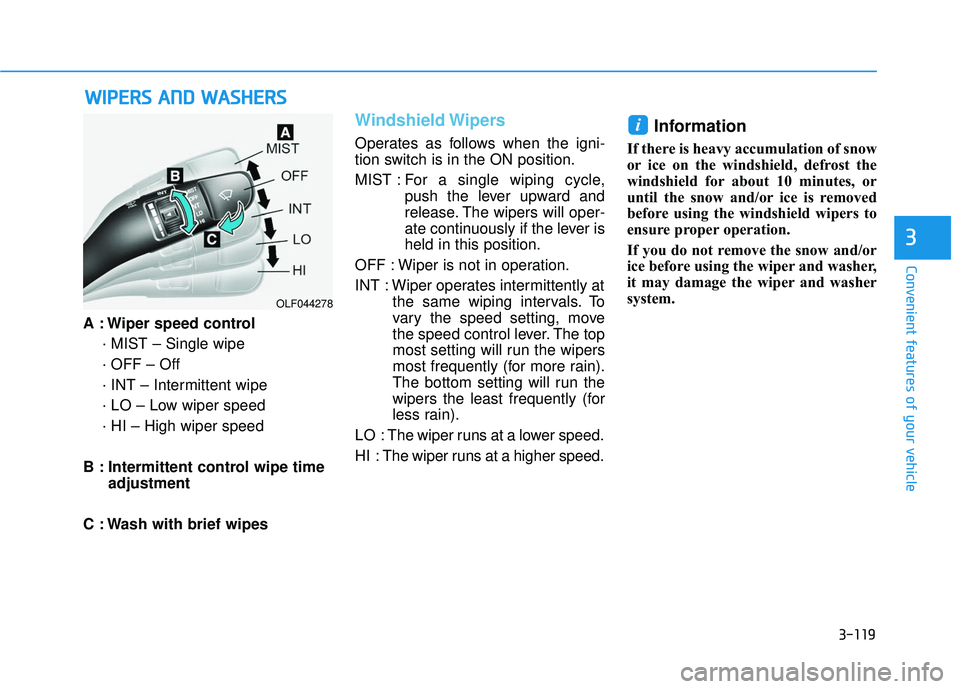
A : Wiper speed control· MIST – Single wipe
· OFF – Off
· INT – Intermittent wipe
· LO – Low wiper speed
· HI – High wiper speed
B : Intermittent control wipe time adjustment
C : Wash with brief wipes
Windshield Wipers
Operates as follows when the igni-
tion switch is in the ON position.
MIST : For a single wiping cycle,
push the lever upward and
release. The wipers will oper-
ate continuously if the lever is
held in this position.
OFF : Wiper is not in operation.
INT : Wiper operates intermittently at the same wiping intervals. To
vary the speed setting, move
the speed control lever. The top
most setting will run the wipers
most frequently (for more rain).
The bottom setting will run the
wipers the least frequently (for
less rain).
LO : The wiper runs at a lower speed.
HI : The wiper runs at a higher speed.
Information
If there is heavy accumulation of snow
or ice on the windshield, defrost the
windshield for about 10 minutes, or
until the snow and/or ice is removed
before using the windshield wipers to
ensure proper operation.
If you do not remove the snow and/or
ice before using the wiper and washer,
it may damage the wiper and washer
system.
i
W W I
IP
P E
ER
R S
S
A
A N
N D
D
W
W A
AS
SH
H E
ER
R S
S
OLF044278
Page 214 of 586
3-120
Convenient features of your vehicle
Windshield Washers
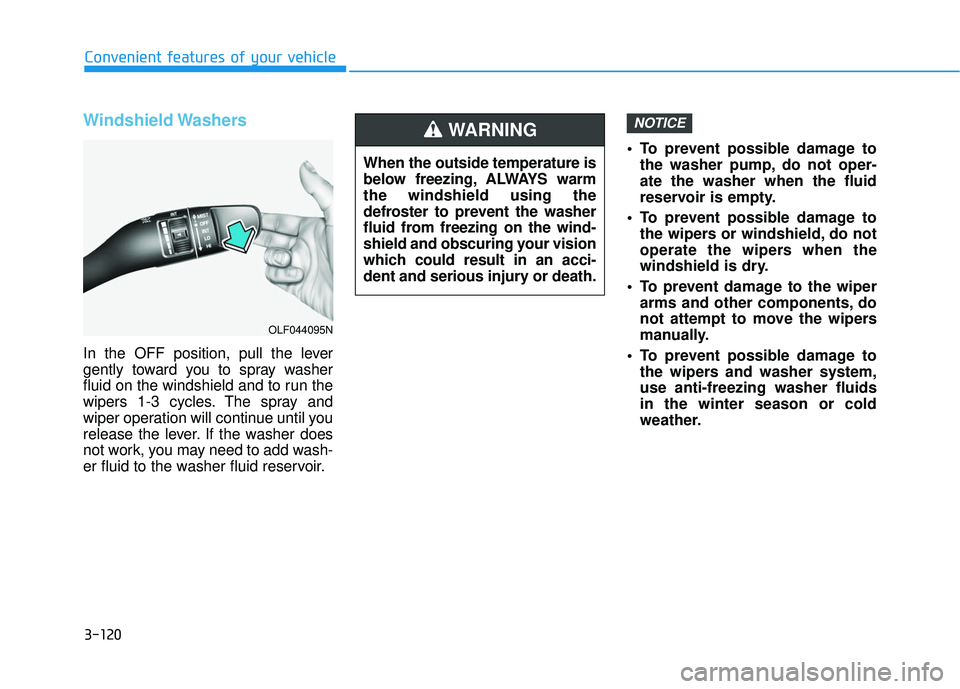
In the OFF position, pull the lever
gently toward you to spray washer
fluid on the windshield and to run the
wipers 1-3 cycles. The spray and
wiper operation will continue until you
release the lever. If the washer does
not work, you may need to add wash-
er fluid to the washer fluid reservoir. To prevent possible damage to
the washer pump, do not oper-
ate the washer when the fluid
reservoir is empty.
To prevent possible damage to the wipers or windshield, do not
operate the wipers when the
windshield is dry.
To prevent damage to the wiper arms and other components, do
not attempt to move the wipers
manually.
To prevent possible damage to the wipers and washer system,
use anti-freezing washer fluids
in the winter season or cold
weather.
NOTICE
When the outside temperature is
below freezing, ALWAYS warm
the windshield using the
defroster to prevent the washer
fluid from freezing on the wind-
shield and obscuring your vision
which could result in an acci-
dent and serious injury or death.
WARNING
OLF044095N
Page 215 of 586
3-121
Convenient features of your vehicle
3
D
DR
RI
IV
V E
ER
R
A
A S
SS
SI
IS
S T
T
S
S Y
Y S
ST
T E
EM
M
Rear View Camera
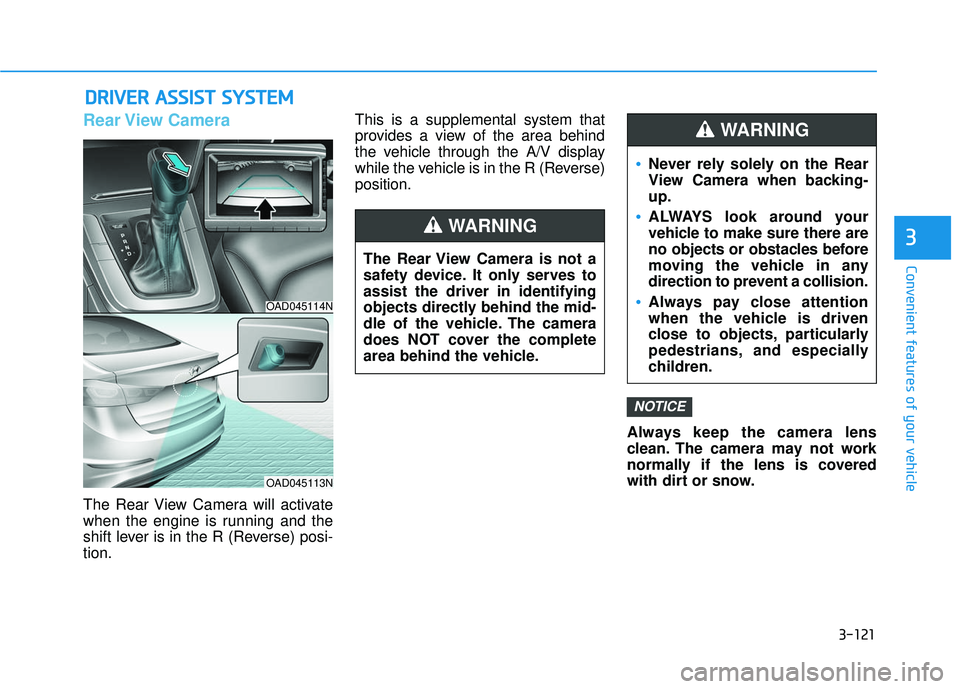
The Rear View Camera will activate
when the engine is running and the
shift lever is in the R (Reverse) posi-
tion. This is a supplemental system that
provides a view of the area behind
the vehicle through the A/V display
while the vehicle is in the R (Reverse)
position.
Always keep the camera lens
clean. The camera may not work
normally if the lens is covered
with dirt or snow.
NOTICE
The Rear View Camera is not a
safety device. It only serves to
assist the driver in identifying
objects directly behind the mid-
dle of the vehicle. The camera
does NOT cover the complete
area behind the vehicle.
WARNING
Never rely solely on the Rear
View Camera when backing-
up.
ALWAYS look around your
vehicle to make sure there are
no objects or obstacles before
moving the vehicle in any
direction to prevent a collision.
Always pay close attention
when the vehicle is driven
close to objects, particularly
pedestrians, and especially
children.
WARNING
OAD045114N
OAD045113N
Page 216 of 586
3-122
Convenient features of your vehicle
D
DE
EF
FR
R O
O S
ST
T E
ER
R
To prevent damage to the conduc-
tors bonded to the inside surface
of the rear window, never use
sharp instruments or window
cleaners containing abrasives to
clean the window.
If you want to defrost and defog
the front windshield, refer to the
"Windshield Defrosting and
Defogging" section in this chapter.
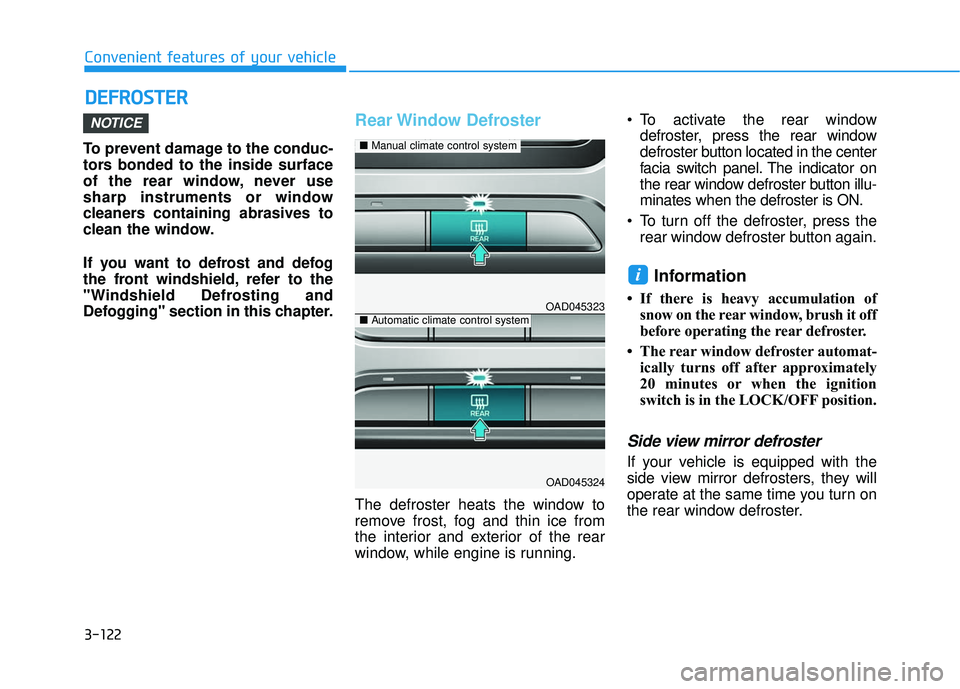
Rear Window Defroster
The defroster heats the window to
remove frost, fog and thin ice from
the interior and exterior of the rear
window, while engine is running. To activate the rear window
defroster, press the rear window
defroster button located in the center
facia switch panel. The indicator on
the rear window defroster button illu-
minates when the defroster is ON.
To turn off the defroster, press the rear window defroster button again.
Information
• If there is heavy accumulation ofsnow on the rear window, brush it off
before operating the rear defroster.
• The rear window defroster automat- ically turns off after approximately
20 minutes or when the ignition
switch is in the LOCK/OFF position.
Side view mirror defroster
If your vehicle is equipped with the
side view mirror defrosters, they will
operate at the same time you turn on
the rear window defroster.
i
NOTICE
OAD045323
OAD045324
■ Manual climate control system
■Automatic climate control system
Page 217 of 586
3-123
Convenient features of your vehicle
3
M
MA
AN
N U
U A
AL
L
C
C L
LI
IM
M A
AT
TE
E
C
C O
O N
NT
TR
R O
O L
L
S
S Y
Y S
ST
T E
EM
M
(
( I
IF
F
E
E Q
Q U
UI
IP
P P
PE
ED
D )
)
OAD045300/OAD045300N
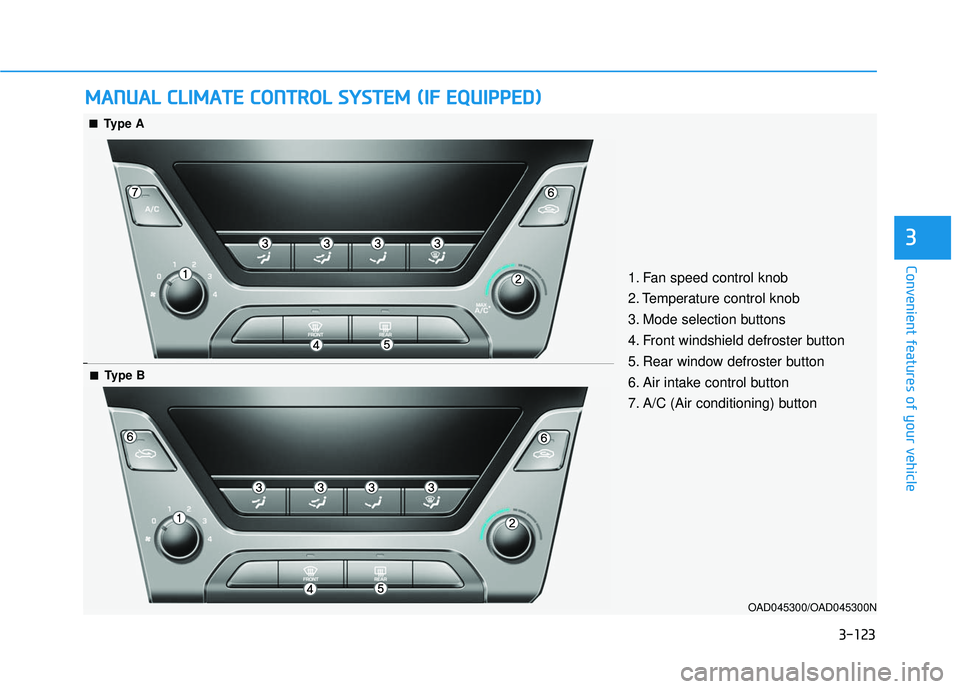
1. Fan speed control knob
2. Temperature control knob
3. Mode selection buttons
4. Front windshield defroster button
5. Rear window defroster button
6. Air intake control button
7. A/C (Air conditioning) button
■ ■Type A
■
■Type B
Page 218 of 586
3-124
Convenient features of your vehicle
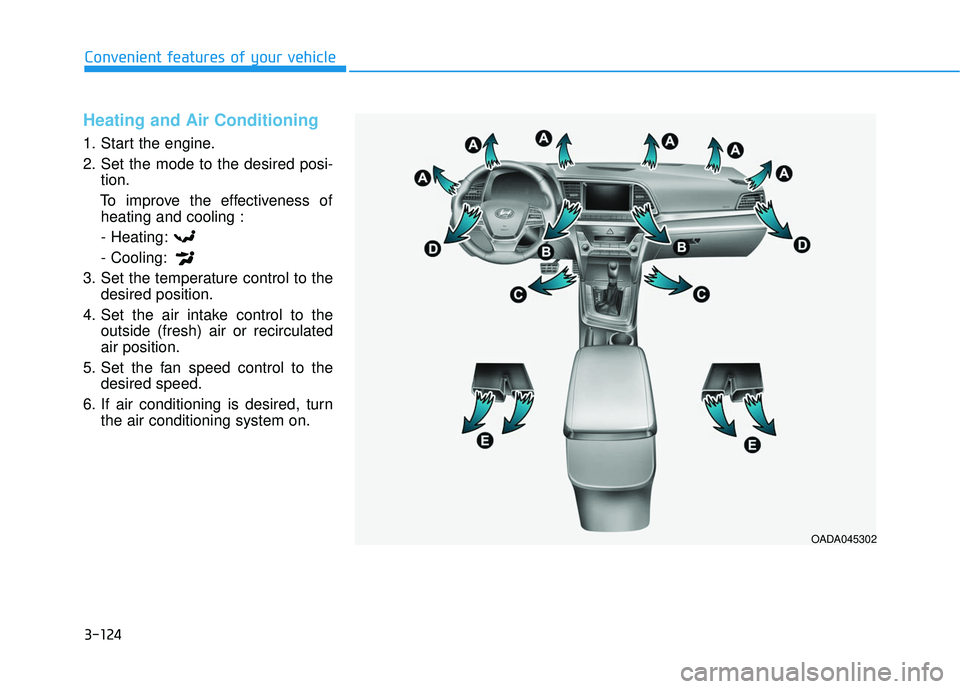
Heating and Air Conditioning
1. Start the engine.
2. Set the mode to the desired posi-tion.
To improve the effectiveness of heating and cooling :
- Heating:
- Cooling:
3. Set the temperature control to the desired position.
4. Set the air intake control to the outside (fresh) air or recirculated
air position.
5. Set the fan speed control to the desired speed.
6. If air conditioning is desired, turn the air conditioning system on.
OADA045302
Page 219 of 586
3-125
Convenient features of your vehicle
3
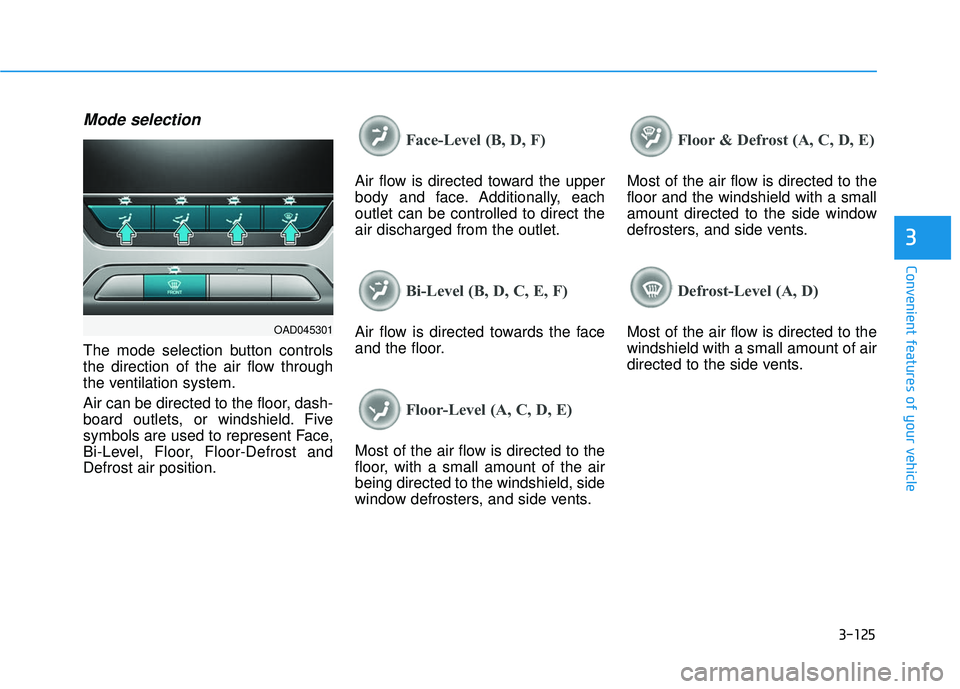
Mode selection
The mode selection button controls
the direction of the air flow through
the ventilation system.
Air can be directed to the floor, dash-
board outlets, or windshield. Five
symbols are used to represent Face,
Bi-Level, Floor, Floor-Defrost and
Defrost air position.
Face-Level (B, D, F)
Air flow is directed toward the upper
body and face. Additionally, each
outlet can be controlled to direct the
air discharged from the outlet.
Bi-Level (B, D, C, E, F)
Air flow is directed towards the face
and the floor.
Floor-Level (A, C, D, E)
Most of the air flow is directed to the
floor, with a small amount of the air
being directed to the windshield, side
window defrosters, and side vents.
Floor & Defrost (A, C, D, E)
Most of the air flow is directed to the
floor and the windshield with a small
amount directed to the side window
defrosters, and side vents.
Defrost-Level (A, D)
Most of the air flow is directed to the
windshield with a small amount of air
directed to the side vents.OAD045301
Page 220 of 586
3-126
Convenient features of your vehicle
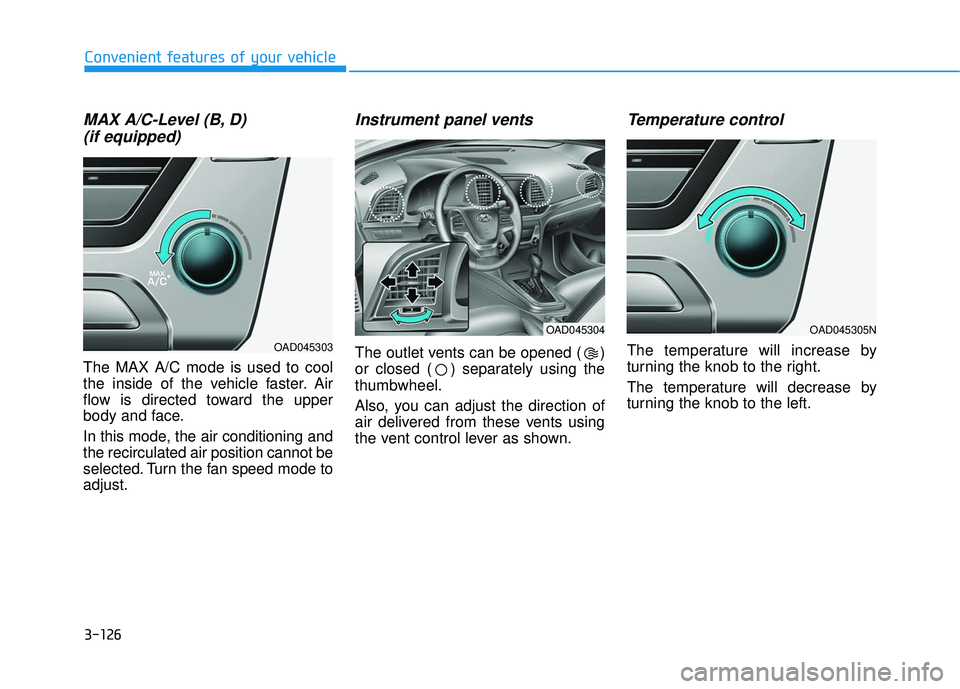
MAX A/C-Level (B, D) (if equipped)
The MAX A/C mode is used to cool
the inside of the vehicle faster. Air
flow is directed toward the upper
body and face.
In this mode, the air conditioning and
the recirculated air position cannot be
selected. Turn the fan speed mode to
adjust.
Instrument panel vents
The outlet vents can be opened ( )
or closed ( ) separately using the
thumbwheel.
Also, you can adjust the direction of
air delivered from these vents using
the vent control lever as shown.
Temperature control
The temperature will increase by
turning the knob to the right.
The temperature will decrease by
turning the knob to the left.
OAD045305N
OAD045303
OAD045304