fuel HYUNDAI ELANTRA SE 2017 Owner's Guide
[x] Cancel search | Manufacturer: HYUNDAI, Model Year: 2017, Model line: ELANTRA SE, Model: HYUNDAI ELANTRA SE 2017Pages: 586, PDF Size: 15.29 MB
Page 200 of 586
3-106
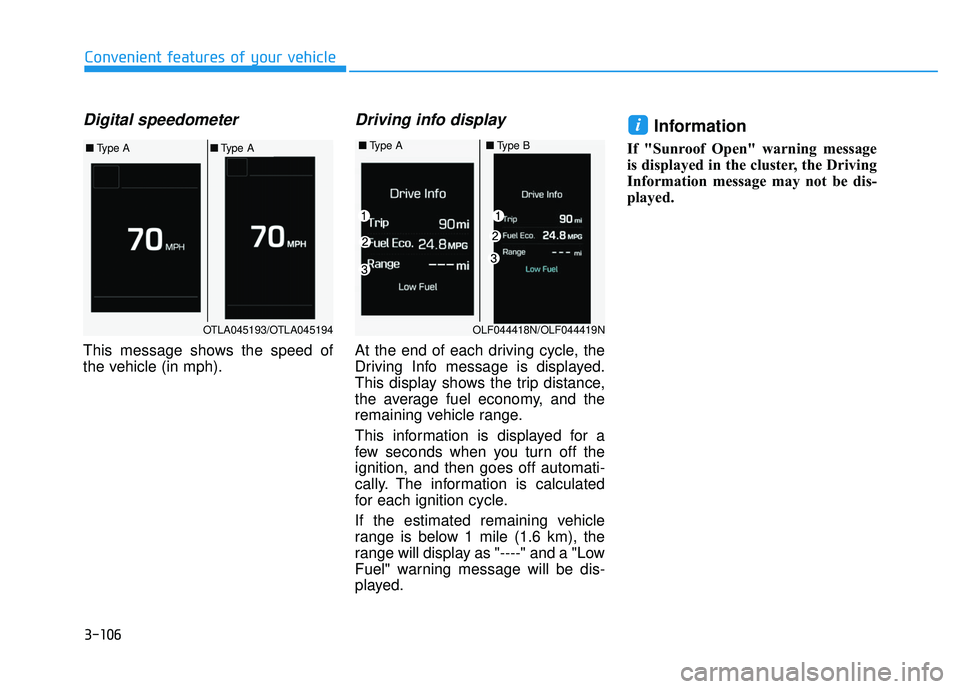
Digital speedometer
This message shows the speed of
the vehicle (in mph).
Driving info display
At the end of each driving cycle, the
Driving Info message is displayed.
This display shows the trip distance,
the average fuel economy, and the
remaining vehicle range.
This information is displayed for a
few seconds when you turn off the
ignition, and then goes off automati-
cally. The information is calculated
for each ignition cycle.
If the estimated remaining vehicle
range is below 1 mile (1.6 km), the
range will display as "----" and a "Low
Fuel" warning message will be dis-
played.
Information
If "Sunroof Open" warning message
is displayed in the cluster, the Driving
Information message may not be dis-
played.
i
Convenient features of your vehicle
■Type A■Type B
OLF044418N/OLF044419N
OTLA045193/OTLA045194
■ Type A■Type A
Page 342 of 586
5-22
Driving your vehicle
R (Reverse)
Use this position to drive the vehicle
backward.
N (Neutral)
The wheels and transmission are not
engaged.
Use N (Neutral) if you need to restart
a stalled engine, or if it is necessary
to stop with the engine ON. Shift into
P (Park) if you need to leave your
vehicle for any reason.
Always depress the brake pedal
when you are shifting from N
(Neutral) to another gear.
D (Drive)
This is the normal driving position.
The transmission will automatically
shift through a six-gear sequence,
providing the best fuel economy and
power.
For extra power when passing anoth-
er vehicle or driving uphill depress
the accelerator pedal further until
you feel the transmission downshift
to a lower gear.
The DRIVE MODE switch, located
on the shift lever console, allows the
driver to switch from NORMAL mode
to ECO or SPORT mode.
For more information, refer to
"Drive Mode Integrated Control
System" later in this chapter.
Always come to a complete
stop before shifting into or out
of R (Reverse); you may dam-
age the transmission if you shift
into R (Reverse) while the vehi-
cle is in motion.
CAUTION
Do not shift into gear unless
your foot is firmly on the brake
pedal. Shifting into gear when
the engine is running at high
speed can cause the vehicle to
move very rapidly. You could
lose control of the vehicle and
hit people or objects.
WARNING
Page 359 of 586
5-39
Driving your vehicle
5
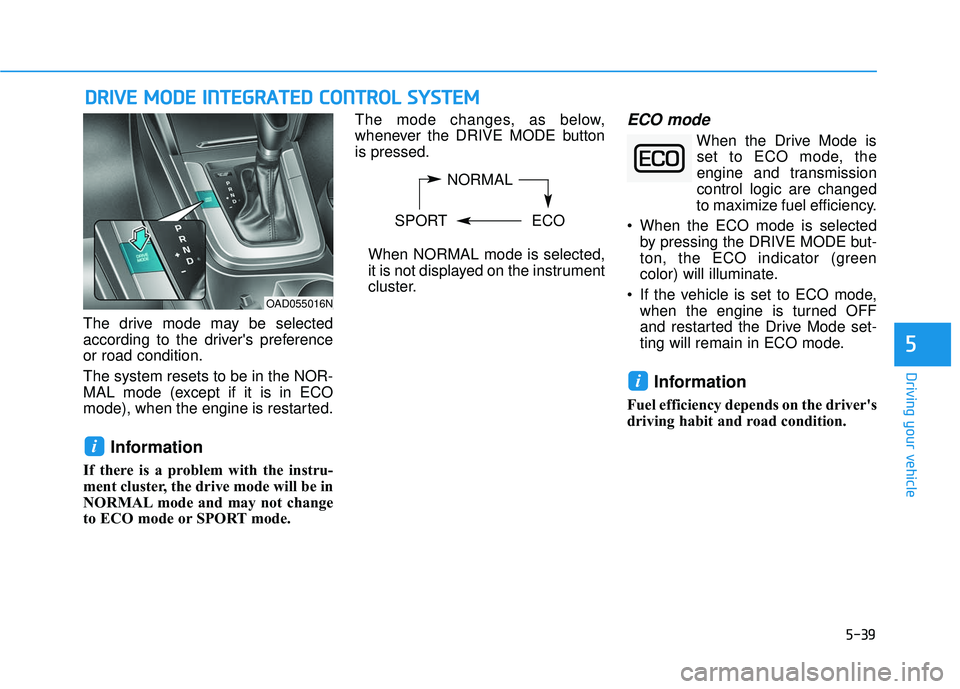
The drive mode may be selected
according to the driver's preference
or road condition.
The system resets to be in the NOR-
MAL mode (except if it is in ECO
mode), when the engine is restarted.
Information
If there is a problem with the instru-
ment cluster, the drive mode will be in
NORMAL mode and may not change
to ECO mode or SPORT mode. The mode changes, as below,
whenever the DRIVE MODE button
is pressed.
When NORMAL mode is selected,
it is not displayed on the instrument
cluster.
ECO mode
When the Drive Mode is set to ECO mode, the
engine and transmission
control logic are changed
to maximize fuel efficiency.
When the ECO mode is selected by pressing the DRIVE MODE but-
ton, the ECO indicator (green
color) will illuminate.
If the vehicle is set to ECO mode, when the engine is turned OFF
and restarted the Drive Mode set-
ting will remain in ECO mode.
Information
Fuel efficiency depends on the driver's
driving habit and road condition.
i
i
D DR
RI
IV
V E
E
M
M O
OD
DE
E
I
IN
N T
TE
EG
G R
RA
A T
TE
ED
D
C
C O
O N
NT
TR
R O
O L
L
S
S Y
Y S
ST
T E
EM
M
NORMAL
SPORT ECO
OAD055016N
Page 360 of 586
5-40
Driving your vehicle
When the ECO mode is activated:
The acceleration response may be slightly reduced if the accelerator
pedal is depressed moderately.
The air conditioner performance may be limited.
The shift pattern of the automatic transmission may change.
The engine noise may get louder.
The above situations are normal
conditions when the ECO mode is
activated to improve fuel efficiency. Limitation of the ECO mode oper-
ation:
If the following conditions occur while
the ECO mode is operating, the sys-
tem operation is limited even though
there is no change in the ECO indi-
cator.
When the coolant temperature is
low:
The system will be limited until
engine performance becomes nor-
mal.
When driving up a hill: The system will be limited to gain
power when driving uphill because
engine torque is restricted.
When driving the vehicle with the automatic transmission gear shift
lever in manual shift mode.
The system will be limited accord-
ing to the shift location.
SPORT mode
SPORT mode manages
the driving dynamics by
automatically adjusting the
steering effort, and the
engine and transmission control
logic for enhanced driver perform-
ance.
When SPORT mode is selected by pressing the DRIVE MODE button,
the SPORT indicator (orange
color) will illuminate.
Whenever the engine is restarted, the Drive Mode will revert back to
NORMAL mode. If SPORT mode is
desired, re-select SPORT mode
from the DRIVE MODE button.
When SPORT mode is activated: - The engine rpm will tend toremain raised over a certain
length of time even after releas-
ing the accelerator
- Upshifts are delayed when accel- erating
Information
In SPORT mode, the fuel efficiency
may decrease.
i
Page 415 of 586
5-95
Driving your vehicle
5
Highway Driving
Tires
Adjust the tire inflation, as specified.
Under-inflation may overheat or
damage the tires.
Do not install worn-out or damaged
tires, which may reduce traction or
fail the braking operation.
Information
Never over-inflate your tires above the
maximum inflation pressure, as speci-
fied on your tires.
Fuel, engine coolant and engineoil
Driving at higher speeds on the high-
way consumes more fuel and is less
efficient than driving at a slower,
more moderate speed. Maintain a
moderate speed in order to conserve
fuel when driving on the highway.
Be sure to check both the engine
coolant level and the engine oil
before driving.
Drive belt
A loose or damaged drive belt may
overheat the engine.
i
Utility vehicles have a signifi-
cantly higher rollover rate than
other types of vehicles. To pre-
vent rollovers or loss of control:
Take corners at slower speeds
than you would with a passen-
ger vehicle.
Avoid sharp turns and abrupt
maneuvers.
Do not modify your vehicle in
any way that you would raise
the center of gravity.
Keep tires properly inflated.
Do not carry heavy cargo on
the roof.
WARNING
In a rollover crash, an unbelted
person is significantly more
likely to die than a person wear-
ing a seat belt. Make sure all
passengers are wearing their
seat belts.
WARNING
Page 420 of 586
5-100
Driving your vehicle
Two labels on your driver's door sill
show how much weight your vehicle
was designed to carry: the Tire and
Loading Information Label and the
Certification Label.
Before loading your vehicle, familiar-
ize yourself with the following terms
for determining your vehicle’s weight
ratings, from the vehicle's specifica-
tions and the Certification Label:
Base Curb Weight
This is the weight of the vehicle
including a full tank of fuel and all
standard equipment. It does not
include passengers, cargo, or option-
al equipment.
Vehicle Curb Weight
This is the weight of your new vehicle
when you picked it up from your deal-
er plus any aftermarket equipment. Cargo Weight
This figure includes all weight added
to the Base Curb Weight, including
cargo and optional equipment.
GAW (Gross Axle Weight)
This is the total weight placed on
each axle (front and rear) - including
vehicle curb weight and all payload.
GAWR (Gross Axle Weight Rating)
This is the maximum allowable
weight that can be carried by a single
axle (front or rear). These numbers
are shown on the Certification Label.
The total load on each axle must
never exceed its GAWR.
GVW (Gross Vehicle Weight)
This is the Base Curb Weight plus
actual Cargo Weight plus passen-
gers.
GVWR (Gross Vehicle Weight
Rating)
This is the maximum allowable
weight of the fully loaded vehicle
(including all options, equipment,
passengers and cargo). The GVWR
is shown on the Certification Label
located on the driver’s door sill.
V V
E
EH
H I
IC
C L
LE
E
L
L O
O A
AD
D
L
L I
IM
M I
IT
T
Page 424 of 586
5-104
Driving your vehicle
Certification label
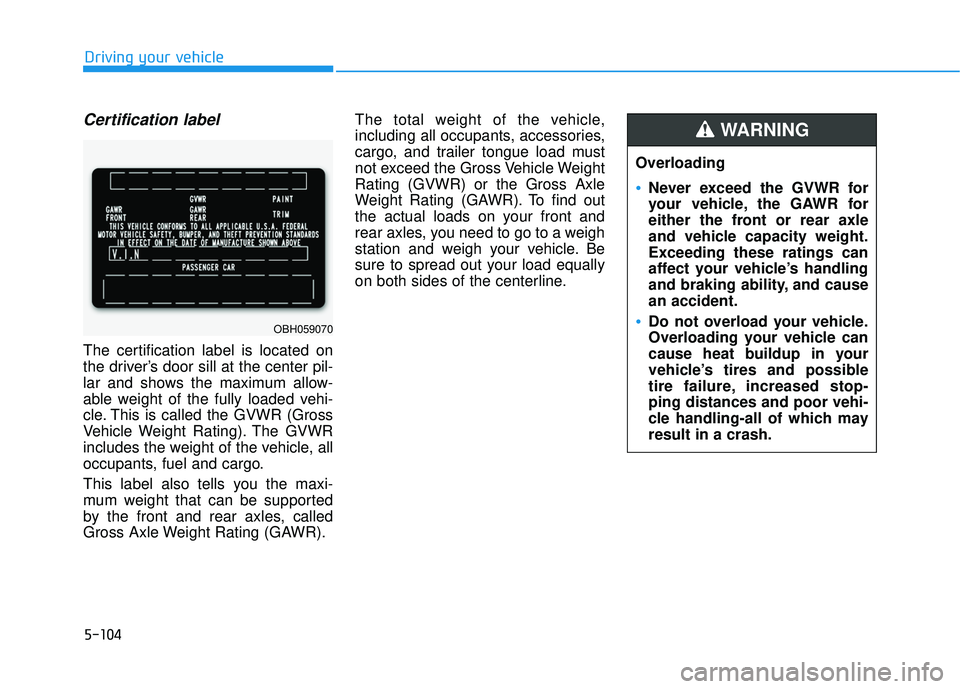
The certification label is located on
the driver’s door sill at the center pil-
lar and shows the maximum allow-
able weight of the fully loaded vehi-
cle. This is called the GVWR (Gross
Vehicle Weight Rating). The GVWR
includes the weight of the vehicle, all
occupants, fuel and cargo.
This label also tells you the maxi-
mum weight that can be supported
by the front and rear axles, called
Gross Axle Weight Rating (GAWR).The total weight of the vehicle,
including all occupants, accessories,
cargo, and trailer tongue load must
not exceed the Gross Vehicle Weight
Rating (GVWR) or the Gross Axle
Weight Rating (GAWR). To find out
the actual loads on your front and
rear axles, you need to go to a weigh
station and weigh your vehicle. Be
sure to spread out your load equally
on both sides of the centerline.
OBH059070
Overloading
Never exceed the GVWR for
your vehicle, the GAWR for
either the front or rear axle
and vehicle capacity weight.
Exceeding these ratings can
affect your vehicle’s handling
and braking ability, and cause
an accident.
Do not overload your vehicle.
Overloading your vehicle can
cause heat buildup in your
vehicle’s tires and possible
tire failure, increased stop-
ping distances and poor vehi-
cle handling-all of which may
result in a crash.
WARNING
Page 428 of 586
6-3
What to do in an emergency
If you Have a Flat Tire While
Driving
If a tire goes flat while you are driving:
Take your foot off the acceleratorpedal and let the vehicle slow down
while driving straight ahead. Do not
apply the brakes immediately or
attempt to pull off the road as this
may cause loss of vehicle control
resulting in an accident. When the
vehicle has slowed to such a speed
that it is safe to do so, brake care-
fully and pull off the road. Drive off
the road as far as possible and park
on firm, level ground. If you are on
a divided highway, do not park in
the median area between the two
traffic lanes.
When the vehicle is stopped, press the hazard warning flasher button,
move the shift lever into P(Park),
and apply the parking brake, and
place the ignition switch in the
LOCK/OFF position.
Have all passengers get out of the vehicle. Be sure they all get out on
the side of the vehicle that is away
from traffic.
When changing a flat tire, follow the instructions provided later in
this chapter.
If the Engine Doesn't Turn
Over or Turns Over Slowly
Be sure the shift lever is in N
(Neutral) or P (Park). The engine
starts only when the shift lever is in
N (Neutral) or P (Park).
Check the battery connections to be sure they are clean and tight.
Turn on the interior light. If the light dims or goes out when you operate
the starter, the battery is drained.
Do not push or pull the vehicle to
start it. This could cause damage to
your vehicle. See instructions for
"Jump Starting" provided in this
chapter.
If the Engine Turns Over
Normally but Doesn't Start
Check the fuel level and add fuel if
necessary.
If the engine still does not start, have
your vehicle checked by an author-
ized HYUNDAI dealer.
6
I I F
F
T
T H
H E
E
E
E N
N G
GI
IN
N E
E
W
W I
IL
L L
L
N
N O
O T
T
S
S T
T A
A R
RT
T
Push or pull starting the vehicle
may cause the catalytic con-
verter to overload which can
lead to damage to the emission
control system.
CAUTION
Page 435 of 586
6-10
What to do in an emergency
Tire Pressure Monitoring
System
Each tire, including the spare (if pro-
vided), should be checked monthly
when cold and inflated to the inflation
pressure recommended by the vehi-
cle manufacturer on the vehicle plac-
ard or tire inflation pressure label. (If
your vehicle has tires of a different
size than the size indicated on the
vehicle placard or tire inflation pres-
sure label, you should determine the
proper tire inflation pressure for
those tires.)As an added safety feature, your
vehicle has been equipped with a tire
pressure monitoring system (TPMS)
that illuminates a low tire pressure
telltale when one or more of your
tires is significantly under-inflated.
Accordingly, when the low tire pres-
sure telltale illuminates, you should
stop and check your tires as soon as
possible, and inflate them to the
proper pressure. Driving on a signifi-
cantly under-inflated tire causes the
tire to overheat and can lead to tire
failure.
Under-inflation also reduces fuel effi-
ciency and tire tread life, and may
affect the vehicle’s handling and
stopping ability.
Please note that the TPMS is not a
substitute for proper tire mainte-
nance, and it is the driver’s responsi-
bility to maintain correct tire pres-
sure, even if under-inflation has not
reached the level to trigger illumina-
tion of the TPMS low tire pressure
telltale.Your vehicle has also been equipped
with a TPMS malfunction indicator to
indicate when the system is not
operating properly. The TPMS mal-
function indicator is combined with
the low tire pressure telltale. When
the system detects a malfunction,
the telltale will flash for approximate-
ly one minute and then remain con-
tinuously illuminated. This sequence
will continue upon subsequent vehi-
cle start-ups as long as the malfunc-
tion exists.
When the malfunction indicator is
illuminated, the system may not be
able to detect or signal low tire pres-
sure as intended. TPMS malfunc-
tions may occur for a variety of rea-
sons, including the installation of
replacement or alternate tires or
wheels on the vehicle that prevent
the TPMS from functioning properly.
Always check the TPMS malfunction
telltale after replacing one or more
tires or wheels on your vehicle to
ensure that the replacement or alter-
nate tires and wheels allow the
TPMS to continue to function proper-
ly.
Over-inflation or under-inflation
can reduce tire life, adversely
affect vehicle handling, and
lead to sudden tire failure that
may cause loss of vehicle con-
trol resulting in an accident.
WARNING
Page 462 of 586
7
Fuses ......................................................................7-\
60
Instrument Panel Fuse Replacement..........................7-61
Engine Compartment Panel Fuse Replacement.......7-63
Fuse/Relay Panel Description ......................................7-66
Light bulbs.............................................................7-72
Headlamp, Parking lamp, Turn signal lamp and
side marker .......................................................................7\
-73
Side repeater lamp replacement .................................7-82
Rear combination light bulb replacement .................7-82
High mounted stop light replacement........................7-86
License plate light bulb replacement .........................7-87
Interior light bulb replacement ....................................7-88
Appearance care ..................................................7-89
Exterior Care ....................................................................7-89\
Interior Care .....................................................................7-9\
5
Emission control system .....................................7-96
1. Crankcase Emission Control System......................7-96
2. Evaporative Emission Control System Including Onboard Refueling Vapor Recovery (ORVR) .......7-96
3. Exhaust Emission Control System ..........................7-97
California perchlorate notice ...........................7-100