window HYUNDAI ELANTRA SEL 2021 User Guide
[x] Cancel search | Manufacturer: HYUNDAI, Model Year: 2021, Model line: ELANTRA SEL, Model: HYUNDAI ELANTRA SEL 2021Pages: 570, PDF Size: 52.21 MB
Page 169 of 570
05
5-33
Operating Door Locks from
Inside the Vehicle
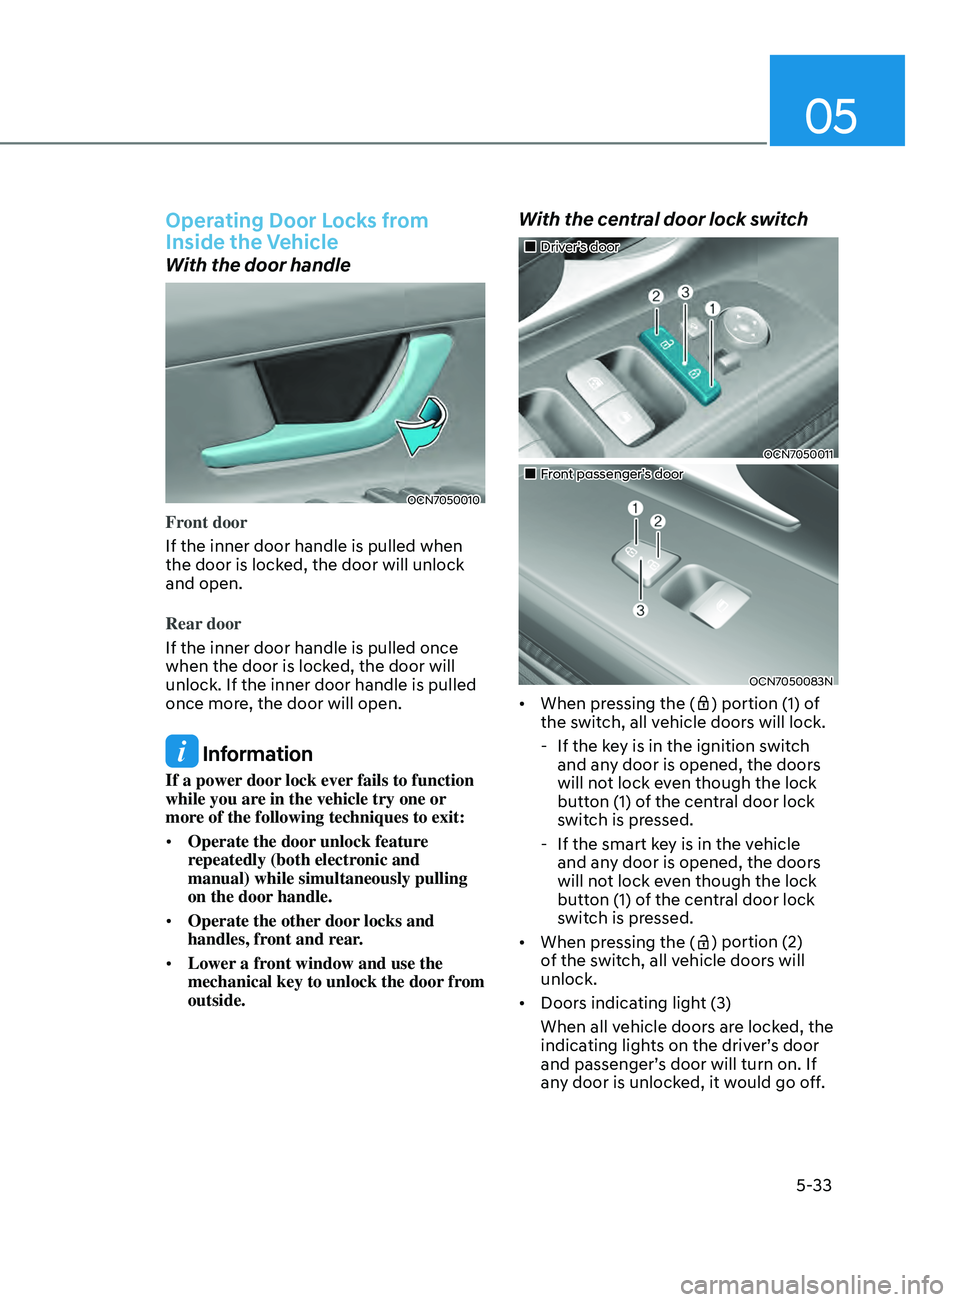
With the door handle
OCN7050010
Front door
If the inner door handle is pulled when
the door is locked, the door will unlock
and open.
Rear door
If the inner door handle is pulled once
when the door is locked, the door will
unlock. If the inner door handle is pulled
once more, the door will open.
Information
If a power door lock ever fails to function
while you are in the vehicle try one or
more of the following techniques to exit:
• Operate the door unlock feature
repeatedly (both electronic and
manual) while simultaneously pulling
on the door handle.
• Operate the other door locks and
handles, front and rear.
• Lower a front window and use the
mechanical key to unlock the door from
outside.
With the central door lock switch
„„Driver’s door
OCN7050011
„„Front passenger’s door
OCN7050083N
• When pressing the () portion (1) of
the switch, all vehicle doors will lock.
- If the ke
y is in the ignition switch
and any door is opened, the doors
will not lock even though the lock
button (1) of the central door lock
switch is pressed.
- If the smart ke
y is in the vehicle
and any door is opened, the doors
will not lock even though the lock
button (1) of the central door lock
switch is pressed.
• When pressing the (
) portion (2)
of the switch, all vehicle doors will
unlock.
• Doors indicating light (3)
When all vehicle doors are locked, the
indicating lights on the driver’s door
and passenger’s door will turn on. If
any door is unlocked, it would go off.
Page 170 of 570
Convenient Features5-34
WARNING
• The doors should alw ays be fully
closed and locked while the
vehicle is in motion. If the doors
are unlocked, the risk of being
thrown from the vehicle in a crash is
increased.
•
Do not pull the inner door handle o
f
the driver’s or passenger’s door while
the vehicle is moving.
WARNING
Do not leave children or animals
unattended in your vehicle. An enclosed
vehicle can become extremely hot,
causing death or serious injury to
unattended children or animals who
cannot escape the vehicle.
Children might operate features of the
vehicle that could injure them, or they
could encounter other harm, possibly
from someone gaining entry to the
vehicle.
WARNING
Always secure your vehicle.
Leaving your vehicle unlocked increases
the potential risk to you or others from
someone hiding in your vehicle.
To secure your vehicle, while depressing
the brake, move the shift button to the
P (Park) position, engage the parking
brake, and place the ignition switch
in the LOCK/OFF position, close all
windows, lock all doors, and always
take the key with you.
WARNING
If you stay in the vehicle for a long time
while the weather is very hot or cold,
there are risks of injuries or danger to
life. Do not lock the vehicle from the
outside when someone is in the vehicle.
WARNING
Opening a door when something is
approaching may cause damage or
injury. Be careful when opening doors
and watch for vehicles, motorcycles,
bicycles or pedestrians approaching the
vehicle in the path of the door.
Page 177 of 570
05
5-41
mirrorS
Inside Rearview Mirror
Before driving your vehicle, check to
see that your inside rearview mirror is
properly positioned. Adjust the rearview
mirror so that the view through the rear
window is properly centered.
WARNING
Make sure your line of sight is not
obstructed. Do not place objects in the
rear seat, cargo area, or behind the rear
head restraints which could interfere
with your vision through the rear
window.
WARNING
To prevent serious injury during an
accident or deployment of the air bag,
do not modify the rearview mirror and
do not install a wide mirror.
WARNING
NEVER adjust the mirror while driving.
This may cause loss of vehicle control
resulting in an accident.
NOTICE
When cleaning the mirror, use a paper
towel or similar material dampened
with glass cleaner. Do not spray glass
cleaner directly on the mirror as this
may cause the liquid cleaner to enter
the mirror housing.
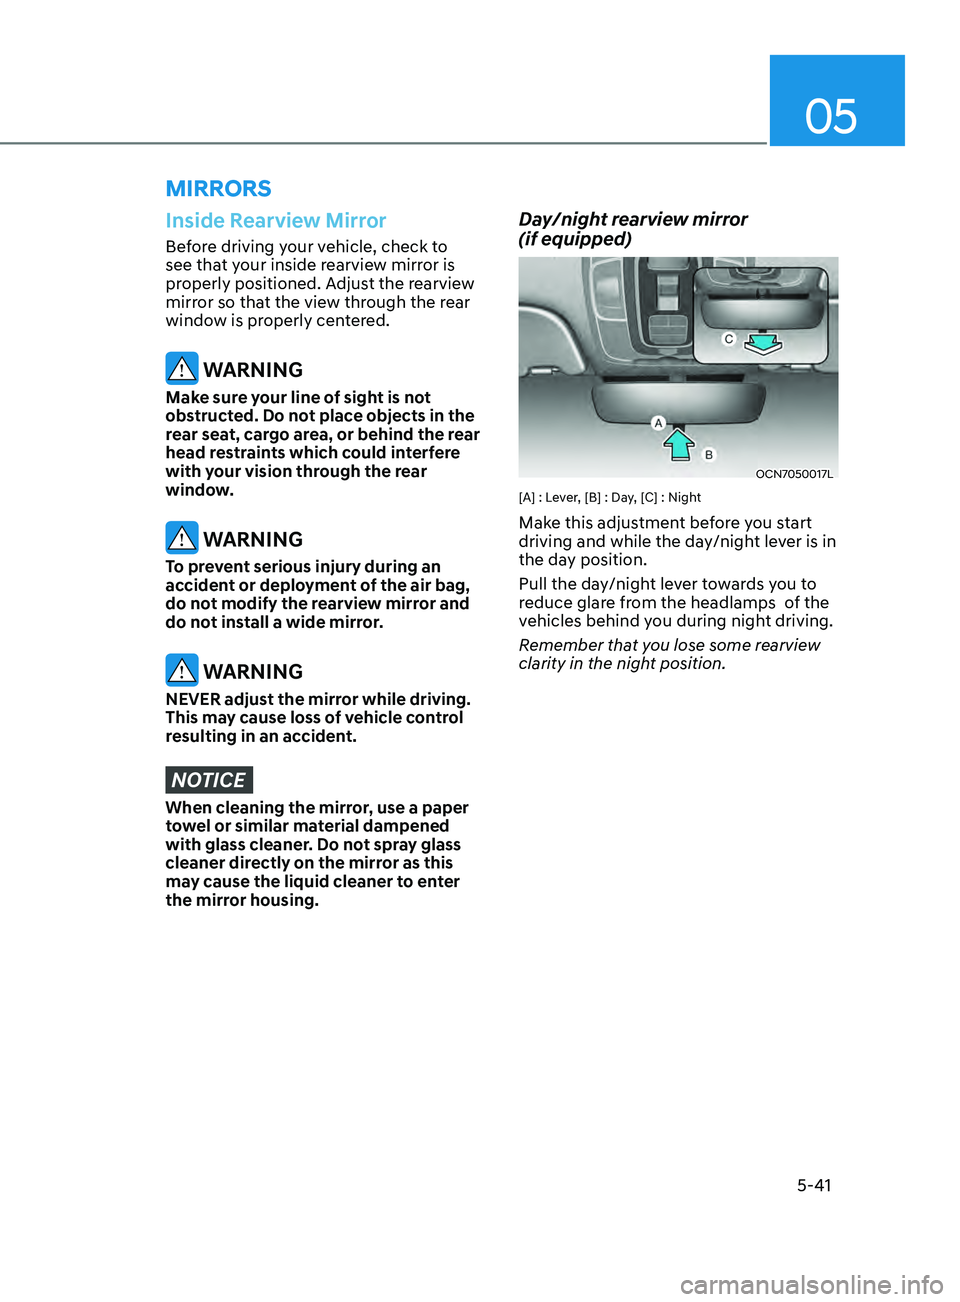
Day/night rearview mirror
(if equipped)
OCN7050017L
[A] : Lever, [B] : Day, [C] : Night
Make this adjustment before you start
driving and while the day/night lever is in
the day position.
Pull the day/night lever towards you to
reduce glare from the headlamps of the
vehicles behind you during night driving.
Remember that you lose some rearview
clarity in the night position.
Page 187 of 570
5-51
05
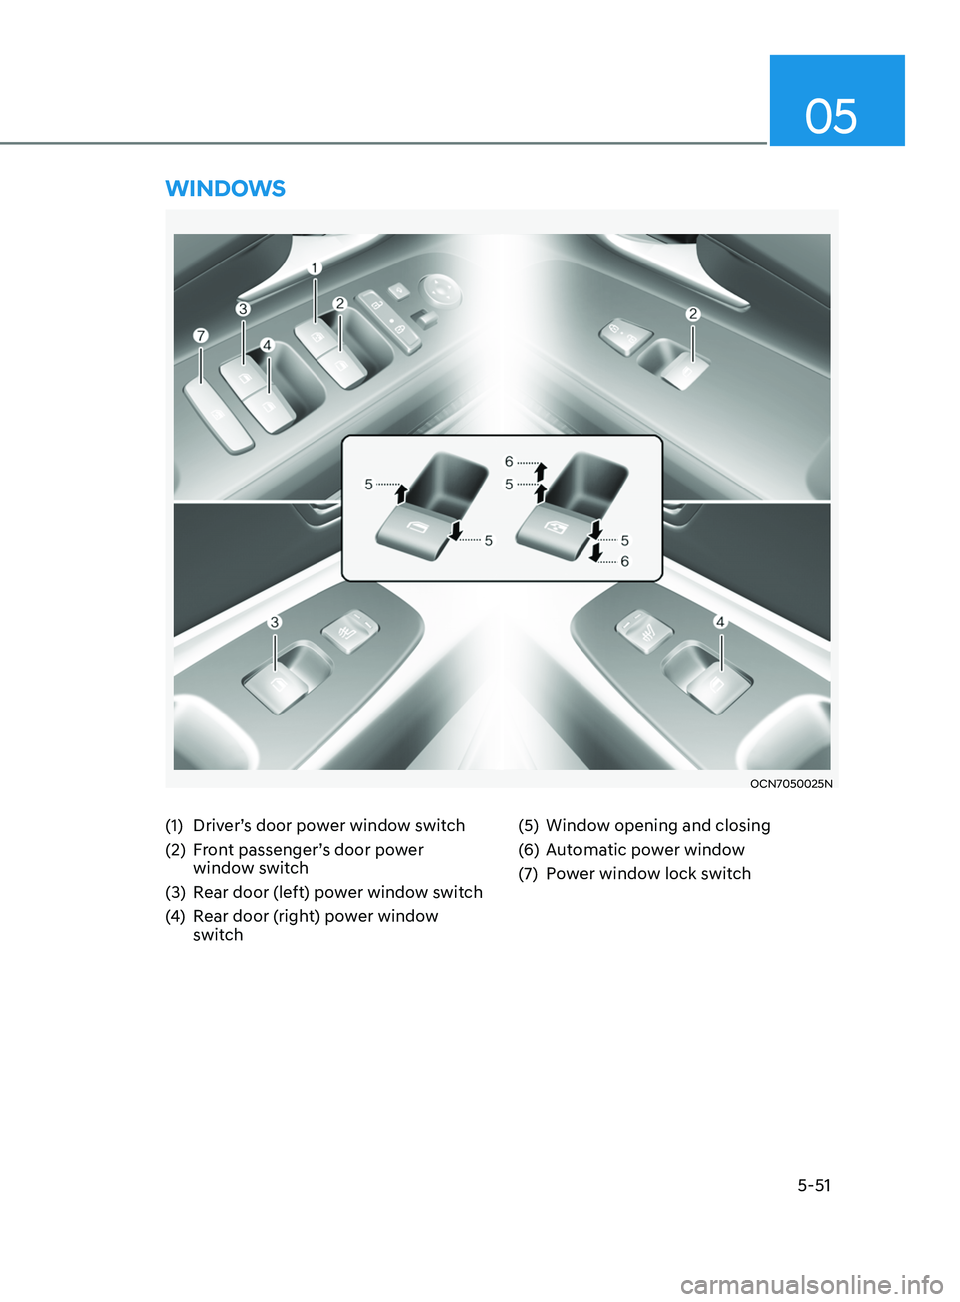
(1) Driver’s door power window switch
(2)
Fr
ont passenger’s door power
window switch
(3)
Rear door (le
ft) power window switch
(4)
Rear door (
right) power window
switch (5) Window opening and closing
(
6)
Aut
omatic power window
(7)
Po
wer window lock switch
WinDoWs
OCN7050025N
Page 188 of 570
Convenient Features
5-52
Power Windows
The ignition switch must be in the
ON position to be able to raise or
lower the windows. Each door has a
Power Window switch to control that
door’s window. The driver has a Power
Window Lock switch which can block
the operation of passenger windows.
The power windows will operate for
approximately 30 seconds after the
ignition switch is placed in the ACC or
LOCK/OFF position. However, if the front
doors are opened, the Power Windows
will not operate even within the 30
second period.
WARNING
To avoid serious injury or death, do not
extend your head, arms or body outside
the windows while driving.
Information
• In cold and wet climates, power
windows may not work properly due to
freezing conditions.
• While driving with the rear windows
down or with the sunroof (if equipped)
opened (or partially opened), your
vehicle may demonstrate a wind
buffeting or pulsation noise. This
noise is normal and can be reduced
or eliminated by taking the following
actions. If the noise occurs with one
or both of the rear windows down,
partially lower both front windows
approximately one inch. If you
experience the noise with the sunroof
open, slightly close the sunroof.
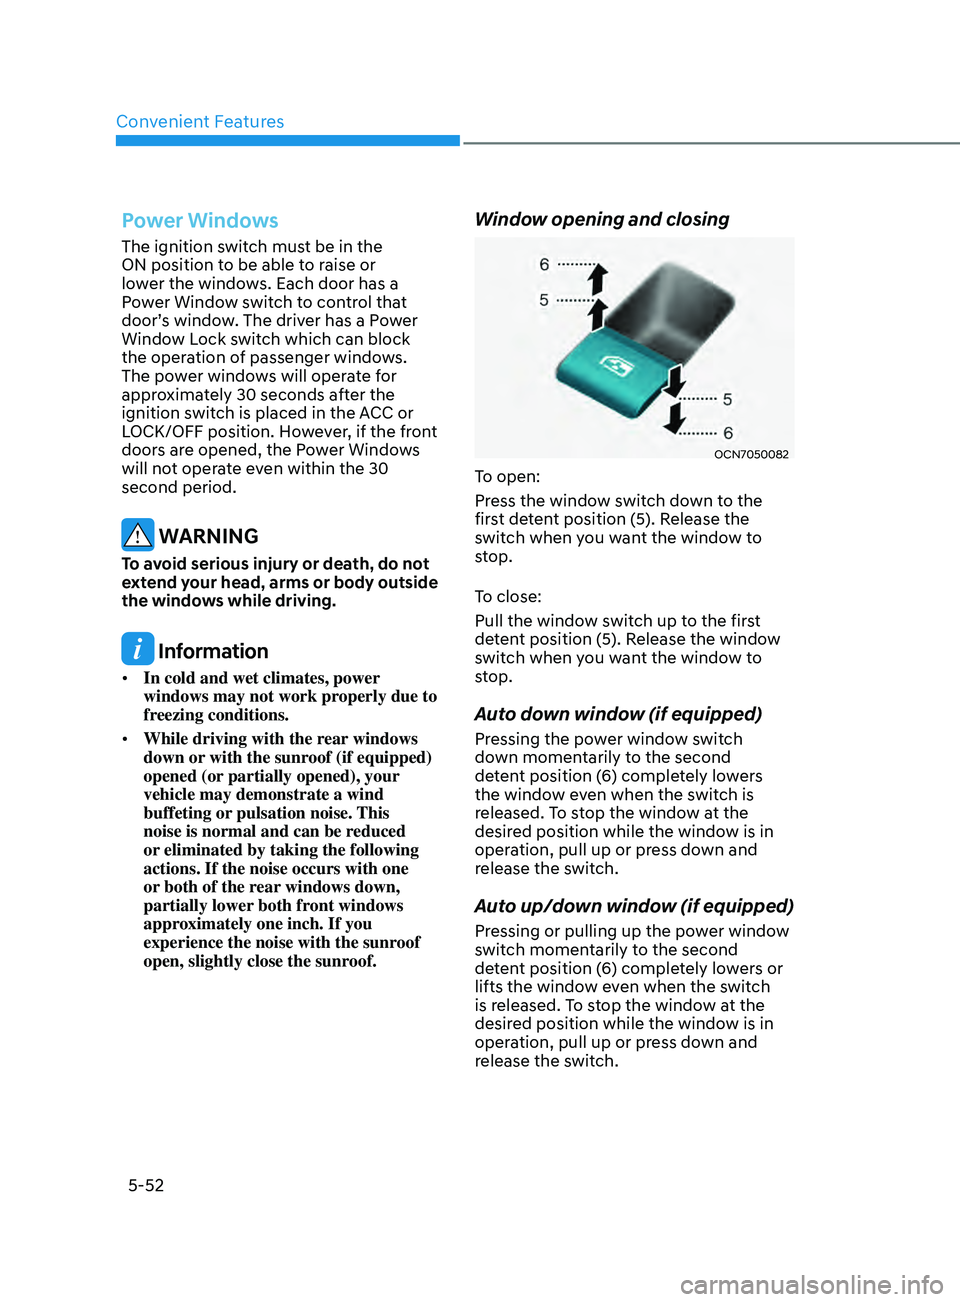
Window opening and closing
OCN7050082
To open:
Press the window switch down to the
first detent position (5). Release the
switch when you want the window to
stop.
To close:
Pull the window switch up to the first
detent position (5). Release the window
switch when you want the window to
stop.
Auto down window (if equipped)
Pressing the power window switch
down momentarily to the second
detent position (6) completely lowers
the window even when the switch is
released. To stop the window at the
desired position while the window is in
operation, pull up or press down and
release the switch.
Auto up/down window (if equipped)
Pressing or pulling up the power window
switch momentarily to the second
detent position (6) completely lowers or
lifts the window even when the switch
is released. To stop the window at the
desired position while the window is in
operation, pull up or press down and
release the switch.
Page 189 of 570
05
5-53
To reset the power windows
If the power windows do not operate
normally, the automatic power window
system must be reset as follows:
1.
Place the ignition swit
ch to the ON
position.
2.
Close the window and con
tinue
pulling up on the power window
switch for at least one second.
If the power windows do not operate
properly after resetting, have the system
checked by an authorized HYUNDAI
dealer.
WARNING
The automatic reverse feature doesn’t
activate while resetting the power
window system. Make sure body parts
or other objects are safely out of the
way before closing the windows to
avoid injuries or vehicle damage.
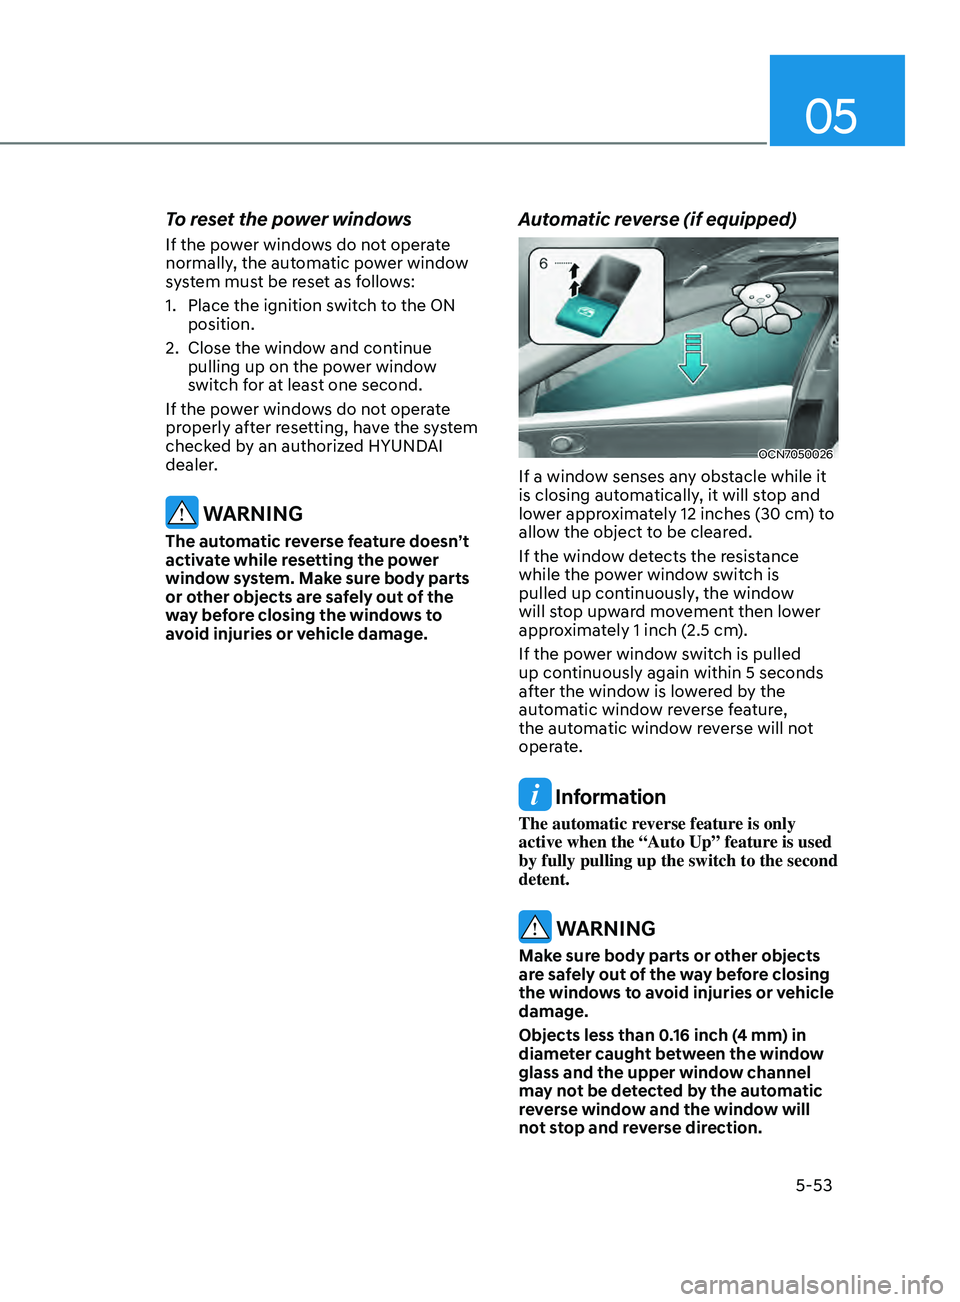
Automatic reverse (if equipped)
OCN7050026
If a window senses any obstacle while it
is closing automatically, it will stop and
lower approximately 12 inches (30 cm) to
allow the object to be cleared.
If the window detects the resistance
while the power window switch is
pulled up continuously, the window
will stop upward movement then lower
approximately 1 inch (2.5 cm).
If the power window switch is pulled
up continuously again within 5 seconds
after the window is lowered by the
automatic window reverse feature,
the automatic window reverse will not
operate.
Information
The automatic reverse feature is only
active when the “Auto Up” feature is used
by fully pulling up the switch to the second
detent.
WARNING
Make sure body parts or other objects
are safely out of the way before closing
the windows to avoid injuries or vehicle
damage.
Objects less than 0.16 inch (4 mm) in
diameter caught between the window
glass and the upper window channel
may not be detected by the automatic
reverse window and the window will
not stop and reverse direction.
Page 190 of 570
Convenient Features
5-54
NOTICE
Do not install any accessories on the
windows. The automatic reverse
feature may not operate.
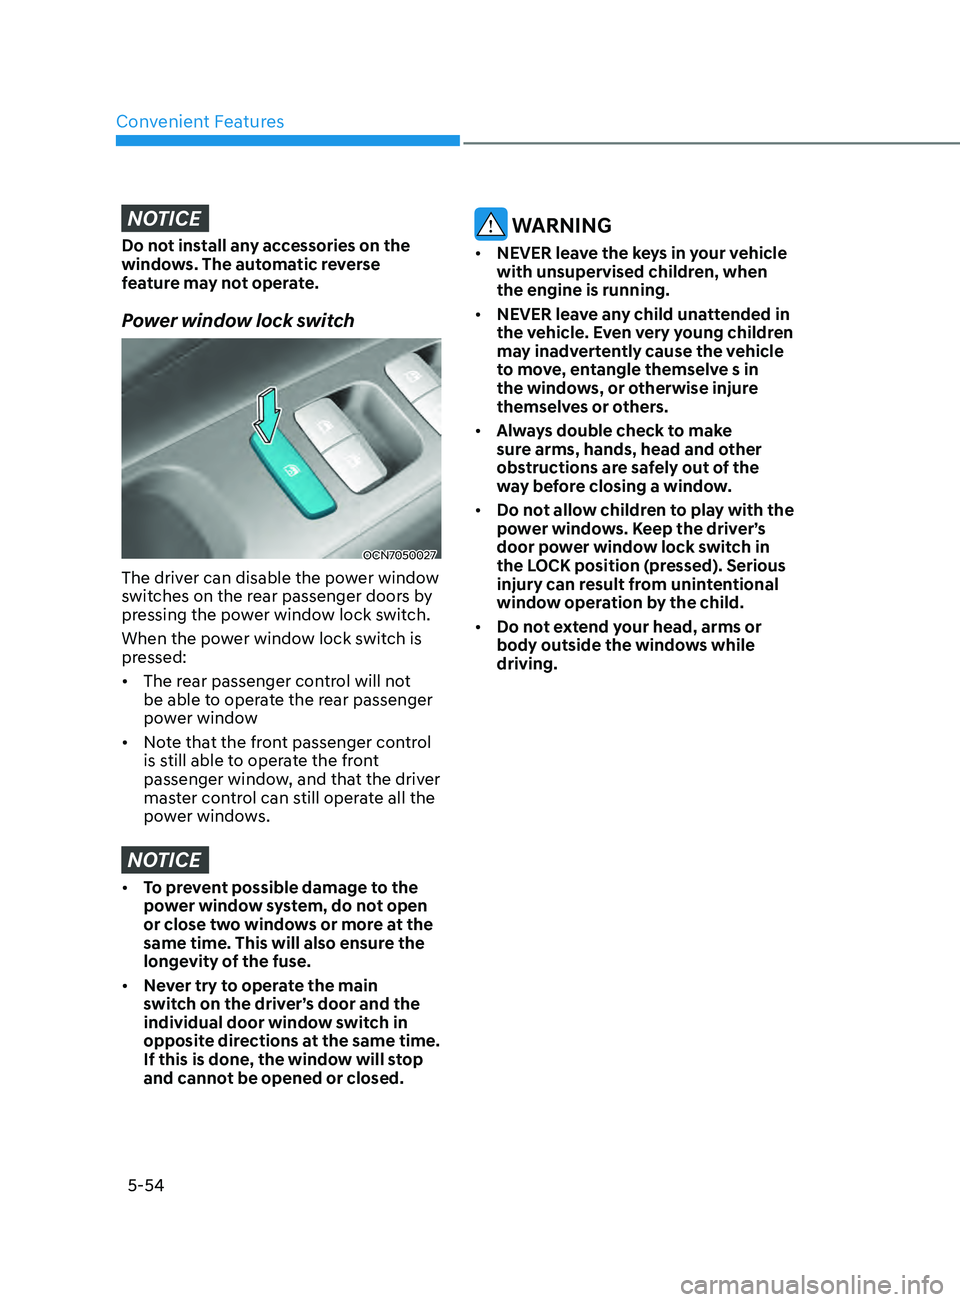
Power window lock switch
OCN7050027
The driver can disable the power window
switches on the rear passenger doors by
pressing the power window lock switch.
When the power window lock switch is
pressed:
• The rear passenger control will not
be able to operate the rear passenger
power window
• Note that the front passenger control
is still able to operate the front
passenger window, and that the driver
master control can still operate all the
power windows.
NOTICE
• To prevent possible damage to the
power window system, do not open
or close two windows or more at the
same time. This will also ensure the
longevity of the fuse.
• Never try to operate the main
switch on the driver’s door and the
individual door window switch in
opposite directions at the same time.
If this is done, the window will stop
and cannot be opened or closed.
WARNING
• NEVER leave the keys in your vehicle
with unsupervised children, when
the engine is running.
• NEVER leave any child unattended in
the vehicle. Even very young children
may inadvertently cause the vehicle
to move, entangle themselve s in
the windows, or otherwise injure
themselves or others.
• Always double check to make
sure arms, hands, head and other
obstructions are safely out of the
way before closing a window.
• Do not allow children to play with the
power windows. Keep the driver’s
door power window lock switch in
the LOCK position (pressed). Serious
injury can result from unintentional
window operation by the child.
• Do not extend your head, arms or
body outside the windows while
driving.
Page 194 of 570
Convenient Features
5-58
Resetting the sunroof
The sunroof may need to be reset if the
following conditions occur:
- The batt
ery is discharged or
disconnected or the sunroof fuse has
been replaced or disconnected.
- The sunroo
f control lever is not
operating correctly.
1.
Turn the ignition s
witch to the ON
position or start the engine. We
recommend resetting the sunroof
while the engine is running.
2.
Close the sunroo
f completely if
opened.
3.
Release the sunr
oof control lever.
4.
Mo
ve the sunroof control lever
forward in the direction of close
until the sunroof moves tilt up. Then,
release the lever.
5.
Mo
ve the sunroof control lever
forward in the direction of close, until
the sunroof operates as follow again:
Tilt
do
wn
→ Slide Open → Slide Close
NOTICE
Do not release the lever until the
operation is completed. If you release
the lever during operation, try again
from step 2.
6.
Release the sunr
oof control lever after
all operation has completed. (The
sunroof system has been reset.)
Information
• If the sunroof does not reset when
the vehicle battery is disconnected or
discharged, or related fuse is blown, the
sunroof may not operate normally.
• For more detailed information, we
recommend that you contact an
authorized HYUNDAI dealer.
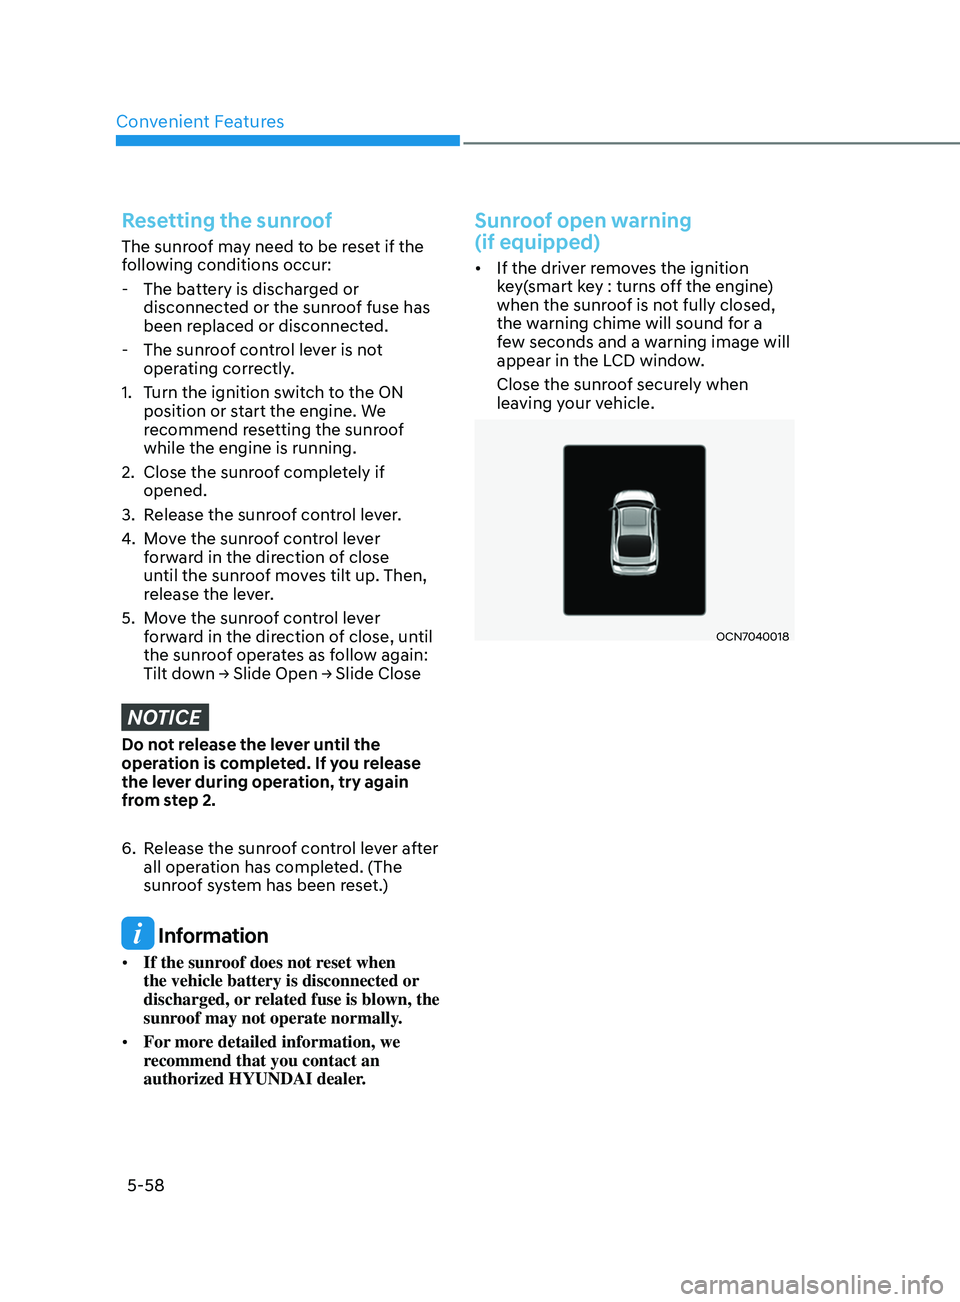
Sunroof open warning
(if equipped)
• If the driver removes the ignition
key(smart key : turns off the engine)
when the sunroof is not fully closed,
the warning chime will sound for a
few seconds and a warning image will
appear in the LCD window.
Close the sunroof securely when
leaving your vehicle.
OCN7040018
Page 204 of 570
Convenient Features5-68
exterior lights
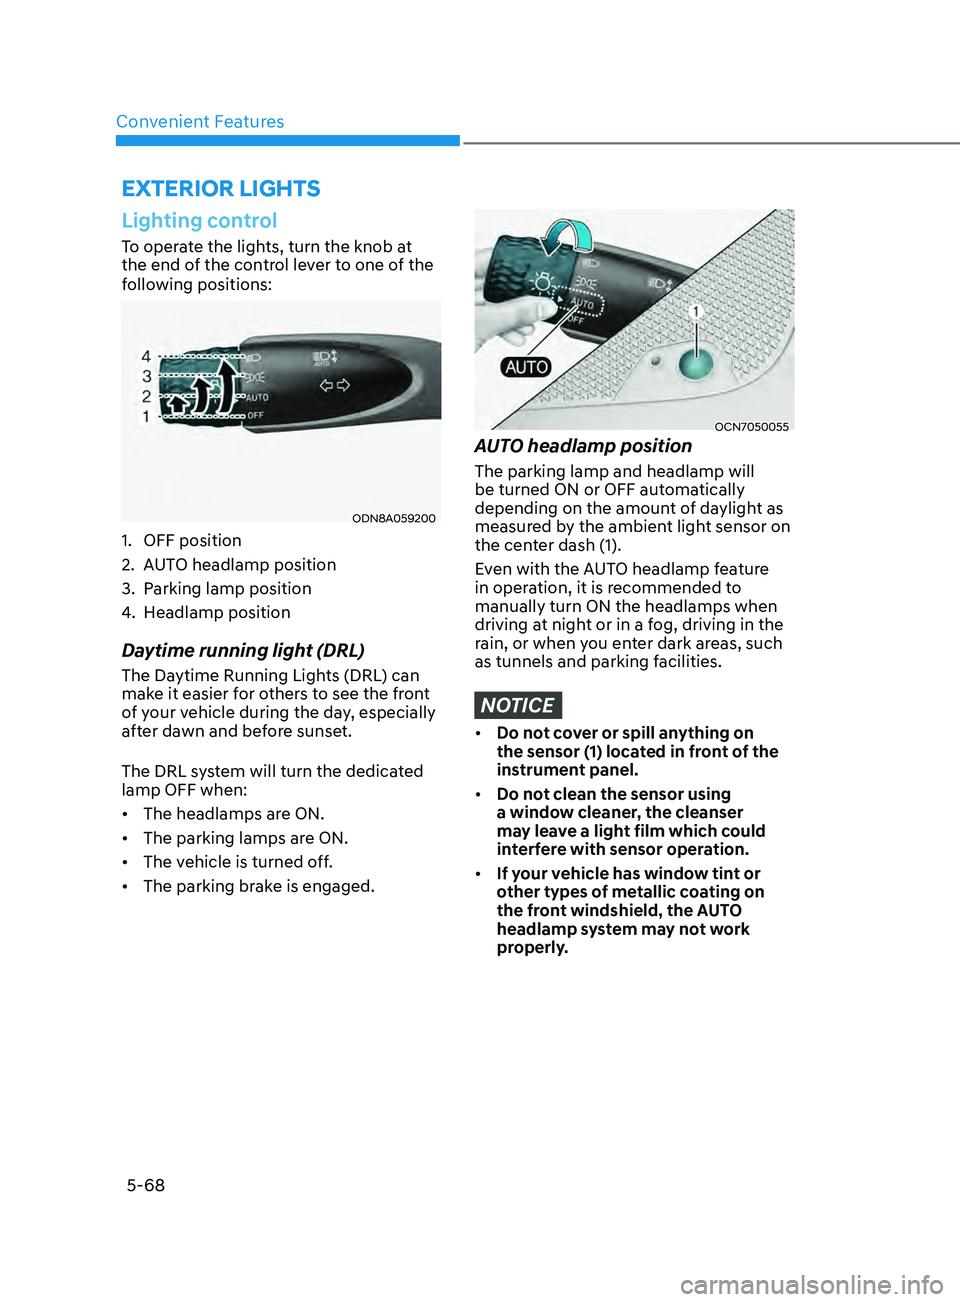
Lighting control
To operate the lights, turn the knob at
the end of the control lever to one of the
following positions:
ODN8A059200
1. OFF position
2.
AUT
O headlamp position
3.
Parking lamp position
4.
Headlamp position
Daytime running light (DRL)
The Daytime Running Lights (DRL) can
make it easier for others to see the front
of your vehicle during the day, especially
after dawn and before sunset.
The DRL system will turn the dedicated
lamp OFF when:
• The headlamps are ON.
• The parking lamps are ON.
• The vehicle is turned off.
• The parking brake is engaged.
OCN7050055
AUTO headlamp position
The parking lamp and headlamp will
be turned ON or OFF automatically
depending on the amount of daylight as
measured by the ambient light sensor on
the center dash (1).
Even with the AUTO headlamp feature
in operation, it is recommended to
manually turn ON the headlamps when
driving at night or in a fog, driving in the
rain, or when you enter dark areas, such
as tunnels and parking facilities.
NOTICE
• Do not cover or spill anything on
the sensor (1) located in front of the
instrument panel.
• Do not clean the sensor using
a window cleaner, the cleanser
may leave a light film which could
interfere with sensor operation.
• If your vehicle has window tint or
other types of metallic coating on
the front windshield, the AUTO
headlamp system may not work
properly.
Page 220 of 570
Convenient Features
5-84
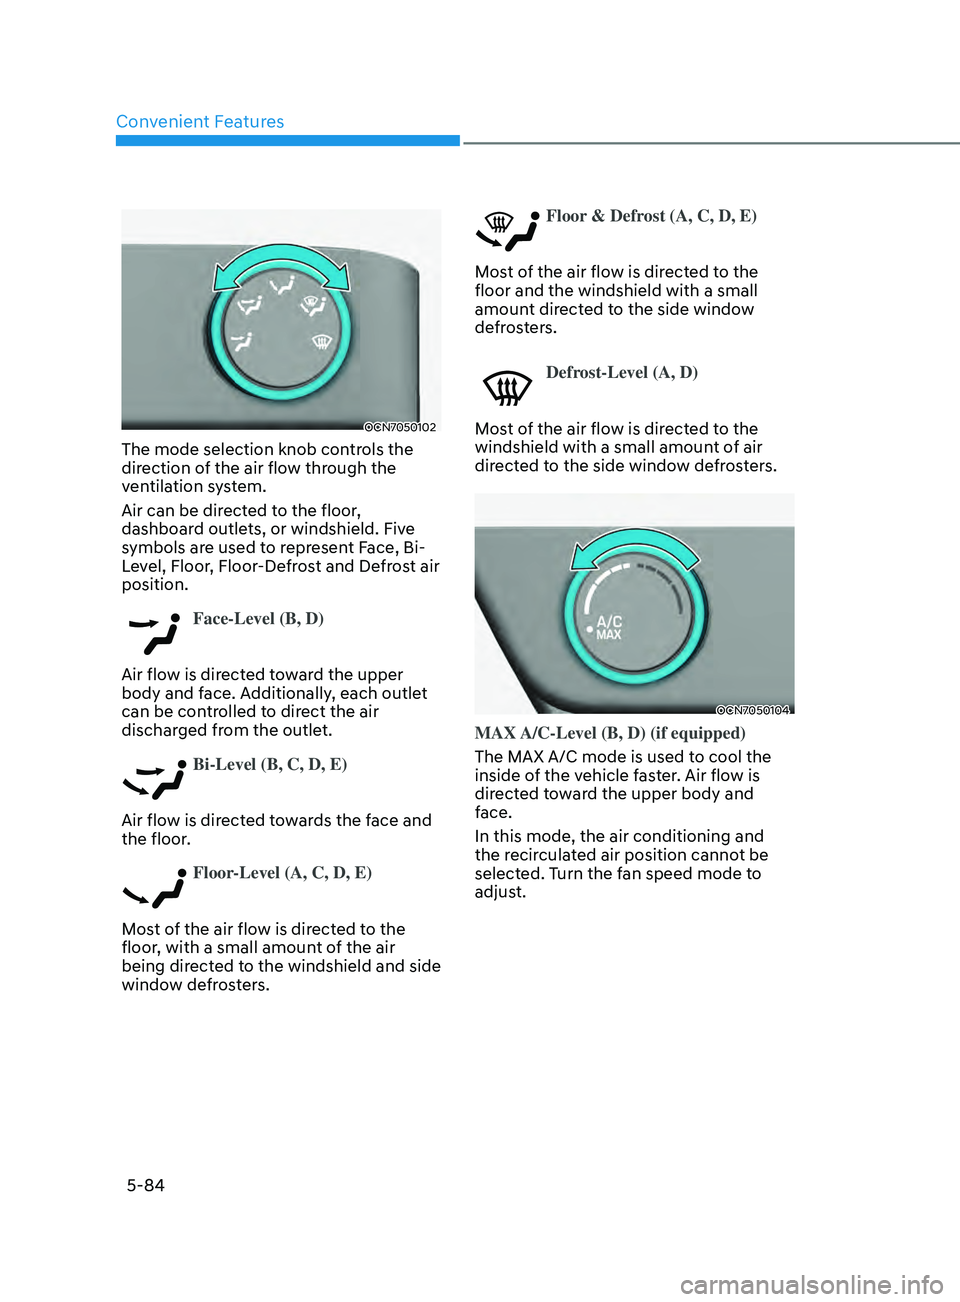
OCN7050102
The mode selection knob controls the
direction of the air flow through the
ventilation system.
Air can be directed to the floor,
dashboard outlets, or windshield. Five
symbols are used to represent Face, Bi-
Level, Floor, Floor-Defrost and Defrost air
position.
Face-Level (B, D)
Air flow is directed toward the upper
body and face. Additionally, each outlet
can be controlled to direct the air
discharged from the outlet.
Bi-Level (B, C, D, E)
Air flow is directed towards the face and
the floor.
Floor-Level (A, C, D, E)
Most of the air flow is directed to the
floor, with a small amount of the air
being directed to the windshield and side
window defrosters.
Floor & Defrost (A, C, D, E)
Most of the air flow is directed to the
floor and the windshield with a small
amount directed to the side window
defrosters.
Defrost-Level (A, D)
Most of the air flow is directed to the
windshield with a small amount of air
directed to the side window defrosters.
OCN7050104
MAX A/C-Level (B, D) (if equipped)
The MAX A/C mode is used to cool the
inside of the vehicle faster. Air flow is
directed toward the upper body and
face.
In this mode, the air conditioning and
the recirculated air position cannot be
selected. Turn the fan speed mode to
adjust.