fuel cap HYUNDAI ELANTRA SEL 2021 Owners Manual
[x] Cancel search | Manufacturer: HYUNDAI, Model Year: 2021, Model line: ELANTRA SEL, Model: HYUNDAI ELANTRA SEL 2021Pages: 570, PDF Size: 52.21 MB
Page 12 of 570
01
1-5
Your new vehicle is designed to obtain
maximum performance with UNLEADED
FUEL, as well as minimize exhaust
emissions and spark plug fouling.
Your new vehicle is designed to use only
unleaded fuel having an octane number
((R+M)/2) of 87 (Research Octane
Number 91) or higher. (Do not use
methanol blended fuels)
NOTICE
To prevent damage to the engine and
engine components, never add any fuel
system cleaning agents to the fuel tank
other than what has been specified.
Consult an authorized HYUNDAI dealer
for additional information.
WARNING
•Do not “top off” after the nozzle
automatically shuts off when
refueling.
• Always check that the fuel cap is
installed securely to prevent fuel
spillage in the event of an accident.
fuel requIreMents
Throughout this manual DANGER,
WARNING, CAUTION, NOTICE and the
SAFETY ALERT SYMBOL will be used.
This is the safety alert symbol. It
is used to alert you to potential
physical injury hazards. Obey
all safety messages that follow
this symbol to avoid possible
injury or death. The safety alert
symbol precedes the signal
words DANGER, WARNING and
CAUTION.
DANGER
DANGER indicates a hazardous
situation which, if not avoided, will
result in death or serious injury.
WARNING
WARNING indicates a hazardous
situation which, if not avoided, could
result in death or serious injury.
CAUTION
CAUTION indicates a hazardous
situation which, if not avoided, could
result in minor or moderate injury.
NOTICE
NOTICE indicates a situation which,
if not avoided, could result in vehicle
damage.
Page 26 of 570
02
2-11
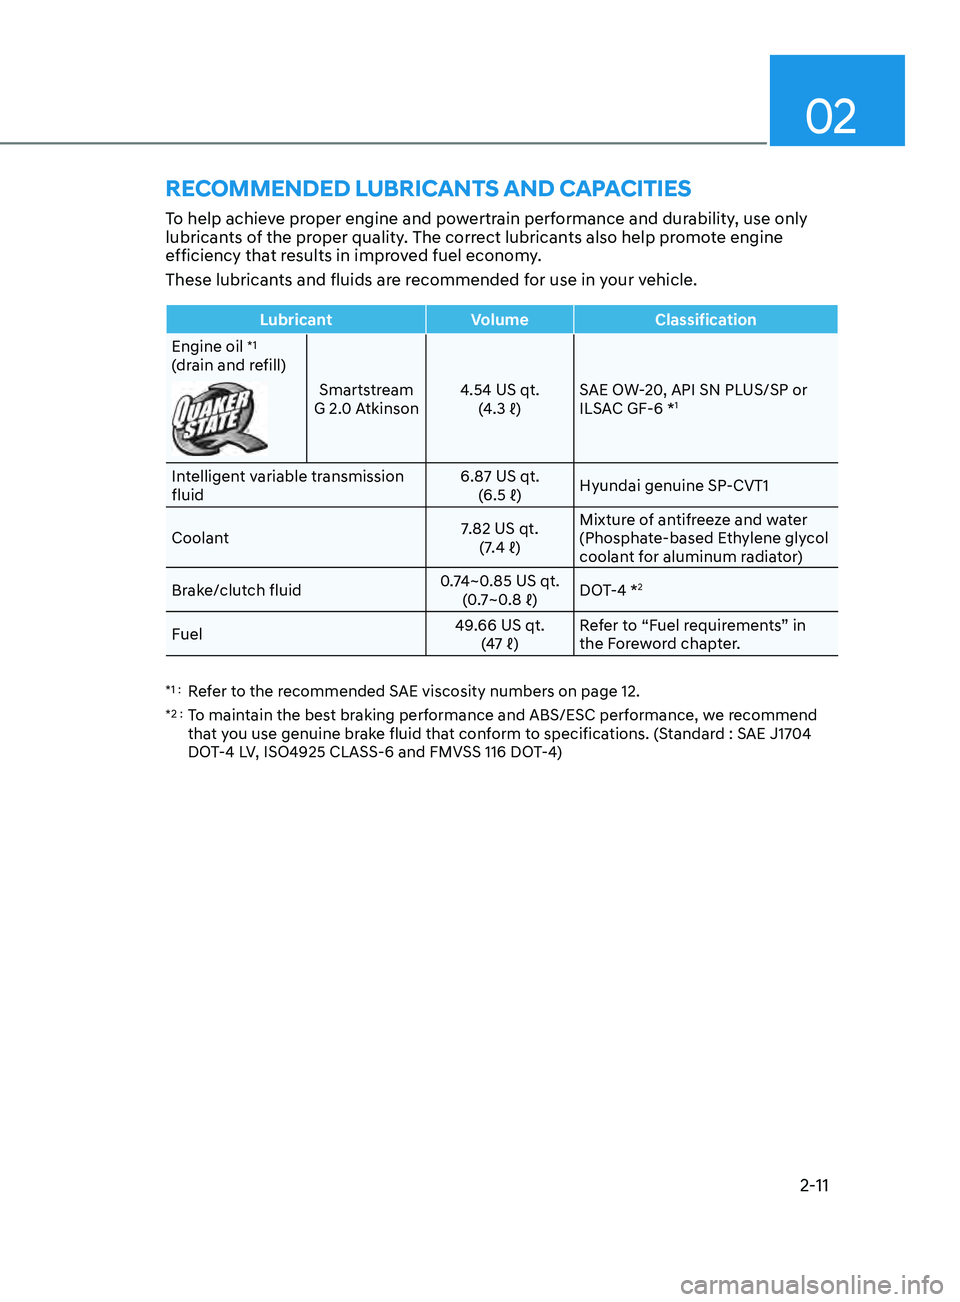
rECommEnDED luBriCants anD CaPaCitiEs
To help achieve proper engine and powertrain performance and durability, use only
lubricants of the proper quality. The correct lubricants also help promote engine
efficiency that results in improved fuel economy.
These lubricants and fluids are recommended for use in your vehicle.
LubricantVolumeClassification
Engine oil
*1
(drain and refill)
Smartstream
G 2.0 Atkinson 4.54 US qt.
(4.3
ℓ) SAE O
W-20, API SN PLUS/SP or
ILSAC GF-6 *
1
Intelligent variable transmission
fluid 6.87 US qt.
(6.5 ℓ) Hyundai genuine SP-CVT1
Coolan
t 7.82 US qt.
(7.4
ℓ)
Mixture o
f antifreeze and water
(Phosphate-based Ethylene glycol
coolant for aluminum radiator)
Brake/clutch fluid
0.
74~0.85 US qt.(0.7~0.8
ℓ) DOT
-4 *
2
Fuel 49.66 US qt.
(47
ℓ) R
efer to “Fuel requirements” in
the Foreword chapter.
*1 : Refer to the recommended SAE viscosity numbers on page 12.
*2 : To maintain the best braking performance and ABS/ESC performance, we recommend
that you use genuine brake fluid that conform to specifications. (Standard : SAE J1704
DOT-4 LV, ISO4925 CLASS-6 and FMVSS 116 DOT-4)
Page 92 of 570
Instrument Cluster
4-6
Engine coolant temperature gauge
OCN7040008
OCN7040009
„„Type A
„
„Type B
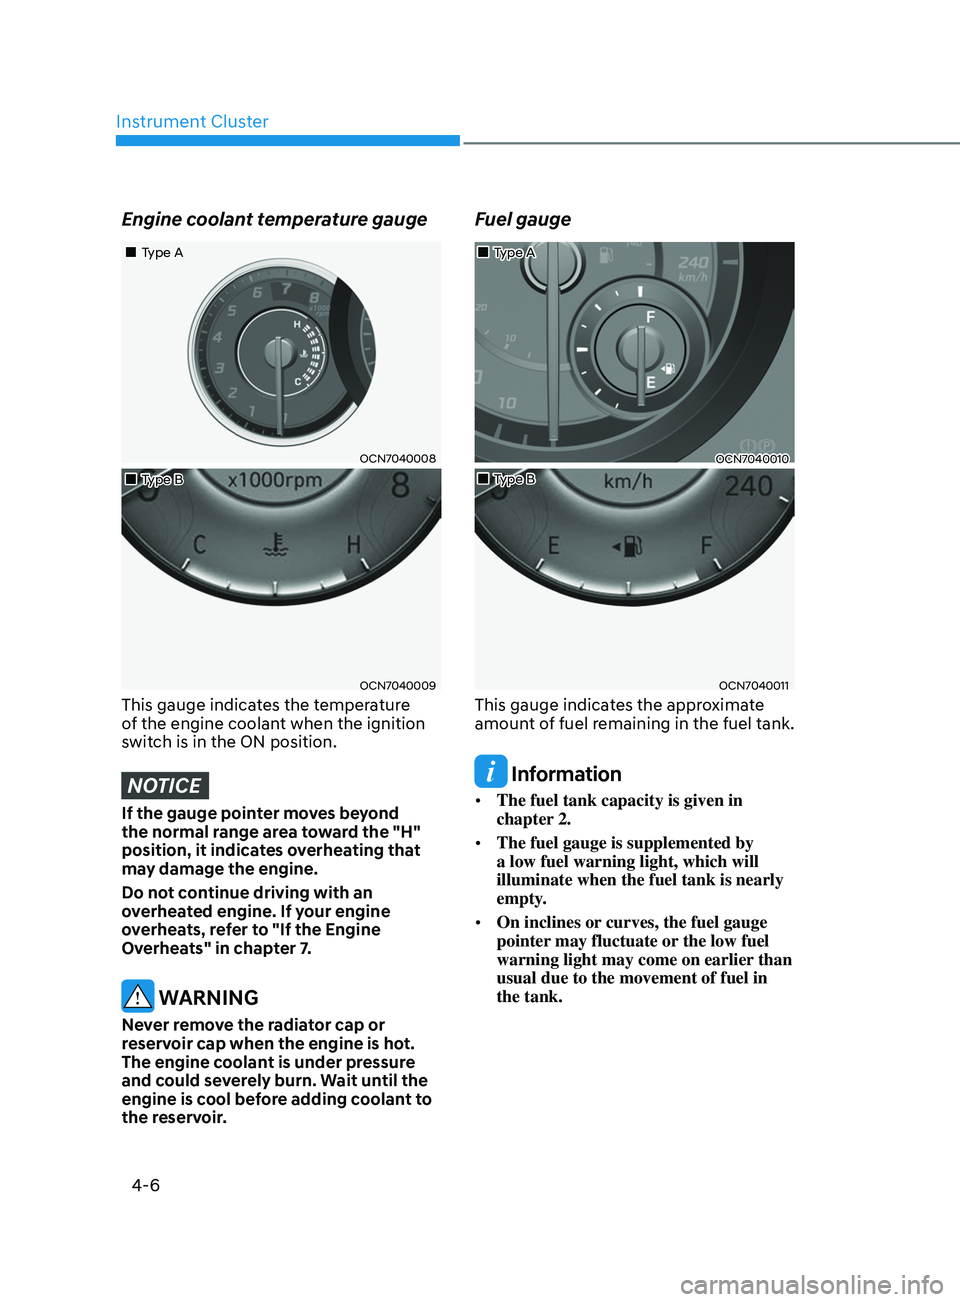
This gauge indicates the temperature
of the engine coolant when the ignition
switch is in the ON position.
NOTICE
If the gauge pointer moves beyond
the normal range area toward the "H"
position, it indicates overheating that
may damage the engine.
Do not continue driving with an
overheated engine. If your engine
overheats, refer to "If the Engine
Overheats" in chapter 7.
WARNING
Never remove the radiator cap or
reservoir cap when the engine is hot.
The engine coolant is under pressure
and could severely burn. Wait until the
engine is cool before adding coolant to
the reservoir.
Fuel gauge
OCN7040010
OCN7040011
„„Type B
„
„Type A
This gauge indicates the approximate
amount of fuel remaining in the fuel tank.
Information
•
The fuel tank capacity is given in
chapter 2.
• The fuel gauge is supplemented by
a low fuel warning light, which will
illuminate when the fuel tank is nearly
empty.
• On inclines or curves, the fuel gauge
pointer may fluctuate or the low fuel
warning light may come on earlier than
usual due to the movement of fuel in
the tank.
Page 202 of 570
Convenient Features5-66
Fuel Filler Door
Opening the fuel filler door
OCN7050042
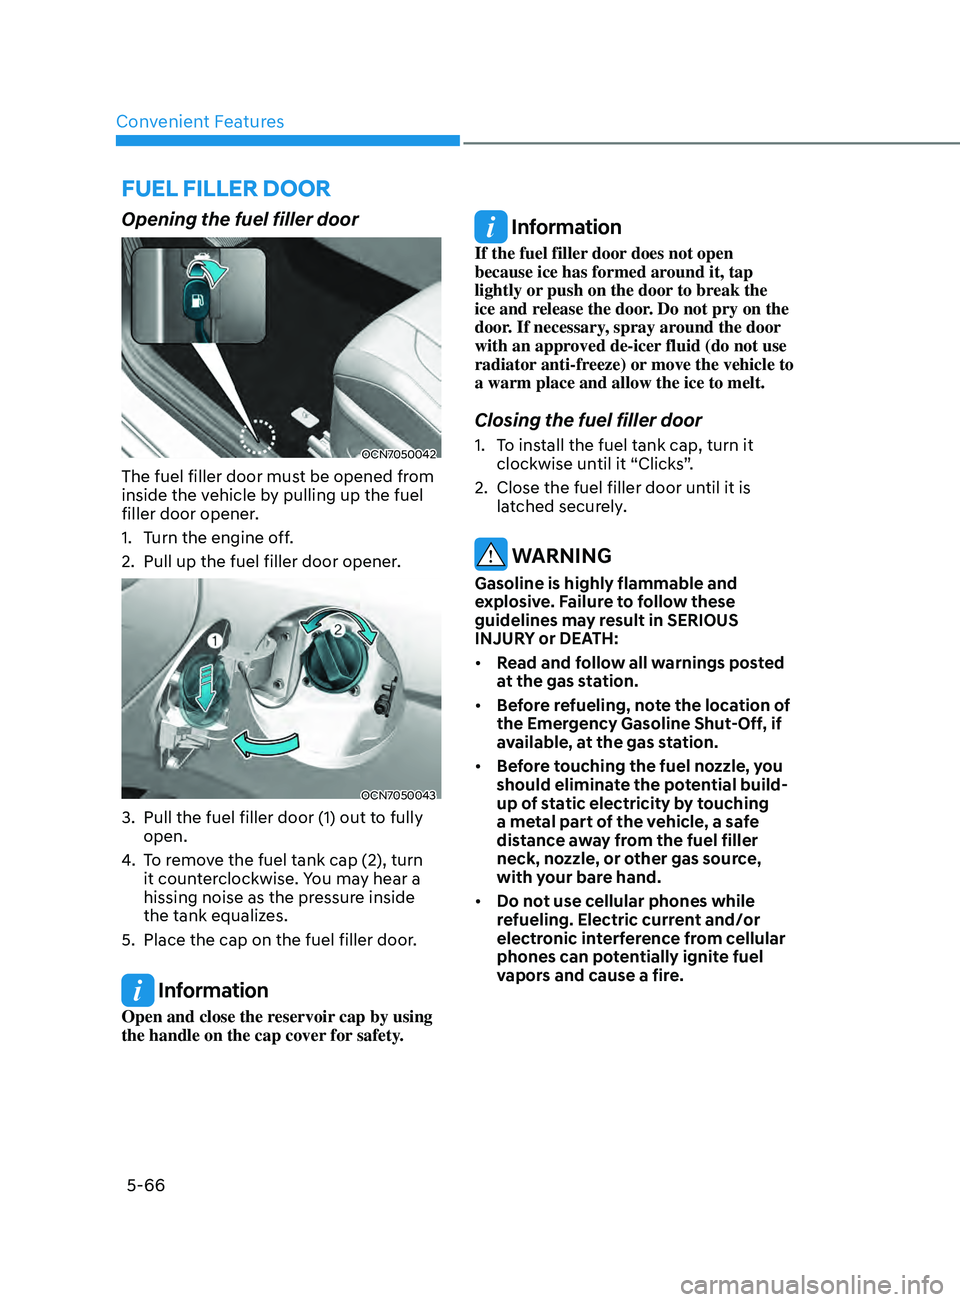
The fuel filler door must be opened from
inside the vehicle by pulling up the fuel
filler door opener.
1.
Turn the engine o
ff.
2.
Pull up the fuel filler door opener.
OCN7050043
3. Pull the fuel filler door (1) out to fully
open.
4.
To r
emove the fuel tank cap (2), turn
it counterclockwise. You may hear a
hissing noise as the pressure inside
the tank equalizes.
5.
Place the cap on the fuel filler door.
Information
Open and close the reservoir cap by using
the handle on the cap cover for safety.
Information
If the fuel filler door does not open
because ice has formed around it, tap
lightly or push on the door to break the
ice and release the door. Do not pry on the
door. If necessary, spray around the door
with an approved de-icer fluid (do not use
radiator anti-freeze) or move the vehicle to
a warm place and allow the ice to melt.
Closing the fuel filler door
1. To install the fuel tank cap, turn it
clockwise un til it “Clicks”.
2.
Close the fuel filler door until it is
la
tched securely.
WARNING
Gasoline is highly flammable and
explosive. Failure to follow these
guidelines may result in SERIOUS
INJURY or DEATH:
• Read and follow all warnings posted
at the gas station.
• Before refueling, note the location of
the Emergency Gasoline Shut-Off, if
available, at the gas station.
• Before touching the fuel nozzle, you
should eliminate the potential build-
up of static electricity by touching
a metal part of the vehicle, a safe
distance away from the fuel filler
neck, nozzle, or other gas source,
with your bare hand.
• Do not use cellular phones while
refueling. Electric current and/or
electronic interference from cellular
phones can potentially ignite fuel
vapors and cause a fire.
Page 203 of 570
05
5-67
• Do not get back into a vehicle
once you have begun refueling.
You can generate a build-up of
static electricity by touching,
rubbing or sliding against any item
or fabric capable of producing
static electricity. Static electricity
discharge can ignite fuel vapors
causing a fire. If you must re-enter
the vehicle, you should once again
eliminate potentially dangerous
static electricity discharge by
touching a metal part of the vehicle,
away from the fuel filler neck, nozzle
or other gasoline source, with your
bare hand.
• When refueling, always move the
shift lever to the P (Park) position,
set the parking brake, and place the
ignition switch to the LOCK/OFF
position.
• Sparks produced by electrical
components related to the engine
can ignite fuel vapors causing a fire.
• When using an approved portable
fuel container, be sure to place the
container on the ground prior to
refueling. Static electricity discharge
from the container can ignite fuel
vapors causing a fire. Once refueling
has begun, contact between your
bare hand and the vehicle should
be maintained until the filling is
complete.
• Use only approved portable plastic
fuel containers designed to carry and
store gasoline.
• Do not use matches or a lighter and
do not smoke or leave a lit cigarette
in your vehicle while at a gas station,
especially during refueling.• Do not over-fill or top-off your
vehicle tank, which can cause
gasoline spillage.
• If a fire breaks out during refueling,
leave the vicinity of the vehicle, and
immediately contact the manager
of the gas station and then contact
the local fire department. Follow any
safety instructions they provide.
• If pressurized fuel sprays out, it can
cover your clothes or skin and thus
subject you to the risk of fire and
burns. Always remove the fuel cap
carefully and slowly. If the cap is
venting fuel or if you hear a hissing
sound, wait until the condition stops
before completely removing the cap.
• Always check that the fuel cap is
installed securely to prevent fuel
spillage in the event of an accident.
Information
Make sure to refuel your vehicle according
to the “Fuel Requirements” suggested in
the Introduction chapter.
NOTICE
• Do not spill fuel on the exterior
surfaces of the vehicle. Any type of
fuel spilled on painted surfaces may
damage the paint.
• If the fuel filler cap requires
replacement, use only a genuine
HYUNDAI cap or the equivalent
specified for your vehicle. An
incorrect fuel filler cap can result
in a serious malfunction of the fuel
system or emission control system.
Page 312 of 570
06
6-53
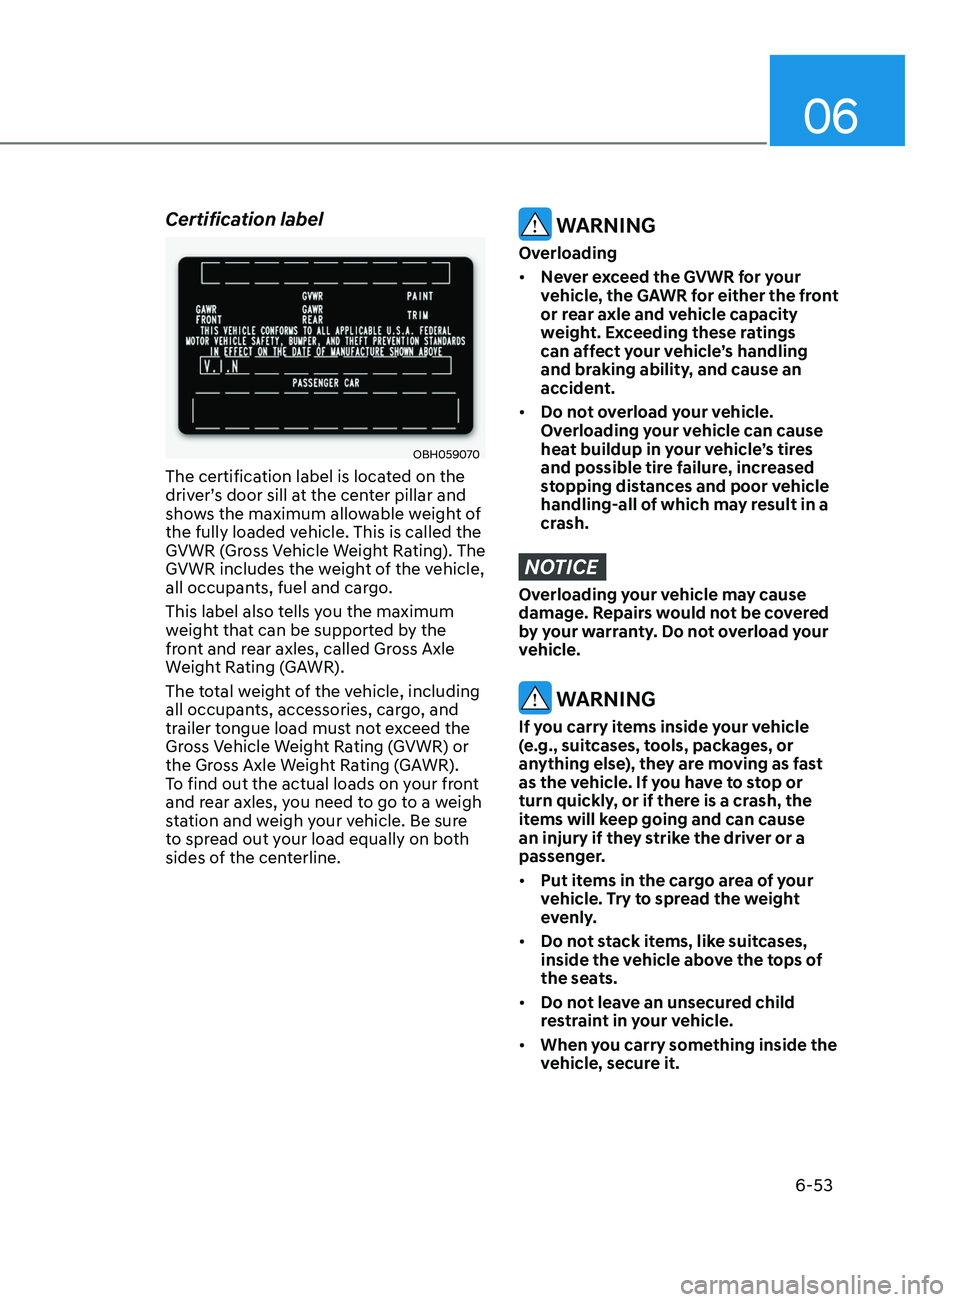
Certification label
OBH059070
The certification label is located on the
driver’s door sill at the center pillar and
shows the maximum allowable weight of
the fully loaded vehicle. This is called the
GVWR (Gross Vehicle Weight Rating). The
GVWR includes the weight of the vehicle,
all occupants, fuel and cargo.
This label also tells you the maximum
weight that can be supported by the
front and rear axles, called Gross Axle
Weight Rating (GAWR).
The total weight of the vehicle, including
all occupants, accessories, cargo, and
trailer tongue load must not exceed the
Gross Vehicle Weight Rating (GVWR) or
the Gross Axle Weight Rating (GAWR).
To find out the actual loads on your front
and rear axles, you need to go to a weigh
station and weigh your vehicle. Be sure
to spread out your load equally on both
sides of the centerline.
WARNING
Overloading
• Never exceed the GVWR for your
vehicle, the GAWR for either the front
or rear axle and vehicle capacity
weight. Exceeding these ratings
can affect your vehicle’s handling
and braking ability, and cause an
accident.
• Do not overload your vehicle.
Overloading your vehicle can cause
heat buildup in your vehicle’s tires
and possible tire failure, increased
stopping distances and poor vehicle
handling-all of which may result in a
crash.
NOTICE
Overloading your vehicle may cause
damage. Repairs would not be covered
by your warranty. Do not overload your
vehicle.
WARNING
If you carry items inside your vehicle
(e.g., suitcases, tools, packages, or
anything else), they are moving as fast
as the vehicle. If you have to stop or
turn quickly, or if there is a crash, the
items will keep going and can cause
an injury if they strike the driver or a
passenger.
• Put items in the cargo area of your
vehicle. Try to spread the weight
evenly.
• Do not stack items, like suitcases,
inside the vehicle above the tops of
the seats.
• Do not leave an unsecured child
restraint in your vehicle.
• When you carry something inside the
vehicle, secure it.
Page 496 of 570

Maintenance
9-10
Normal Maintenance Schedule (Smartstream G2.0 Atkinson) (CONT)
MAINTENANCE INTERVALS
MAINTENANCE
ITEM Months 12 24 36 48 60 72 84 96 108 120 132 144 156
Miles×1,000 8 16 24 32 40 48 56 64 72 80 88 96 104 Km×1,000 13 26 39 52 65 78 91 104 117 130 143 156 169
Vapor hose, fuel filler cap and fuel tank I I I I I I
Fuel tank air filter *
1
I I I I I I
Fuel filter *
1
I I I I I I
Fuel lines, hoses and connections I I I I I I
Parking brake I I I I I I
Brake fluid Inspect every 8,000 miles (13,000 km) or 12 months,
Replace every 48,000 miles (78,000 km) or 48 months
R: Replace or change.
I : Inspect and if necessary, adjust, correct, clean or replace.*1 : Fuel filter & Fuel tank air filter are considered to be maintenance free but periodic inspection is recommended for this
maintenance schedule depends on fuel quality. If there are some important safety matters like fuel flow restriction, surging,
loss of power, hard starting problem, etc. replace the fuel filter immediately regardless of maintenance schedule and consult an
authorized HYUNDAI dealer for details.
Page 499 of 570

09
9-13
Engine Oil and Filter
The engine oil and filter should be
changed at the intervals specified in the
maintenance schedule. If the vehicle
is being driven in severe conditions,
more frequent oil and filter changes are
required.
Drive Belts
Inspect all drive belts for evidence
of cuts, cracks, excessive wear or oil
saturation and replace if necessary. Drive
belts should be checked periodically
for proper tension and adjusted as
necessary.
Fuel Filter
A clogged-up fuel filter may limit the
vehicle driving speed, damage the
emission system, and cause the hard
starting. When a considerable amount
of foreign substances are accumulated
in the fuel tank, the fuel filter should be
replaced.
Upon installing a new fuel filter, operate
the engine for several minutes, and
check the connections for any leakages.
Fuel filters should be installed by an
authorized HYUNDAI dealer.
Fuel Lines, Fuel Hoses and
Connections
Check the fuel lines, fuel hoses and
connections for leakage and damage.
Have an authorized HYUNDAI dealer
replace any damaged or leaking parts
immediately.
Vapor Hose and Fuel Filler Cap
The vapor hose and fuel filler cap should
be inspected at those intervals specified
in the maintenance schedule. Make sure
a new vapor hose or fuel filler cap is
correctly replaced.
Air Cleaner Filter
A genuine HYUNDAI air cleaner filter
is recommended when the filter is
replaced.
Spark Plugs
Make sure to install new spark plugs of
the correct heat range.
Cooling System
Check cooling system components, such
as radiator, coolant reservoir, hoses and
connections for leakage and damage.
Replace any damaged parts.
Explanation of SChEdulEd maintEnanCE itEmS
Page 514 of 570
Maintenance
9-28
WARNING
Recommended pressures must be
maintained for the best ride, vehicle
handling, and minimum tire wear.
Over-inflation or under-inflation can
reduce tire life, adversely affect vehicle
handling, and lead to sudden tire failure
that could result in loss of vehicle
control resulting in an accident.
Severe under-inflation can lead to
severe heat build-up, causing blowouts,
tread separation and other tire failures
that can result in the loss of vehicle
control resulting in an accident. This
risk is much higher on hot days and
when driving for long periods at high
speeds.
CAUTION
• Under-inflation results in excessive
wear, poor handling and reduced
fuel economy. Wheel deformation
is also possible. Keep your tire
pressures at the proper levels. If a
tire frequently needs refilling, have it
checked by an authorized HYUNDAI
dealer.
• Over-inflation produces a harsh ride,
excessive wear at the center of the
tire tread, and a greater possibility of
damage from road hazards.
Check Tire Inflation Pressure
Check your tires, including the spare tire,
once a month or more.
How to check
Use a good quality tire pressure gauge
to check tire pressure. You can not tell
if your tires are properly inflated simply
by looking at them. Radial tires may look
properly inflated when they are under-
inflated.
Remove the valve cap from the tire valve
stem. Press the tire gauge firmly onto the
valve to get a pressure measurement.
If the cold tire inflation pressure
matches the recommended pressure
on the tire label located on the driver’s
side center pillar or in this manual. No
further adjustment is necessary. If the
pressure is low, add air until you reach
the recommended pressure. Make sure
to put the valve caps back on the valve
stems. Without the valve cap, dirt or
moisture could get into the valve core
and cause air leakage. If a valve cap is
missing, install a new one as soon as
possible.
If you overfill the tire, release air by
pushing on the metal stem in the
center of the tire valve. Recheck the tire
pressure with the tire gauge. Be sure
to put the valve caps back on the valve
stems. Without the valve cap, dirt or
moisture could get into the valve core
and cause air leakage. If a valve cap is
missing, install a new one as soon as
possible.
A cold tire means the vehicle has been
sitting for 3 hours and driven for less
than 1 mile (1.6 km) in that 3 hour period.
Allow the tire to cool before measuring
the inflation pressure. Always be sure
the tire is cold before inflating to the
recommended pressure.
Page 522 of 570
Maintenance
9-36
Curb Weight
This means the weight of a motor vehicle
with standard and optional equipment
including the maximum capacity of fuel,
oil and coolant, but without passengers
and cargo.
DOT Markings
A code molded into the sidewall
of a tire signifying that the tire is in
compliance with the U.S. Department
of Transportation motor vehicle safety
standards. The DOT code includes the
Tire Identification Number (TIN), an
alphanumeric designator which can
also identify the tire manufacturer,
production plant, brand and date of
production.
GVWR
Gross Vehicle Weight Rating
GAWR FRT
Gross Axle Weight Rating for the Front
Axle.
GAWR RR
Gross Axle Weight Rating for the Rear
axle.
Intended Outboard Sidewall
The side of an asymmetrical tire,
that must always face outward when
mounted on a vehicle.
Kilopascal (kPa)
The metric unit for air pressure.
Light truck (LT) tire
A tire designated by its manufacturer as
primarily intended for use on lightweight
trucks or multipurpose passenger
vehicles.
Load ratings
The maximum load that a tire is rated to
carry for a given inflation pressure.
Load Index
An assigned number ranging from 1 to
279 that corresponds to the load carrying
capacity of a tire.
Maximum Inflation Pressure
The maximum air pressure to which a
cold tire may be inflated. The maximum
air pressure is molded onto the sidewall.
Maximum Load Rating
The load rating for a tire at the maximum
permissible inflation pressure for that
tire.
Maximum Loaded Vehicle Weight
The sum of curb weight; accessory
weight; vehicle capacity weight; and
production options weight.
Normal Occupant Weight
The number of occupants a vehicle
is designed to seat multiplied by 150
pounds (68 kg).
Occupant Distribution
Designated seating positions.
Outward Facing Sidewall
An asymmetrical tire has a particular
side that faces outward when mounted
on a vehicle. The outward facing
sidewall bears white lettering or bears
manufacturer, brand, and/or model
name molding that is higher or deeper
than the same moldings on the inner
facing sidewall.
Passenger (P-Metric) tire
A tire used on passenger cars and some
light duty trucks and multipurpose
vehicles.