fuse HYUNDAI ELANTRA SPORT 2018 Owners Manual
[x] Cancel search | Manufacturer: HYUNDAI, Model Year: 2018, Model line: ELANTRA SPORT, Model: HYUNDAI ELANTRA SPORT 2018Pages: 534, PDF Size: 51.51 MB
Page 15 of 534
1-4
Your vehicle at a glanceI
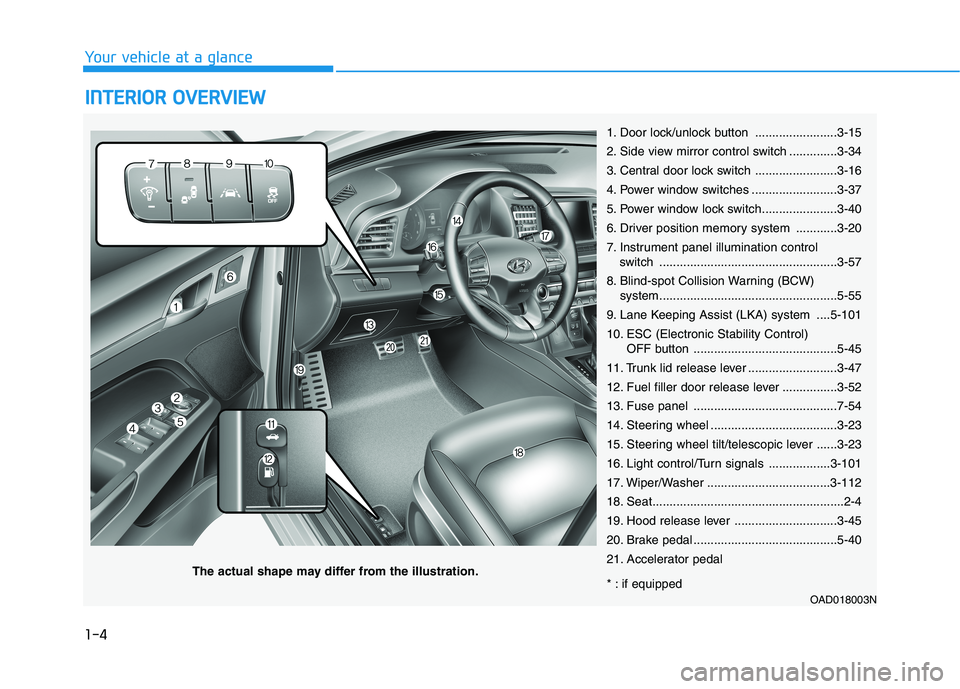
I NN TTEERR IIOO RR OO VVEERR VV IIEE WW
1. Door lock/unlock button ........................3-15
2. Side view mirror control switch ..............3-34
3. Central door lock switch ........................3-16
4. Power window switches .........................3-37
5. Power window lock switch......................3-40
6. Driver position memory system ............3-20
7. Instrument panel illumination control
switch ....................................................3-57
8. Blind-spot Collision Warning (BCW) system....................................................5-55
9. Lane Keeping Assist (LKA) system ....5-101
10. ESC (Electronic Stability Control) OFF button ..........................................5-45
11. Trunk lid release lever ..........................3-47
12. Fuel filler door release lever ................3-52
13. Fuse panel ..........................................7-54
14. Steering wheel .....................................3-23
15. Steering wheel tilt/telescopic lever ......3-23
16. Light control/Turn signals ..................3-101
17. Wiper/Washer ....................................3-112
18. Seat........................................................2-4
19. Hood release lever ..............................3-45
20. Brake pedal ..........................................5-40
21. Accelerator pedal
* : if equipped OAD018003N
The actual shape may differ from the illustration.
Page 17 of 534
1-6
Your vehicle at a glanceE
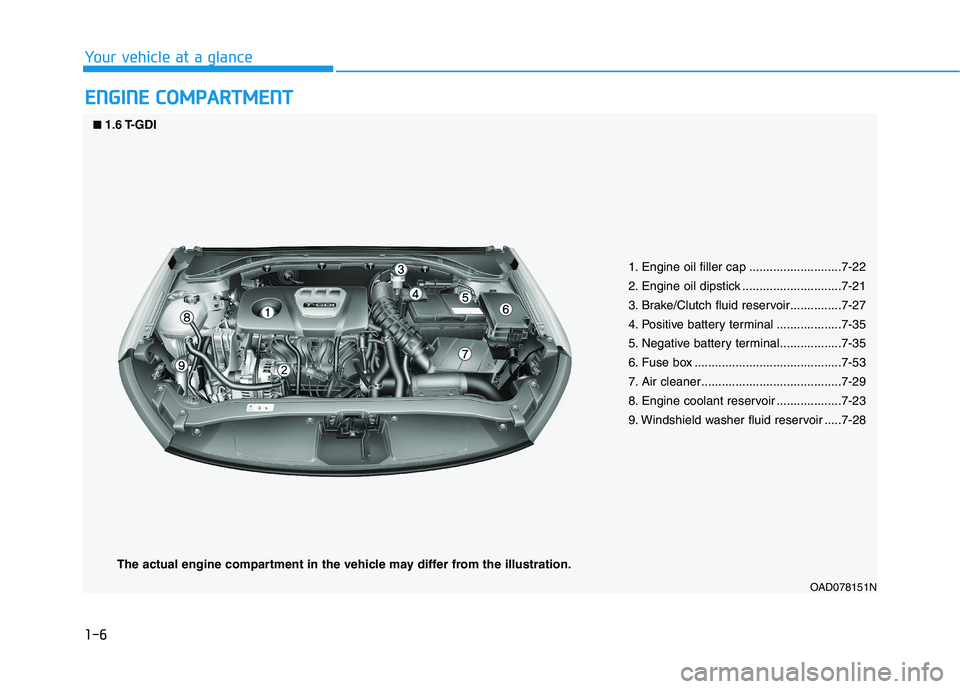
E NN GGIINN EE CC OO MM PPAA RRTTMM EENN TT
OAD078151N
1. Engine oil filler cap ...........................7-22
2. Engine oil dipstick .............................7-21
3. Brake/Clutch fluid reservoir...............7-27
4. Positive battery terminal ...................7-35
5. Negative battery terminal..................7-35
6. Fuse box ...........................................7-53
7. Air cleaner.........................................7-29
8. Engine coolant reservoir ...................7-23
9. Windshield washer fluid reservoir .....7-28
■
■
1.6 T-GDI
The actual engine compartment in the vehicle may differ from the illustration.
Page 18 of 534
1-7
Your vehicle at a glance
1
OAD078100L
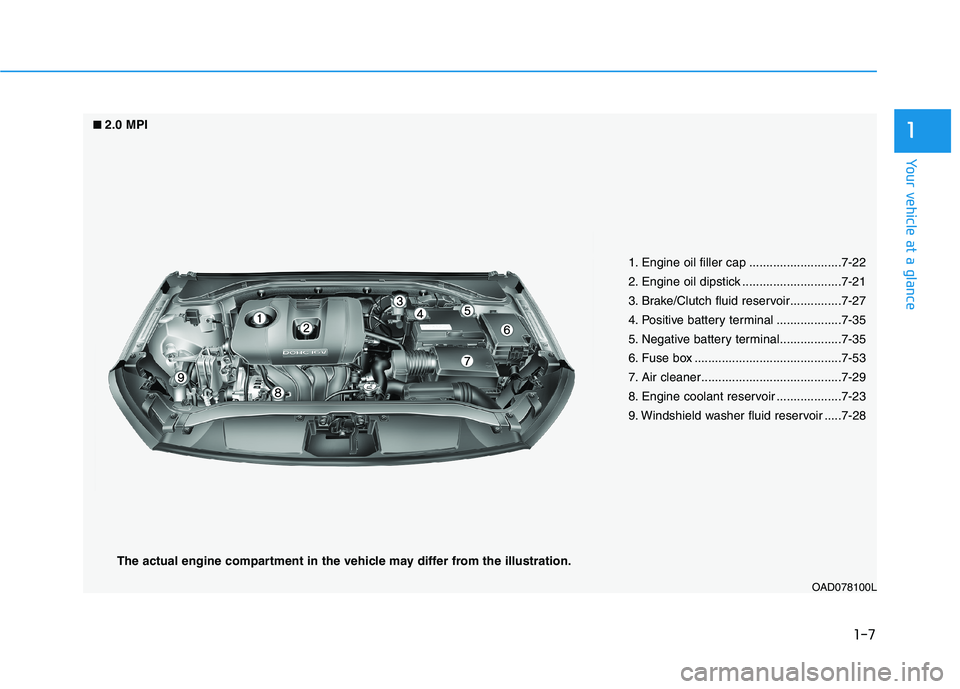
1. Engine oil filler cap ...........................7-22
2. Engine oil dipstick .............................7-21
3. Brake/Clutch fluid reservoir...............7-27
4. Positive battery terminal ...................7-35
5. Negative battery terminal..................7-35
6. Fuse box ...........................................7-53
7. Air cleaner.........................................7-29
8. Engine coolant reservoir ...................7-23
9. Windshield washer fluid reservoir .....7-28
■
■
2.0 MPI
The actual engine compartment in the vehicle may differ from the illustration.
Page 125 of 534
3-40
Convenient features of your vehicle
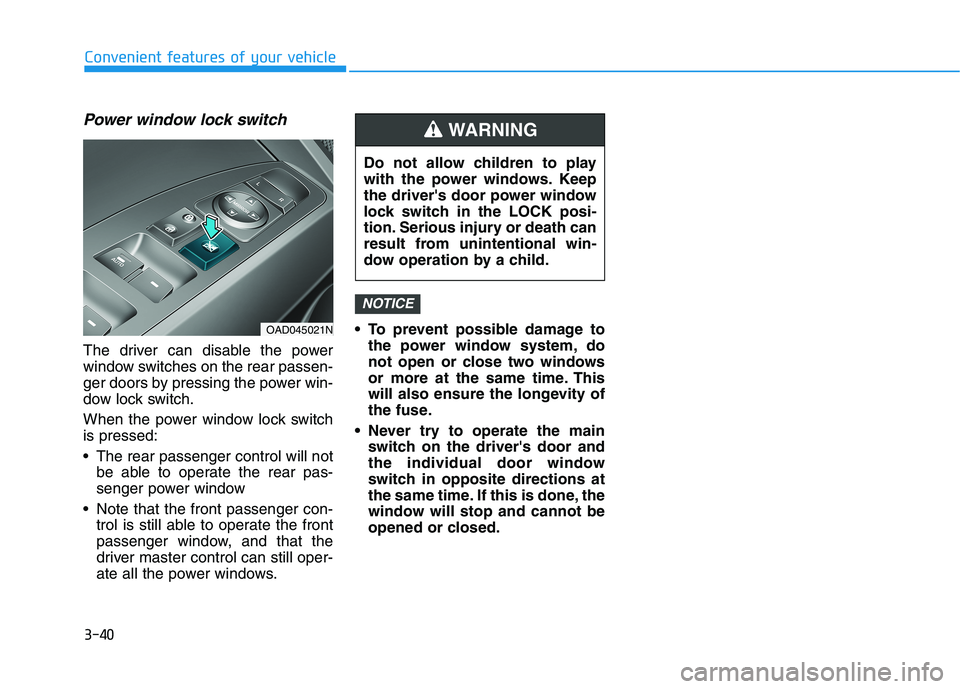
Power window lock switch
The driver can disable the power
window switches on the rear passen-
ger doors by pressing the power win-
dow lock switch.
When the power window lock switch is pressed:
The rear passenger control will notbe able to operate the rear pas-
senger power window
Note that the front passenger con- trol is still able to operate the front
passenger window, and that the
driver master control can still oper-
ate all the power windows. To prevent possible damage to
the power window system, do
not open or close two windows
or more at the same time. This
will also ensure the longevity of
the fuse.
Never try to operate the main switch on the driver's door and
the individual door window
switch in opposite directions at
the same time. If this is done, the
window will stop and cannot be
opened or closed.
NOTICE
Do not allow children to play
with the power windows. Keep
the driver's door power window
lock switch in the LOCK posi-
tion. Serious injury or death can
result from unintentional win-
dow operation by a child.
WARNING
OAD045021N
Page 128 of 534
3-43
Convenient features of your vehicle
3
Periodically remove any dirt thatmay accumulate on the sunroof guide rail or between the sun-
roof and roof panel which can
make a noise.
Do not try to open the sunroof when the temperature is below
freezing or when the sunroof is
covered with snow or ice, other-wise the motor could be dam-
aged. In cold and wet climates,
the sunroof may not work prop-
erly.
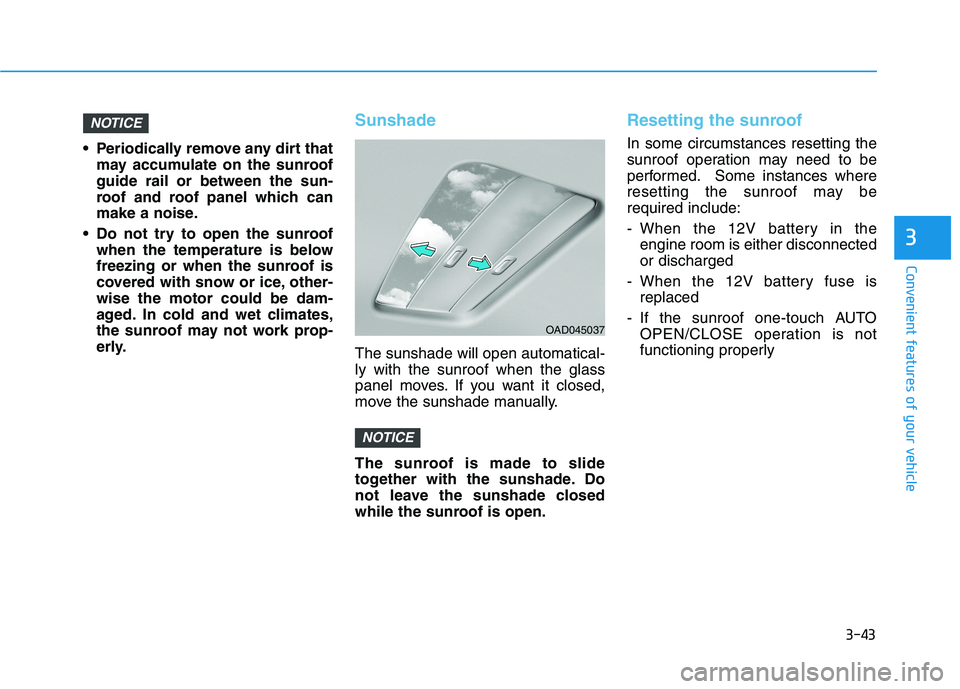
Sunshade
The sunshade will open automatical- ly with the sunroof when the glass
panel moves. If you want it closed,
move the sunshade manually.
The sunroof is made to slide
together with the sunshade. Do
not leave the sunshade closed
while the sunroof is open.
Resetting the sunroof
In some circumstances resetting the
sunroof operation may need to be
performed. Some instances where
resetting the sunroof may berequired include:
- When the 12V battery in theengine room is either disconnected or discharged
- When the 12V battery fuse is replaced
- If the sunroof one-touch AUTO OPEN/CLOSE operation is not
functioning properly
NOTICE
NOTICE
OAD045037
Page 129 of 534
3-44
Convenient features of your vehicle
Sunroof resetting procedure:
1. Place the ignition switch to the ONposition or start the engine. It is recommended to reset the sun-
roof while the engine is running.
2. Push the control lever forward. The sunroof will close completelyor tilt depending on the condition
of the sunroof.
3. Release the control lever when the sunroof stops moving.
4. Push the control lever forward about 10 seconds.
- When the sunroof is in the closed position :
The glass will tilt and slightly move up and down.
- When the sunroof is in the tilt position:
The glass will slightly move up and down.
Do not release the lever until the
operation is completed.
If you release the lever during opera-
tion, start the procedure again fromstep 2. 5. Within 3 seconds, push and hold
the control lever forward until the
sunroof operates as follows:
Tilt down �Slide Open �Slide
Close.
Do not release the lever until the
operation is completed.
If you release the lever during opera-
tion, start the procedure again fromstep 2.
6. Release the sunroof control lever after all steps have completed. (The sunroof system has beenreset.)
Information
If the sunroof is not reset when the vehicle battery is disconnected or
discharged, or the sunroof fuse is
blown, the sunroof may not operate
normally.
For more detailed information, we recommend that you contact an
authorized HYUNDAI dealer.Sunroof Open Warning (if equipped)
If the driver turns off the enginewhen the sunroof is not fully
closed, the warning chime will
sound for approximately 3 seconds
and the sunroof open warning will
appear on the LCD display.
If the driver turns off the engine and opens the door when the sun-roof is not fully closed, the open
sunroof warning will appear on the
LCD display until the door is closedor the sunroof is fully closed.
Close the sunroof securely when
leaving your vehicle.
i
Page 163 of 534
3-78
Convenient features of your vehicle
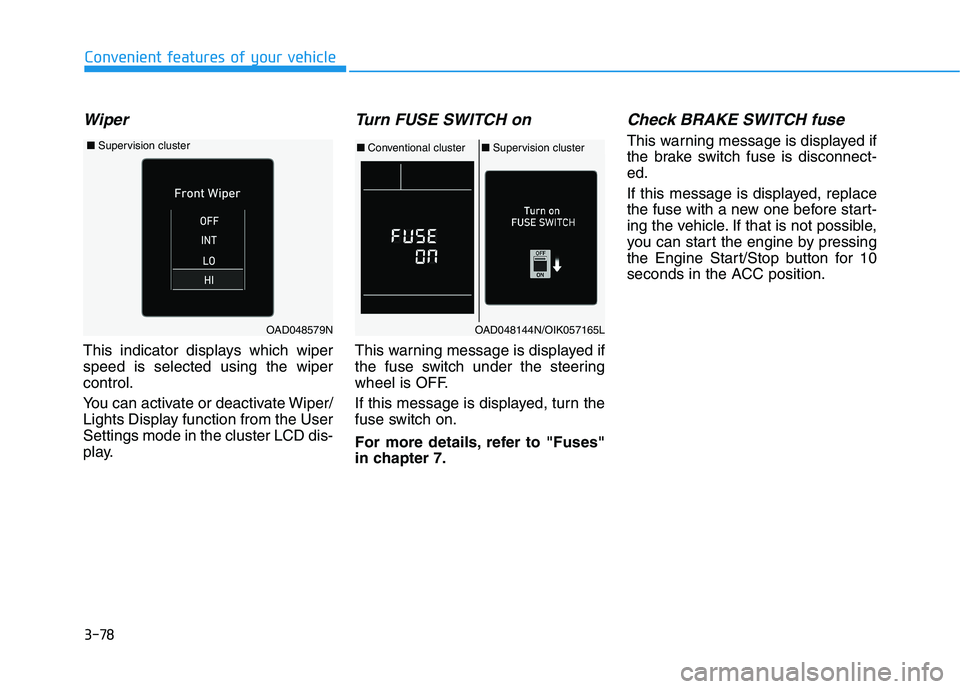
Wiper
This indicator displays which wiper speed is selected using the wipercontrol.
You can activate or deactivate Wiper/
Lights Display function from the UserSettings mode in the cluster LCD dis-
play.
Turn FUSE SWITCH on
This warning message is displayed if
the fuse switch under the steering
wheel is OFF.
If this message is displayed, turn the
fuse switch on.
For more details, refer to "Fuses"
in chapter 7.
Check BRAKE SWITCH fuse
This warning message is displayed if
the brake switch fuse is disconnect-ed.
If this message is displayed, replace
the fuse with a new one before start-
ing the vehicle. If that is not possible,
you can start the engine by pressing
the Engine Start/Stop button for 10
seconds in the ACC position.
OAD048144N/OIK057165L
■Conventional cluster ■Supervision cluster
OAD048579N
■ Supervision cluster
Page 176 of 534
3-91
Convenient features of your vehicle
3
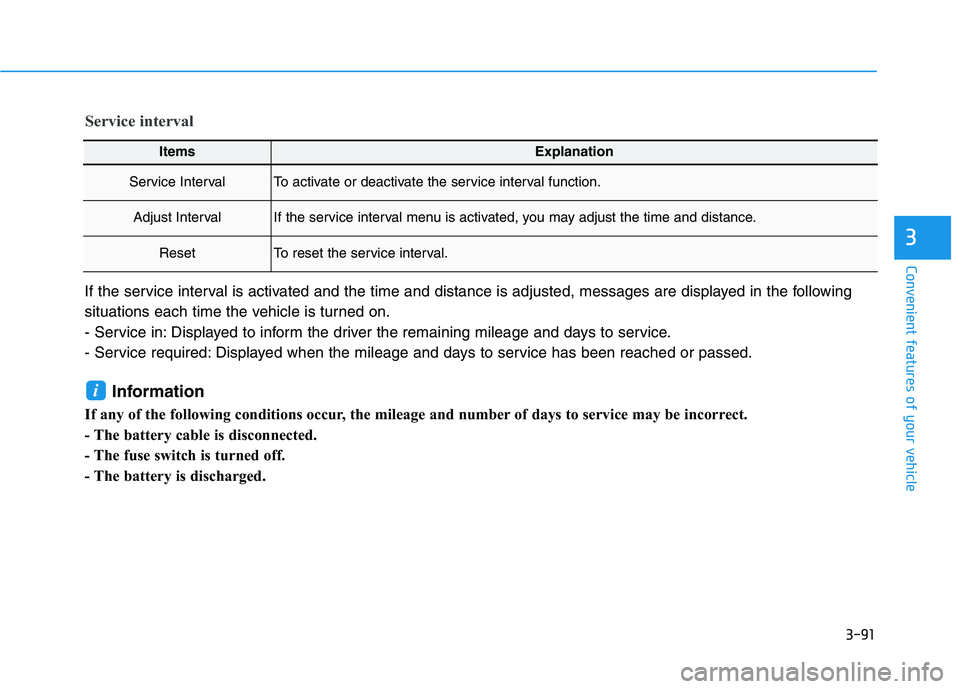
ItemsExplanation
Service IntervalTo activate or deactivate the service interval function.
Adjust IntervalIf the service interval menu is activated, you may adjust the time and distance.
ResetTo reset the service interval.
Service interval
If the service interval is activated and the time and distance is adjusted, messages are displayed in the following
situations each time the vehicle is turned on.
- Service in: Displayed to inform the driver the remaining mileage and days to service.
- Service required: Displayed when the mileage and days to service has been reached or passed.Information
If any of the following conditions occur, the mileage and number of days to service may be incorrect.
- The battery cable is disconnected.
- The fuse switch is turned off.
- The battery is discharged.
i
Page 233 of 534
3-148
Convenient features of your vehicle
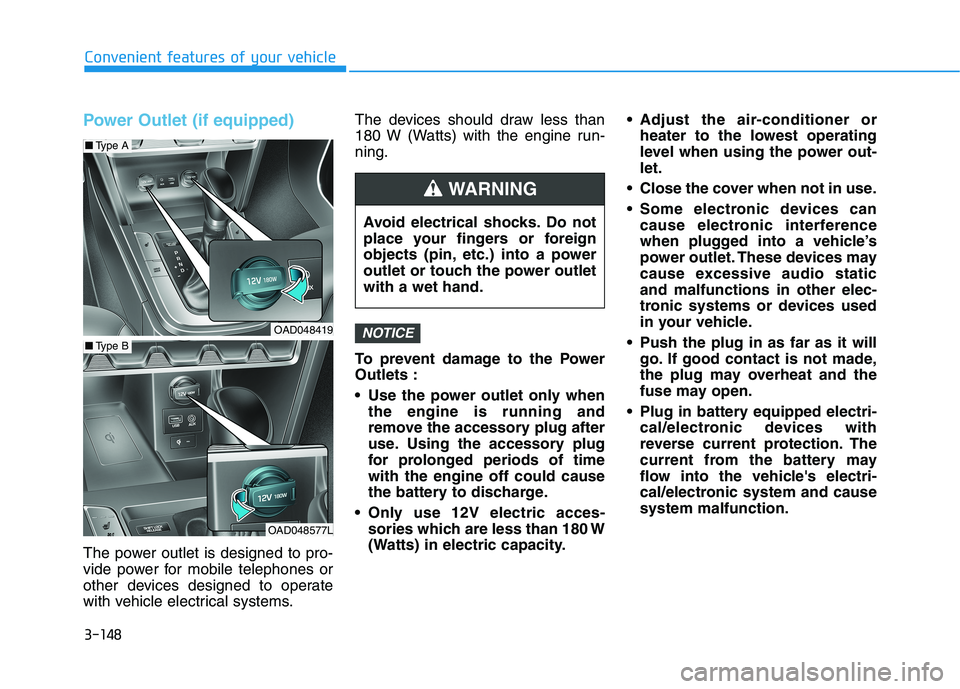
Power Outlet (if equipped)
The power outlet is designed to pro-
vide power for mobile telephones or
other devices designed to operate
with vehicle electrical systems.The devices should draw less than
180 W (Watts) with the engine run-ning.
To prevent damage to the Power Outlets :
Use the power outlet only when
the engine is running and
remove the accessory plug after
use. Using the accessory plug
for prolonged periods of timewith the engine off could cause
the battery to discharge.
Only use 12V electric acces- sories which are less than 180 W
(Watts) in electric capacity. Adjust the air-conditioner or
heater to the lowest operating
level when using the power out-let.
Close the cover when not in use.
Some electronic devices can cause electronic interference
when plugged into a vehicle’s
power outlet. These devices may
cause excessive audio staticand malfunctions in other elec-
tronic systems or devices used
in your vehicle.
Push the plug in as far as it will go. If good contact is not made,
the plug may overheat and the
fuse may open.
Plug in battery equipped electri- cal/electronic devices with
reverse current protection. The
current from the battery may
flow into the vehicle's electri-
cal/electronic system and causesystem malfunction.
NOTICE
Avoid electrical shocks. Do not
place your fingers or foreign
objects (pin, etc.) into a power
outlet or touch the power outletwith a wet hand.
WARNING
OAD048419
OAD048577L
■Type B
■Type A
Page 256 of 534
5-15
Driving your vehicle
5
Information
Do not wait for the engine to warm up while the vehicle remains station-
ary. Start driving at moderate
engine speeds. (Aggressive acceler-
ating and decelerating should be
avoided.)
Always start the vehicle with your foot on the brake pedal. Do not
depress the accelerator while start-
ing the vehicle. Do not race the
engine while warming it up.
To prevent damage to the vehicle:
If the engine stalls while you are in motion, do not attempt to
move the shift lever to the P
(Park) position.
If traffic and road conditions
permit, you may put the shift
lever in the N (Neutral) position
while the vehicle is still moving
and press the Engine Start/Stop
button in an attempt to restart
the engine.
Do not push or tow your vehicle to start the engine. To prevent damage to the vehicle:
When the stop lamp switch fuse is
blown, you can't start the engine
normally. Replace the fuse with a
new one. If you are not able to
replace the fuse, you can start the
engine by pressing and holding
the Engine Start/Stop button for10 seconds with the Engine
Start/Stop button in the ACC posi-tion.
Do not press the Engine Start/
Stop button for more than 10 sec-
onds except when the stop lamp
switch fuse is blown.
For your safety always depress
the brake pedal before starting the
engine.
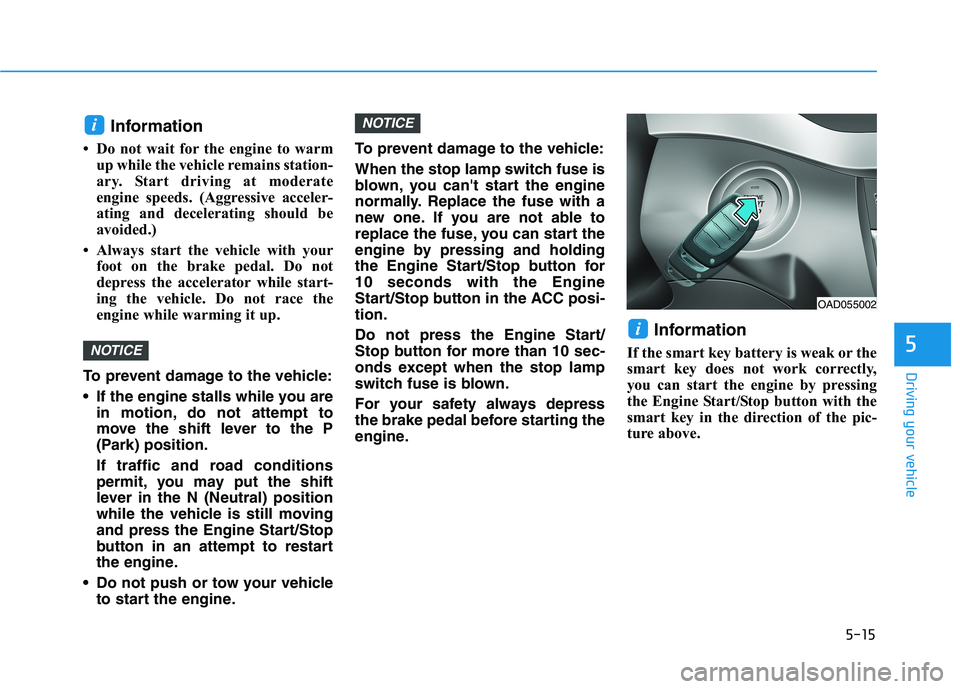
Information
If the smart key battery is weak or the
smart key does not work correctly,
you can start the engine by pressing
the Engine Start/Stop button with the
smart key in the direction of the pic-
ture above.
i
NOTICE
NOTICE
i
OAD055002