ECO mode Hyundai Elantra Touring 2011 Owner's Manual
[x] Cancel search | Manufacturer: HYUNDAI, Model Year: 2011, Model line: Elantra Touring, Model: Hyundai Elantra Touring 2011Pages: 402, PDF Size: 37.54 MB
Page 33 of 402
Safety features of your vehicle
16 3
C020106AFD
Seat belts - Front passenger and rear
seat 3-point system with combination
locking retractor
To fasten your seat belt:
Combination retractor type seat belts are
installed in the rear seat positions to help
accommodate the installation of child
restraint systems. Although a combina-
tion retractor is also installed in the front
passenger seat position, it is strongly
recommended that children always be
seated in the rear seat. NEVER place
any infant restraint system in the front
seat of the vehicle.
This type of seat belt combines the fea-
tures of both an emergency locking
retractor seat belt and an automatic lock-
ing retractor seat belt. To fasten your seat
belt, pull it out of the retractor and insert
the metal tab into the buckle. There will
be an audible "click" when the tab locks
into the buckle. When not securing a
child restraint, the seat belt operates in
the same way as the driver's seat belt
(Emergency Locking Retractor Type). It
automatically adjusts to the proper length
only after the lap belt portion of the seat
belt is adjusted manually so that it fits
snugly around your hips.When the seat belt is fully extended from
the retractor to allow the installation of a
child restraint system, the seat belt oper-
ation changes to allow the belt to retract,
but not to extend (Automatic Locking
Retractor Type). Refer to “Using a child
restraint system” in this section.
✽ ✽
NOTICE
Although the combination retractor
provides the same level of protection for
seated passengers in either emergency
or automatic locking modes, it is recom-
mended that seated passengers use the
emergency locking feature for improved
convenience. The automatic locking
function is intended to facilitate child
restraint installation. To convert from
the automatic locking feature to the
emergency locking operation mode,
allow the unbuckled seat belt to fully
retract.
B200A02NF
WARNING
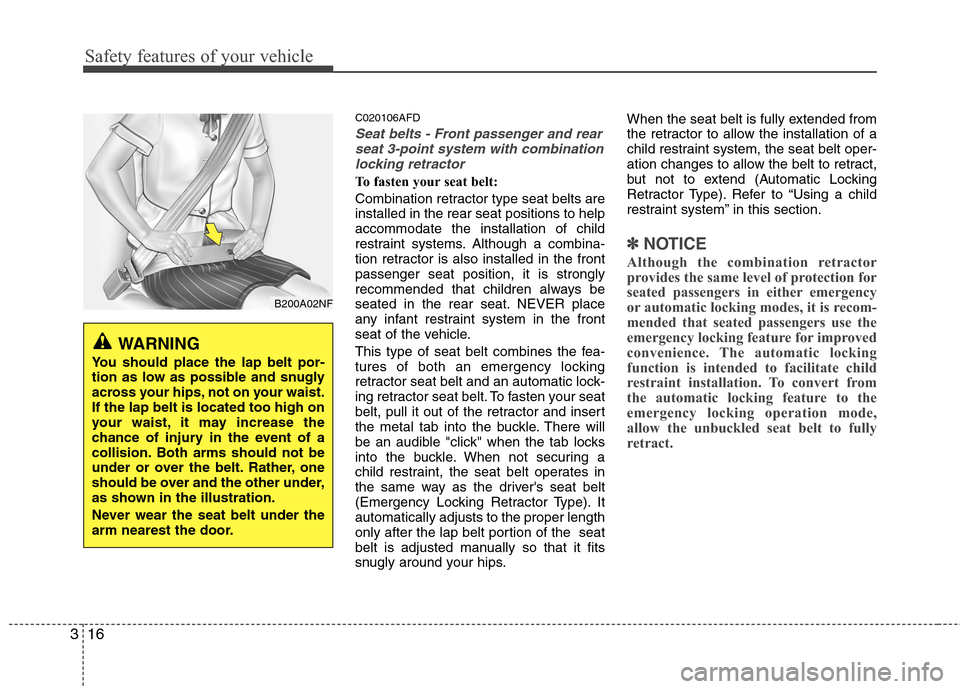
You should place the lap belt por-
tion as low as possible and snugly
across your hips, not on your waist.
If the lap belt is located too high on
your waist, it may increase the
chance of injury in the event of a
collision. Both arms should not be
under or over the belt. Rather, one
should be over and the other under,
as shown in the illustration.
Never wear the seat belt under the
arm nearest the door.
Page 79 of 402
43
Features of your vehicle
Remote keyless entry system
operations
D020101AFD-EU
Lock (1)
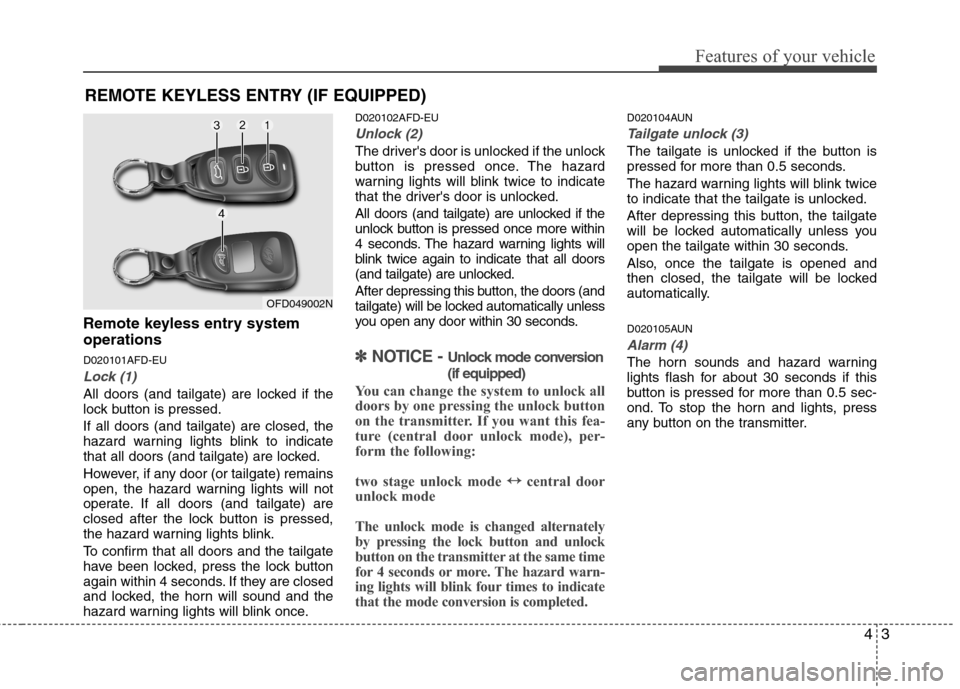
All doors (and tailgate) are locked if the
lock button is pressed.
If all doors (and tailgate) are closed, the
hazard warning lights blink to indicate
that all doors (and tailgate) are locked.
However, if any door (or tailgate) remains
open, the hazard warning lights will not
operate. If all doors (and tailgate) are
closed after the lock button is pressed,
the hazard warning lights blink.
To confirm that all doors and the tailgate
have been locked, press the lock button
again within 4 seconds. If they are closed
and locked, the horn will sound and the
hazard warning lights will blink once.
D020102AFD-EU
Unlock (2)
The driver's door is unlocked if the unlock
button is pressed once. The hazard
warning lights will blink twice to indicate
that the driver's door is unlocked.
All doors (and tailgate) are unlocked if the
unlock button is pressed once more within
4 seconds. The hazard warning lights will
blink twice again to indicate that all doors
(and tailgate) are unlocked.
After depressing this button, the doors (and
tailgate) will be locked automatically unless
you open any door within 30 seconds.
✽ ✽
NOTICE - Unlock mode conversion
(if equipped)
You can change the system to unlock all
doors by one pressing the unlock button
on the transmitter. If you want this fea-
ture (central door unlock mode), per-
form the following:
two stage unlock mode ↔ ↔
central door
unlock mode
The unlock mode is changed alternately
by pressing the lock button and unlock
button on the transmitter at the same time
for 4 seconds or more. The hazard warn-
ing lights will blink four times to indicate
that the mode conversion is completed.
D020104AUN
Tailgate unlock (3)
The tailgate is unlocked if the button is
pressed for more than 0.5 seconds.
The hazard warning lights will blink twice
to indicate that the tailgate is unlocked.
After depressing this button, the tailgate
will be locked automatically unless you
open the tailgate within 30 seconds.
Also, once the tailgate is opened and
then closed, the tailgate will be locked
automatically.
D020105AUN
Alarm (4)
The horn sounds and hazard warning
lights flash for about 30 seconds if this
button is pressed for more than 0.5 sec-
ond. To stop the horn and lights, press
any button on the transmitter.
REMOTE KEYLESS ENTRY (IF EQUIPPED)
OFD049002N
Page 83 of 402
47
Features of your vehicle
D050100AFD-EU
Operating door locks from out-
side the vehicle
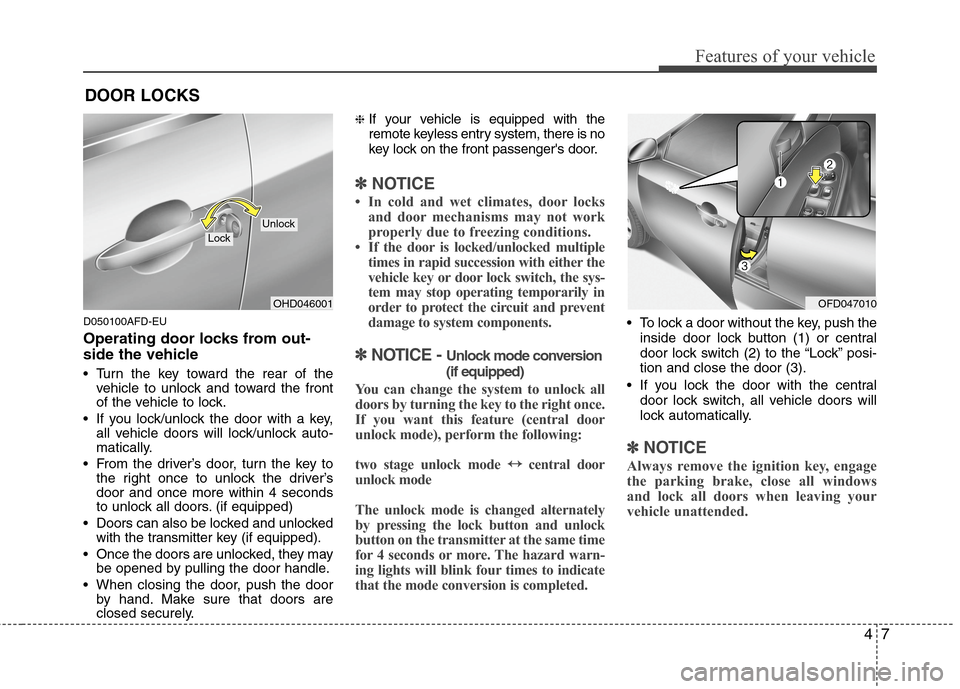
Turn the key toward the rear of the
vehicle to unlock and toward the front
of the vehicle to lock.
If you lock/unlock the door with a key,
all vehicle doors will lock/unlock auto-
matically.
From the driver’s door, turn the key to
the right once to unlock the driver’s
door and once more within 4 seconds
to unlock all doors. (if equipped)
Doors can also be locked and unlocked
with the transmitter key (if equipped).
Once the doors are unlocked, they may
be opened by pulling the door handle.
When closing the door, push the door
by hand. Make sure that doors are
closed securely.
❈If your vehicle is equipped with the
remote keyless entry system, there is no
key lock on the front passenger's door.
✽ ✽
NOTICE
• In cold and wet climates, door locks
and door mechanisms may not work
properly due to freezing conditions.
• If the door is locked/unlocked multiple
times in rapid succession with either the
vehicle key or door lock switch, the sys-
tem may stop operating temporarily in
order to protect the circuit and prevent
damage to system components.
✽ ✽
NOTICE - Unlock mode conversion
(if equipped)
You can change the system to unlock all
doors by turning the key to the right once.
If you want this feature (central door
unlock mode), perform the following:
two stage unlock mode ↔ ↔
central door
unlock mode
The unlock mode is changed alternately
by pressing the lock button and unlock
button on the transmitter at the same time
for 4 seconds or more. The hazard warn-
ing lights will blink four times to indicate
that the mode conversion is completed.
To lock a door without the key, push the
inside door lock button (1) or central
door lock switch (2
)to the “Lock” posi-
tion and close the door (3).
If you lock the door with the central
door lock switch, all vehicle doors will
lock automatically.
✽ ✽
NOTICE
Always remove the ignition key, engage
the parking brake, close all windows
and lock all doors when leaving your
vehicle unattended.
DOOR LOCKS
OHD046001
LockUnlock
OFD047010
Page 107 of 402
431
Features of your vehicle
Retain the original transmitter for future
programming procedures (i.e., new vehi-
cle purchase). It is also suggested that
upon the sale of the vehicle, the pro-
grammed HomeLink buttons be erased
for security purposes (follow step 1 in the
“Programming” portion of this text).
Programming
Your vehicle may require the ignition
switch to be turned to the ACC position
for programming and/or operation of
HomeLink. It is also recommended that a
new battery be replaced in the hand-held
transmitter of the device being pro-
grammed to HomeLink for quicker train-
ing and accurate transmission of the
radio-frequency.
Follow these steps to train your
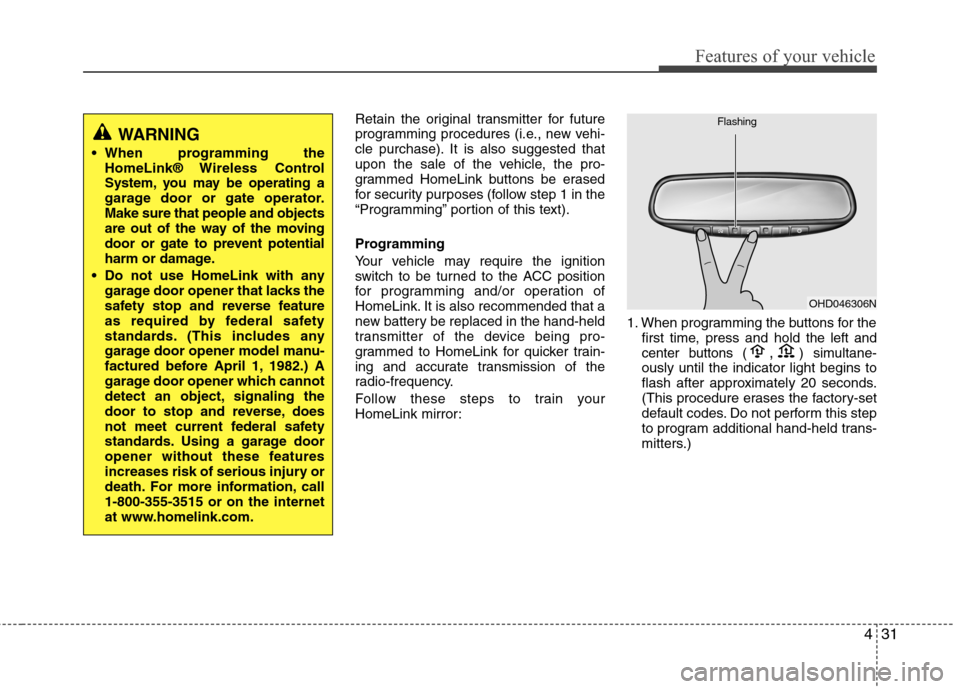
HomeLink mirror:1. When programming the buttons for the
first time, press and hold
the left and
center buttons (,)simultane-
ously until the indicator light begins to
flash after approximately 20 seconds.
(This procedure erases the factory-set
default codes. Do not perform this step
to program additional hand-held trans-
mitters.)
WARNING
When programming the
HomeLink® Wireless Control
System, you may be operating a
garage door or gate operator.
Make sure that people and objects
are out of the way of the moving
door or gate to prevent potential
harm or damage.
Do not use HomeLink with any
garage door opener that lacks the
safety stop and reverse feature
as required by federal safety
standards. (This includes any
garage door opener model manu-
factured before April 1, 1982.) A
garage door opener which cannot
detect an object, signaling the
door to stop and reverse, does
not meet current federal safety
standards. Using a garage door
opener without these features
increases risk of serious injury or
death. For more information, call
1-800-355-3515 or on the internet
at www.homelink.com.
OHD046306N Flashing
Page 109 of 402
433
Features of your vehicle
Operating HomeLink
To operate, simply press the pro-
grammed HomeLink button. Activation
will now occur for the trained product
(garage door, security system, entry door
lock, estate gate, or home or office light-
ing). For convenience, the hand-held
transmitter of the device may also be
used at any time. The HomeLink
Wireless Controls System (once pro-
grammed) or the original hand-held
transmitter may be used to activate the
device (e.g. garage door, entry door lock,
etc.). In the event that there are still pro-
gramming difficulties, contact HomeLink
at 1-800-355-3515 or on the internet at
www.homelink.com.Erasing programmed HomeLink but-
tons
To erase the three programmed buttons
(individual buttons cannot be erased):
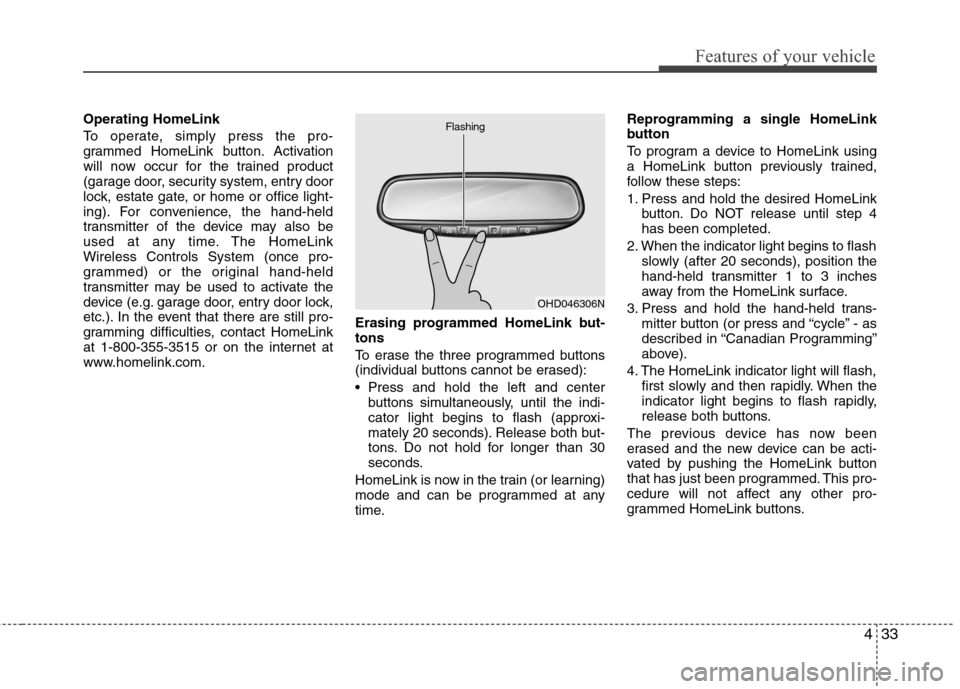
Press and hold the left and center
buttons simultaneously, until the indi-
cator light begins to flash (approxi-
mately 20 seconds). Release both but-
tons. Do not hold for longer than 30
seconds.
HomeLink is now in the train (or learning)
mode and can be programmed at any
time.Reprogramming a single HomeLink
button
To program a device to HomeLink using
a HomeLink button previously trained,
follow these steps:
1. Press and hold the desired HomeLink
button. Do NOT release until step 4
has been completed.
2. When the indicator light begins to flash
slowly (after 20 seconds), position the
hand-held transmitter 1 to 3 inches
away from the HomeLink surface.
3. Press and hold the hand-held trans-
mitter button (or press and “cycle” - as
described in “Canadian Programming”
above).
4. The HomeLink indicator light will flash,
first slowly and then rapidly. When the
indicator light begins to flash rapidly,
release both buttons.
The previous device has now been
erased and the new device can be acti-
vated by pushing the HomeLink button
that has just been programmed. This pro-
cedure will not affect any other pro-
grammed HomeLink buttons.
OHD046306N Flashing
Page 118 of 402
Features of your vehicle
42 4
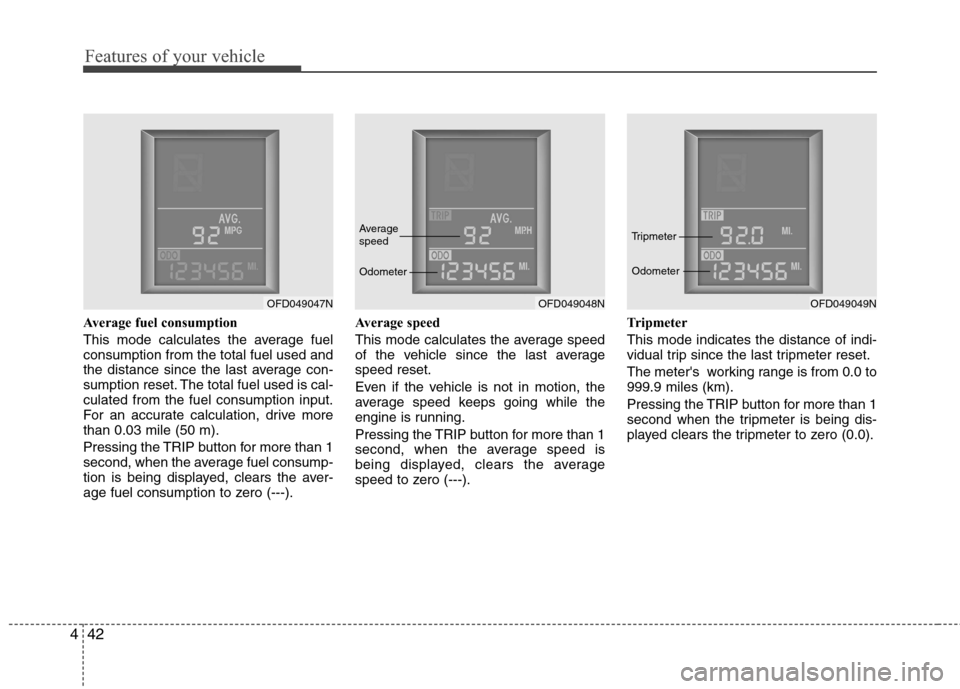
Average fuel consumption
This mode calculates the average fuel
consumption from the total fuel used and
the distance since the last average con-
sumption reset. The total fuel used is cal-
culated from the fuel consumption input.
For an accurate calculation, drive more
than 0.03 mile (50 m).
Pressing the TRIP button for more than 1
second, when the average fuel consump-
tion is being displayed, clears the aver-
age fuel consumption to zero (---).Average speed
This mode calculates the average speed
of the vehicle since the last average
speed reset.
Even if the vehicle is not in motion, the
average speed keeps going while the
engine is running.
Pressing the TRIP button for more than 1
second, when the average speed is
being displayed, clears the average
speed to zero (---).Tripmeter
This mode indicates the distance of indi-
vidual trip since the last tripmeter reset.
The meter's working range is from 0.0 to
999.9 miles (km).
Pressing the TRIP button for more than 1
second when the tripmeter is being dis-
played clears the tripmeter to zero (0.0).
OFD049047NOFD049048N Average
speed
OdometerOFD049049N Tripmeter
Odometer
Page 125 of 402
449
Features of your vehicle
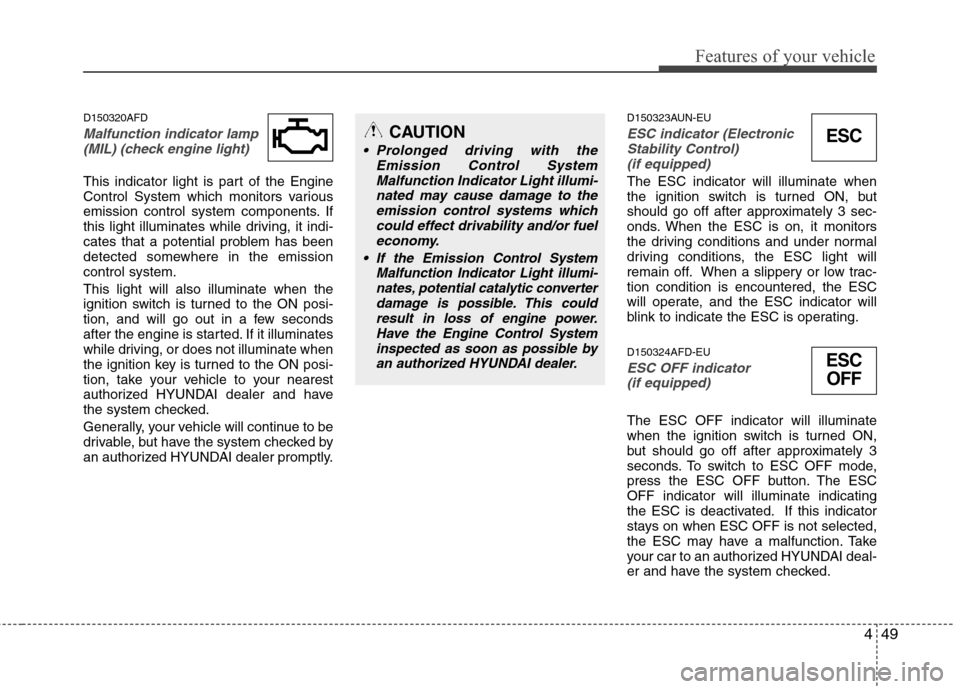
D150320AFD
Malfunction indicator lamp
(MIL) (check engine light)
This indicator light is part of the Engine
Control System which monitors various
emission control system components. If
this light illuminates while driving, it indi-
cates that a potential problem has been
detected somewhere in the emission
control system.
This light will also illuminate when the
ignition switch is turned to the ON posi-
tion, and will go out in a few seconds
after the engine is started. If it illuminates
while driving, or does not illuminate when
the ignition key is turned to the ON posi-
tion, take your vehicle to your nearest
authorized HYUNDAI dealer and have
the system checked.
Generally, your vehicle will continue to be
drivable, but have the system checked by
an authorized HYUNDAI dealer promptly.
D150323AUN-EU
ESC indicator (Electronic
Stability Control)
(if equipped)
The ESC indicator will illuminate when
the ignition switch is turned ON, but
should go off after approximately 3 sec-
onds. When the ESC is on, it monitors
the driving conditions and under normal
driving conditions, the ESC light will
remain off. When a slippery or low trac-
tion condition is encountered, the ESC
will operate, and the ESC indicator will
blink to indicate the ESC is operating.
D150324AFD-EU
ESC OFF indicator
(if equipped)
The ESC OFF indicator will illuminate
when the ignition switch is turned ON,
but should go off after approximately 3
seconds. To switch to ESC OFF mode,
press the ESC OFF button. The ESC
OFF indicator will illuminate indicating
the ESC is deactivated. If this indicator
stays on when ESC OFF is not selected,
the ESC may have a malfunction. Take
your car to an authorized HYUNDAI deal-
er and have the system checked.
CAUTION
Prolonged driving with the
Emission Control System
Malfunction Indicator Light illumi-
nated may cause damage to the
emission control systems which
could effect drivability and/or fuel
economy.
If the EmissionControl System
Malfunction Indicator Light illumi-
nates, potential catalytic converter
damage is possible. This could
result in loss of engine power.
Have the Engine Control System
inspected as soon as possible by
an authorized HYUNDAI dealer.
ESC
ESC
OFF
Page 149 of 402
473
Features of your vehicle
Air conditioning system operation tips
If the vehicle has been parked in direct
sunlight during hot weather, open the
windows for a short time to let the hot
air inside the vehicle escape.
To help reduce moisture inside of the
windows on rainy or humid days,
decrease the humidity inside the vehi-
cle by operating the air conditioning
system.
During air conditioning system opera-
tion, you may occasionally notice a
slight change in engine speed as the
air conditioning compressor cycles.
This is a normal system operation
characteristic.
Use the air conditioning system every
month if only for a few minutes to
ensure maximum system perform-
ance.
When using the air conditioning sys-
tem, you may notice clear water drip-
ping (or even puddling) on the ground
under the passenger side of the vehi-
cle. This is a normal system operation
characteristic.
Operating the air conditioning system
in the recirculated air position provides
maximum cooling, however, continual
operation in this mode may cause the
air inside the vehicle to become stale. During cooling operation, you may
occasionally notice a misty air flow
because of rapid cooling and humid air
intake. This is a normal system opera-
tion characteristic.
D230300AFD
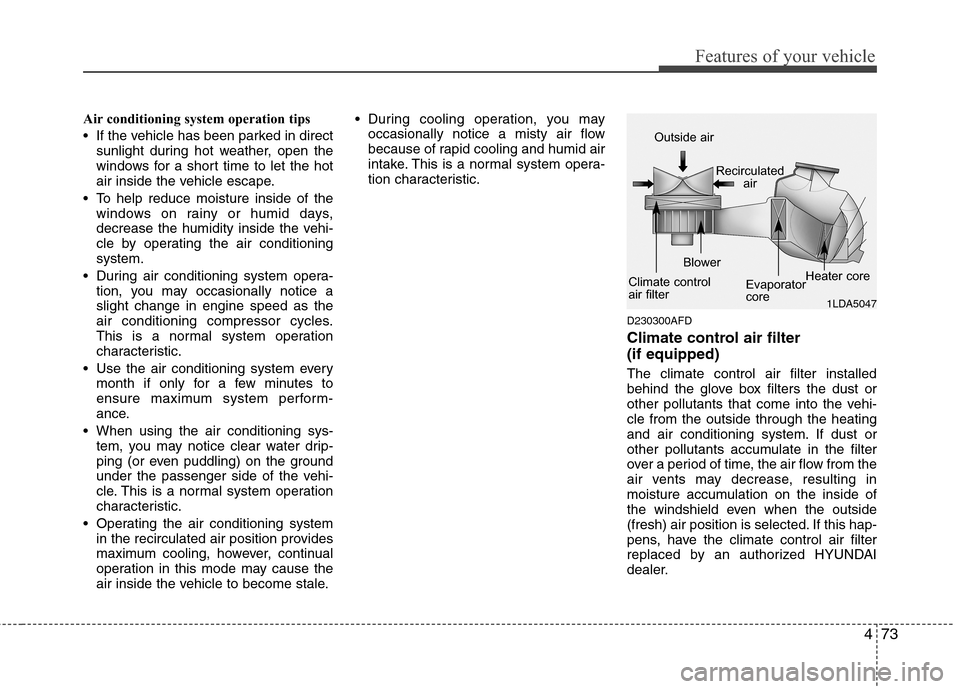
Climate control air filter
(if equipped)
The climate control air filter installed
behind the glove box filters the dust or
other pollutants that come into the vehi-
cle from the outside through the heating
and air conditioning system. If dust or
other pollutants accumulate in the filter
over a period of time, the air flow from the
air vents may decrease, resulting in
moisture accumulation on the inside of
the windshield even when the outside
(fresh) air position is selected. If this hap-
pens, have the climate control air filter
replaced by an authorized HYUNDAI
dealer.
1LDA5047
Outside air
Recirculated
air
Climate control
air filterBlower
Evaporator
coreHeater core
Page 155 of 402

479
Features of your vehicle
D240202AFD-EU
Temperature control
The temperature will increase to the
maximum (HI) by turning the knob to the
right extremely.
The temperature will decrease to the
minimum (Lo) by turning the knob to the
left extremely.
When turning the knob, the temperature
will increase or decrease by 1°F/0.5°C.
When set to the lowest temperature set-
ting, the air conditioning will operate con-
tinuously.Temperature conversion
If the battery has been discharged or dis-
connected, the temperature mode dis-
play will reset to Fahrenheit.
This is normal condition. You can switch
the temperature mode between
Centigrade to Fahrenheit as follows;
While depressing the AUTO button,
depress the OFF button for 3 seconds or
more. The display will change from
Fahrenheit to Centigrade, or from
Centigrade to Fahrenheit.
D240203AFD-EU
Air intake control
This is used to select outside (fresh) air
position or recirculated air position.
To change the air intake control position,
push the control button.
OFD047107OFD047109
Page 160 of 402
Features of your vehicle
84 4
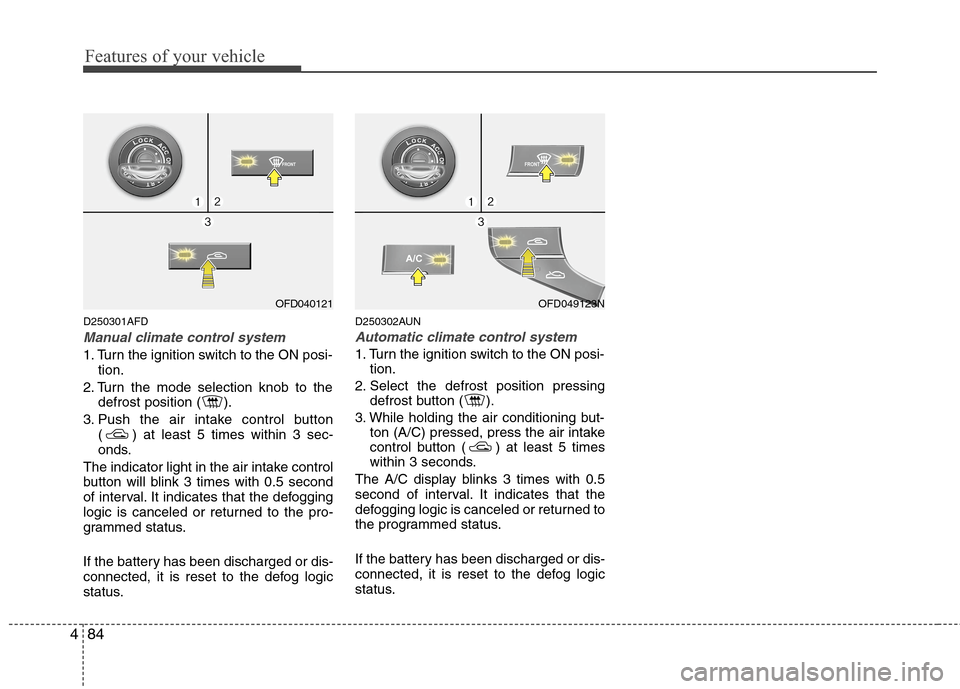
D250301AFD
Manual climate control system
1. Turn the ignition switch to the ON posi-
tion.
2. Turn the mode selection knob to the
defrost position ( ).
3. Push the air intake control button
( ) at least 5 times within 3 sec-
onds.
The indicator light in the air intake control
button will blink 3 times with 0.5 second
of interval. It indicates that the defogging
logic is canceled or returned to the pro-
grammed status.
If the battery has been discharged or dis-
connected, it is reset to the defog logic
status.
D250302AUN
Automatic climate control system
1. Turn the ignition switch to the ON posi-
tion.
2. Select the defrost position pressing
defrost button ( ).
3. While holding the air conditioning but-
ton (A/C) pressed, press the air intake
control button ( ) at least 5 times
within 3 seconds.
The A/C display blinks 3 times with 0.5
second of interval. It indicates that the
defogging logic is canceled or returned to
the programmed status.
If the battery has been discharged or dis-
connected, it is reset to the defog logic
status.
OFD040121OFD049123N