clock reset Hyundai Elantra Touring 2011 Owner's Manual
[x] Cancel search | Manufacturer: HYUNDAI, Model Year: 2011, Model line: Elantra Touring, Model: Hyundai Elantra Touring 2011Pages: 402, PDF Size: 37.54 MB
Page 168 of 402
Features of your vehicle
92 4
D280600AEN
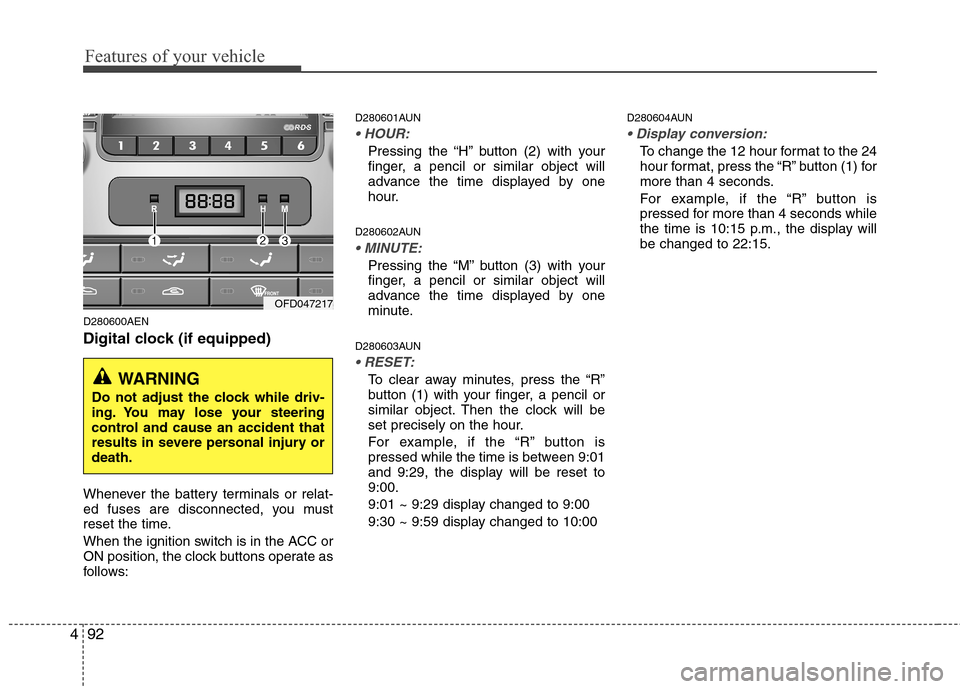
Digital clock (if equipped)
Whenever the battery terminals or relat-
ed fuses are disconnected, you must
reset the time.
When the ignition switch is in the ACC or
ON position, the clock buttons operate as
follows:
D280601AUN
Pressing the “H” button (2) with your
finger, a pencil or similar object will
advance the time displayed by one
hour.
D280602AUN
Pressing the “M” button (3) with your
finger, a pencil or similar object will
advance the time displayed by one
minute.
D280603AUN
To clear away minutes, press the “R”
button (1) with your finger, a pencil or
similar object. Then the clock will be
set precisely on the hour.
For example, if the “R” button is
pressed while the time is between 9:01
and 9:29, the display will be reset to
9:00.
9:01 ~ 9:29 display changed to 9:00
9:30 ~ 9:59 display changed to 10:00
D280604AUN
To change the 12 hour format to the 24
hour format, press the “R” button (1) for
more than 4 seconds.
For example, if the “R” button is
pressed for more than 4 seconds while
the time is 10:15 p.m., the display will
be changed to 22:15.
OFD047217
WARNING
Do not adjust the clock while driv-
ing. You may lose your steering
control and cause an accident that
results in severe personal injury or
death.
Page 181 of 402
4105
Features of your vehicle
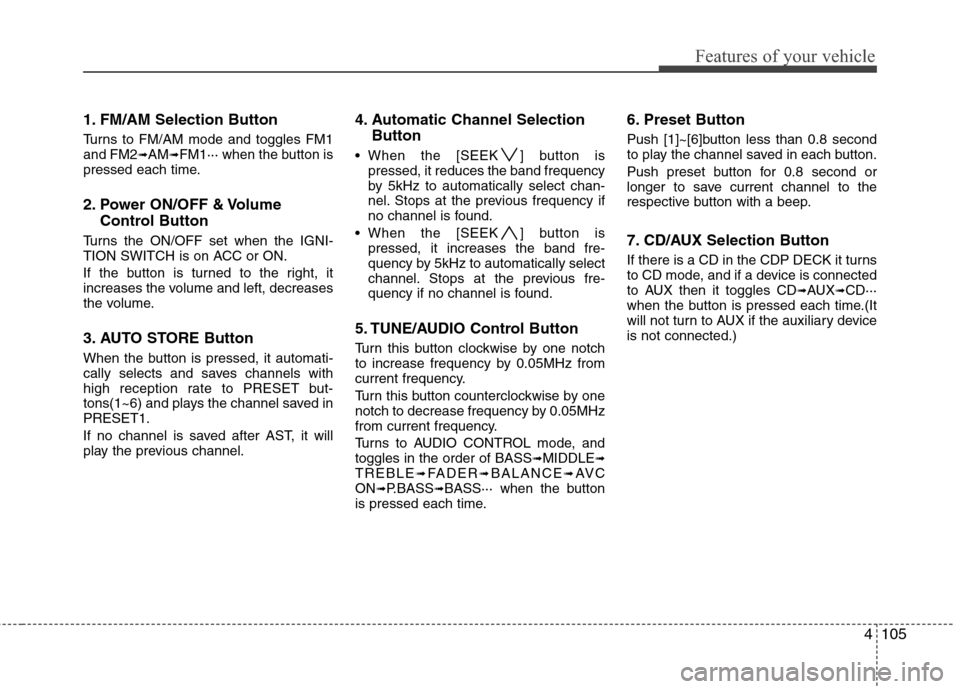
1. FM/AM Selection Button
Turns to FM/AM mode and toggles FM1
and FM2➟AM➟FM1··· when the button is
pressed each time.
2. Power ON/OFF & Volume
Control Button
Turns the ON/OFF set when the IGNI-
TION SWITCH is on ACC or ON.
If the button is turned to the right, it
increases the volume and left, decreases
the volume.
3. AUTO STORE Button
When the button is pressed, it automati-
cally selects and saves channels with
high reception rate to PRESET but-
tons(1~6) and plays the channel saved in
PRESET1.
If no channel is saved after AST, it will
play the previous channel.
4. Automatic Channel Selection
Button
When the [SEEK ] button is
pressed, it reduces the band frequency
by 5kHz to automatically select chan-
nel. Stops at the previous frequency if
no channel is found.
When the [SEEK ] button is
pressed, it increases the band fre-
quency by 5kHz to automatically select
channel. Stops at the previous fre-
quency if no channel is found.
5. TUNE/AUDIO Control Button
Turn this button clockwise by one notch
to increase frequency by 0.05MHz from
current frequency.
Turn this button counterclockwise by one
notch to decrease frequency by 0.05MHz
from current frequency.
Turns to AUDIO CONTROL mode, and
toggles in the order of BASS
➟MIDDLE➟TREBLE➟FADER➟BALANCE➟AV C
ON➟P.BASS➟BASS··· when the button
is pressed each time.
6. Preset Button
Push [1]~[6]button less than 0.8 second
to play the channel saved in each button.
Push preset button for 0.8 second or
longer to save current channel to the
respective button with a beep.
7. CD/AUX Selection Button
If there is a CD in the CDP DECK it turns
to CD mode, and if a device is connected
to AUX then it toggles CD
➟AUX➟CD···
when the button is pressed each time.(It
will not turn to AUX if the auxiliary device
is not connected.)
Page 184 of 402
Features of your vehicle
108 4
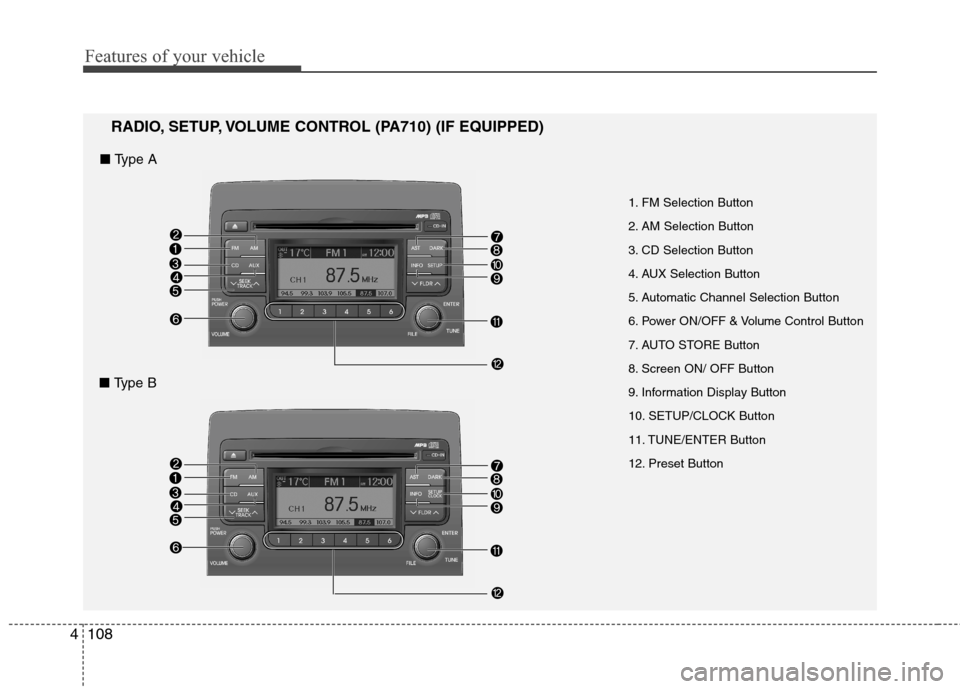
1. FM Selection Button
2. AM Selection Button
3. CD Selection Button
4. AUX Selection Button
5. Automatic Channel Selection Button
6. Power ON/OFF & VolumeControl Button
7. AUTO STORE Button
8. Screen ON/ OFF Button
9. Information Display Button
10. SETUP/CLOCK Button
11. TUNE/ENTER Button
12. Preset Button
RADIO, SETUP, VOLUME CONTROL (PA710) (IF EQUIPPED)
■ Type A
■ Type B
Page 186 of 402

Features of your vehicle
110 4
10. SETUP/CLOCK Button
Press this button to turn to the SOUND,
clock setting, time display, SCROLL,
SDVC, temperature display and adjust-
ment mode.
If no action is taken for 5 seconds after
pressing the button, it will return to the
play mode.(After entering SETUP mode,
move between items using the left, right
and PUSH functions of the TUNE button.)
The setup item changes from AUDIO
➟CLOCK➟TIME➟SCROLL➟SDVC➟TEMP➟P.BASS➟AUDIO...
11. TUNE/ENTER Button
Turn this button clockwise by one notch
to increase frequency by 0.05MHz from
current frequency.
Turn this button counterclockwise by one
notch to decrease frequency by 0.05MHz
from current frequency.
Press this button while holding SETUP
button to activate / inactivate the item to.
Select SETUP item using left and right
function of the Tune button.
12. Preset Button
Push [1]~[6] buttons less than 0.8 second
to play the channel saved in each button.
Push preset button for 0.8 second or
longer to save current channel to the
respective button with a beep.
Page 197 of 402
4121
Features of your vehicle
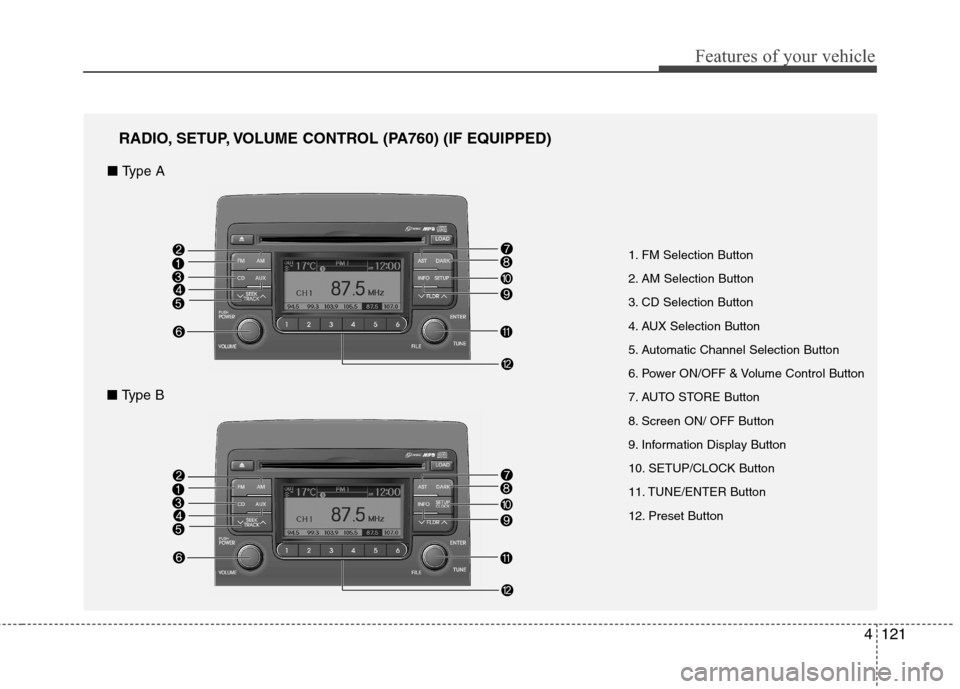
1. FM Selection Button
2. AM Selection Button
3. CD Selection Button
4. AUX Selection Button
5. Automatic Channel Selection Button
6. Power ON/OFF & Volume Control Button
7. AUTO STORE Button
8. Screen ON/ OFF Button
9. Information Display Button
10. SETUP/CLOCK Button
11. TUNE/ENTER Button
12. Preset Button
RADIO, SETUP, VOLUME CONTROL (PA760) (IF EQUIPPED)
■ Type A
■ Type B
Page 199 of 402
4123
Features of your vehicle
10. SETUP/CLOCK Button
Press this button to turn to the SOUND,
clock setting, time display, SCROLL,
SDVC, temperature display and adjust-
ment mode.
If no action is taken for 5 seconds after
pressing the button, it will return to the
play mode.(After entering SETUP mode,
move between items using the left, right
and PUSH functions of the TUNE button.)
The setup item changes from AUDIO
➟CLOCK➟TIME➟SCROLL➟SDVC➟TEMP➟AUDIO...
11. TUNE/ENTER Button
Turn this button clockwise by one notch
to increase frequency by 0.05MHz from
current frequency.
Turn this button counterclockwise by one
notch to decrease frequency by 0.05MHz
from current frequency.
Press this button while holding SETUP
button to activate / inactivate the item to.
Select SETUP item using left and right
function of the Tune button.
12. Preset Button
Push [1]~[6] buttons less than 0.8 second
to play the channel saved in each button.
Push preset button for 0.8 second or
longer to save current channel to the
respective button with a beep.
Page 210 of 402
Features of your vehicle
134 4
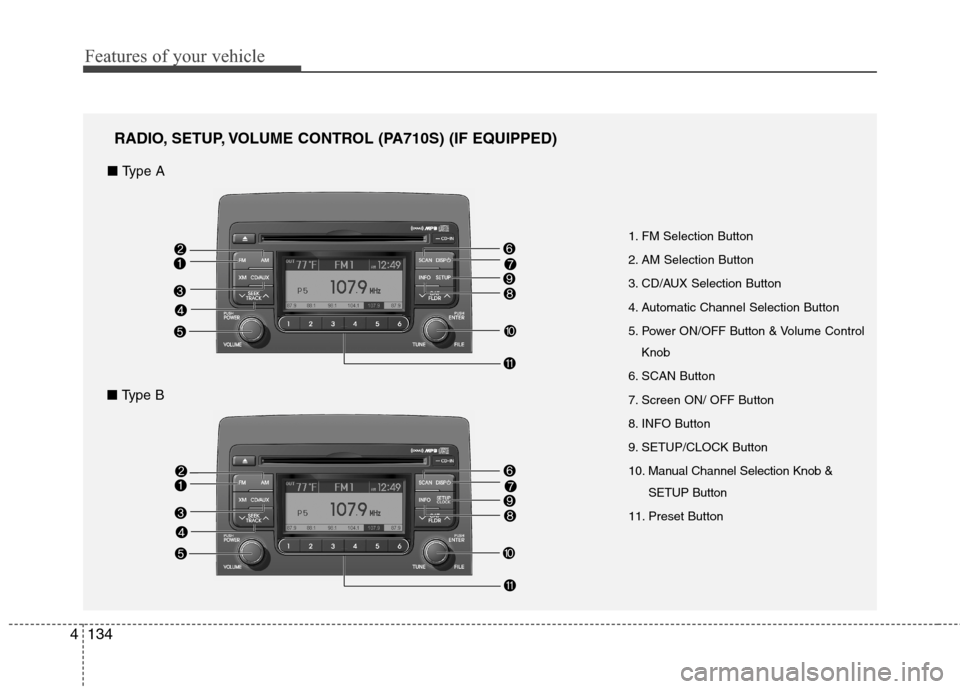
1. FM Selection Button
2. AM Selection Button
3. CD/AUX Selection Button
4. Automatic Channel Selection Button
5. Power ON/OFF Button & Volume Control
Knob
6. SCAN Button
7. Screen ON/ OFF Button
8. INFO Button
9. SETUP/CLOCK Button
10. Manual Channel Selection Knob &
SETUP Button
11. Preset Button
RADIO, SETUP, VOLUME CONTROL (PA710S) (IF EQUIPPED)
■ Type A
■ Type B
Page 212 of 402
Features of your vehicle
136 4
9. SETUP/CLOCKButton
Press this button to turn to the SOUND,
XM setting, clock setting, time display,
SCROLL, SDVC, temperature display
and adjustment mode.
If no action is taken for 5 seconds after
pressing the button, it will return to the play
mode.(After entering SETUP mode, move
between items using the left, right and
PUSH functions of the [TUNE] button.)
The setup item changes from AUDIO
➟XM➟CLOCK➟TIME➟SCROLL➟SDVC➟TEMP➟P.BASS➟AUDIO
10. Manual Channel Selection
Knob & SETUP Button
Turn this button clockwise by one notch
to increase frequency by 0.2MHz from
current frequency.
Turn this button counterclockwise by one
notch to decrease frequency by 0.2MHz
from current frequency.
11. Preset Button
Push [1]~[6] buttons less than 0.8 second
to play the channel saved in each button.
Push [PRESET] button for 0.8 second or
longer to save current channel to the
respective button with a beep.
Page 224 of 402
Features of your vehicle
148 4
1. XM Selection Button
Turns to XM Satellite Radio Mode. XM
mode toggles in order to XM1 ➟ XM2 ➟XM3 ➟ XM1... when the button is pressed
each time.
2. INFO Button
Displays the information of the current
channel in the order of Artist/Song title ➟Category/Channel name ➟ Current Play
Channel ➟ Artist/Song title ➟ Category/
Channel name... when the button is
pressed each time. If can not display the
whole text information, rotate the tune
button to see the next page.
3. Automatic Channel Selection
Button
Push [SEEK ] button for less than
0.8 second to select previous channel.
Push [SEEK ] button for 0.8 second
or longer to continuously move to pre-
vious channel.
Push [SEEK ] button for less than
0.8 second to select next channel.
Push [SEEK ] button for 0.8 second
or longer to contiuously move to next
channel.
Radio ID : Seek or Tune to XM channel
0 to display the Radio ID.
4. SCAN Button
Press to hear a brief sampling of all
channel. To cancel the scan mode, press
the button once again.
5. CATEGORY Search Button
Push [CAT ] button to search previ-
ous category.
Push [CAT ] button to search next
category. To listen to the displayed cate-
gory, press the TUNE/ENTER knob. To
scan channel in displayed category,
press the [SCAN] button. To search
channel in displayed category, press
[SEEK] buttons or turn the [TUNE] knob
clockwise/counterclockwise.(CATEGO-
RY icon is will be turned on in Category
mode)
6. Manual Channel Selection
Button
While listening to XM broadcast, rotate
this control to the right or left to search
other channels while listening to current
channel. (Turn to the right to searchhigh-
er channels and left, lower channels)
7. Preset Button
Push [1]~[6] buttons less than 0.8 sec-
ond to play the channel saved in each
button. Push [PRESET] button for 0.8
second or longer to save current channel
to the respective button with a beep.
Page 225 of 402
4149
Features of your vehicle
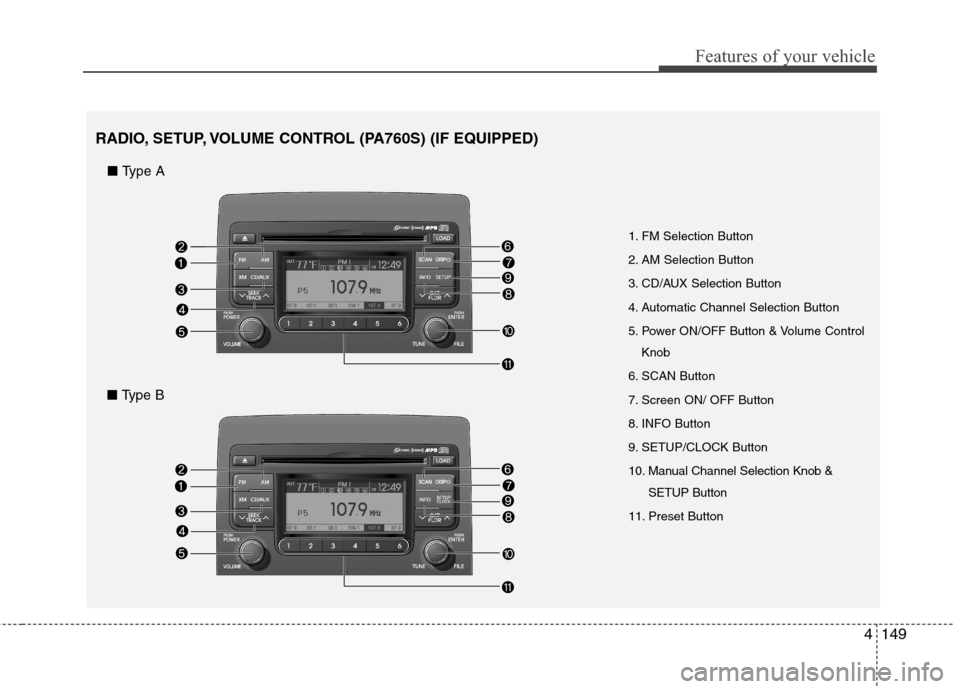
1. FM Selection Button
2. AM Selection Button
3. CD/AUX Selection Button
4. Automatic Channel Selection Button
5. Power ON/OFF Button & Volume Control
Knob
6. SCAN Button
7. Screen ON/ OFF Button
8. INFO Button
9. SETUP/CLOCK Button
10. Manual Channel Selection Knob &
SETUP Button
11. Preset Button
RADIO, SETUP, VOLUME CONTROL (PA760S) (IF EQUIPPED)
■ Type A
■ Type B