low beam Hyundai Elantra Touring 2011 Owner's Manual
[x] Cancel search | Manufacturer: HYUNDAI, Model Year: 2011, Model line: Elantra Touring, Model: Hyundai Elantra Touring 2011Pages: 402, PDF Size: 37.54 MB
Page 13 of 402
Introduction
6 1
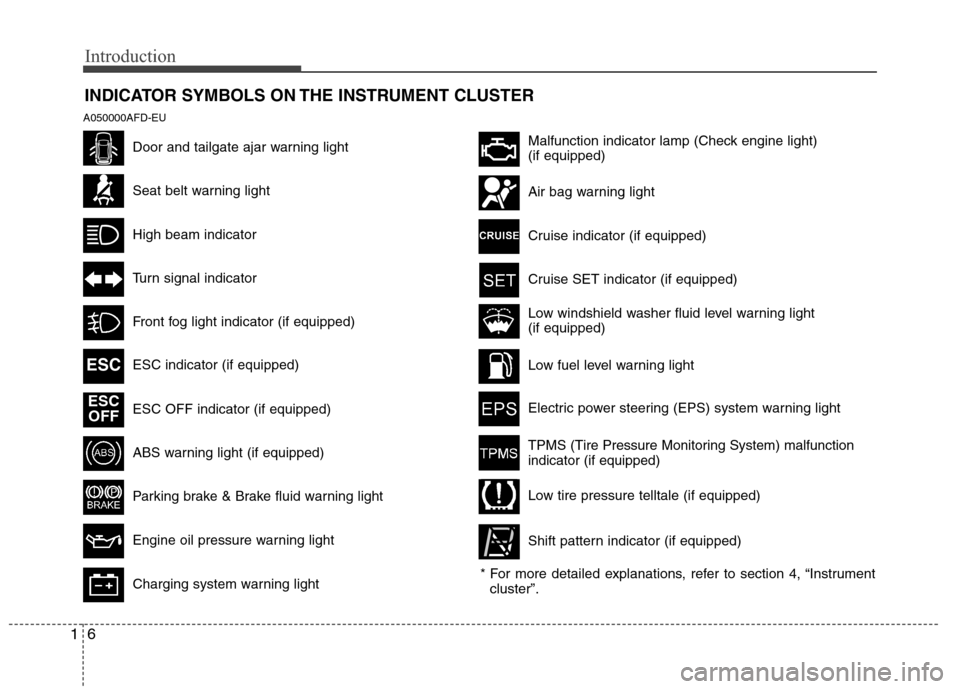
INDICATOR SYMBOLS ON THE INSTRUMENT CLUSTER
A050000AFD-EU
Door and tailgate ajar warning light
Seat belt warning light
High beam indicator
Turn signal indicator
Front fog light indicator (if equipped)
ESC indicator (if equipped)
ABS warning light (if equipped)
Parking brake & Brake fluid warning light
Engine oil pressure warning light
Charging system warning light ESC OFF indicator (if equipped)
Malfunction indicator lamp (Check engine light)
(if equipped)
Air bag warning light
Cruise indicator (if equipped)
Cruise SET indicator (if equipped)
Low fuel level warning light
Electric power steering (EPS) system warning light
Low windshield washer fluid level warning light
(if equipped)
* For more detailed explanations, refer to section 4, “Instrument
cluster”.
TPMS (Tire Pressure Monitoring System) malfunction
indicator (if equipped)
Low tire pressure telltale (if equipped)
Shift pattern indicator (if equipped)
ESC
ESC
OFF
Page 121 of 402
445
Features of your vehicle
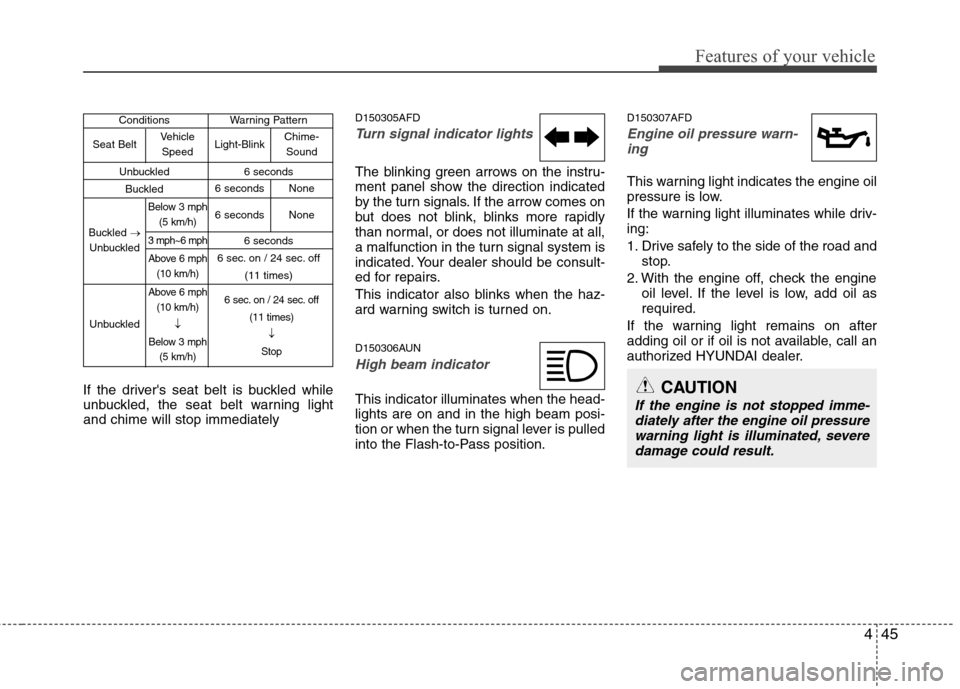
If the driver's seat belt is buckled while
unbuckled, the seat belt warning light
and chime will stop immediately
D150305AFD
Turn signal indicator lights
The blinking green arrows on the instru-
ment panel show the direction indicated
by the turn signals. If the arrow comes on
but does not blink, blinks more rapidly
than normal, or does not illuminate at all,
a malfunction in the turn signal system is
indicated. Your dealer should be consult-
ed for repairs.
This indicator also blinks when the haz-
ard warning switch is turned on.
D150306AUN
High beam indicator
This indicator illuminates when the head-
lights are on and in the high beam posi-
tion or when the turn signal lever is pulled
into the Flash-to-Pass position.
D150307AFD
Engine oil pressure warn-
ing
This warning light indicates the engine oil
pressure is low.
If the warning light illuminates while driv-
ing:
1. Drive safely to the side of the road and
stop.
2. With the engine off, check the engine
oil level. If the level is low, add oil as
required.
If the warning light remains on after
adding oil or if oil is not available, call an
authorized HYUNDAI dealer.
CAUTION
If the engine is not stopped imme-
diately after the engine oil pressure
warning light is illuminated, severe
damage could result.
Conditions Warning Pattern
Unbuckled 6 seconds
Buckled
6 seconds
6 sec. on / 24 sec. off
(11 times)
Seat Belt
Buckled →
Unbuckled
UnbuckledVehicle
Speed
Below 3 mph
(5 km/h)
3 mph~6 mph
Above 6 mph
(10 km/h)
Above 6 mph
(10 km/h)
↓
Below 3 mph
(5 km/h)6 sec. on / 24 sec. off
(11 times)↓
Stop
Light-Blink
6 seconds None
6 seconds NoneChime-
Sound
Page 132 of 402
Features of your vehicle
56 4
D190403AUN
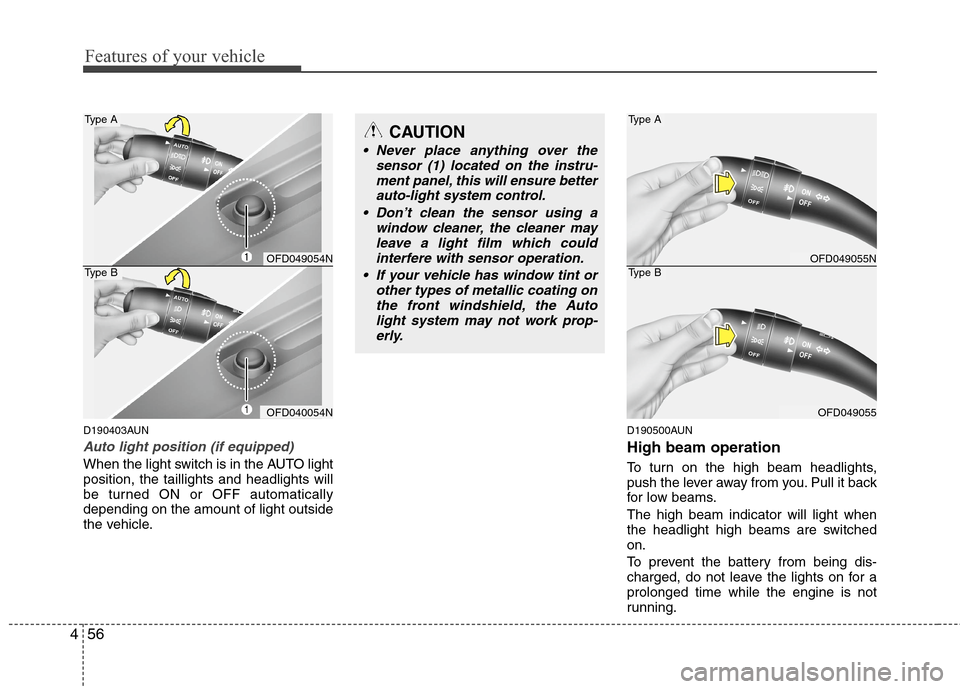
Auto light position (if equipped)
When the light switch is in the AUTO light
position, the taillights and headlights will
be turned ON or OFF automatically
depending on the amount of light outside
the vehicle.
D190500AUN
High beam operation
To turn on the high beam headlights,
push the lever away from you. Pull it back
for low beams.
The high beam indicator will light when
the headlight high beams are switched
on.
To prevent the battery from being dis-
charged, do not leave the lights on for a
prolonged time while the engine is not
running.
CAUTION
Never place anything over the
sensor (1) located on the instru-
ment panel, this will ensure better
auto-light system control.
Don’t clean the sensor using a
window cleaner, the cleaner may
leave a light film which could
interfere with sensor operation.
If your vehicle has window tint or
other types of metallic coating on
the front windshield, the Auto
light system may not work prop-
erly.
OFD049055N
OFD049055
Type A
Type BOFD049054N
OFD040054N
Type A
Type B
Page 133 of 402
457
Features of your vehicle
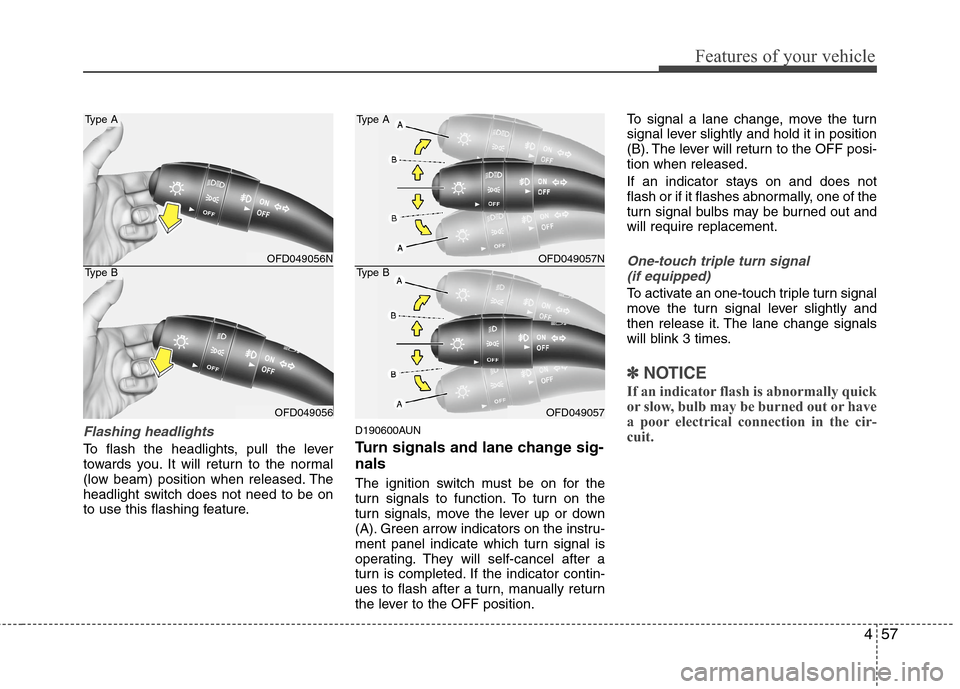
Flashing headlights
To flash the headlights, pull the lever
towards you. It will return to the normal
(low beam) position when released. The
headlight switch does not need to be on
to use this flashing feature.
D190600AUN
Turn signals and lane change sig-
nals
The ignition switch must be on for the
turn signals to function. To turn on the
turn signals, move the lever up or down
(A). Green arrow indicators on the instru-
ment panel indicate which turn signal is
operating. They will self-cancel after a
turn is completed. If the indicator contin-
ues to flash after a turn, manually return
the lever to the OFF position.To signal a lane change, move the turn
signal lever slightly and hold it in position
(B). The lever will return to the OFF posi-
tion when released.
If an indicator stays on and does not
flash or if it flashes abnormally, one of the
turn signal bulbs may be burned out and
will require replacement.
One-touch triple turn signal
(if equipped)
To activate an one-touch triple turn signal
move the turn signal lever slightly and
then release it. The lane change signals
will blink 3 times.
✽ ✽
NOTICE
If an indicator flash is abnormally quick
or slow, bulb may be burned out or have
a poor electrical connection in the cir-
cuit.
OFD049056N
OFD049056
Type A
Type BOFD049057N
OFD049057
Type A
Type B
Page 369 of 402
Maintenance
54 7
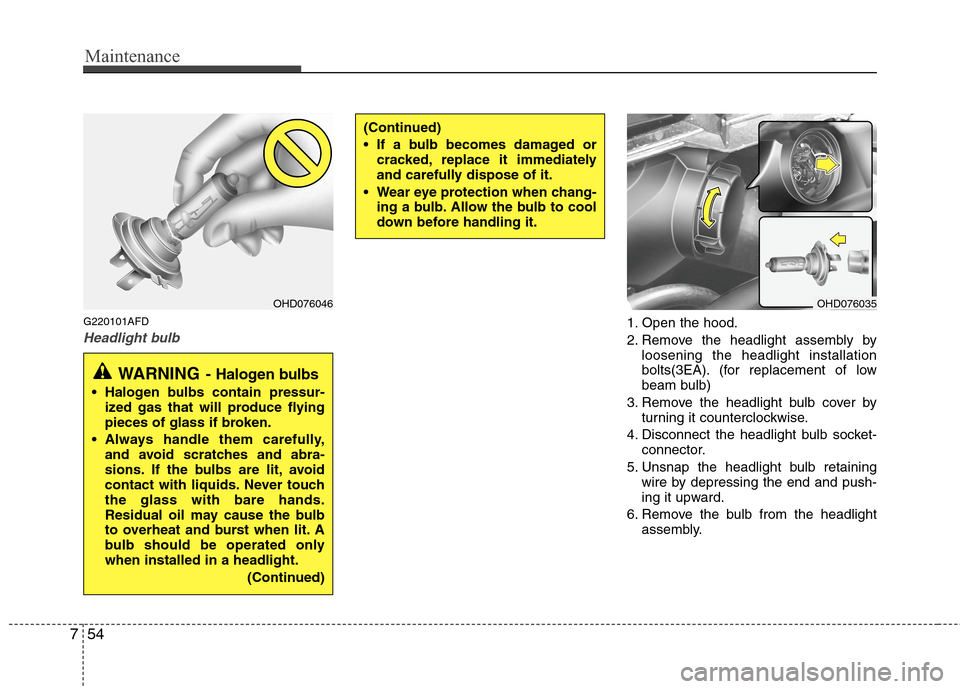
G220101AFD
Headlight bulb1. Open the hood.
2. Remove the headlight assembly by
loosening the headlight installation
bolts(3EA). (for replacement of low
beam bulb)
3. Remove the headlight bulb cover by
turning it counterclockwise.
4. Disconnect the headlight bulb socket-
connector.
5. Unsnap the headlight bulb retaining
wire by depressing the end and push-
ing it upward.
6. Remove the bulb from the headlight
assembly.
OHD076046
WARNING- Halogen bulbs
Halogen bulbs contain pressur-
ized gas that will produce flying
pieces of glass if broken.
Always handle them carefully,
and avoid scratches and abra-
sions. If the bulbs are lit, avoid
contact with liquids. Never touch
the glass with bare hands.
Residual oil may cause the bulb
to overheat and burst when lit. A
bulb should be operated only
when installed in a headlight.
(Continued)
(Continued)
If a bulb becomes damaged or
cracked, replace it immediately
and carefully dispose of it.
Wear eye protection when chang-
ing a bulb. Allow the bulb to cool
down before handling it.
OHD076035
Page 370 of 402
755
Maintenance
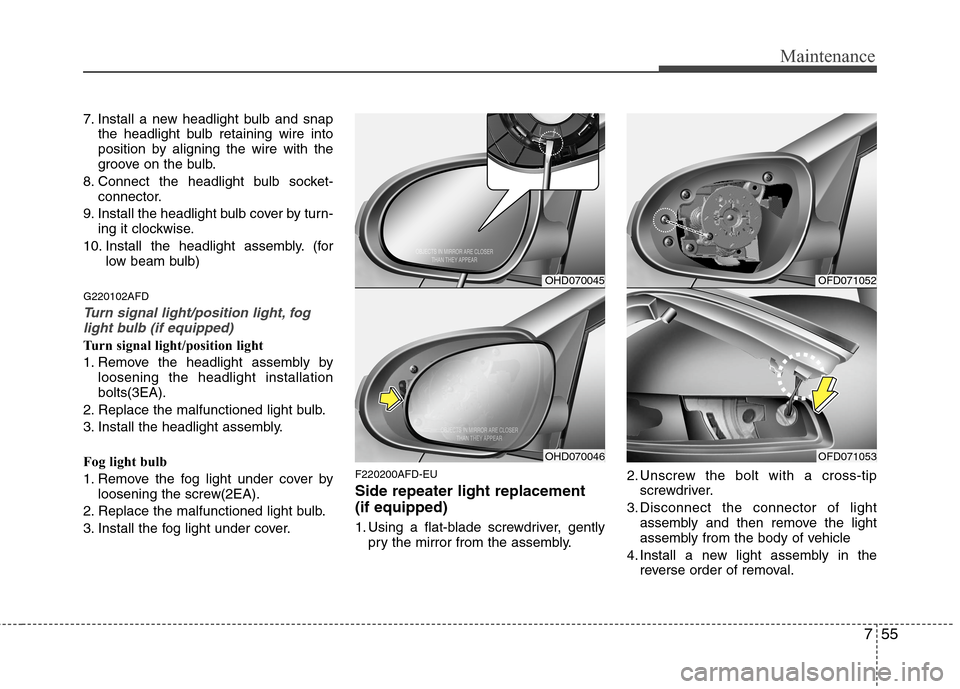
7. Install a new headlight bulb and snap
the headlight bulb retaining wire into
position by aligning the wire with the
groove on the bulb.
8. Connect the headlight bulb socket-
connector.
9. Install the headlight bulb cover by turn-
ing it clockwise.
10. Install the headlight assembly. (for
low beam bulb)
G220102AFD
Turn signal light/position light, fog
light bulb (if equipped)
Turn signal light/position light
1. Remove the headlight assembly by
loosening the headlight installation
bolts(3EA).
2. Replace the malfunctioned light bulb.
3. Install the headlight assembly.
Fog light bulb
1. Remove the fog light under cover by
loosening the screw(2EA).
2. Replace the malfunctioned light bulb.
3. Install the fog light under cover.
F220200AFD-EU
Side repeater light replacement
(if equipped)
1. Using a flat-blade screwdriver, gently
pry the mirror from the assembly.2. Unscrew the bolt with a cross-tip
screwdriver.
3. Disconnect the connector of light
assembly and then remove the light
assembly from the body of vehicle
4. Install a new light assembly in the
reverse order of removal.
OHD070045
OHD070046
OFD071052
OFD071053