power steering HYUNDAI ENTOURAGE 2008 Owners Manual
[x] Cancel search | Manufacturer: HYUNDAI, Model Year: 2008, Model line: ENTOURAGE, Model: HYUNDAI ENTOURAGE 2008Pages: 393, PDF Size: 8.78 MB
Page 15 of 393
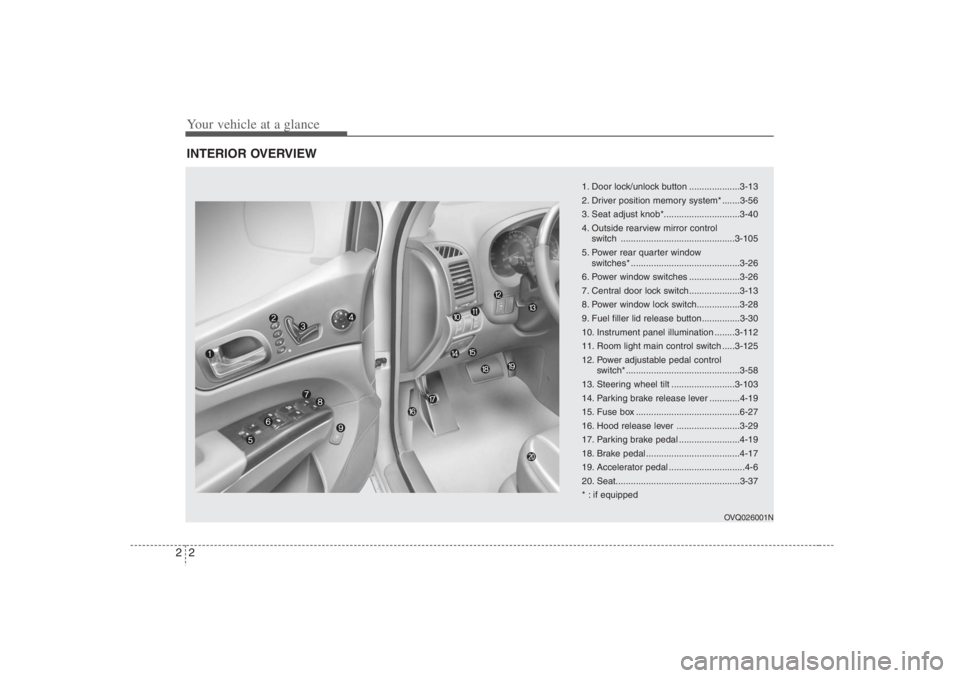
Your vehicle at a glance2 2INTERIOR OVERVIEW
OVQ026001N
1. Door lock/unlock button ....................3-13
2. Driver position memory system* .......3-56
3. Seat adjust knob*..............................3-40
4. Outside rearview mirror control
switch .............................................3-105
5. Power rear quarter window
switches* ...........................................3-26
6. Power window switches ....................3-26
7. Central door lock switch....................3-13
8. Power window lock switch.................3-28
9. Fuel filler lid release button...............3-30
10. Instrument panel illumination ........3-112
11. Room light main control switch .....3-125
12. Power adjustable pedal control
switch*.............................................3-58
13. Steering wheel tilt .........................3-103
14. Parking brake release lever ............4-19
15. Fuse box .........................................6-27
16. Hood release lever .........................3-29
17. Parking brake pedal ........................4-19
18. Brake pedal .....................................4-17
19. Accelerator pedal ..............................4-6
20. Seat.................................................3-37
* : if equipped
Page 16 of 393
23
Your vehicle at a glance
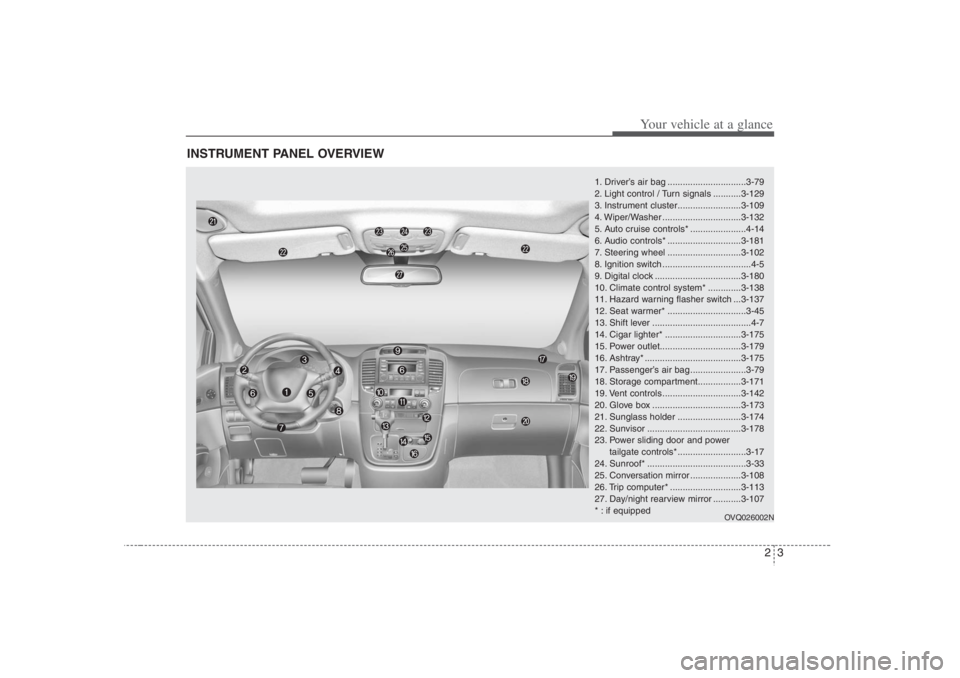
INSTRUMENT PANEL OVERVIEW
1. Driver’s air bag ...............................3-79
2. Light control / Turn signals ...........3-129
3. Instrument cluster.........................3-109
4. Wiper/Washer ...............................3-132
5. Auto cruise controls* ......................4-14
6. Audio controls* .............................3-181
7. Steering wheel .............................3-102
8. Ignition switch ...................................4-5
9. Digital clock ..................................3-180
10. Climate control system* .............3-138
11. Hazard warning flasher switch ...3-137
12. Seat warmer* ...............................3-45
13. Shift lever .......................................4-7
14. Cigar lighter* ..............................3-175
15. Power outlet................................3-179
16. Ashtray* ......................................3-175
17. Passenger’s air bag ......................3-79
18. Storage compartment.................3-171
19. Vent controls ...............................3-142
20. Glove box ...................................3-173
21. Sunglass holder .........................3-174
22. Sunvisor .....................................3-178
23. Power sliding door and power
tailgate controls* ...........................3-17
24. Sunroof* .......................................3-33
25. Conversation mirror ....................3-108
26. Trip computer* ............................3-113
27. Day/night rearview mirror ...........3-107
* : if equipped
OVQ026002N
Page 17 of 393
3
Keys / 3-3
Remote keyless entry / 3-4
Theft-alarm system / 3-7
Immobilizer system / 3-9
Door locks / 3-11
Power sliding door and power tailgate / 3-17
Window / 3-26
Hood / 3-29
Fuel filler lid / 3-30
Sunroof / 3-33
Seat / 3-37
Driver position memory system / 3-57
Power adjustable pedals / 3-59
Seat belts / 3-59
Child restraint system / 3-71
Air bags-advanced restraint system / 3-78
Steering wheel / 3-102
Mirrors / 3-104
Instrument cluster / 3-109
Gauges / 3-110
Trip computer / 3-113
Warnings and indicators / 3-119
Features of your vehicle
Page 118 of 393
Features of your vehicle102 3Power steeringPower steering uses energy from the
engine to assist you in steering the vehi-
cle. If the engine is off or if the power
steering system becomes inoperative,
the vehicle may still be steered, but it will
require increased steering effort.
Should you notice any change in the
effort required to steer during normal
vehicle operation, have the power steer-
ing checked by an Authorized Hyundai
Dealer.
✽ ✽
NOTICEIf the vehicle is parked for extended
periods outside in cold weather (below
14°F/-10°C), the power steering may
require increased effort when the engine
is first started. This is caused by
increased fluid viscosity due to the cold
weather and does not indicate a mal-
function.
When this happens, increase the engine
RPM by depressing accelerator until the
RPM reaches 1,500 rpm then release or
let the engine idle for two or three min-
utes to warm up the fluid.
STEERING WHEEL
CAUTION
Never hold the steering wheel
against a stop (extreme right or
left turn) for more than 5 seconds
with the engine running. Holding
the steering wheel for more than
5 seconds in either position may
cause damage to the power steer-
ing pump.
If the power steering drive belt
breaks or if the power steering
pump malfunctions, the steering
effort will greatly increase.
Page 257 of 393
417
Driving your vehicle
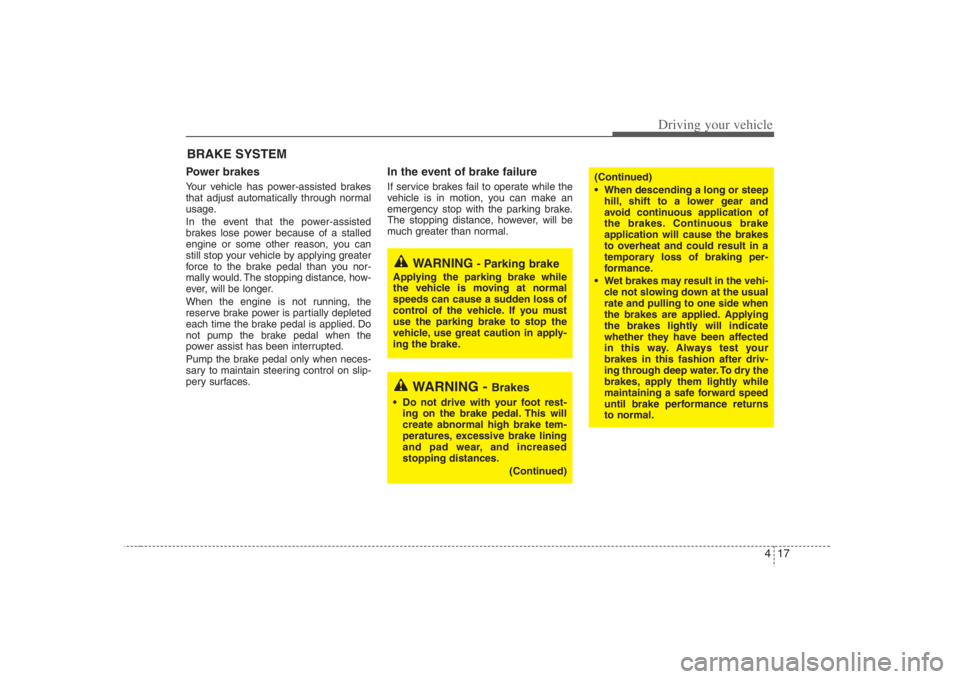
Power brakes Your vehicle has power-assisted brakes
that adjust automatically through normal
usage.
In the event that the power-assisted
brakes lose power because of a stalled
engine or some other reason, you can
still stop your vehicle by applying greater
force to the brake pedal than you nor-
mally would. The stopping distance, how-
ever, will be longer.
When the engine is not running, the
reserve brake power is partially depleted
each time the brake pedal is applied. Do
not pump the brake pedal when the
power assist has been interrupted.
Pump the brake pedal only when neces-
sary to maintain steering control on slip-
pery surfaces.
In the event of brake failure If service brakes fail to operate while the
vehicle is in motion, you can make an
emergency stop with the parking brake.
The stopping distance, however, will be
much greater than normal.
BRAKE SYSTEM
(Continued)
When descending a long or steep
hill, shift to a lower gear and
avoid continuous application of
the brakes. Continuous brake
application will cause the brakes
to overheat and could result in a
temporary loss of braking per-
formance.
Wet brakes may result in the vehi-
cle not slowing down at the usual
rate and pulling to one side when
the brakes are applied. Applying
the brakes lightly will indicate
whether they have been affected
in this way. Always test your
brakes in this fashion after driv-
ing through deep water. To dry the
brakes, apply them lightly while
maintaining a safe forward speed
until brake performance returns
to normal.
WARNING
- Parking brake
Applying the parking brake while
the vehicle is moving at normal
speeds can cause a sudden loss of
control of the vehicle. If you must
use the parking brake to stop the
vehicle, use great caution in apply-
ing the brake.
WARNING -
Brakes
Do not drive with your foot rest-
ing on the brake pedal. This will
create abnormal high brake tem-
peratures, excessive brake lining
and pad wear, and increased
stopping distances.
(Continued)
Page 269 of 393
429
Driving your vehicle
Your vehicle's fuel economy depends
mainly on your style of driving, where you
drive and when you drive.
Each of these factors affects how many
miles (kilometers) you can get from a gal-
lon (liter) of fuel. To operate your vehicle
as economically as possible, use the fol-
lowing driving suggestions to help save
money in both fuel and repairs:
Avoid lengthy warm-up idling. Once the
engine is running smoothly, begin driv-
ing. Remember, engine warm-up may
take a little longer on cold days.
Save fuel by accelerating slowly after
stopping.
Keep the engine in tune and follow the
recommended periodic maintenance
schedule. This will increase the life of
all parts and lower your operating
costs. Do not use the air conditioner unnec-
essarily.
Slow down when driving on rough
roads.
For longer tire life and better fuel econ-
omy, always keep the tires inflated to
the recommended pressures.
Maintain a safe distance from other
vehicles to avoid sudden stops. This
will reduce wear on brake linings and
pads. Driving in such a way will also
save fuel because extra fuel is required
to accelerate back to driving speed.
Do not carry unnecessary weight in the
vehicle.
Do not rest your foot on the brake
pedal while driving. This can cause
needless wear, possible damage to the
brakes, and poor fuel economy.
Improper wheel alignment results in
faster tire wear and lower fuel econo-
my. Open windows at high speeds can
reduce fuel economy.
Fuel economy is less in crosswinds
and headwinds. To help offset some of
this loss, slow down when driving in
these conditions.
Keeping a vehicle in good operating con-
dition is important both for economy and
safety. Therefore, have an authorized
Hyundai dealer perform scheduled
inspections and maintenance.ECONOMICAL OPERATION
WARNING
- Engine off dur-
ing motion
Never turn the engine off to coast
down hills or anytime the vehicle is
in motion. The power steering and
power brakes will not function
properly without the engine run-
ning. Instead, keep the engine on
and downshift to an appropriate
gear for engine braking effect. In
addition, turning off the ignition
while driving could engage the
steering wheel lock resulting in
loss of vehicle steering which could
cause serious injury or death.
Page 307 of 393
521
What to do in an emergency
When towing your vehicle in an emer-
gency without wheel dollies :
1. Set the ignition switch in the ACC posi-
tion.
2. Place the transaxle shift lever in N
(Neutral).
3. Release the parking brake.
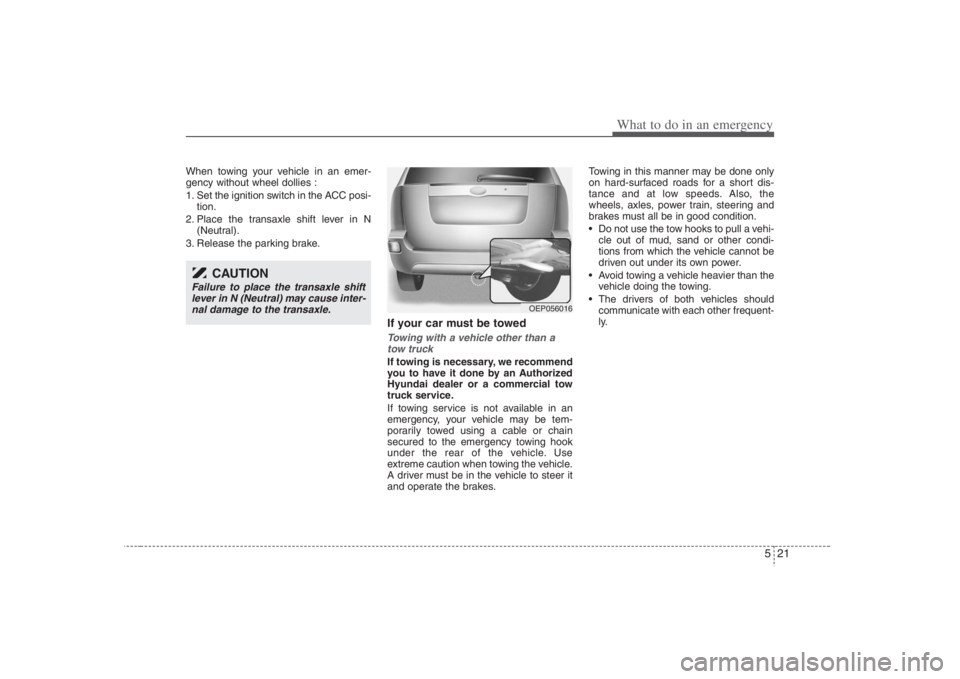
If your car must be towedTowing with a vehicle other than a
tow truck If towing is necessary, we recommend
you to have it done by an Authorized
Hyundai dealer or a commercial tow
truck service.
If towing service is not available in an
emergency, your vehicle may be tem-
porarily towed using a cable or chain
secured to the emergency towing hook
under the rear of the vehicle. Use
extreme caution when towing the vehicle.
A driver must be in the vehicle to steer it
and operate the brakes.Towing in this manner may be done only
on hard-surfaced roads for a short dis-
tance and at low speeds. Also, the
wheels, axles, power train, steering and
brakes must all be in good condition.
Do not use the tow hooks to pull a vehi-
cle out of mud, sand or other condi-
tions from which the vehicle cannot be
driven out under its own power.
Avoid towing a vehicle heavier than the
vehicle doing the towing.
The drivers of both vehicles should
communicate with each other frequent-
ly.
CAUTION
Failure to place the transaxle shift
lever in N (Neutral) may cause inter-
nal damage to the transaxle.
OEP056016
Page 310 of 393

6
Maintenance services / 6-2
Scheduled maintenance service / 6-2
Explanation of scheduled maintenance items / 6-7
Owner maintenance / 6-9
Engine compartment / 6-11
Engine oil / 6-12
Engine coolant / 6-13
Air cleaner / 6-15
Automatic transaxle / 6-17
Brakes / 6-19
Lubricants and fluids / 6-20
Power steering / 6-21
Climate control air filter / 6-22
Wiper blades / 6-24
Fuses / 6-26
Battery / 6-35
Tires and wheels / 6-37
Light bulbs replacement / 6-51
Lubricant / 6-59
Corrosion protection / 6-61
Appearance care / 6-63
Emission control system / 6-66
California perchlorate notice / 6-68
Maintenance
Page 314 of 393
65
Maintenance
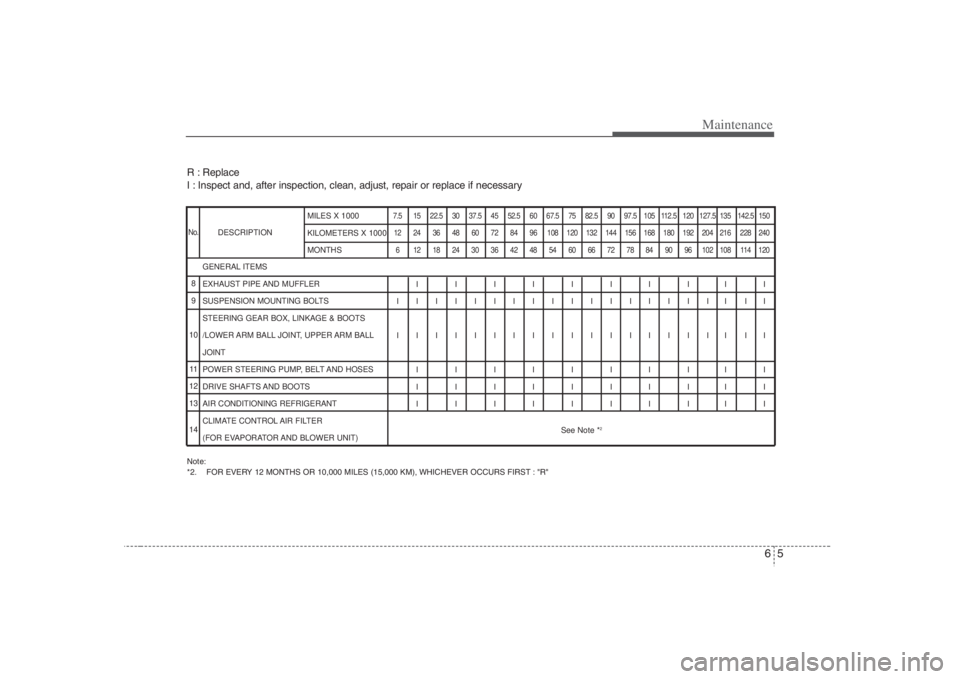
R : Replace
I : Inspect and, after inspection, clean, adjust, repair or replace if necessaryNote:
*2. FOR EVERY 12 MONTHS OR 10,000 MILES (15,000 KM), WHICHEVER OCCURS FIRST : "R"DESCRIPTION
7.5 15 22.5 30 37.5 45 52.5 60 67.5 75 82.5 90 97.5 105 112.5 120 127.5 135 142.5 150
12 24 36 48 60 72 84 96 108 120 132 144 156 168 180 192 204 216 228 240
6 121824303642485460667278849096102108114120
IIIIIIIIII
IIIIIIIIIIIIIIIIII II
IIIIIIIIIIIIIIIIII II
IIIIIIIIII
IIIIIIIIII
IIIIIIIIII
See Note *
2
GENERAL ITEMS
EXHAUST PIPE AND MUFFLER
SUSPENSION MOUNTING BOLTS
STEERING GEAR BOX, LINKAGE & BOOTS
/LOWER ARM BALL JOINT, UPPER ARM BALL
JOINT
POWER STEERING PUMP, BELT AND HOSES
DRIVE SHAFTS AND BOOTS
AIR CONDITIONING REFRIGERANT
CLIMATE CONTROL AIR FILTER
(FOR EVAPORATOR AND BLOWER UNIT)MILES X 1000
KILOMETERS X 1000
MONTHS
No.8
9
10
11
12
13
14
Page 317 of 393
Maintenance8 6Automatic transaxle fluid The fluid level should be in the “HOT”
range of the dipstick, after the engine
and transaxle are at normal operating
temperature. Check the automatic
transaxle fluid level with the engine run-
ning and the transaxle in neutral, with the
parking brake properly applied. Use
HYUNDAI GENUINE ATF SP-III, DIA-
MOND ATF SP-III, SK ATF SP-III or other
brands meeting the SP III specification
approved by Hyundai Motor Co. when
adding or changing fluid. Using the
wrong ATF may result in damage to the
ATM.Brake hoses and linesVisually check for proper installation,
chafing, cracks, deterioration and any
leakage. Replace any deteriorated or
damaged parts immediately.Brake fluidCheck brake fluid level in the brake fluid
reservoir. The level should be between
"MIN" and "MAX" marks on the side of
the reservoir. Use only hydraulic brake
fluid conforming to DOT 3 or DOT 4.
Rear disc brake / linings, parking
brakeCheck the rear disc brake and linings for
scoring, burning, leaking fluid, broken
parts, and excessive wear. Inspect the
parking brake system including the park-
ing brake pedal and cables. For detailed
service procedures, refer to the Shop
Manual.Brake pads, calipers and rotorsCheck the pads for excessive wear, discs
for run out and wear, and calipers for fluid
leakage.Exhaust pipe and mufflerVisually inspect the exhaust pipes, muf-
fler and hangers for cracks, deterioration,
or damage. Start the engine and listen
carefully for any exhaust gas leakage.
Tighten connections or replace parts as
necessary.Suspension mounting boltsCheck the suspension connections for
looseness or damage. Retighten to the
specified torque.
Steering gear box, linkage &
boots/lower arm ball joint, upper
arm ball jointWith the vehicle stopped and engine off,
check for excessive free-play in the steer-
ing wheel. Check the linkage for bends or
damage. Check the dust boots and ball
joints for deterioration, cracks, or dam-
age. Replace any damaged parts.Power steering pump, belt and
hosesCheck the power steering pump and
hoses for leakage and damage. Replace
any damaged or leaking parts immediate-
ly. Inspect the power steering belt (or
drive belt) for evidence of cuts, cracks,
excessive wear, oiliness and proper ten-
sion. Replace or adjust it if necessary.Drive shafts and bootsCheck the drive shafts, boots and clamps
for cracks, deterioration, or damage.
Replace any damaged parts and, if nec-
essary, repack the grease.Air conditioning refrigerantCheck the air conditioning lines and con-
nections for leakage and damage. Check
air conditioning performance according to
the relevant shop manual if necessary.