audio Hyundai Equus 2010 Owner's Manual
[x] Cancel search | Manufacturer: HYUNDAI, Model Year: 2010, Model line: Equus, Model: Hyundai Equus 2010Pages: 374, PDF Size: 41.29 MB
Page 194 of 374
Features of your vehicle
116
4
CAUTION
Use the power outlet only when
the engine is running and remove
the accessory plug after use.Using the accessory plug for pro-longed periods of time with theengine off could cause the bat-
tery to discharge.
Only use 12V electric accessories which are less than 10A in elec-tric capacity.
Adjust the air-conditioner or heater to the lowest operating
level when using the power outlet.
Close the cover when not in use. Some electronic devices can cause electronic interferencewhen plugged into a vehicle’s
power outlet. These devices may cause excessive audio static andmalfunctions in other electronic systems or devices used in your
vehicle.
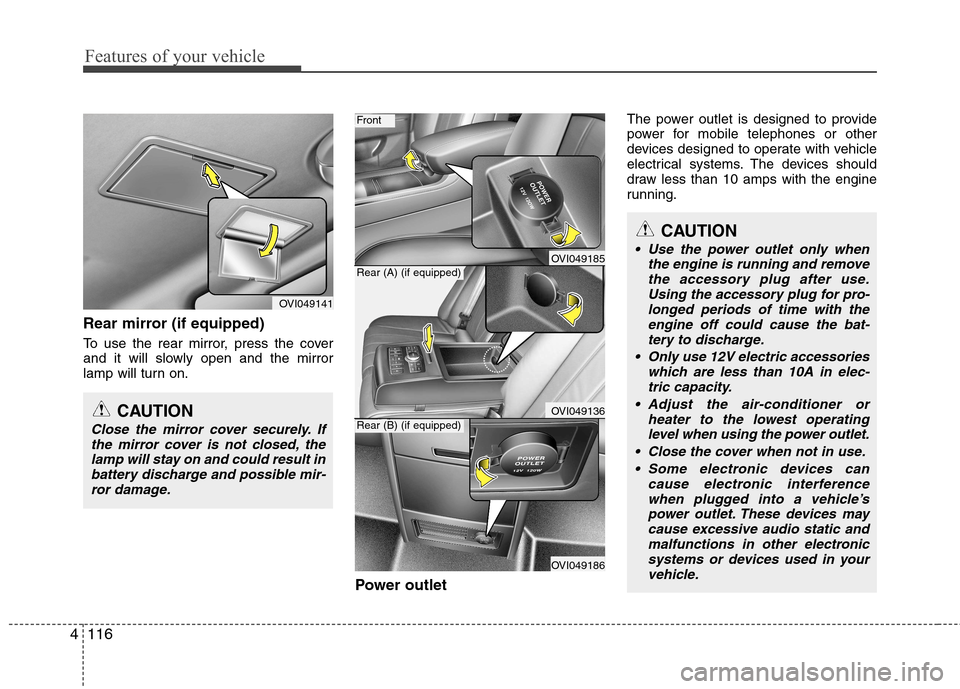
Rear mirror (if equipped)
To use the rear mirror, press the cover
and it will slowly open and the mirror
lamp will turn on.
Power outletThe power outlet is designed to provide
power for mobile telephones or other
devices designed to operate with vehicle
electrical systems. The devices should
draw less than 10 amps with the engine
running.
OVI049141
CAUTION
Close the mirror cover securely. If
the mirror cover is not closed, thelamp will stay on and could result in battery discharge and possible mir-ror damage.
OVI049185
OVI049136
OVI049186
Front
Rear (A) (if equipped)
Rear (B) (if equipped)
Page 201 of 374
4123
Features of your vehicle
MULTIMEDIA SYSTEM
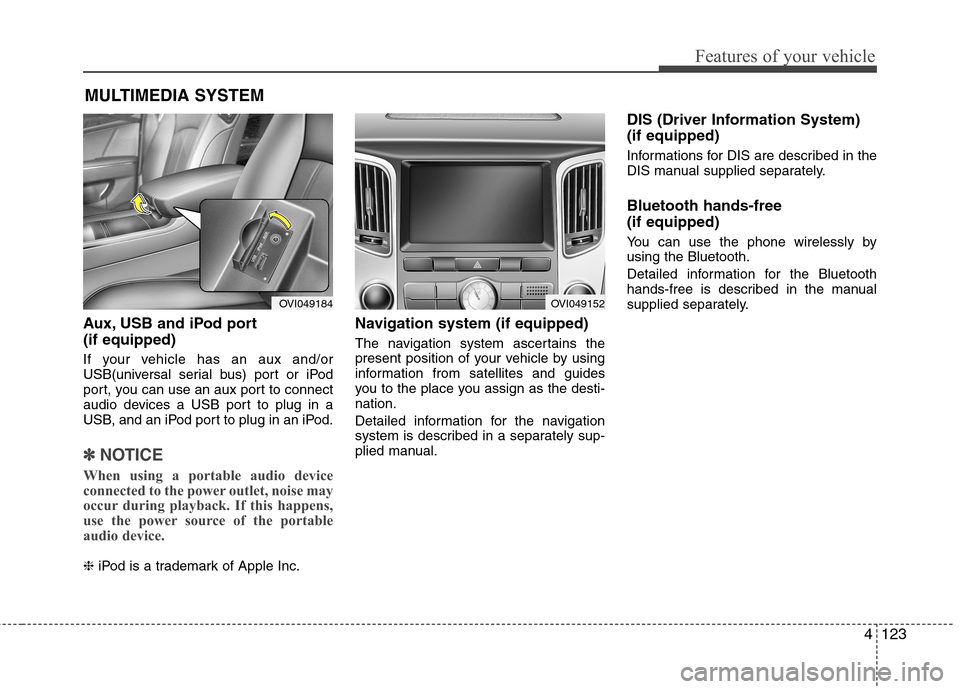
Aux, USB and iPod port (if equipped)
If your vehicle has an aux and/or
USB(universal serial bus) port or iPod
port, you can use an aux port to connect
audio devices a USB port to plug in a
USB, and an iPod port to plug in an iPod.
✽✽NOTICE
When using a portable audio device
connected to the power outlet, noise may
occur during playback. If this happens,
use the power source of the portable
audio device.
❈ iPod is a trademark of Apple Inc. Navigation system (if equipped)
The navigation system ascertains the
present position of your vehicle by using
information from satellites and guides
you to the place you assign as the desti-nation.
Detailed information for the navigation
system is described in a separately sup-
plied manual. DIS (Driver Information System) (if equipped)
Informations for DIS are described in the
DIS manual supplied separately. Bluetooth hands-free (if equipped)
You can use the phone wirelessly by using the Bluetooth.
Detailed information for the Bluetooth
hands-free is described in the manual
supplied separately.
OVI049184OVI049152
Page 203 of 374
4125
Features of your vehicle
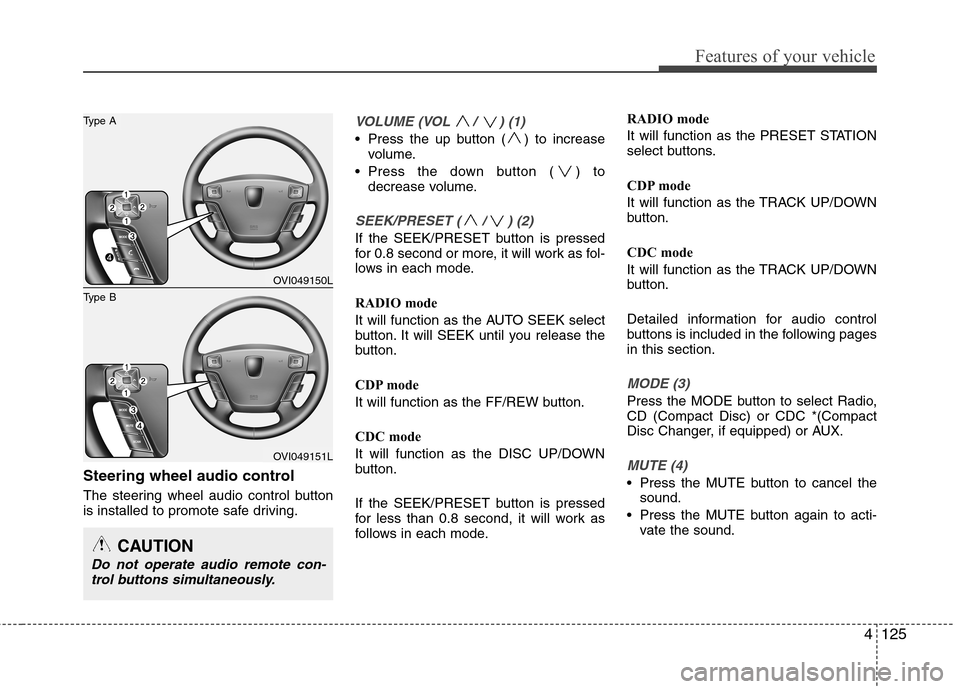
Steering wheel audio control
The steering wheel audio control button
is installed to promote safe driving.
VOLUME (VOL / ) (1)
Press the up button ( ) to increasevolume.
Press the down button ( ) to decrease volume.
SEEK/PRESET ( / ) (2)
If the SEEK/PRESET button is pressed
for 0.8 second or more, it will work as fol-
lows in each mode.
RADIO mode
It will function as the AUTO SEEK select
button. It will SEEK until you release the
button.
CDP mode
It will function as the FF/REW button.
CDC mode
It will function as the DISC UP/DOWN
button.
If the SEEK/PRESET button is pressed
for less than 0.8 second, it will work as
follows in each mode. RADIO mode
It will function as the PRESET STATION
select buttons.
CDP mode
It will function as the TRACK UP/DOWN
button.
CDC mode
It will function as the TRACK UP/DOWN
button.
Detailed information for audio control
buttons is included in the following pagesin this section.
MODE (3)
Press the MODE button to select Radio, CD (Compact Disc) or CDC *(Compact
Disc Changer, if equipped) or AUX.
MUTE (4)
Press the MUTE button to cancel the
sound.
Press the MUTE button again to acti- vate the sound.
CAUTION
Do not operate audio remote con-
trol buttons simultaneously.
OVI049150L
OVI049151L
Type B
Type A
Page 250 of 374

Driving your vehicle
46
5
This system detects the lane with the
sensor at the front windshield and warns
you when your vehicle leaves the lane. To operate the LDWS, pull the switch or
press the switch with the engine
start/stop button in the ON position. The
indicator illuminates on the cluster. To
cancel the LDWS, pull the switch or
press the switch again.
LANE DEPARTURE WARNING SYSTEM (LDWS) (IF EQUIPPED)
OVI059012
OVI059013
WARNING
The LDWS does not make the vehicle change lanes. It is driver's
responsibility to always check
the road conditions.
Do not turn the steering wheel suddenly, when the LDWS warns
that your vehicle leaving the lane.
If the sensor can not detect the lane or if the vehicle speed does
not exceed 60km/h, the LDWS
won't warn you even though vehi-
cle leaves the lane.
If your vehicle has window tint or other types of coating on the
front windshield, the LDWS may
not work properly.
Prevent the LDWS sensor from water or any liquid.
Do not remove the LDWS parts and do not affect the sensor by a
strong impact.
Do not put objects that reflect light on the dash board.
Always check the road conditions because you may not hear the
warning chime because of audio,
and external conditions.
OVI059062L
Type AType B
Page 323 of 374
Maintenance
32
7
Reset items
Items should be reset after the battery
has been discharged or the battery hasbeen disconnected.
Power trunk (See section 4)
Sunroof (See section 4)
Trip computer (See section 4)
Climate control system
(See section 4)
Clock (See section 4)
Audio (See section 4)
WARNING
Before performing maintenance or recharging the battery, turn off all accessories and stop the
engine.
The negative battery cable must be removed first and installed
last when the battery is discon-nected.
Operation related to the battery should be done in an authorized
HYUNDAI dealer.
CAUTION
Keep the battery away from water
or any liquid.
The battery is in the trunk, so you should be careful when you load
a container filled with liquid intothe trunk.
For your safety, use the authentic- ity by approved authorizedHYUNDAI dealer, when you
replace the battery.
Page 336 of 374
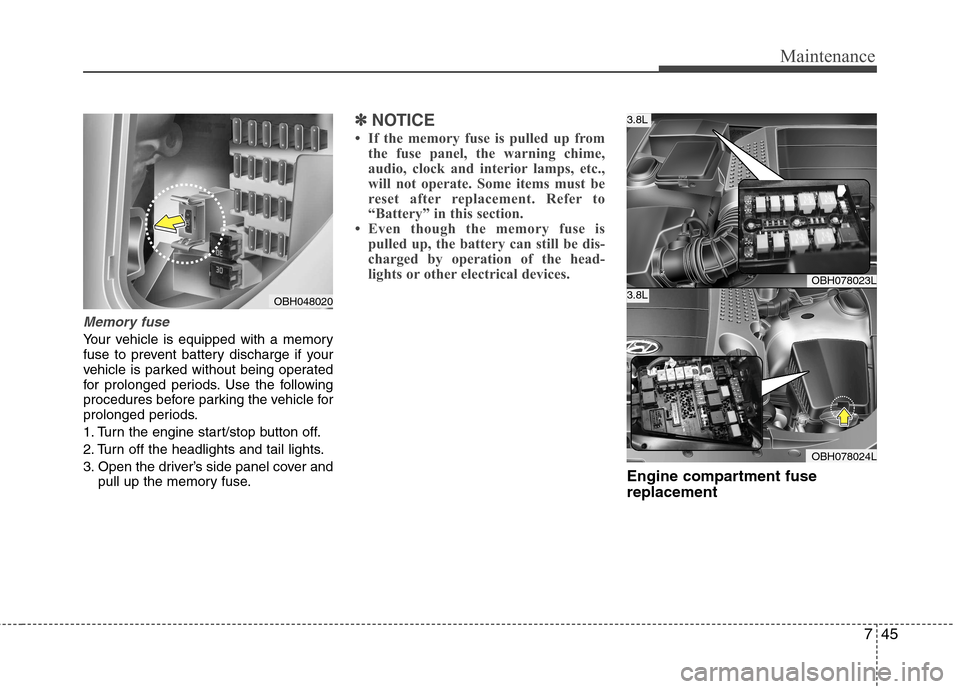
745
Maintenance
Memory fuse
Your vehicle is equipped with a memory
fuse to prevent battery discharge if your
vehicle is parked without being operated
for prolonged periods. Use the following
procedures before parking the vehicle for
prolonged periods.
1. Turn the engine start/stop button off.
2. Turn off the headlights and tail lights.
3. Open the driver’s side panel cover andpull up the memory fuse.
✽✽ NOTICE
If the memory fuse is pulled up from the fuse panel, the warning chime,
audio, clock and interior lamps, etc.,
will not operate. Some items must be
reset after replacement. Refer to
“Battery” in this section.
Even though the memory fuse is
pulled up, the battery can still be dis-
charged by operation of the head-
lights or other electrical devices.
Engine compartment fuse replacement
OBH048020
OBH078023L
OBH078024L
3.8L
3.8L
Page 340 of 374
749
Maintenance
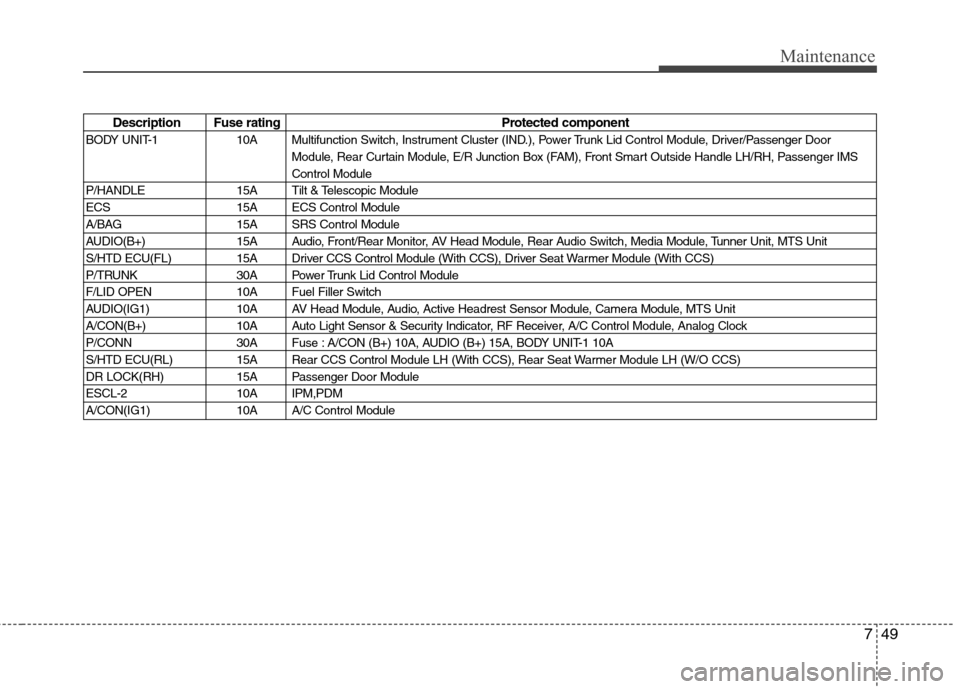
Description Fuse ratingProtected component
BODY UNIT-1 10A Multifunction Switch, Instrument Cluster (IND.), Power Trunk Lid Control Module, Driver/Passenger Door Module, Rear Curtain Module, E/R Junction Box (FAM), Front Smart Outside Handle LH/RH, Passenger IMS Control Module
P/HANDLE 15A Tilt & Telescopic Module
ECS 15A ECS Control Module
A/BAG 15A SRS Control Module
AUDIO(B+) 15A Audio, Front/Rear Monitor, AV Head Module, Rear Audio Switch, Media Module, Tunner Unit, MTS Unit
S/HTD ECU(FL) 15A Driver CCS Control Module (With CCS), Driver Seat Warmer Module (With CCS)
P/TRUNK 30A Power Trunk Lid Control Module
F/LID OPEN 10A Fuel Filler Switch
AUDIO(IG1) 10A AV Head Module, Audio, Active Headrest Sensor Module, Camera Module, MTS Unit
A/CON(B+) 10A Auto Light Sensor & Security Indicator, RF Receiver, A/C Control Module, Analog Clock
P/CONN 30A Fuse : A/CON (B+) 10A, AUDIO (B+) 15A, BODY UNIT-1 10A
S/HTD ECU(RL) 15A Rear CCS Control Module LH (With CCS), Rear Seat Warmer Module LH (W/O CCS)
DR LOCK(RH) 15A Passenger Door Module
ESCL-2 10A IPM,PDM
A/CON(IG1) 10A A/C Control Module
Page 341 of 374
Maintenance
50
7
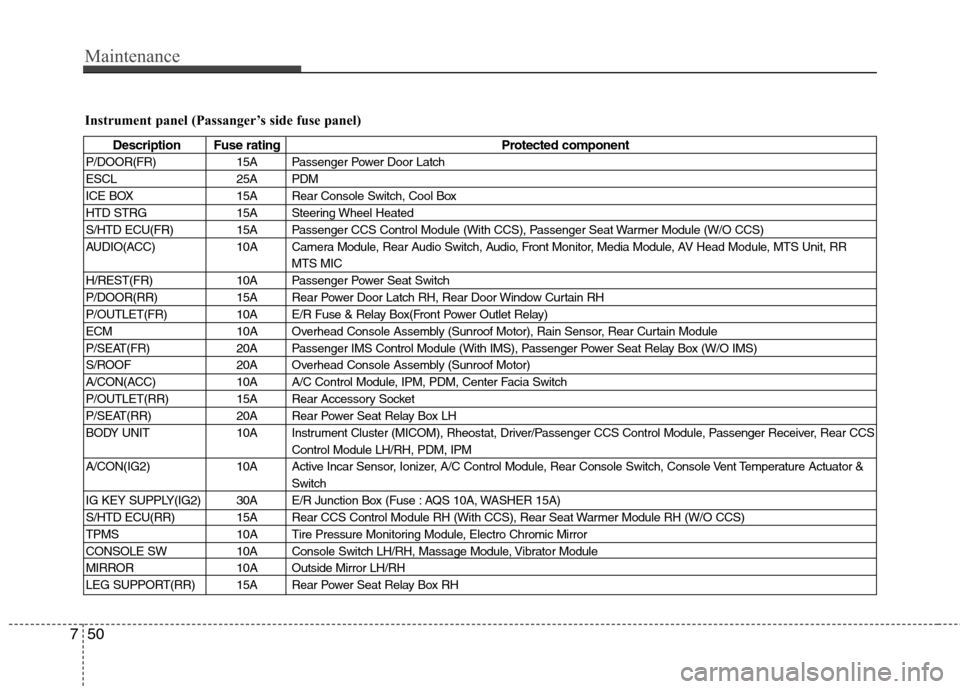
Instrument panel (Passanger’s side fuse panel)
Description Fuse rating Protected component
P/DOOR(FR) 15A Passenger Power Door Latch
ESCL 25A PDM
ICE BOX 15A Rear Console Switch, Cool Box
HTD STRG 15A Steering Wheel Heated
S/HTD ECU(FR) 15A Passenger CCS Control Module (With CCS), Passenger Seat Warmer Module (W/O CCS)
AUDIO(ACC) 10A Camera Module, Rear Audio Switch, Audio, Front Monitor, Media Module, AV Head Module, MTS Unit, RR MTS MIC
H/REST(FR) 10A Passenger Power Seat Switch
P/DOOR(RR) 15A Rear Power Door Latch RH, Rear Door Window Curtain RH
P/OUTLET(FR) 10A E/R Fuse & Relay Box(Front Power Outlet Relay)
ECM 10A Overhead Console Assembly (Sunroof Motor), Rain Sensor, Rear Curtain Module
P/SEAT(FR) 20A Passenger IMS Control Module (With IMS), Passenger Power Seat Relay Box (W/O IMS)
S/ROOF 20A Overhead Console Assembly (Sunroof Motor)
A/CON(ACC) 10A A/C Control Module, IPM, PDM, Center Facia Switch
P/OUTLET(RR) 15A Rear Accessory Socket
P/SEAT(RR) 20A Rear Power Seat Relay Box LH
BODY UNIT 10A Instrument Cluster (MICOM), Rheostat, Driver/Passenger CCS Control Module, Passenger Receiver, Rear CCS Control Module LH/RH, PDM, IPM
A/CON(IG2) 10A Active Incar Sensor, Ionizer, A/C Control Module, Rear Console Switch, Console Vent Temperature Actuator & Switch
IG KEY SUPPLY(IG2) 30A E/R Junction Box (Fuse : AQS 10A, WASHER 15A)
S/HTD ECU(RR) 15A Rear CCS Control Module RH (With CCS), Rear Seat Warmer Module RH (W/O CCS)
TPMS 10A Tire Pressure Monitoring Module, Electro Chromic Mirror
CONSOLE SW 10A Console Switch LH/RH, Massage Module, Vibrator Module
MIRROR 10A Outside Mirror LH/RH
LEG SUPPORT(RR) 15A Rear Power Seat Relay Box RH
Page 342 of 374
751
Maintenance
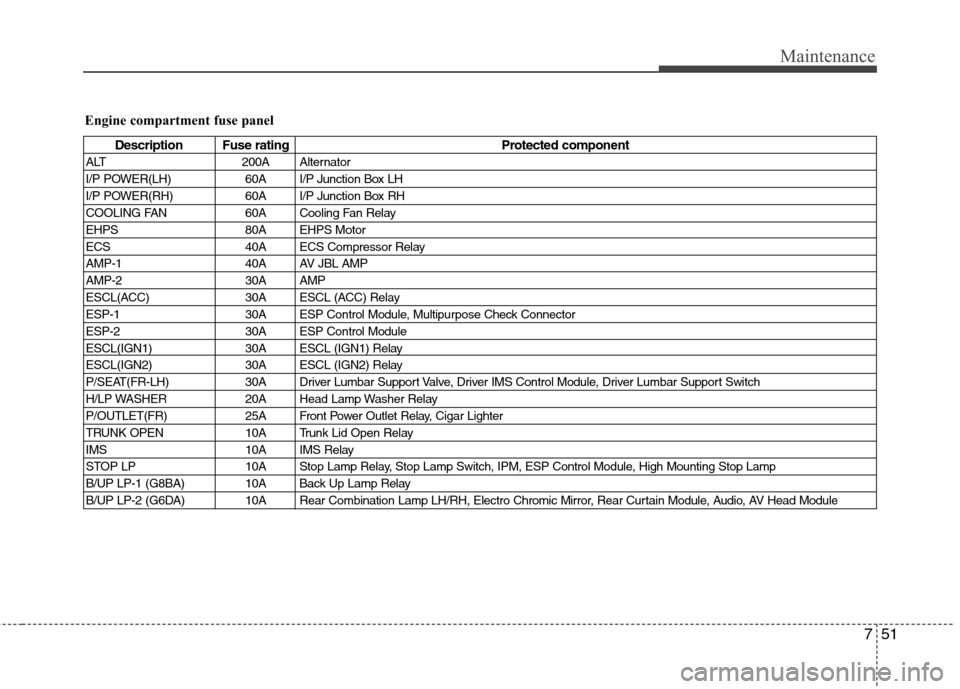
Engine compartment fuse panel
Description Fuse rating Protected component
ALT 200A Alternator
I/P POWER(LH) 60A I/P Junction Box LH
I/P POWER(RH) 60A I/P Junction Box RH
COOLING FAN 60A Cooling Fan Relay
EHPS 80A EHPS Motor
ECS 40A ECS Compressor Relay
AMP-1 40A AV JBL AMP
AMP-2 30A AMP
ESCL(ACC) 30A ESCL (ACC) Relay
ESP-1 30A ESP Control Module, Multipurpose Check Connector
ESP-2 30A ESP Control Module
ESCL(IGN1) 30A ESCL (IGN1) Relay
ESCL(IGN2) 30A ESCL (IGN2) Relay
P/SEAT(FR-LH) 30A Driver Lumbar Support Valve, Driver IMS Control Module, Driver Lumbar Support Switch
H/LP WASHER 20A Head Lamp Washer Relay
P/OUTLET(FR) 25A Front Power Outlet Relay, Cigar Lighter
TRUNK OPEN 10A Trunk Lid Open Relay
IMS 10A IMS Relay
STOP LP 10A Stop Lamp Relay, Stop Lamp Switch, IPM, ESP Control Module, High Mounting Stop Lamp
B/UP LP-1 (G8BA) 10A Back Up Lamp Relay
B/UP LP-2 (G6DA) 10A Rear Combination Lamp LH/RH, Electro Chromic Mirror, Rear Curtain Module, Audio, AV Head Module