oil level Hyundai Equus 2012 Owner's Manual
[x] Cancel search | Manufacturer: HYUNDAI, Model Year: 2012, Model line: Equus, Model: Hyundai Equus 2012Pages: 385, PDF Size: 10.67 MB
Page 12 of 385
15
Introduction
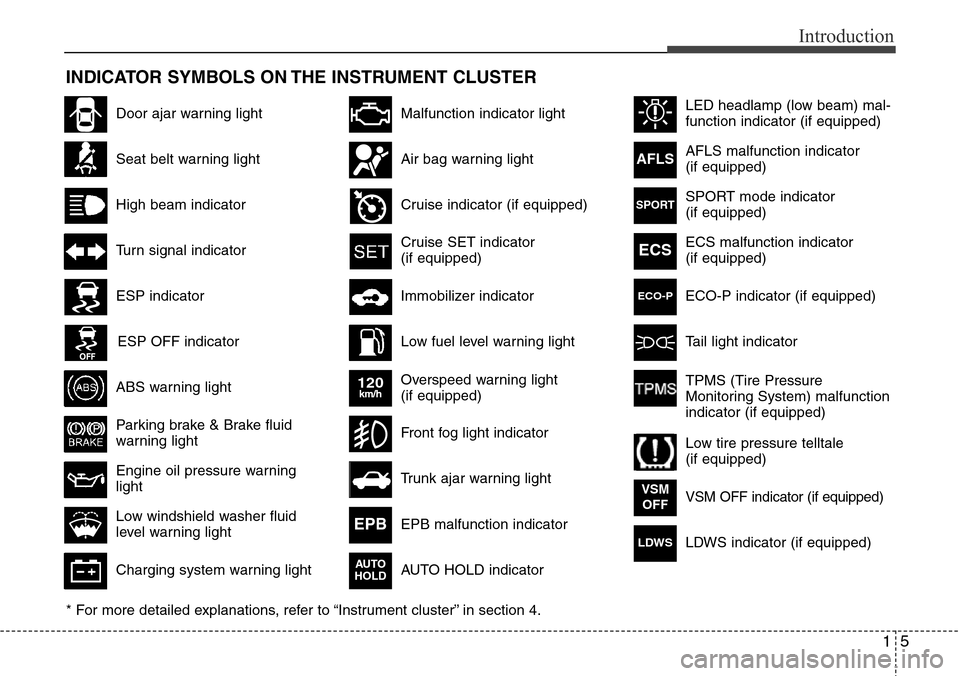
INDICATOR SYMBOLS ON THE INSTRUMENT CLUSTER
Seat belt warning light
High beam indicator
Turn signal indicator
ABS warning light
Parking brake & Brake fluid
warning light
Engine oil pressure warning
light
ESP indicator
ESP OFF indicator
Malfunction indicator light
Air bag warning light
Cruise indicator (if equipped)
Cruise SET indicator
(if equipped)
Immobilizer indicator
Low fuel level warning light
* For more detailed explanations, refer to “Instrument cluster” in section 4.
Charging system warning light
Low windshield washer fluid
level warning light
Door ajar warning light
Overspeed warning light
(if equipped)
120km/h
AFLS malfunction indicator
(if equipped)
ECS malfunction indicator
(if equipped)
Tail light indicator
Trunk ajar warning light
Front fog light indicator
AFLS
ECS
EPB malfunction indicator
AUTO HOLD indicator EPB
VSM OFF indicator (if equipped)VSM
OFF
AUTO
HOLD
TPMS (Tire Pressure
Monitoring System) malfunction
indicator (if equipped)
Low tire pressure telltale
(if equipped) ECO-P indicator (if equipped)
ECO-P
SPORT mode indicator
(if equipped)SPORT
LDWS indicator (if equipped)LDWS
LED headlamp (low beam) mal-
function indicator (if equipped)
Page 141 of 385
459
Features of your vehicle
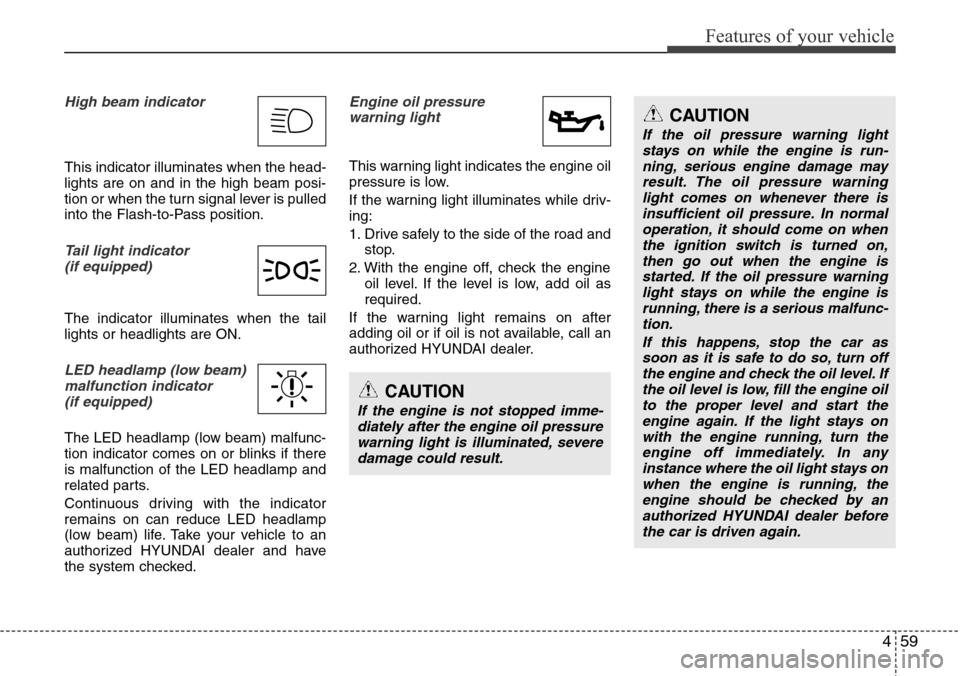
High beam indicator
This indicator illuminates when the head-
lights are on and in the high beam posi-
tion or when the turn signal lever is pulled
into the Flash-to-Pass position.
Tail light indicator
(if equipped)
The indicator illuminates when the tail
lights or headlights are ON.
LED headlamp (low beam)
malfunction indicator
(if equipped)
The LED headlamp (low beam) malfunc-
tion indicator comes on or blinks if there
is malfunction of the LED headlamp and
related parts.
Continuous driving with the indicator
remains on can reduce LED headlamp
(low beam) life. Take your vehicle to an
authorized HYUNDAI dealer and have
the system checked.
Engine oil pressure
warning light
This warning light indicates the engine oil
pressure is low.
If the warning light illuminates while driv-
ing:
1. Drive safely to the side of the road and
stop.
2. With the engine off, check the engine
oil level. If the level is low, add oil as
required.
If the warning light remains on after
adding oil or if oil is not available, call an
authorized HYUNDAI dealer.
CAUTION
If the engine is not stopped imme-
diately after the engine oil pressure
warning light is illuminated, severe
damage could result.
CAUTION
If the oil pressure warning light
stays on while the engine is run-
ning, serious engine damage may
result. The oil pressure warning
light comes on whenever there is
insufficient oil pressure. In normal
operation, it should come on when
the ignition switch is turned on,
then go out when the engine is
started. If the oil pressure warning
light stays on while the engine is
running, there is a serious malfunc-
tion.
If this happens, stop the car as
soon as it is safe to do so, turn off
the engine and check the oil level. If
the oil level is low, fill the engine oil
to the proper level and start the
engine again. If the light stays on
with the engine running, turn the
engine off immediately. In any
instance where the oil light stays on
when the engine is running, the
engine should be checked by an
authorized HYUNDAI dealer before
the car is driven again.
Page 216 of 385
53
Driving your vehicle
Before entering vehicle
• Be sure that all windows, outside mir-
ror(s), and outside lights are clean.
• Check the condition of the tires.
• Check under the vehicle for any sign of
leaks.
• Be sure there are no obstacles behind
you if you intend to back up.
Necessary inspections
Fluid levels, such as engine oil, engine
coolant, brake fluid, and washer fluid
should be checked on a regular basis,
with the exact interval depending on the
fluid. Further details are provided in sec-
tion 7, “Maintenance”.
Before starting
• Close and lock all doors.
• Position the seat so that all controls are
easily reached.
• Adjust the inside and outside rearview
mirrors.
• Be sure that all lights work.
• Check all gauges.
• Check the operation of warning lights
when the engine start/stop button is
turned to the ON position.
• Release the parking brake and make
sure the brake warning light goes out.
For safe operation, be sure you are famil-
iar with your vehicle and its equipment.
BEFORE DRIVING
WARNING
All passengers must be properly
belted whenever the vehicle is mov-
ing. Refer to “Seat belts” in section
3 for more information on their
proper use.
WARNING
Always check the surrounding
areas near your vehicle for people,
especially children, before putting a
vehicle into D (Drive) or R
(Reverse).
WARNING- Driving under
the influence of alcohol or
drugs
Drinking and driving is dangerous.
Drunk driving is the number one
contributor to the highway death
toll each year. Even a small amount
of alcohol will affect your reflexes,
perceptions and judgment. Driving
while under the influence of drugs
is as dangerous or more dangerous
than driving drunk.
You are much more likely to have a
serious accident if you drink or
take drugs and drive.
If you are drinking or taking drugs,
don’t drive. Do not ride with a driv-
er who has been drinking or taking
drugs. Choose a designated driver
or call a cab.
WARNING
Driving while distracted can result in
a loss of vehicle control, that may
lead to an accident, severe personal
injury, and death. The driver’s primary
responsibility is in the safe and legal
operation of a vehicle, and use of any
handheld devices, other equipment,
or vehicle systems which take the
driver’s eyes, attention and focus
away from the safe operation of a
vehicle or which are not permissible
by law should never be used during
operation of the vehicle.
Page 275 of 385
Driving your vehicle
62 5
Use high quality ethylene glycol
coolant
Your vehicle is delivered with high quality
ethylene glycol coolant in the cooling
system. It is the only type of coolant that
should be used because it helps prevent
corrosion in the cooling system, lubri-
cates the water pump and prevents
freezing. Be sure to replace or replenish
your coolant in accordance with the
maintenance schedule in section 7.
Before winter, have your coolant tested to
assure that its freezing point is sufficient
for the temperatures anticipated during
the winter.
Check battery and cables
Winter puts additional burdens on the
battery system. Visually inspect the bat-
tery and cables as described in section
7. The level of charge in your battery can
be checked by an authorized HYUNDAI
dealer or a service station.
Change to "winter weight" oil if
necessary
In some climates it is recommended that
a lower viscosity "winter weight" oil be
used during cold weather. See section 8
for recommendations. If you aren't sure
what weight oil you should use, consult
an authorized HYUNDAI dealer.
Check spark plugs and ignition
system
Inspect your spark plugs as described in
section 7 and replace them if necessary.
Also check all ignition wiring and compo-
nents to be sure they are not cracked,
worn or damaged in any way.
WARNING- Tire chains
• The use of chains may adversely
affect vehicle handling.
• Do not exceed 30 km/h (20 mph)
or the chain manufacturer’s rec-
ommended speed limit, whichev-
er is lower.
• Drive carefully and avoid bumps,
holes, sharp turns, and other
road hazards, which may cause
the vehicle to bounce.
• Avoid sharp turns or locked-
wheel braking.
CAUTION
• Chains that are the wrong size or
improperly installed can damage
your vehicle's brake lines, sus-
pension, body and wheels.
• Stop driving and retighten the
chains any time you hear them
hitting the vehicle.
Page 281 of 385
63
What to do in an emergency
4. When changing a flat tire, follow the
instruction provided later in this sec-
tion.
If engine stalls while driving
1. Reduce your speed gradually, keeping
a straight line. Move cautiously off the
road to a safe place.
2. Turn on your emergency flashers.
3. Try to start the engine again. If your
vehicle will not start, contact an
authorized HYUNDAI dealer or seek
other qualified assistance.
If engine doesn't turn over or
turns over slowly
1. Be sure the shift lever is in N (Neutral)
or P (Park) and the emergency brake
is set.
2. Check the battery connections to be
sure they are clean and tight.
3. Turn on the interior light. If the light
dims or goes out when you operate the
starter, the battery is discharged.
4. Check the starter connections to be
sure they are securely tightened.
5. Do not push or pull the vehicle to start
it. See instructions for "Jump starting".
If engine turns over normally but
does not start
1. Check fuel level.
2. With the engine start/stop button in the
OFF position, check all connectors at
the ignition coils and spark plugs.
Reconnect any that may be discon-
nected or loose.
3. If the engine still does not start, call an
authorized HYUNDAI dealer or seek
other qualified assistance.
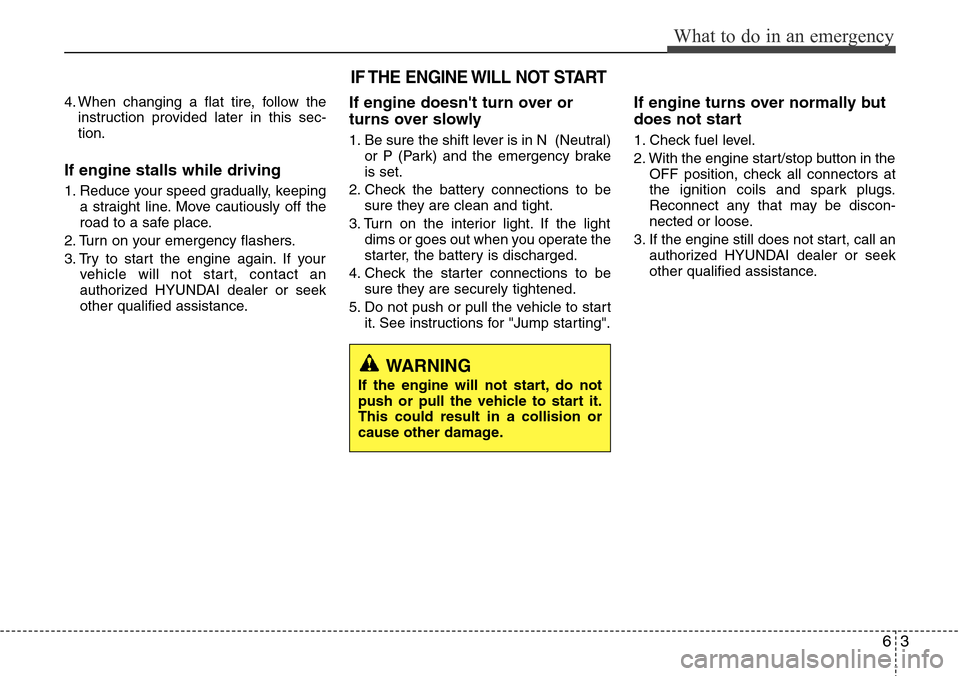
IF THE ENGINE WILL NOT START
WARNING
If the engine will not start, do not
push or pull the vehicle to start it.
This could result in a collision or
cause other damage.
Page 308 of 385
Maintenance
6 7
OWNER MAINTENANCE
The following lists are vehicle checks and
inspections that should be performed by
the owner or an authorized HYUNDAI
dealer at the frequencies indicated to
help ensure safe, dependable operation
of your vehicle.
Any adverse conditions should be
brought to the attention of your dealer as
soon as possible.
These Owner Maintenance Checks are
generally not covered by warranties and
you may be charged for labor, parts and
lubricants used.Owner maintenance schedule
When you stop for fuel:
• Check the engine oil level.
• Check coolant level in coolant reser-
voir.
• Check the windshield washer fluid
level.
• Look for low or under-inflated tires.
WARNING- Maintenance
work
• Performing maintenance work on
a vehicle can be dangerous. You
can be seriously injured while
performing some maintenance
procedures. If you lack sufficient
knowledge and experience or the
proper tools and equipment to do
the work, have it done by an
authorized HYUNDAI dealer.
• Working under the hood with the
engine running is dangerous. It
becomes even more dangerous
when you wear jewelry or loose
clothing. These can become
entangled in moving parts and
result in injury. Therefore, if you
must run the engine while work-
ing under the hood, make certain
that you remove all jewelry (espe-
cially rings, bracelets, watches,
and necklaces) and all neckties,
scarves, and similar loose cloth-
ing before getting near the
engine or cooling fans.
WARNING
Be careful when checking your
engine coolant level when the
engine is hot. Scalding hot coolant
and steam may blow out under
pressure. This could cause burns
or other serious injury.
Page 311 of 385
79
Maintenance
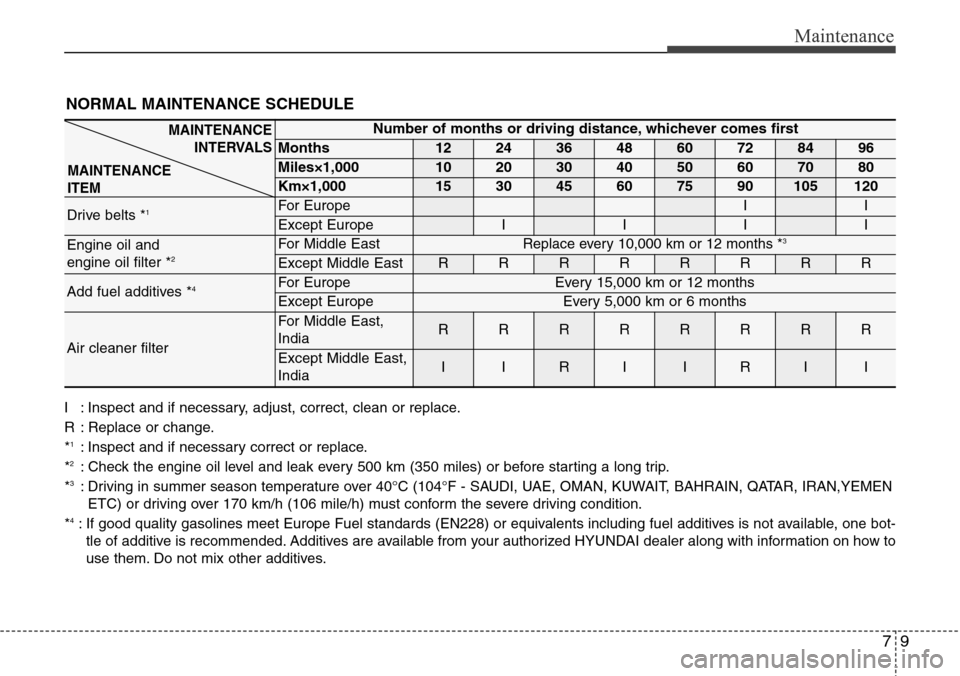
NORMAL MAINTENANCE SCHEDULE
I : Inspect and if necessary, adjust, correct, clean or replace.
R : Replace or change.
*
1: Inspect and if necessary correct or replace.
*2: Check the engine oil level and leak every 500 km (350 miles) or before starting a long trip.
*3: Driving in summer season temperature over 40°C (104°F - SAUDI, UAE, OMAN, KUWAIT, BAHRAIN, QATAR, IRAN,YEMEN
ETC) or driving over 170 km/h (106 mile/h) must conform the severe driving condition.
*
4: If good quality gasolines meet Europe Fuel standards (EN228) or equivalents including fuel additives is not available, one bot-
tle of additive is recommended. Additives are available from your authorized HYUNDAI dealer along with information on how to
use them. Do not mix other additives.
Number of months or driving distance, whichever comes first
Months1224364860728496
Miles×1,0001020304050607080
Km×1,000153045607590105120
Drive belts *1For EuropeII
Except EuropeIIII
Engine oil and
engine oil filter *2For Middle EastReplace every 10,000 km or 12 months *3
Except Middle EastRRRRRRRR
Add fuel additives *4For EuropeEvery 15,000 km or 12 months
Except EuropeEvery 5,000 km or 6 months
Air cleaner filter
For Middle East,
IndiaRRRRRRRR
Except Middle East,
IndiaIIRIIRII
MAINTENANCE
INTERVALS
MAINTENANCE
ITEM
Page 319 of 385
717
Maintenance
Brake hoses and lines
Visually check for proper installation,
chafing, cracks, deterioration and any
leakage. Replace any deteriorated or
damaged parts immediately.
Brake fluid
Check brake fluid level in the brake fluid
reservoir. The level should be between
“MIN” and “MAX” marks on the side of
the reservoir. Use only hydraulic brake
fluid conforming to DOT 3 or DOT 4
specification.
Steering gear box, linkage &
boots/lower arm ball joint
With the vehicle stopped and engine off,
check for excessive free-play in the
steering wheel.
Check the linkage for bends or damage.
Check the dust boots and ball joints for
deterioration, cracks, or damage.
Replace any damaged parts.
Power steering pump, belt and
hoses
Check the power steering pump and
hoses for leakage and damage. Replace
any damaged or leaking parts immedi-
ately. Inspect the power steering belt (or
drive belt) for evidence of cuts, cracks,
excessive wear, oiliness and proper ten-
sion. Replace or adjust it if necessary.
Drive shafts and boots
Check the drive shafts, boots and clamps
for cracks, deterioration, or damage.
Replace any damaged parts and, if nec-
essary, repack the grease.
Air conditioning refrigerant
(if equipped)
Check the air conditioning lines and con-
nections for leakage and damage.
Brake discs, pads, calipers and
rotors
Check the pads for excessive wear, discs
for run out and wear, and calipers for fluid
leakage.
For more information on checking the
pads or lining wear limit, refer to the
Hyundai web site.
(http://brakeman
ual.hmc.co.kr)
Suspension mounting bolts
Check the suspension connections for
looseness or damage. Retighten to the
specified torque.
Page 320 of 385
Maintenance
18 7
ENGINE OIL
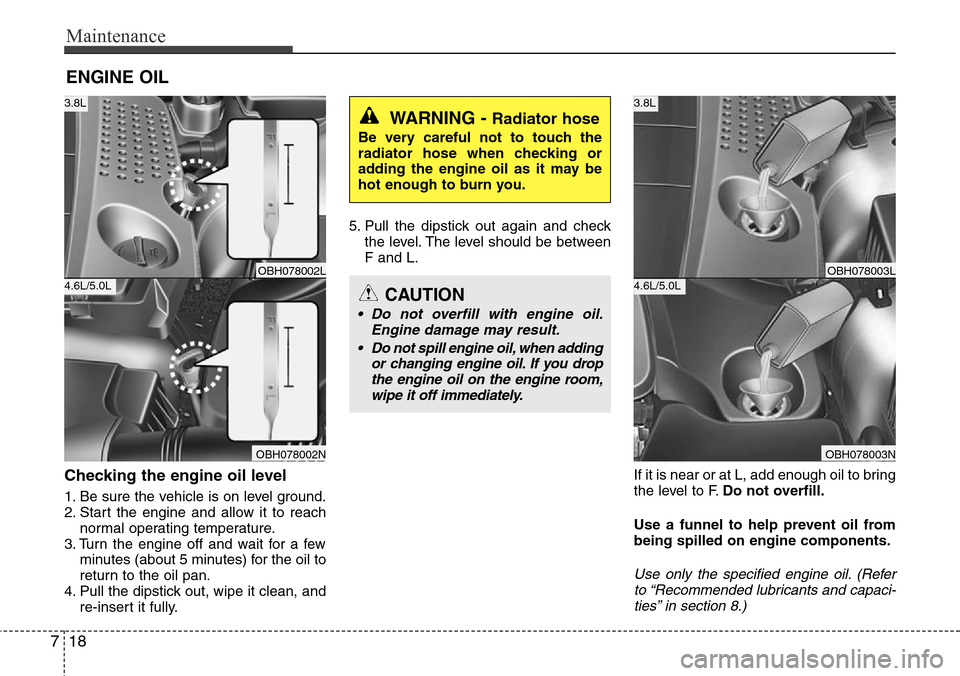
Checking the engine oil level
1. Be sure the vehicle is on level ground.
2. Start the engine and allow it to reach
normal operating temperature.
3. Turn the engine off and wait for a few
minutes (about 5 minutes) for the oil to
return to the oil pan.
4. Pull the dipstick out, wipe it clean, and
re-insert it fully.5. Pull the dipstick out again and check
the level. The level should be between
F and L.
If it is near or at L, add enough oil to bring
the level to F.Do not overfill.
Use a funnel to help prevent oil from
being spilled on engine components.
Use only the specified engine oil. (Refer
to “Recommended lubricants and capaci-
ties” in section 8.)
WARNING - Radiator hose
Be very careful not to touch the
radiator hose when checking or
adding the engine oil as it may be
hot enough to burn you.
OBH078002L
OBH078002N
3.8L
4.6L/5.0LOBH078003L
OBH078003N
3.8L
4.6L/5.0LCAUTION
• Do not overfill with engine oil.
Engine damage may result.
• Do not spill engine oil, when adding
or changing engine oil. If you drop
the engine oil on the engine room,
wipe it off immediately.
Page 321 of 385
719
Maintenance
Changing the engine oil and filter
Have engine oil and filter changed by an
authorized HYUNDAI dealer according to
the Maintenance Schedule at the begin-
ning of this section.The high-pressure cooling system has a
reservoir filled with year-round antifreeze
coolant. The reservoir is filled at the fac-
tory.
Check the antifreeze protection and
coolant level at least once a year, at the
beginning of the winter season, and
before traveling to a colder climate.
Checking the coolant level
WARNING
Used engine oil may cause irrita-
tion or cancer of the skin if left in
contact with the skin for prolonged
periods of time. Used engine oil
contains chemicals that have
caused cancer in laboratory ani-
mals. Always protect your skin by
washing your hands thoroughly
with soap and warm water as soon
as possible after handling used oil.
ENGINE COOLANT
WARNING
Removing radiator
cap
• Never attempt to remove the radi-
ator cap while the engine is oper-
ating or hot. Doing so might lead
to cooling system and engine
damage and could result in seri-
ous personal injury from escap-
ing hot coolant or steam.
• Turn the engine off and wait until
it cools down. Use extreme care
when removing the radiator cap.
Wrap a thick towel around it, and
turn it counterclockwise slowly to
the first stop. Step back while the
pressure is released from the
cooling system. When you are
sure all the pressure has been
released, press down on the cap,
using a thick towel, and continue
turning counterclockwise to
remove it.
(Continued)