instrument cluster Hyundai Equus 2013 Owner's Manual
[x] Cancel search | Manufacturer: HYUNDAI, Model Year: 2013, Model line: Equus, Model: Hyundai Equus 2013Pages: 479, PDF Size: 10.15 MB
Page 17 of 479
25
Your vehicle at a glance
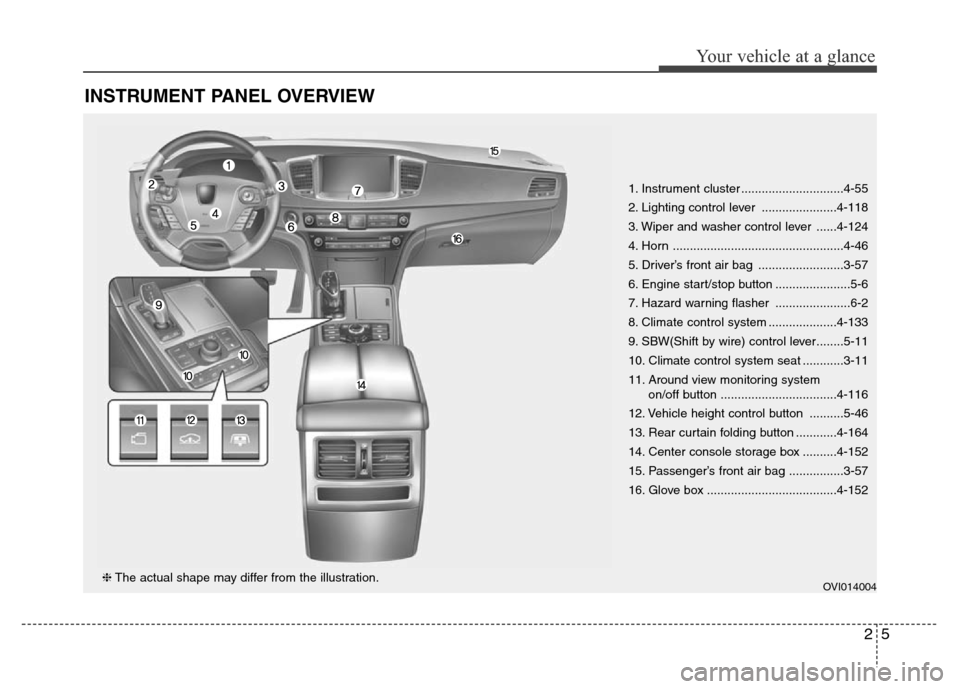
INSTRUMENT PANEL OVERVIEW
1. Instrument cluster ..............................4-55
2. Lighting control lever ......................4-118
3. Wiper and washer control lever ......4-124
4. Horn ..................................................4-46
5. Driver’s front air bag .........................3-57
6. Engine start/stop button ......................5-6
7. Hazard warning flasher ......................6-2
8. Climate control system ....................4-133
9. SBW(Shift by wire) control lever........5-11
10. Climate control system seat ............3-11
11. Around view monitoring system
on/off button ..................................4-116
12. Vehicle height control button ..........5-46
13. Rear curtain folding button ............4-164
14. Center console storage box ..........4-152
15. Passenger’s front air bag ................3-57
16. Glove box ......................................4-152
OVI014004❈The actual shape may differ from the illustration.
Page 75 of 479
Safety features of your vehicle
56 3
WARNING
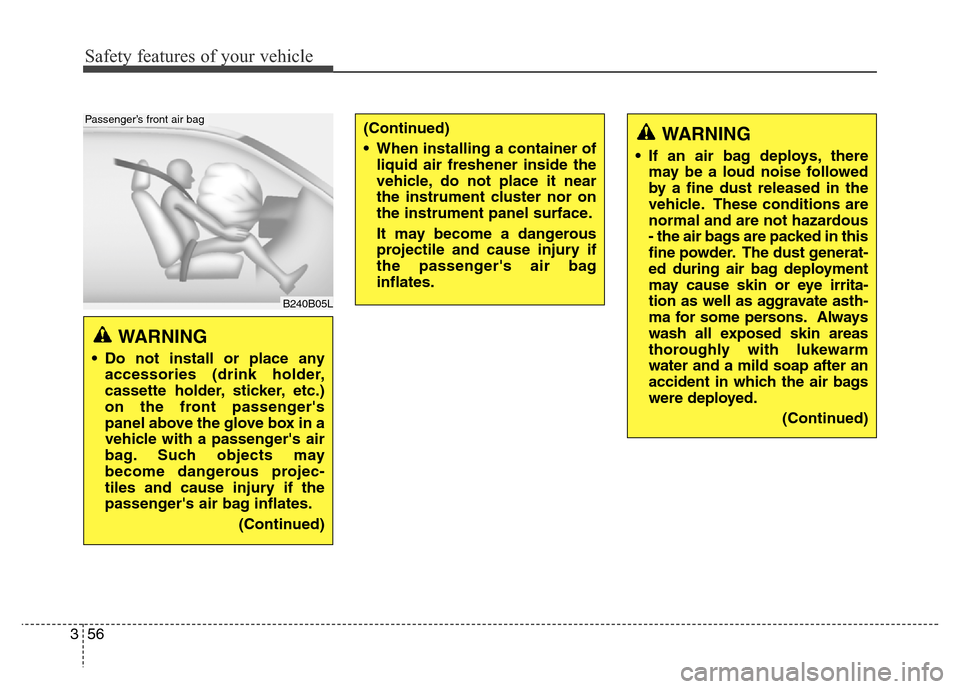
• Do not install or place any
accessories (drink holder,
cassette holder, sticker, etc.)
on the front passenger's
panel above the glove box in a
vehicle with a passenger's air
bag. Such objects may
become dangerous projec-
tiles and cause injury if the
passenger's air bag inflates.
(Continued)
(Continued)
• When installing a container of
liquid air freshener inside the
vehicle, do not place it near
the instrument cluster nor on
the instrument panel surface.
It may become a dangerous
projectile and cause injury if
the passenger's air bag
inflates.
B240B05L
Passenger’s front air bag
WARNING
• If an air bag deploys, there
may be a loud noise followed
by a fine dust released in the
vehicle. These conditions are
normal and are not hazardous
- the air bags are packed in this
fine powder. The dust generat-
ed during air bag deployment
may cause skin or eye irrita-
tion as well as aggravate asth-
ma for some persons. Always
wash all exposed skin areas
thoroughly with lukewarm
water and a mild soap after an
accident in which the air bags
were deployed.
(Continued)
Page 90 of 479
Features of your vehicle
Smart key . . . . . . . . . . . . . . . . . . . . . . . . . . . . . . . . . 4-4
• Smart key function . . . . . . . . . . . . . . . . . . . . . . . . . . . . 4-4
• Buttons on the smart key . . . . . . . . . . . . . . . . . . . . . . . 4-7
• Restrictions in handling keys . . . . . . . . . . . . . . . . . . . . 4-8
• Smart key precautions . . . . . . . . . . . . . . . . . . . . . . . . . 4-9
• Immobilizer system . . . . . . . . . . . . . . . . . . . . . . . . . . . 4-10
• Battery replacement . . . . . . . . . . . . . . . . . . . . . . . . . . 4-11
Theft-alarm system . . . . . . . . . . . . . . . . . . . . . . . . 4-13
Door locks . . . . . . . . . . . . . . . . . . . . . . . . . . . . . . . . 4-16
• From outside . . . . . . . . . . . . . . . . . . . . . . . . . . . . . . . . 4-16
• Power door latch . . . . . . . . . . . . . . . . . . . . . . . . . . . . . 4-17
• From inside . . . . . . . . . . . . . . . . . . . . . . . . . . . . . . . . . 4-17
• Child-protector rear door lock . . . . . . . . . . . . . . . . . 4-19
Trunk . . . . . . . . . . . . . . . . . . . . . . . . . . . . . . . . . . . . 4-20
• Non-powered trunk . . . . . . . . . . . . . . . . . . . . . . . . . . . 4-20
• Power trunk . . . . . . . . . . . . . . . . . . . . . . . . . . . . . . . . . 4-21
• Emergency trunk safety release . . . . . . . . . . . . . . . . . 4-26
Windows . . . . . . . . . . . . . . . . . . . . . . . . . . . . . . . . . 4-28
Hood. . . . . . . . . . . . . . . . . . . . . . . . . . . . . . . . . . . . . 4-33
Fuel filler lid . . . . . . . . . . . . . . . . . . . . . . . . . . . . . . 4-35
• Emergency fuel filler lid release. . . . . . . . . . . . . . . . . 4-37
Sunroof . . . . . . . . . . . . . . . . . . . . . . . . . . . . . . . . . . 4-38
• Sliding the sunroof . . . . . . . . . . . . . . . . . . . . . . . . . . . 4-39
• Tilting the sunroof . . . . . . . . . . . . . . . . . . . . . . . . . . . . 4-39
• Sunshade . . . . . . . . . . . . . . . . . . . . . . . . . . . . . . . . . . . 4-40• Resetting the sunroof . . . . . . . . . . . . . . . . . . . . . . . . . 4-41
Driver position memory system . . . . . . . . . . . . . . 4-42
Steering wheel . . . . . . . . . . . . . . . . . . . . . . . . . . . . . 4-44
• Power steering . . . . . . . . . . . . . . . . . . . . . . . . . . . . . . . 4-44
• Tilt/Telescopic steering . . . . . . . . . . . . . . . . . . . . . . . . 4-45
• Heated steering wheel . . . . . . . . . . . . . . . . . . . . . . . . . 4-45
• Horn . . . . . . . . . . . . . . . . . . . . . . . . . . . . . . . . . . . . . . . 4-46
Mirrors . . . . . . . . . . . . . . . . . . . . . . . . . . . . . . . . . . 4-47
• Inside rearview mirror . . . . . . . . . . . . . . . . . . . . . . . . 4-47
• Outside rearview mirror . . . . . . . . . . . . . . . . . . . . . . . 4-51
Instrument cluster . . . . . . . . . . . . . . . . . . . . . . . . . 4-55
• Instrument cluster control . . . . . . . . . . . . . . . . . . . . . 4-56
• LCD display control . . . . . . . . . . . . . . . . . . . . . . . . . . 4-57
• Gauges . . . . . . . . . . . . . . . . . . . . . . . . . . . . . . . . . . . . . 4-58
LCD display . . . . . . . . . . . . . . . . . . . . . . . . . . . . . . 4-63
• LCD modes. . . . . . . . . . . . . . . . . . . . . . . . . . . . . . . . . . 4-63
• Trip computer mode . . . . . . . . . . . . . . . . . . . . . . . . . . 4-64
• ASCC/LDWS mode . . . . . . . . . . . . . . . . . . . . . . . . . . . 4-64
• A/V mode . . . . . . . . . . . . . . . . . . . . . . . . . . . . . . . . . . . 4-64
• Turn by turn mode . . . . . . . . . . . . . . . . . . . . . . . . . . . 4-65
• Information mode . . . . . . . . . . . . . . . . . . . . . . . . . . . . 4-65
• User settings mode. . . . . . . . . . . . . . . . . . . . . . . . . . . . 4-68
• Warning messages . . . . . . . . . . . . . . . . . . . . . . . . . . . . 4-75
4
Page 144 of 479
455
Features of your vehicle
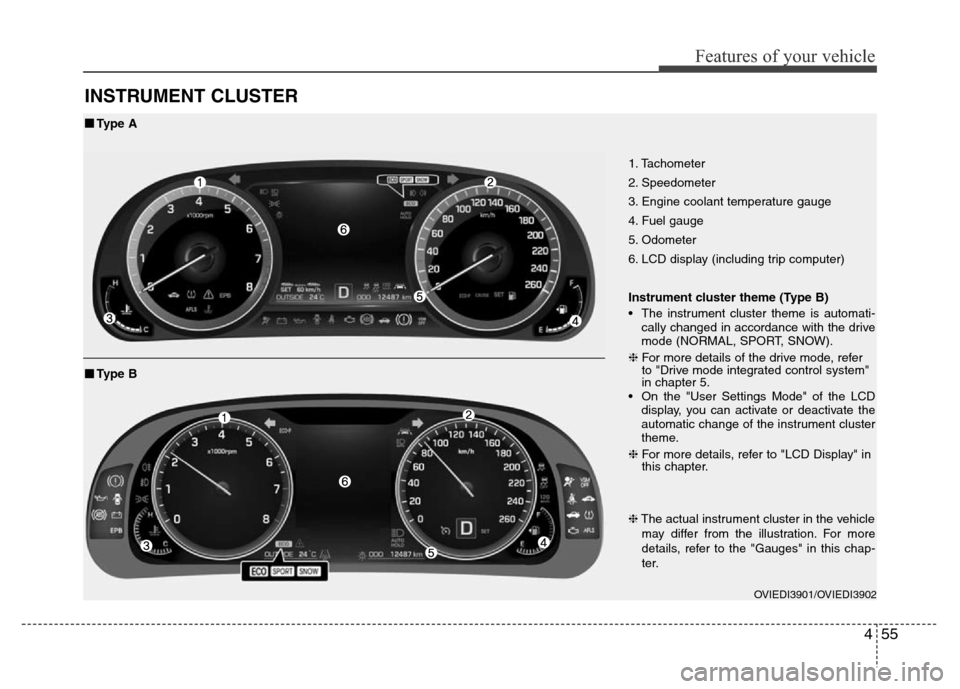
INSTRUMENT CLUSTER
1. Tachometer
2. Speedometer
3. Engine coolant temperature gauge
4. Fuel gauge
5. Odometer
6. LCD display (including trip computer)
Instrument cluster theme (Type B)
• The instrument cluster theme is automati-
cally changed in accordance with the drive
mode (NORMAL, SPORT, SNOW).
❈For more details of the drive mode, refer
to "Drive mode integrated control system"
in chapter 5.
• On the "User Settings Mode" of the LCD
display, you can activate or deactivate the
automatic change of the instrument cluster
theme.
❈For more details, refer to "LCD Display" in
this chapter.
OVIEDI3901/OVIEDI3902
■Type A
❈The actual instrument cluster in the vehicle
may differ from the illustration. For more
details, refer to the "Gauges" in this chap-
ter.
■Type B
Page 145 of 479
Features of your vehicle
56 4
Instrument cluster control
Adjusting Instrument Cluster
Illumination
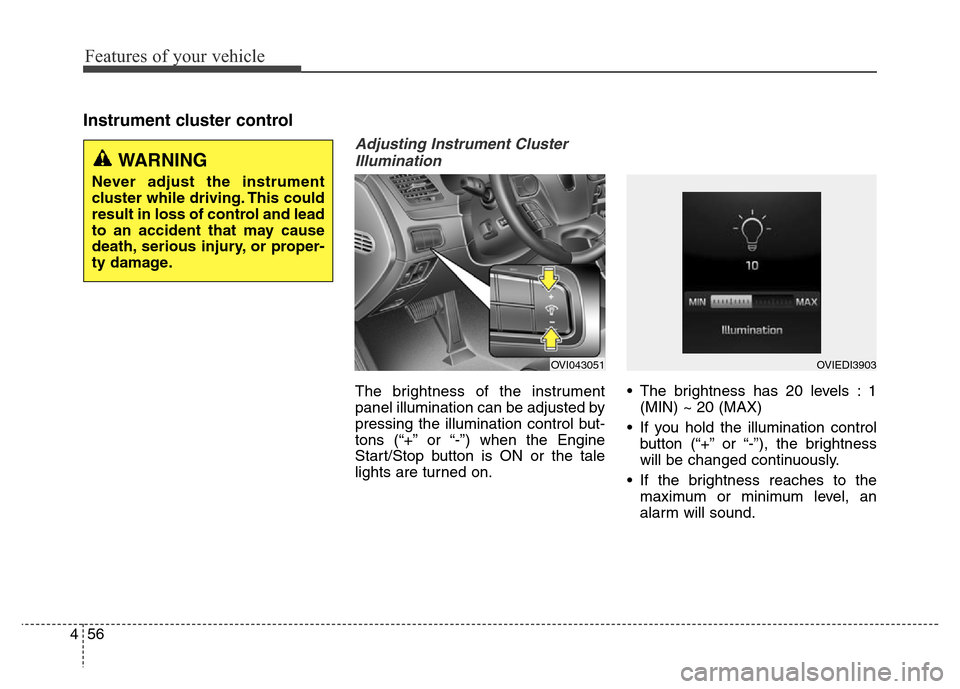
The brightness of the instrument
panel illumination can be adjusted by
pressing the illumination control but-
tons (“+” or “-”) when the Engine
Start/Stop button is ON or the tale
lights are turned on.• The brightness has 20 levels : 1
(MIN) ~ 20 (MAX)
• If you hold the illumination control
button (“+” or “-”), the brightness
will be changed continuously.
• If the brightness reaches to the
maximum or minimum level, an
alarm will sound.
OVI043051OVIEDI3903
WARNING
Never adjust the instrument
cluster while driving. This could
result in loss of control and lead
to an accident that may cause
death, serious injury, or proper-
ty damage.
Page 159 of 479
Features of your vehicle
70 4
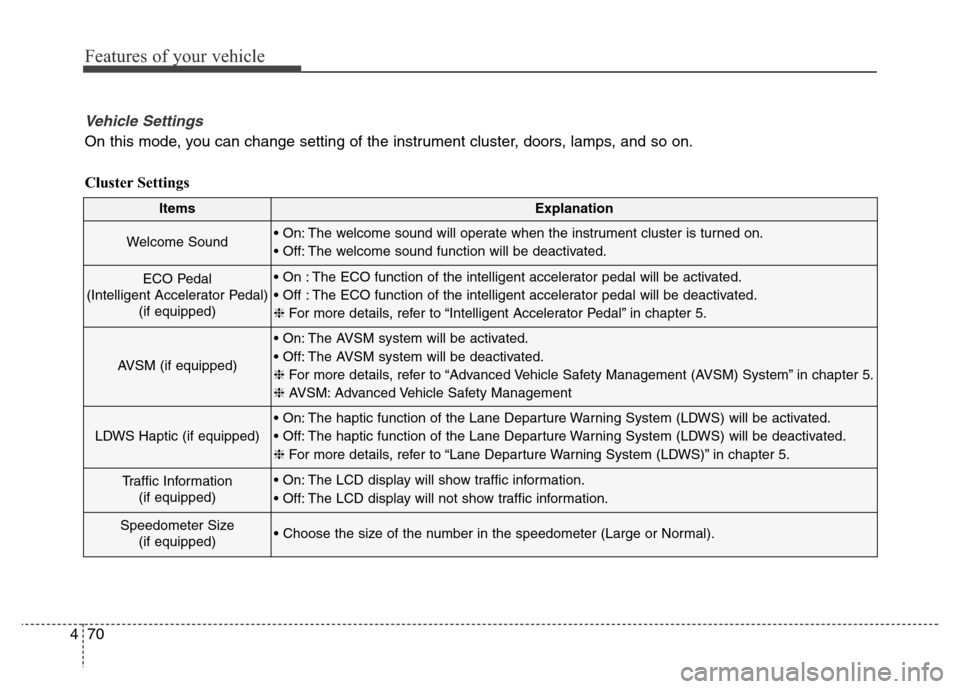
ItemsExplanation
Welcome Sound• On: The welcome sound will operate when the instrument cluster is turned on.
• Off: The welcome sound function will be deactivated.
ECO Pedal
(Intelligent Accelerator Pedal)
(if equipped)• On : The ECO function of the intelligent accelerator pedal will be activated.
• Off : The ECO function of the intelligent accelerator pedal will be deactivated.
❈For more details, refer to “Intelligent Accelerator Pedal” in chapter 5.
AVSM (if equipped)
• On: The AVSM system will be activated.
• Off: The AVSM system will be deactivated.
❈For more details, refer to “Advanced Vehicle Safety Management (AVSM) System” in chapter 5.
❈ AVSM: Advanced Vehicle Safety Management
LDWS Haptic (if equipped)
• On: The haptic function of the Lane Departure Warning System (LDWS) will be activated.
• Off: The haptic function of the Lane Departure Warning System (LDWS) will be deactivated.
❈For more details, refer to “Lane Departure Warning System (LDWS)” in chapter 5.
Traffic Information
(if equipped)• On: The LCD display will show traffic information.
• Off: The LCD display will not show traffic information.
Speedometer Size
(if equipped)• Choose the size of the number in the speedometer (Large or Normal).
Vehicle Settings
On this mode, you can change setting of the instrument cluster, doors, lamps, and so on.
Cluster Settings
Page 160 of 479
471
Features of your vehicle
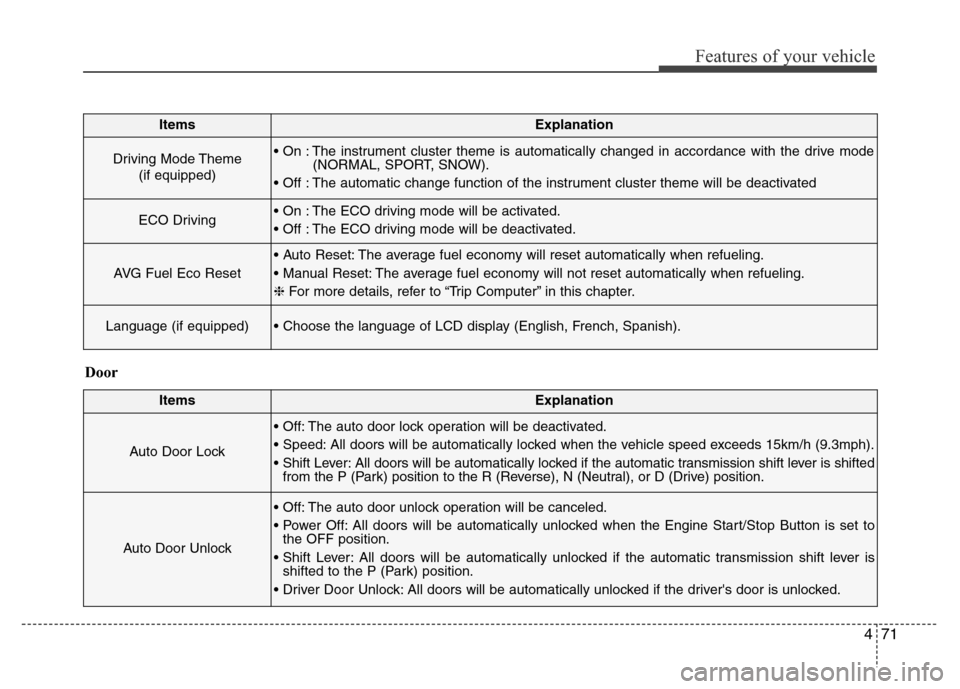
ItemsExplanation
Driving Mode Theme
(if equipped)• On : The instrument cluster theme is automatically changed in accordance with the drive mode
(NORMAL, SPORT, SNOW).
• Off : The automatic change function of the instrument cluster theme will be deactivated
ECO Driving• On : The ECO driving mode will be activated.
• Off : The ECO driving mode will be deactivated.
AVG Fuel Eco Reset
• Auto Reset: The average fuel economy will reset automatically when refueling.
• Manual Reset: The average fuel economy will not reset automatically when refueling.
❈For more details, refer to “Trip Computer” in this chapter.
Language (if equipped)• Choose the language of LCD display (English, French, Spanish).
ItemsExplanation
Auto Door Lock
• Off: The auto door lock operation will be deactivated.
• Speed: All doors will be automatically locked when the vehicle speed exceeds 15km/h (9.3mph).
• Shift Lever: All doors will be automatically locked if the automatic transmission shift lever is shifted
from the P (Park) position to the R (Reverse), N (Neutral), or D (Drive) position.
Auto Door Unlock
• Off: The auto door unlock operation will be canceled.
• Power Off: All doors will be automatically unlocked when the Engine Start/Stop Button is set to
the OFF position.
• Shift Lever: All doors will be automatically unlocked if the automatic transmission shift lever is
shifted to the P (Park) position.
• Driver Door Unlock: All doors will be automatically unlocked if the driver's door is unlocked.
Door
Page 191 of 479
![Hyundai Equus 2013 Owners Manual Features of your vehicle
102 4
Lane Departure Warning
System (LDWS)
Indicator Light
(if equipped)
This indicator light illuminates:
• [Green] When you activate the lane
departure warning system by
Hyundai Equus 2013 Owners Manual Features of your vehicle
102 4
Lane Departure Warning
System (LDWS)
Indicator Light
(if equipped)
This indicator light illuminates:
• [Green] When you activate the lane
departure warning system by](/img/35/14642/w960_14642-190.png)
Features of your vehicle
102 4
Lane Departure Warning
System (LDWS)
Indicator Light
(if equipped)
This indicator light illuminates:
• [Green] When you activate the lane
departure warning system by
pressing the LDWS button.
• [White] When system operating
conditions are not satisfied or
when the sensor does not detect
the lane line.
• [Yellow] When there is a malfunc-
tion with the lane departure warn-
ing system.
In this case, we recommend that
you have the vehicle inspected by
an authorized HYUNDAI dealer.
❈For more details, refer to “Lane
Departure Warning System
(LDWS)” in chapter 5.
Advanced Vehicle Safety
Management (AVSM)
OFF Indicator Light
(if equipped)
This indicator light illuminates:
• Once you set the Engine Start/Stop
Button to the ON position.
- It illuminates for approximately 3
seconds and then goes off.
• When you deactivate the AVSM sys-
tem by setting on the LCD display.
❈For more details, refer to “LCD
Display” in this chapter.
If this indicator stays on when VSM
OFF is not selected, the AVSM may
have malfunctioned.
In this case, we recommend that you
have the vehicle inspected by an
authorized HYUNDAI dealer.
❈For more details, refer to “Advanced
Vehicle Safety Management
(AVSM) System” in chapter 5.
SPORT/SNOW Mode
Indicator Light
This indicator light illuminates:
• When you select "SPORT/SNOW"
mode as drive mode.
❈For more details, refer to "Drive
mode integrated control system"
in chapter 5.
✽ NOTICE
If you activate the Driving Mode
Theme on the User Settings Mode of
the LCD display (if equipped), the
SPORT and SNOW indicators will
not turn on the instrument cluster.
VSM
OFFSPORT
Page 193 of 479
Features of your vehicle
104 4
Description
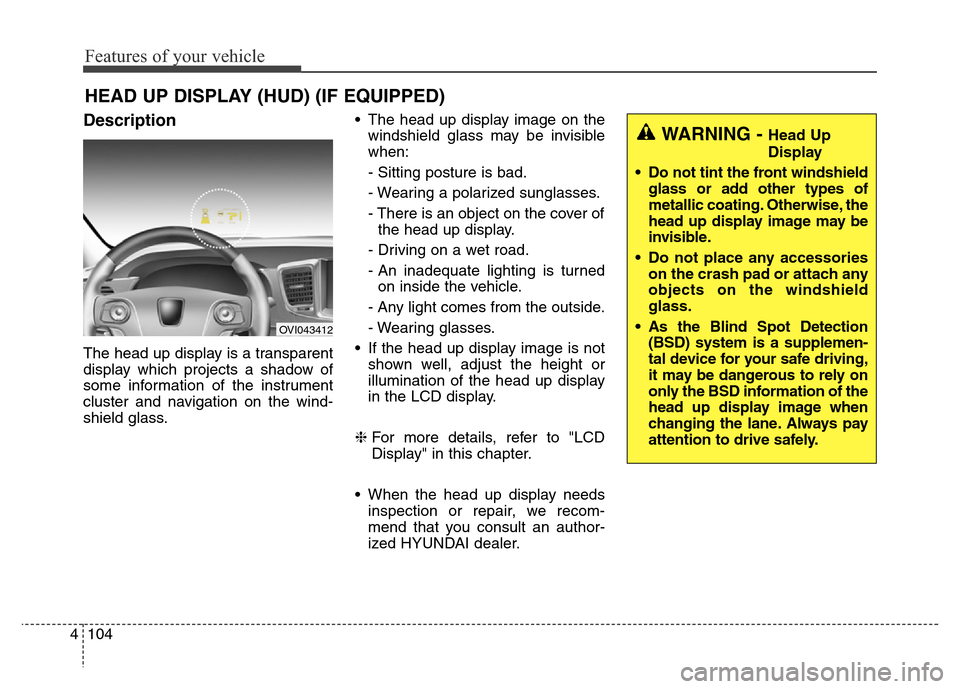
The head up display is a transparent
display which projects a shadow of
some information of the instrument
cluster and navigation on the wind-
shield glass.• The head up display image on the
windshield glass may be invisible
when:
- Sitting posture is bad.
- Wearing a polarized sunglasses.
- There is an object on the cover of
the head up display.
- Driving on a wet road.
- An inadequate lighting is turned
on inside the vehicle.
- Any light comes from the outside.
- Wearing glasses.
• If the head up display image is not
shown well, adjust the height or
illumination of the head up display
in the LCD display.
❈For more details, refer to "LCD
Display" in this chapter.
• When the head up display needs
inspection or repair, we recom-
mend that you consult an author-
ized HYUNDAI dealer.
HEAD UP DISPLAY (HUD) (IF EQUIPPED)
OVI043412
WARNING - Head Up
Display
• Do not tint the front windshield
glass or add other types of
metallic coating. Otherwise, the
head up display image may be
invisible.
• Do not place any accessories
on the crash pad or attach any
objects on the windshield
glass.
• As the Blind Spot Detection
(BSD) system is a supplemen-
tal device for your safe driving,
it may be dangerous to rely on
only the BSD information of the
head up display image when
changing the lane. Always pay
attention to drive safely.
Page 302 of 479
545
Driving your vehicle
SPORT mode
SPORT mode focuses on dynamic
driving by automatically controlling
the steering wheel, engine and
transaxle system.
• When the DRIVE MODE
button is pressed and
the SPORT mode is
selected, the SPORT
indicator will illuminate.
• If the SPORT mode is activated,
and the engine start/stop button is
turned off and on DRIVE MODE
would be changed to NORMAL
mode. To turn on the SPORT mode
press DRIVE MODE button again.
• If the system is activated:
- Deceleration from release of
accelerator pedal will result in less
rapid fall in RPM (revolutions per
minute) than in the NORMAL
mode.
- Up-shifting is delayed.
✽ NOTICE
In Sport drive mode, the fuel effi-
ciency may decrease.
✽ NOTICE
If you activate the Driving Mode
Theme on the User Settings Mode of
the LCD display (if equipped), the
SPORT and SNOW indicators will
not turn on the instrument cluster.
SNOW mode (if equipped)
Snow mode helps the driver to drive
more effectively on slippery roads
such as snowy or muddy roads.
• When the DRIVE MODE
button is pressed and
the SNOW mode is
selected, the SNOW
indicator will illuminate.
SPORTSNOW