Hyundai Equus 2015 Owner's Manual
Manufacturer: HYUNDAI, Model Year: 2015, Model line: Equus, Model: Hyundai Equus 2015Pages: 483, PDF Size: 13.26 MB
Page 141 of 483
Features of your vehicle
52 4
The electric rearview mirror automati-
cally controls the glare from the head-
lights of the car behind you in night-
time or low light driving conditions. The
sensor mounted in the mirror senses
the light level around the vehicle, and
automatically controls the headlight
glare from vehicles behind you.
When the engine is running, the glare
is automatically controlled by the sen-
sor mounted in the rearview mirror.
Whenever the shift lever is shifted
into R (Reverse), the mirror will auto-
matically go to the brightest setting in
order to improve the drivers view
behind the vehicle.To operate the electric rearview mirror:
• Press the on/off button (1) to turn the
automatic dimming function on. The
mirror indicator light will illuminate.
Press the on/off button to turn the
automatic dimming function off. The
mirror indicator light will turn off.
• The mirror defaults to the ON posi-
tion whenever the ignition switch is
turned on.1. To operate Compass feature
Press and release the button, then the
vehicle's directional heading will be
displayed. Pressing and releasing the
button again will turn off the display.
Heading display
- E : East
- W : West
- S : South
- N : North
ex) NE : North East
CAUTION
When cleaning the mirror, use a
paper towel or similar material
dampened with glass cleaner.
Do not spray glass cleaner
directly on the mirror as that
may cause the liquid cleaner to
enter the mirror housing.
Page 142 of 483
453
Features of your vehicle
2. Calibration procedure
Press and hold the button for more
than 9 but less than 12 seconds.
When the compass memory is
cleared a "C" will appear in the display.
- Driving the vehicle in a circle at less
than 8km/h 2 times or until the com-
pass heading appears.
- Driving in a circle in right-handed
direction and opposite direction are
possible, and if the calibration is
completed, the compass heading
will appear.
- Keep driving in a circle until a com-
pass heading appears.3. Setting the compass zone
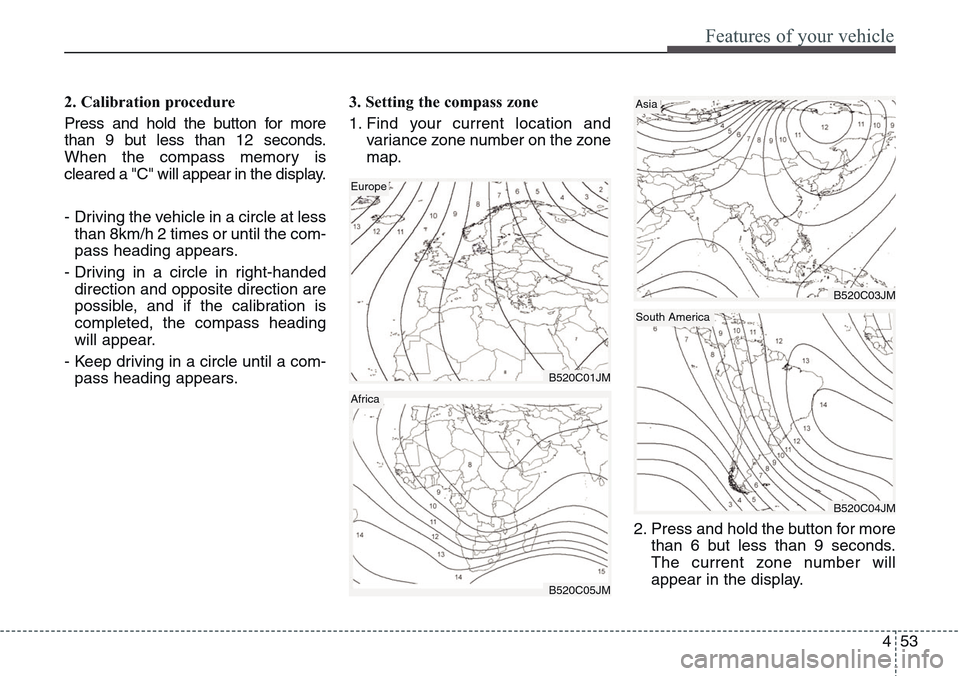
1. Find your current location and
variance zone number on the zone
map.
2. Press and hold the button for more
than 6 but less than 9 seconds.
The current zone number will
appear in the display.
B520C01JM
Europe
B520C03JM
Asia
B520C04JM
South America
B520C05JM
Africa
Page 143 of 483
Features of your vehicle
54 4
3. Press the button until the new zone
number appears in the display.
After you stop pressing the button
in, the display will show a compass
direction within a few seconds.
4. Changing Mirror Angle setting
(if equipped):
Due to mirror positions being angled
towards the driver, the compass mir-
ror can also compensate for drivers
seated on the Left Hand side of the
vehicle (steering wheel on the LH
side of the vehicle) or Right Hand
side of the vehicle (steering wheel on
the RH side of the vehicle).To adjust the Left Hand, “L” or Right
Hand, “R”, setting:
1. Press and hold the button for more
than 12 seconds.
2. Release then press the button to
toggle between “L” and “R”.
✽NOTICE
This procedure also causes the com-
pass to be de-calibrated.
3. To re-calibrate the compass, drive
the vehicle in 2 complete circles at
less than 8km/h (5mph).
CAUTION
1.Do not install the ski rack,
antenna, etc. which are
attached to the vehicle by
means of a magnet. They affect
the operation of the compass.
2.If the compass deviates from
the correct indication soon
after repeated adjustment, we
recommend that the system
be checked by an authorized
HYUNDAI dealer.
3.The compass may not indicate
the correct compass point in
tunnels or while driving up or
down a steep hill.
(The compass returns to the
correct compass point when
the vehicle moves to an area
where the geomagnetism is
stabilized.)
4.When cleaning the mirror, use
a paper towel or similar materi-
al dampened with glass clean-
er. Do not spray glass cleaner
directly on the mirror as that
may cause the liquid cleaner to
enter the mirror housing.
Page 144 of 483
455
Features of your vehicle
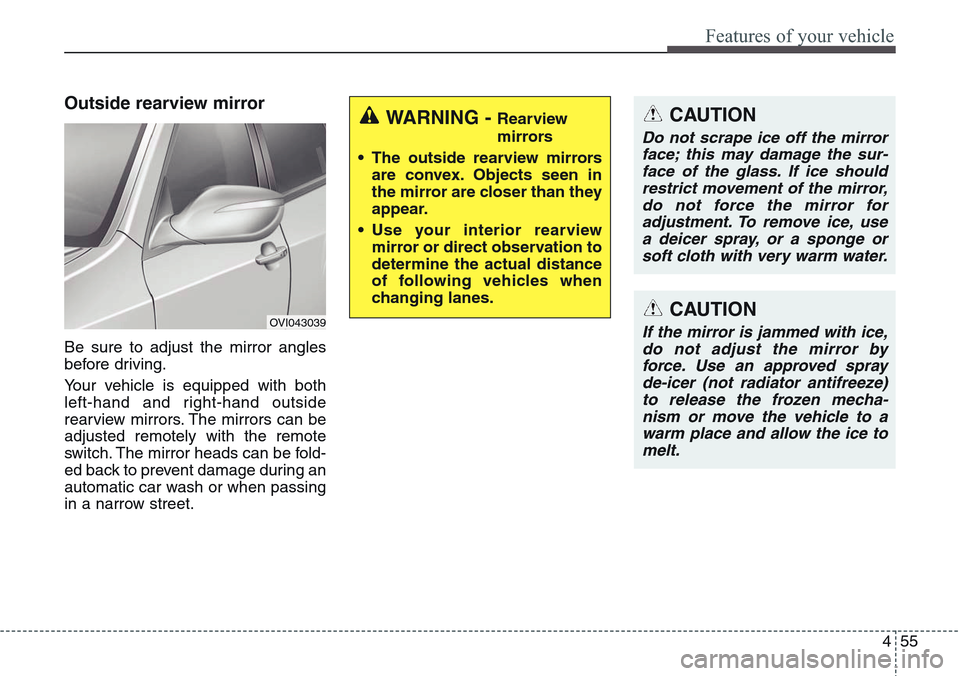
Outside rearview mirror
Be sure to adjust the mirror angles
before driving.
Your vehicle is equipped with both
left-hand and right-hand outside
rearview mirrors. The mirrors can be
adjusted remotely with the remote
switch. The mirror heads can be fold-
ed back to prevent damage during an
automatic car wash or when passing
in a narrow street.
OVI043039
WARNING - Rearview
mirrors
• The outside rearview mirrors
are convex. Objects seen in
the mirror are closer than they
appear.
• Use your interior rearview
mirror or direct observation to
determine the actual distance
of following vehicles when
changing lanes.CAUTION
Do not scrape ice off the mirror
face; this may damage the sur-
face of the glass. If ice should
restrict movement of the mirror,
do not force the mirror for
adjustment. To remove ice, use
a deicer spray, or a sponge or
soft cloth with very warm water.
CAUTION
If the mirror is jammed with ice,
do not adjust the mirror by
force. Use an approved spray
de-icer (not radiator antifreeze)
to release the frozen mecha-
nism or move the vehicle to a
warm place and allow the ice to
melt.
Page 145 of 483
Features of your vehicle
56 4
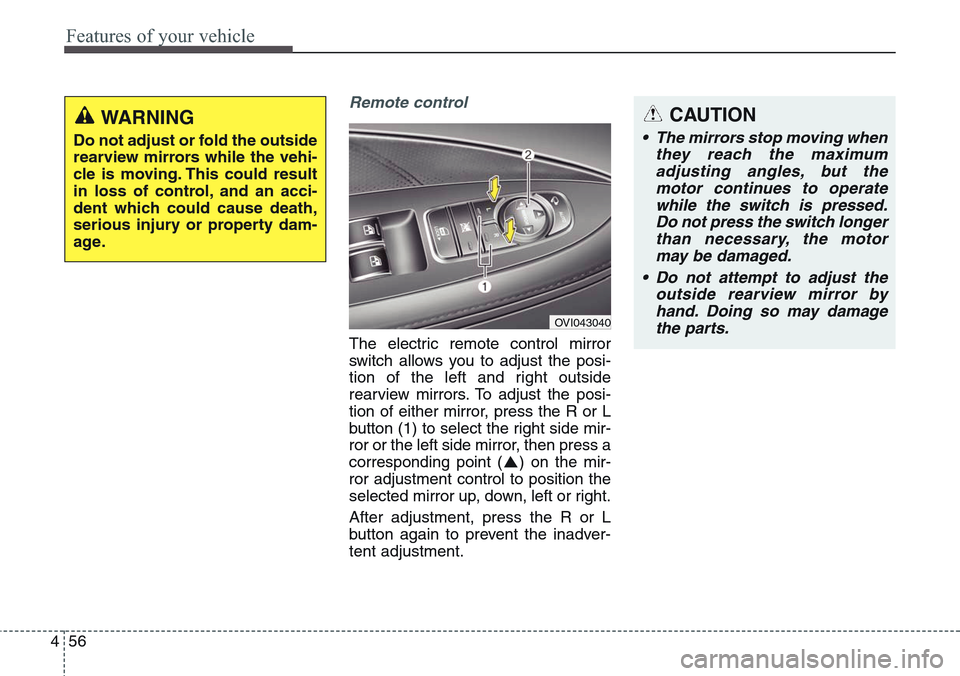
Remote control
The electric remote control mirror
switch allows you to adjust the posi-
tion of the left and right outside
rearview mirrors. To adjust the posi-
tion of either mirror, press the R or L
button (1) to select the right side mir-
ror or the left side mirror, then press a
corresponding point ( ) on the mir-
ror adjustment control to position the
selected mirror up, down, left or right.
After adjustment, press the R or L
button again to prevent the inadver-
tent adjustment.
OVI043040
WARNING
Do not adjust or fold the outside
rearview mirrors while the vehi-
cle is moving. This could result
in loss of control, and an acci-
dent which could cause death,
serious injury or property dam-
age.
CAUTION
• The mirrors stop moving when
they reach the maximum
adjusting angles, but the
motor continues to operate
while the switch is pressed.
Do not press the switch longer
than necessary, the motor
may be damaged.
• Do not attempt to adjust the
outside rearview mirror by
hand. Doing so may damage
the parts.
Page 146 of 483
457
Features of your vehicle
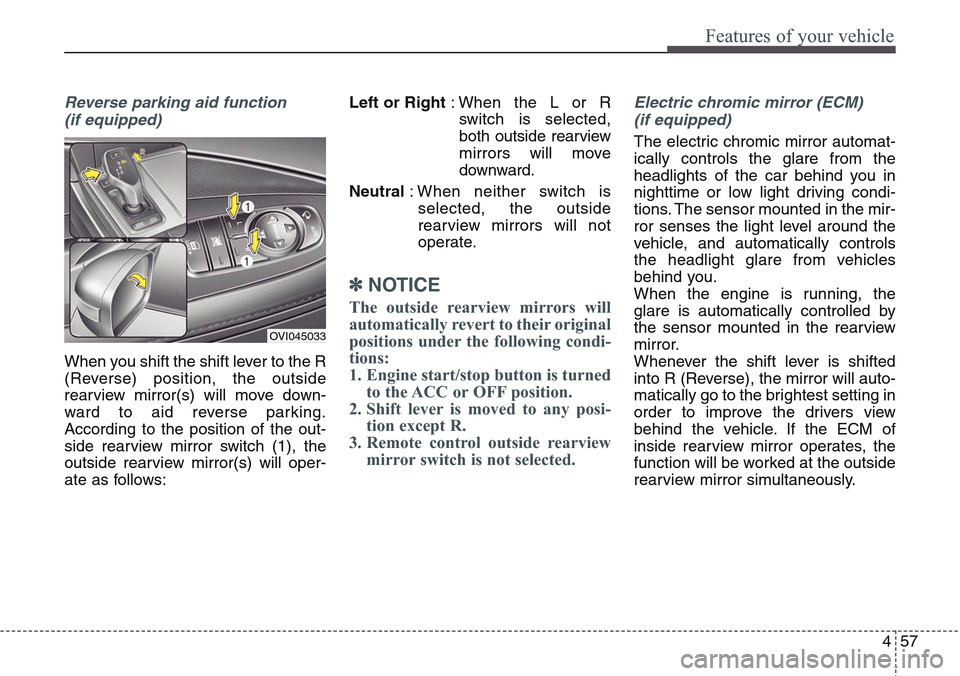
Reverse parking aid function
(if equipped)
When you shift the shift lever to the R
(Reverse) position, the outside
rearview mirror(s) will move down-
ward to aid reverse parking.
According to the position of the out-
side rearview mirror switch (1), the
outside rearview mirror(s) will oper-
ate as follows:Left or Right: When the L or R
switch is selected,
both outside rearview
mirrors will move
downward.
Neutral: When neither switch is
selected, the outside
rearview mirrors will not
operate.
✽NOTICE
The outside rearview mirrors will
automatically revert to their original
positions under the following condi-
tions:
1. Engine start/stop button is turned
to the ACC or OFF position.
2. Shift lever is moved to any posi-
tion except R.
3. Remote control outside rearview
mirror switch is not selected.
Electric chromic mirror (ECM)
(if equipped)
The electric chromic mirror automat-
ically controls the glare from the
headlights of the car behind you in
nighttime or low light driving condi-
tions. The sensor mounted in the mir-
ror senses the light level around the
vehicle, and automatically controls
the headlight glare from vehicles
behind you.
When the engine is running, the
glare is automatically controlled by
the sensor mounted in the rearview
mirror.
Whenever the shift lever is shifted
into R (Reverse), the mirror will auto-
matically go to the brightest setting in
order to improve the drivers view
behind the vehicle. If the ECM of
inside rearview mirror operates, the
function will be worked at the outside
rearview mirror simultaneously.
OVI045033
Page 147 of 483
Features of your vehicle
58 4
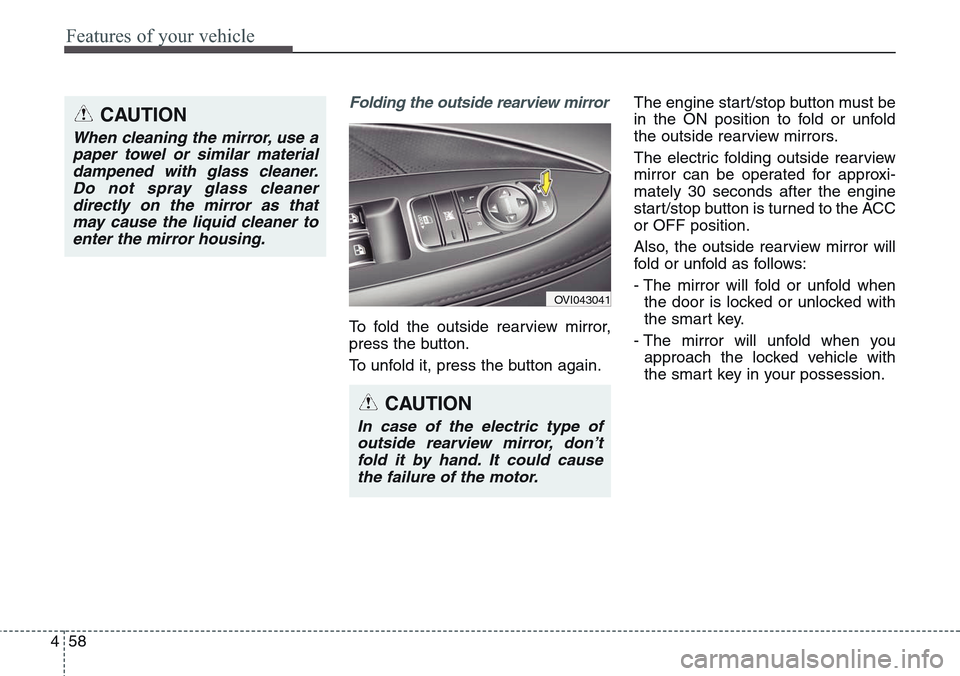
Folding the outside rearview mirror
To fold the outside rearview mirror,
press the button.
To unfold it, press the button again.The engine start/stop button must be
in the ON position to fold or unfold
the outside rearview mirrors.
The electric folding outside rearview
mirror can be operated for approxi-
mately 30 seconds after the engine
start/stop button is turned to the ACC
or OFF position.
Also, the outside rearview mirror will
fold or unfold as follows:
- The mirror will fold or unfold when
the door is locked or unlocked with
the smart key.
- The mirror will unfold when you
approach the locked vehicle with
the smart key in your possession.
OVI043041
CAUTION
In case of the electric type of
outside rearview mirror, don’t
fold it by hand. It could cause
the failure of the motor.
CAUTION
When cleaning the mirror, use a
paper towel or similar material
dampened with glass cleaner.
Do not spray glass cleaner
directly on the mirror as that
may cause the liquid cleaner to
enter the mirror housing.
Page 148 of 483
459
Features of your vehicle
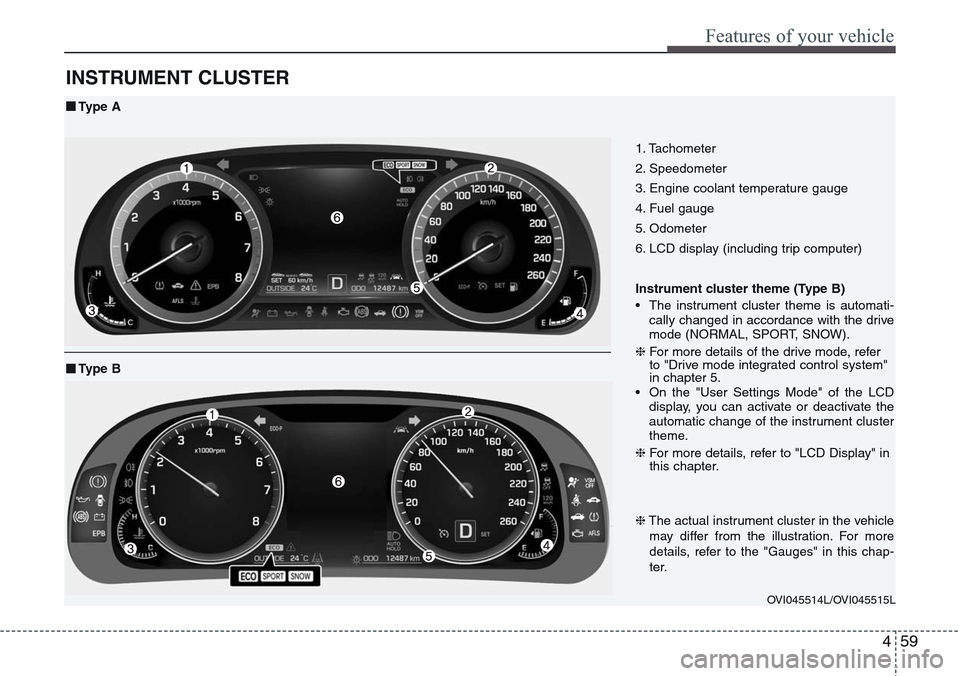
INSTRUMENT CLUSTER
1. Tachometer
2. Speedometer
3. Engine coolant temperature gauge
4. Fuel gauge
5. Odometer
6. LCD display (including trip computer)
Instrument cluster theme (Type B)
• The instrument cluster theme is automati-
cally changed in accordance with the drive
mode (NORMAL, SPORT, SNOW).
❈For more details of the drive mode, refer
to "Drive mode integrated control system"
in chapter 5.
• On the "User Settings Mode" of the LCD
display, you can activate or deactivate the
automatic change of the instrument cluster
theme.
❈For more details, refer to "LCD Display" in
this chapter.
OVI045514L/OVI045515L
■Type A
❈The actual instrument cluster in the vehicle
may differ from the illustration. For more
details, refer to the "Gauges" in this chap-
ter.
■Type B
Page 149 of 483
Features of your vehicle
60 4
Instrument cluster control
Adjusting Instrument Cluster
Illumination
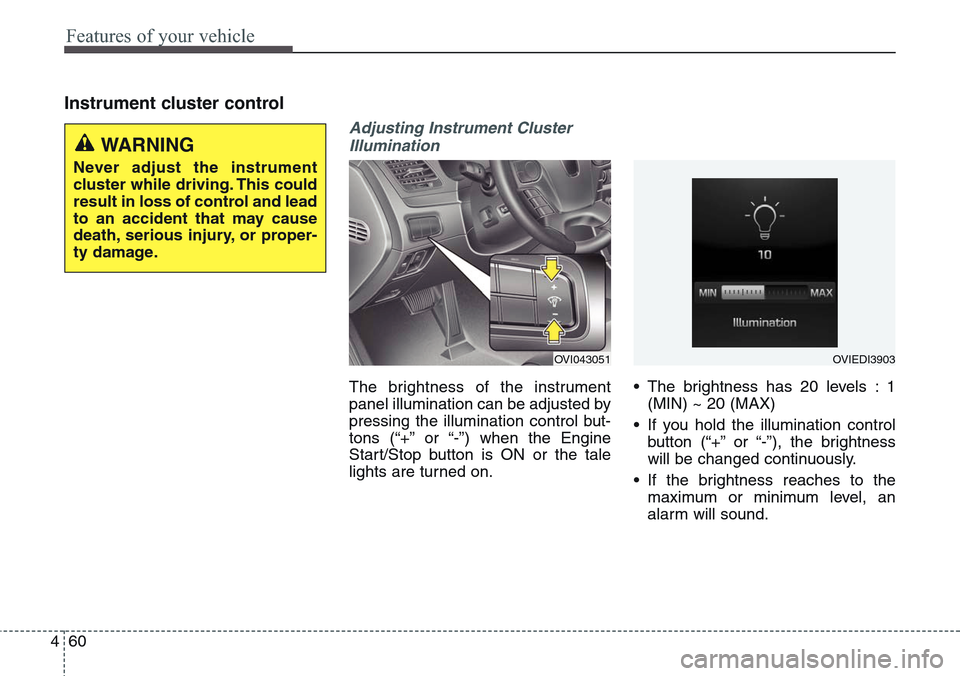
The brightness of the instrument
panel illumination can be adjusted by
pressing the illumination control but-
tons (“+” or “-”) when the Engine
Start/Stop button is ON or the tale
lights are turned on.• The brightness has 20 levels : 1
(MIN) ~ 20 (MAX)
• If you hold the illumination control
button (“+” or “-”), the brightness
will be changed continuously.
• If the brightness reaches to the
maximum or minimum level, an
alarm will sound.
OVI043051OVIEDI3903
WARNING
Never adjust the instrument
cluster while driving. This could
result in loss of control and lead
to an accident that may cause
death, serious injury, or proper-
ty damage.
Page 150 of 483
461
Features of your vehicle
LCD Display Control
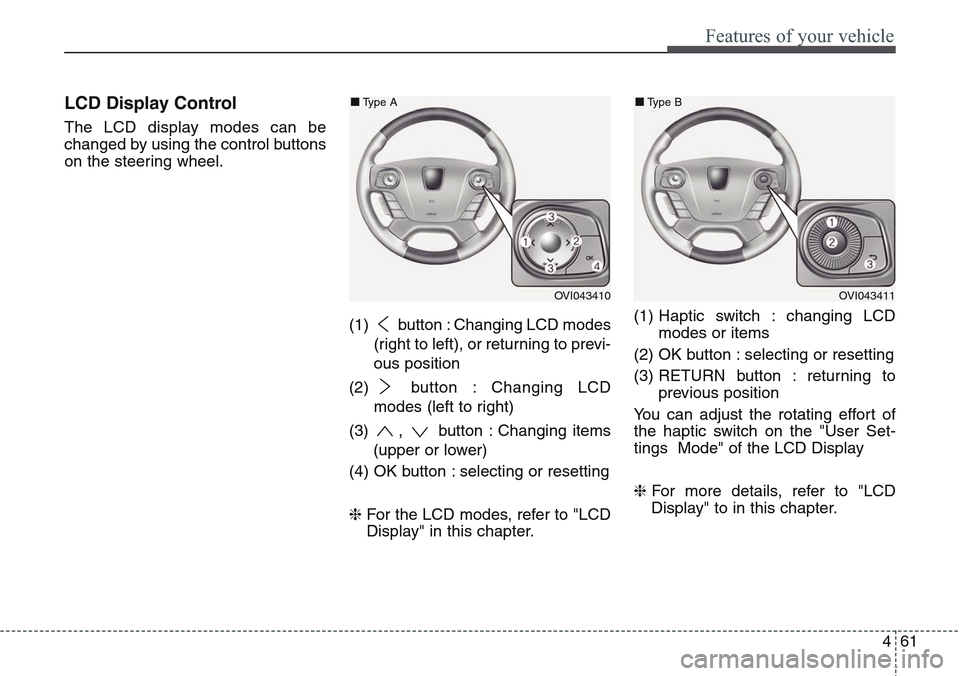
The LCD display modes can be
changed by using the control buttons
on the steering wheel.
(1) button : Changing LCD modes
(right to left), or returning to previ-
ous position
(2) button : Changing LCD
modes (left to right)
(3) , button : Changing items
(upper or lower)
(4) OK button : selecting or resetting
❈For the LCD modes, refer to "LCD
Display" in this chapter.(1) Haptic switch : changing LCD
modes or items
(2) OK button : selecting or resetting
(3) RETURN button : returning to
previous position
You can adjust the rotating effort of
the haptic switch on the "User Set-
tings Mode" of the LCD Display
❈For more details, refer to "LCD
Display" to in this chapter.
OVI043410
■Type A
OVI043411
■Type B