Hyundai Equus 2015 Owner's Manual
Manufacturer: HYUNDAI, Model Year: 2015, Model line: Equus, Model: Hyundai Equus 2015Pages: 483, PDF Size: 13.26 MB
Page 451 of 483
Maintenance
62 7
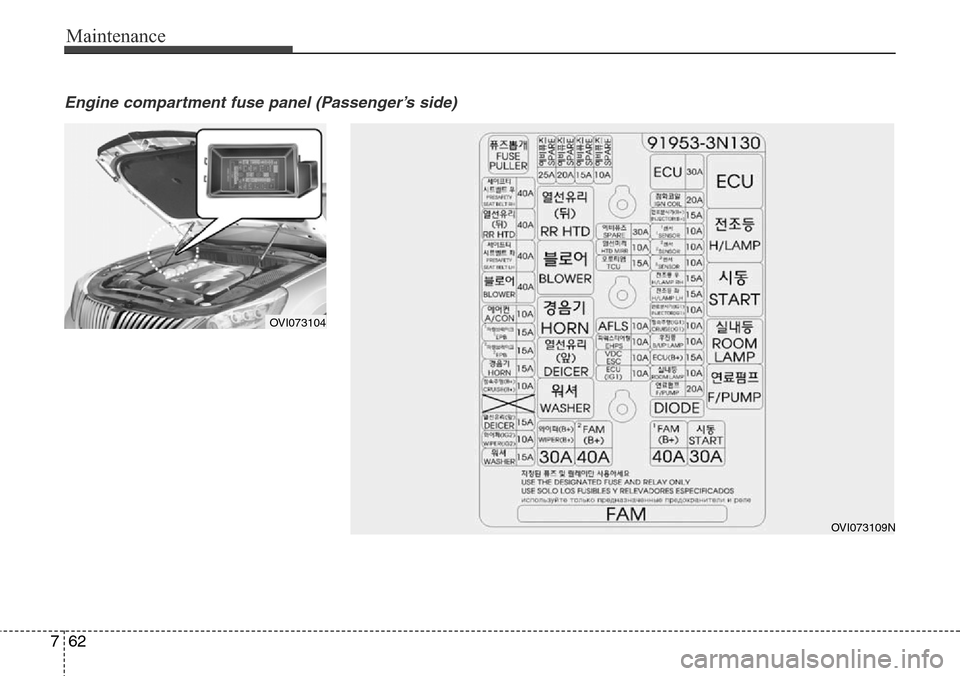
Engine compartment fuse panel (Passenger’s side)
OVI073104
OVI073109N
Page 452 of 483
763
Maintenance
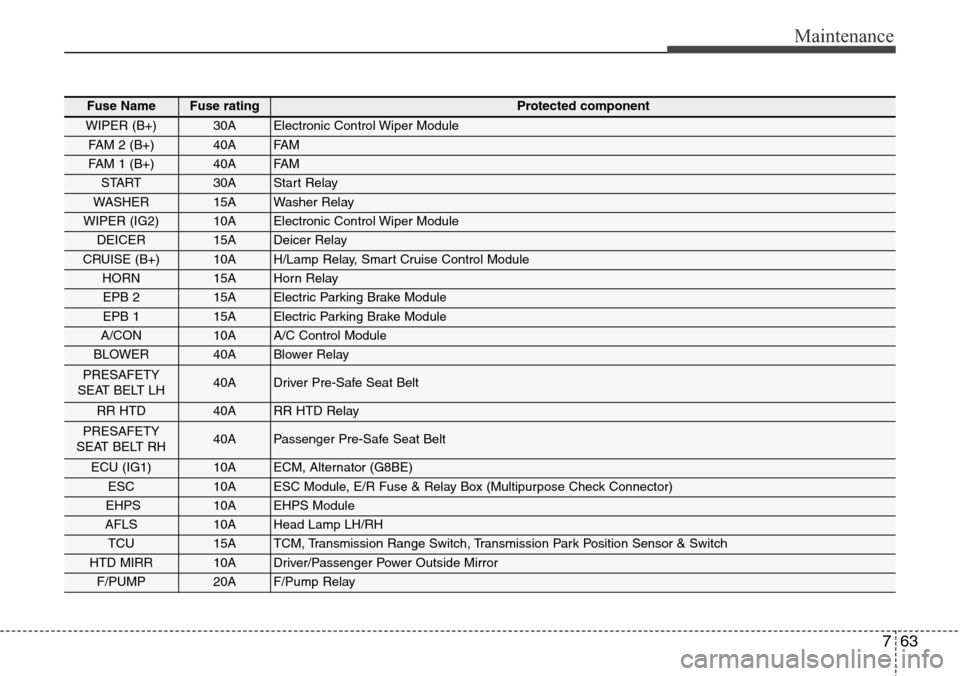
Fuse NameFuse ratingProtected component
WIPER (B+)30AElectronic Control Wiper Module
FAM 2 (B+)40AFA M
FAM 1 (B+)40AFA M
START30AStart Relay
WASHER15AWasher Relay
WIPER (IG2)10AElectronic Control Wiper Module
DEICER15ADeicer Relay
CRUISE (B+)10AH/Lamp Relay, Smart Cruise Control Module
HORN15AHorn Relay
EPB 215AElectric Parking Brake Module
EPB 115AElectric Parking Brake Module
A/CON10AA/C Control Module
BLOWER40ABlower Relay
PRESAFETY
SEAT BELT LH40ADriver Pre-Safe Seat Belt
RR HTD40ARR HTD Relay
PRESAFETY
SEAT BELT RH40APassenger Pre-Safe Seat Belt
ECU (IG1)10AECM, Alternator (G8BE)
ESC10AESC Module, E/R Fuse & Relay Box (Multipurpose Check Connector)
EHPS10AEHPS Module
AFLS10AHead Lamp LH/RH
TCU15ATCM, Transmission Range Switch, Transmission Park Position Sensor & Switch
HTD MIRR10ADriver/Passenger Power Outside Mirror
F/PUMP20AF/Pump Relay
Page 453 of 483
Maintenance
64 7
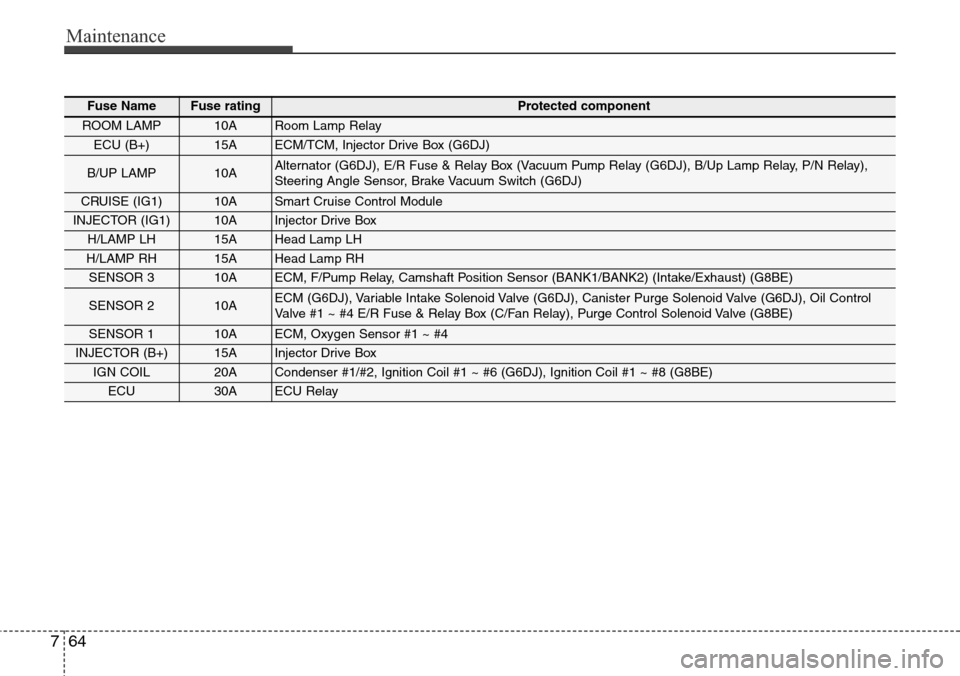
Fuse NameFuse ratingProtected component
ROOM LAMP10ARoom Lamp Relay
ECU (B+)15AECM/TCM, Injector Drive Box (G6DJ)
B/UP LAMP10AAlternator (G6DJ), E/R Fuse & Relay Box (Vacuum Pump Relay (G6DJ), B/Up Lamp Relay, P/N Relay),
Steering Angle Sensor, Brake Vacuum Switch (G6DJ)
CRUISE (IG1)10ASmart Cruise Control Module
INJECTOR (IG1)10AInjector Drive Box
H/LAMP LH15AHead Lamp LH
H/LAMP RH15AHead Lamp RH
SENSOR 310AECM, F/Pump Relay, Camshaft Position Sensor (BANK1/BANK2) (Intake/Exhaust) (G8BE)
SENSOR 210AECM (G6DJ), Variable Intake Solenoid Valve (G6DJ), Canister Purge Solenoid Valve (G6DJ), Oil Control
Valve #1 ~ #4 E/R Fuse & Relay Box (C/Fan Relay), Purge Control Solenoid Valve (G8BE)
SENSOR 110AECM, Oxygen Sensor #1 ~ #4
INJECTOR (B+)15AInjector Drive Box
IGN COIL20ACondenser #1/#2, Ignition Coil #1 ~ #6 (G6DJ), Ignition Coil #1 ~ #8 (G8BE)
ECU30AECU Relay
Page 454 of 483
765
Maintenance
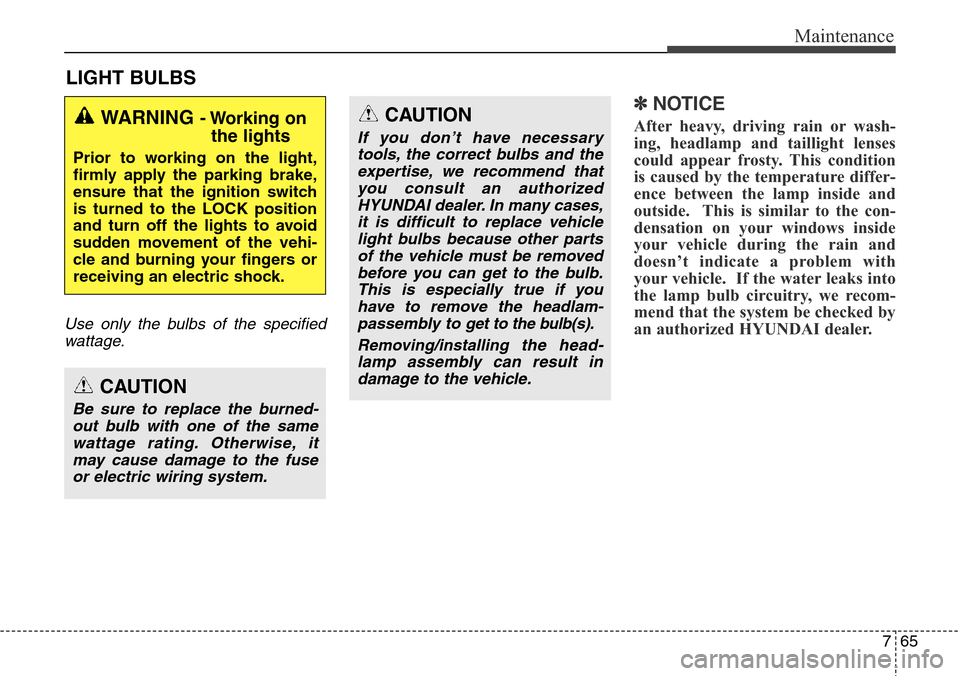
LIGHT BULBS
Use only the bulbs of the specified
wattage.
✽NOTICE
After heavy, driving rain or wash-
ing, headlamp and taillight lenses
could appear frosty. This condition
is caused by the temperature differ-
ence between the lamp inside and
outside. This is similar to the con-
densation on your windows inside
your vehicle during the rain and
doesn’t indicate a problem with
your vehicle. If the water leaks into
the lamp bulb circuitry, we recom-
mend that the system be checked by
an authorized HYUNDAI dealer.WARNING - Working on
the lights
Prior to working on the light,
firmly apply the parking brake,
ensure that the ignition switch
is turned to the LOCK position
and turn off the lights to avoid
sudden movement of the vehi-
cle and burning your fingers or
receiving an electric shock.
CAUTION
Be sure to replace the burned-
out bulb with one of the same
wattage rating. Otherwise, it
may cause damage to the fuse
or electric wiring system.
CAUTION
If you don’t have necessary
tools, the correct bulbs and the
expertise, we recommend that
you consult an authorized
HYUNDAI dealer. In many cases,
it is difficult to replace vehicle
light bulbs because other parts
of the vehicle must be removed
before you can get to the bulb.
This is especially true if you
have to remove the headlam-
passembly to
get to the bulb(s).
Removing/installing
the head-
lamp assembly can result in
damage to the vehicle.
Page 455 of 483
Maintenance
66 7
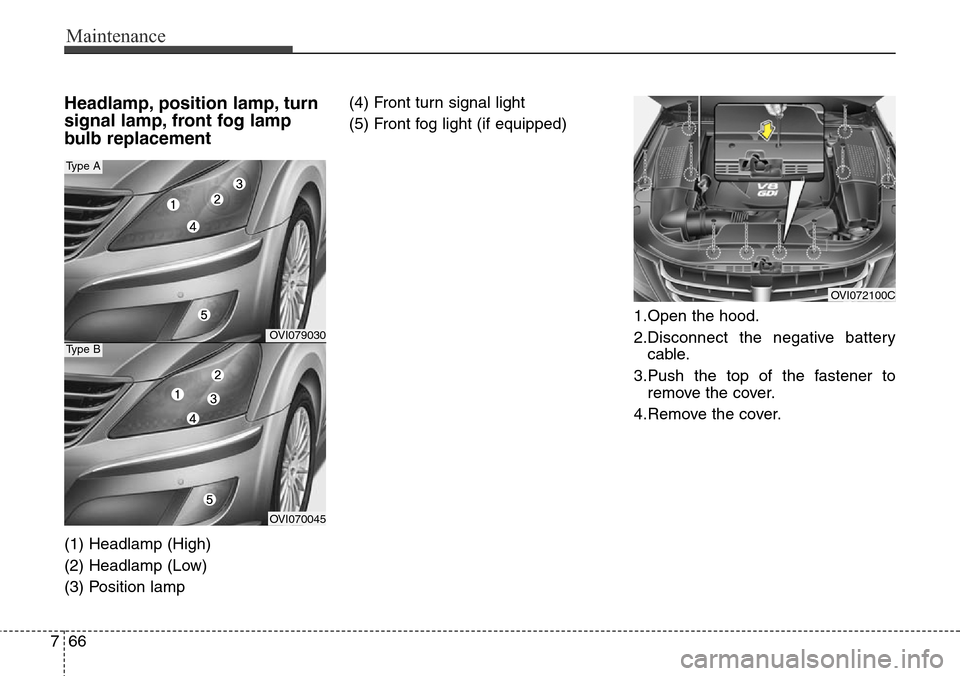
Headlamp, position lamp, turn
signal lamp, front fog lamp
bulb replacement
(1) Headlamp (High)
(2) Headlamp (Low)
(3) Position lamp(4) Front turn signal light
(5) Front fog light (if equipped)
1.Open the hood.
2.Disconnect the negative battery
cable.
3.Push the top of the fastener to
remove the cover.
4.Remove the cover.
OVI072100C
OVI079030
OVI070045
Type A
Type B
Page 456 of 483
767
Maintenance
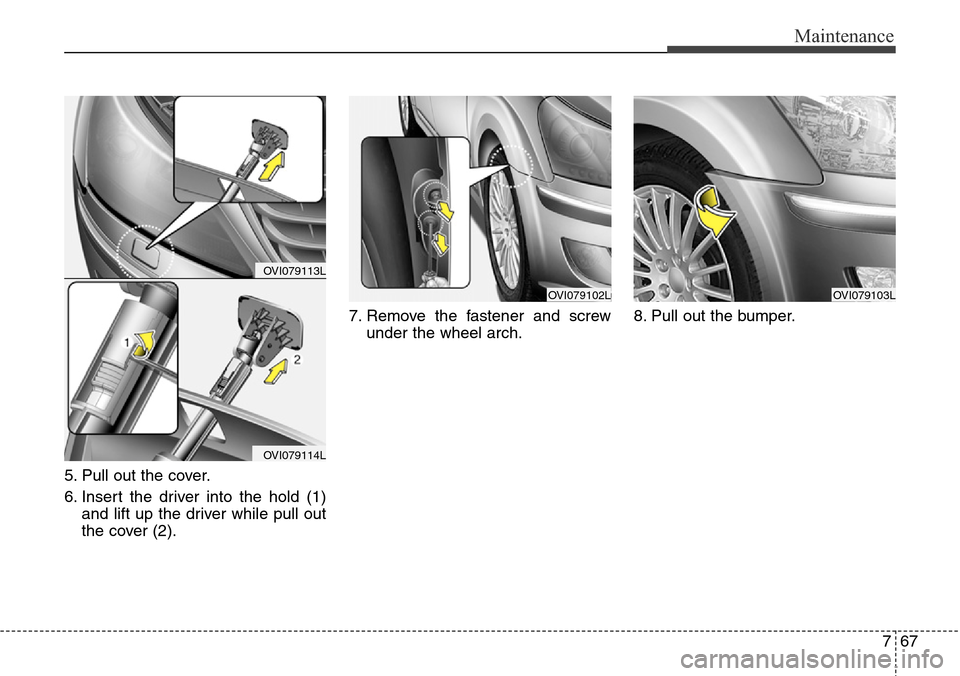
5. Pull out the cover.
6. Insert the driver into the hold (1)
and lift up the driver while pull out
the cover (2).7. Remove the fastener and screw
under the wheel arch.8. Pull out the bumper.
OVI079113L
OVI079114L
OVI079103LOVI079102L
Page 457 of 483
Maintenance
68 7
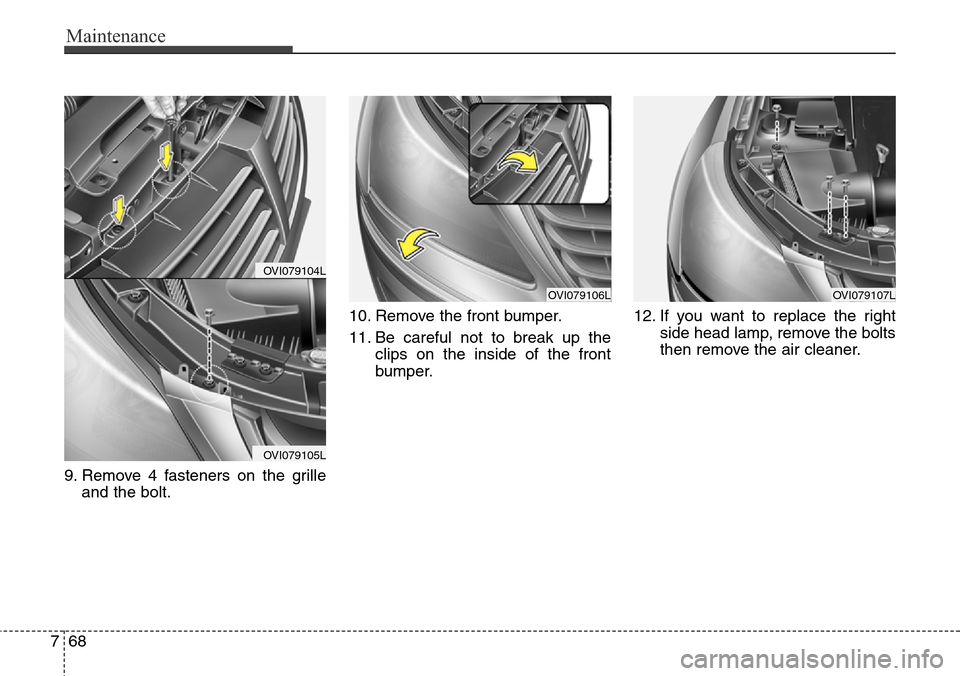
9. Remove 4 fasteners on the grille
and the bolt.10. Remove the front bumper.
11. Be careful not to break up the
clips on the inside of the front
bumper.12. If you want to replace the right
side head lamp, remove the bolts
then remove the air cleaner.
OVI079104L
OVI079105L
OVI079106LOVI079107L
Page 458 of 483
769
Maintenance
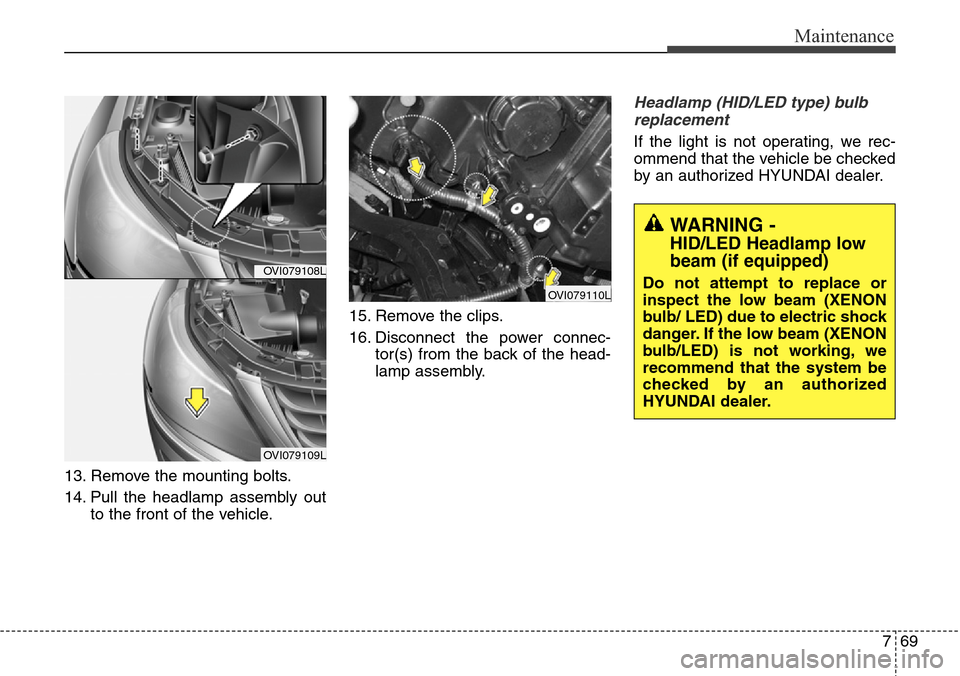
13. Remove the mounting bolts.
14. Pull the headlamp assembly out
to the front of the vehicle.15. Remove the clips.
16. Disconnect the power connec-
tor(s) from the back of the head-
lamp assembly.
Headlamp (HID/LED type) bulb
replacement
If the light is not operating, we rec-
ommend that the vehicle be checked
by an authorized HYUNDAI dealer.
OVI079108L
OVI079109L
OVI079110L
WARNING -
HID/LED Headlamp low
beam (if equipped)
Do not attempt to replace or
inspect the low beam (XENON
bulb/ LED) due to electric shock
danger. If the low beam (XENON
bulb/LED) is not working, we
recommend that the system be
checked by an authorized
HYUNDAI dealer.
Page 459 of 483
Maintenance
70 7
✽NOTICE
HID/LED lamps have superior per-
formance vs. halogen bulbs.
HID/LED lamps are estimated by
the manufacturer to last twice as
long or longer than halogen bulbs
depending on their frequency of use.
They will probably require replace-
ment at some point in the life of the
vehicle. Cycling the headlamps on
and off more than typical use will
shorten HID/LED lamps life. HID/
LED lamps do not fail in the same
manner as halogen incandescent
lamps. If a headlamp goes out after
a period of operation but will imme-
diately relight when the headlamp
switch is cycled it is likely the
HID/LED lamp needs to be
replaced. HID/LED lighting compo-
nents are more complex than con-
ventional halogen bulbs thus have
higher replacement cost.
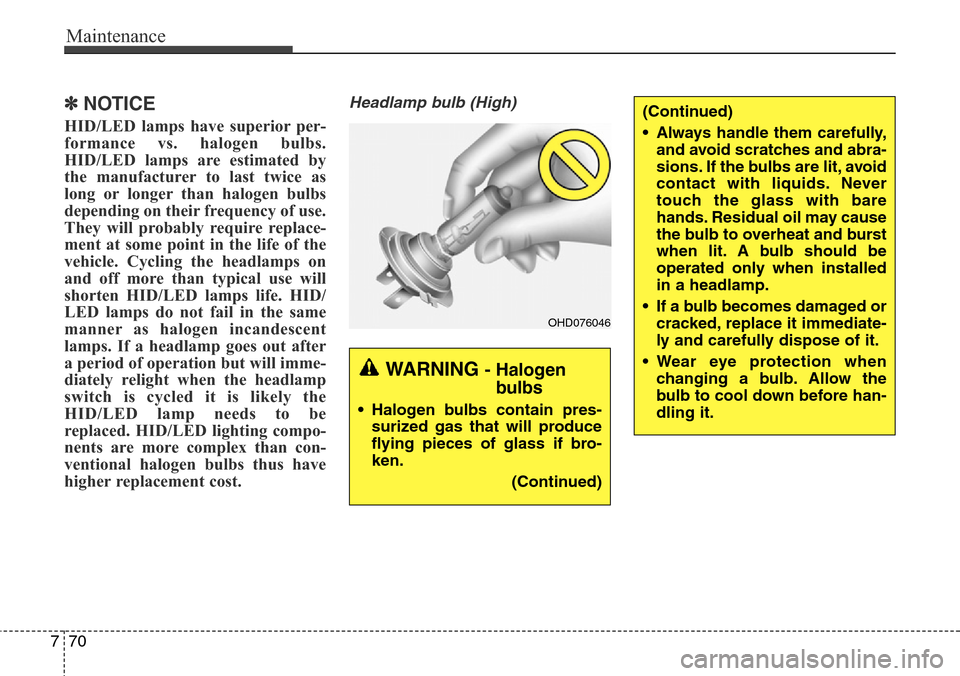
Headlamp bulb (High)
OHD076046
WARNING - Halogen
bulbs
• Halogen bulbs contain pres-
surized gas that will produce
flying pieces of glass if bro-
ken.
(Continued)
(Continued)
• Always handle them carefully,
and avoid scratches and abra-
sions. If the bulbs are lit, avoid
contact with liquids. Never
touch the glass with bare
hands. Residual oil may cause
the bulb to overheat and burst
when lit. A bulb should be
operated only when installed
in a headlamp.
• If a bulb becomes damaged or
cracked, replace it immediate-
ly and carefully dispose of it.
• Wear eye protection when
changing a bulb. Allow the
bulb to cool down before han-
dling it.
Page 460 of 483
771
Maintenance
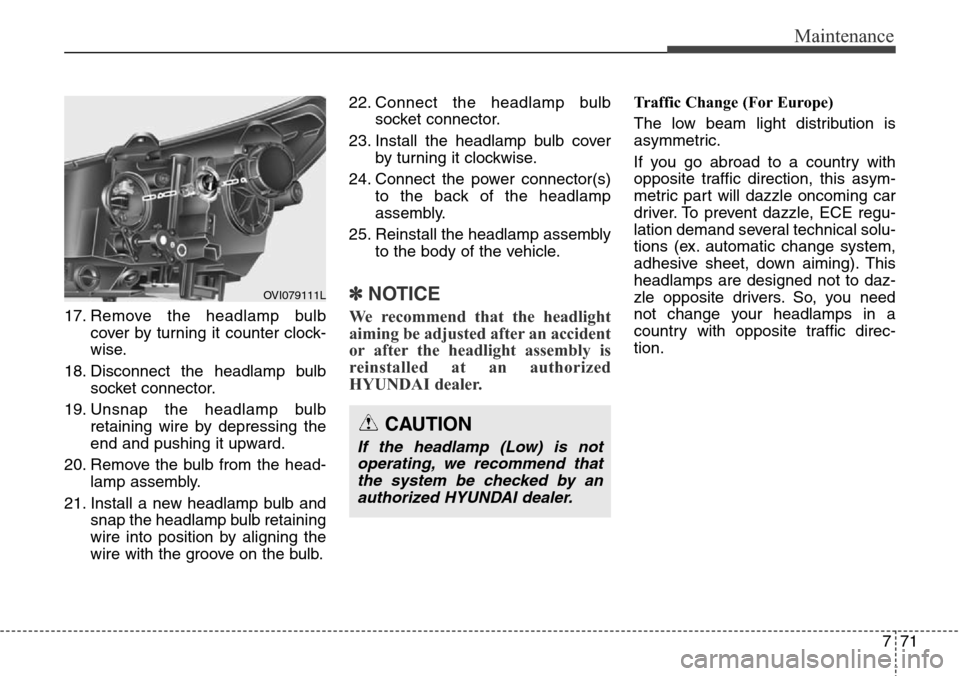
17. Remove the headlamp bulb
cover by turning it counter clock-
wise.
18. Disconnect the headlamp bulb
socket connector.
19. Unsnap the headlamp bulb
retaining wire by depressing the
end and pushing it upward.
20. Remove the bulb from the head-
lamp assembly.
21. Install a new headlamp bulb and
snap the headlamp bulb retaining
wire into position by aligning the
wire with the groove on the bulb.22. Connect the headlamp bulb
socket connector.
23. Install the headlamp bulb cover
by turning it clockwise.
24. Connect the power connector(s)
to the back of the headlamp
assembly.
25. Reinstall the headlamp assembly
to the body of the vehicle.
✽NOTICE
We recommend that the headlight
aiming be adjusted after an accident
or after the headlight assembly is
reinstalled at an authorized
HYUNDAI dealer.
Traffic Change (For Europe)
The low beam light distribution is
asymmetric.
If you go abroad to a country with
opposite traffic direction, this asym-
metric part will dazzle oncoming car
driver. To prevent dazzle, ECE regu-
lation demand several technical solu-
tions (ex. automatic change system,
adhesive sheet, down aiming). This
headlamps are designed not to daz-
zle opposite drivers. So, you need
not change your headlamps in a
country with opposite traffic direc-
tion.
OVI079111L
CAUTION
If the headlamp (Low) is not
operating, we recommend that
the system be checked by an
authorized HYUNDAI dealer.