glove box Hyundai Equus 2015 Owner's Manual
[x] Cancel search | Manufacturer: HYUNDAI, Model Year: 2015, Model line: Equus, Model: Hyundai Equus 2015Pages: 483, PDF Size: 13.26 MB
Page 17 of 483
25
Your vehicle at a glance
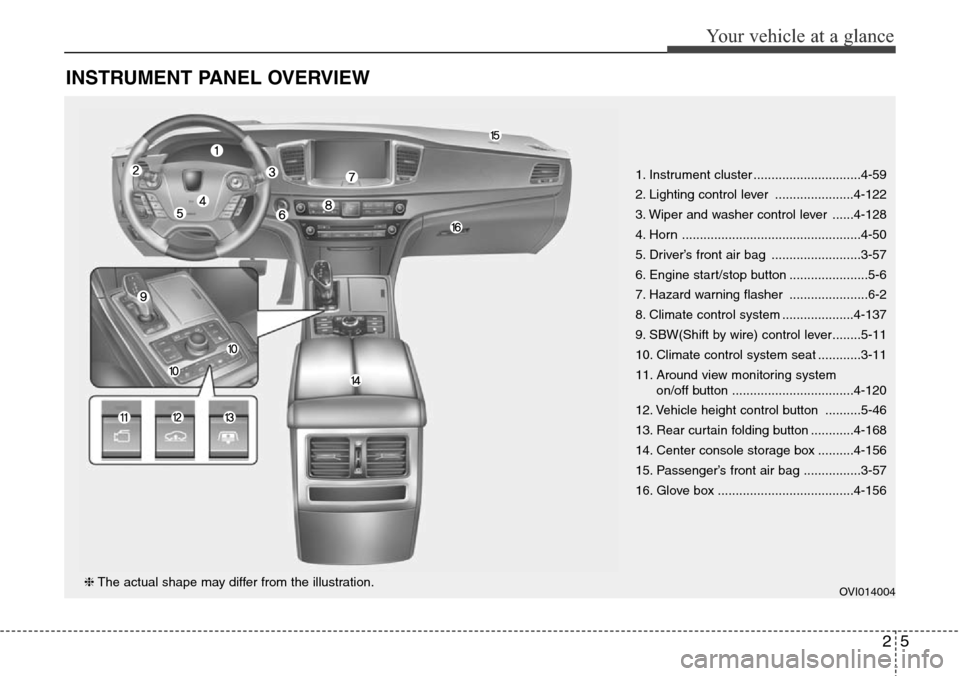
INSTRUMENT PANEL OVERVIEW
1. Instrument cluster ..............................4-59
2. Lighting control lever ......................4-122
3. Wiper and washer control lever ......4-128
4. Horn ..................................................4-50
5. Driver’s front air bag .........................3-57
6. Engine start/stop button ......................5-6
7. Hazard warning flasher ......................6-2
8. Climate control system ....................4-137
9. SBW(Shift by wire) control lever........5-11
10. Climate control system seat ............3-11
11. Around view monitoring system
on/off button ..................................4-120
12. Vehicle height control button ..........5-46
13. Rear curtain folding button ............4-168
14. Center console storage box ..........4-156
15. Passenger’s front air bag ................3-57
16. Glove box ......................................4-156
OVI014004❈The actual shape may differ from the illustration.
Page 74 of 483
355
Safety features of your vehicle
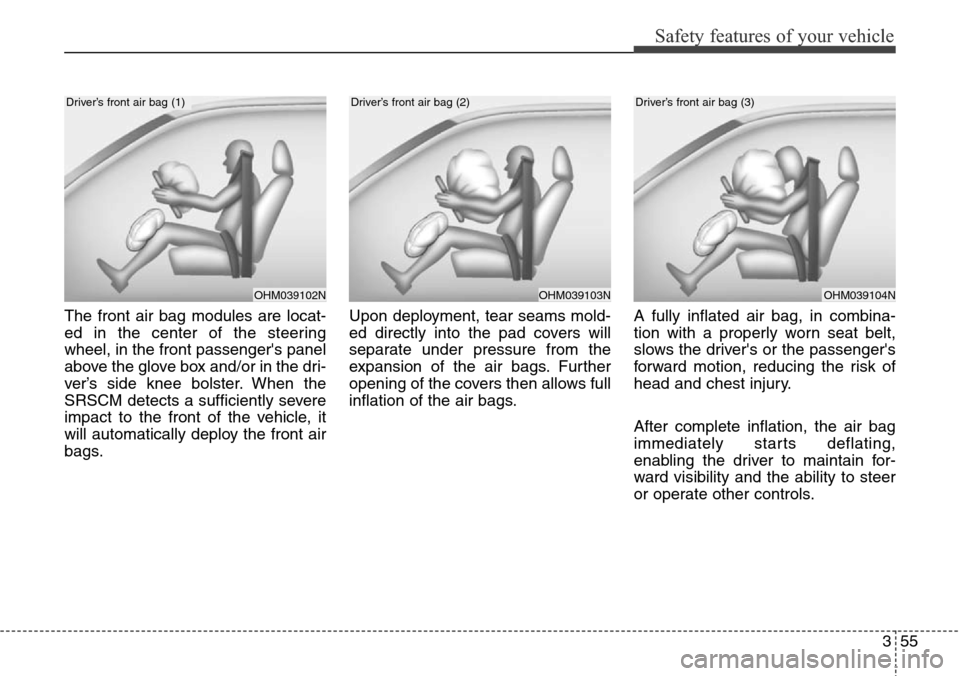
The front air bag modules are locat-
ed in the center of the steering
wheel, in the front passenger's panel
above the glove box and/or in the dri-
ver’s side knee bolster. When the
SRSCM detects a sufficiently severe
impact to the front of the vehicle, it
will automatically deploy the front air
bags.Upon deployment, tear seams mold-
ed directly into the pad covers will
separate under pressure from the
expansion of the air bags. Further
opening of the covers then allows full
inflation of the air bags.A fully inflated air bag, in combina-
tion with a properly worn seat belt,
slows the driver's or the passenger's
forward motion, reducing the risk of
head and chest injury.
After complete inflation, the air bag
immediately starts deflating,
enabling the driver to maintain for-
ward visibility and the ability to steer
or operate other controls.
OHM039102N
Driver’s front air bag (1)
OHM039103NOHM039104N
Driver’s front air bag (2)Driver’s front air bag (3)
Page 75 of 483
Safety features of your vehicle
56 3
WARNING
• Do not install or place any
accessories (drink holder,
cassette holder, sticker, etc.)
on the front passenger's
panel above the glove box in a
vehicle with a passenger's air
bag. Such objects may
become dangerous projec-
tiles and cause injury if the
passenger's air bag inflates.
(Continued)
(Continued)
• When installing a container of
liquid air freshener inside the
vehicle, do not place it near
the instrument cluster nor on
the instrument panel surface.
It may become a dangerous
projectile and cause injury if
the passenger's air bag
inflates.
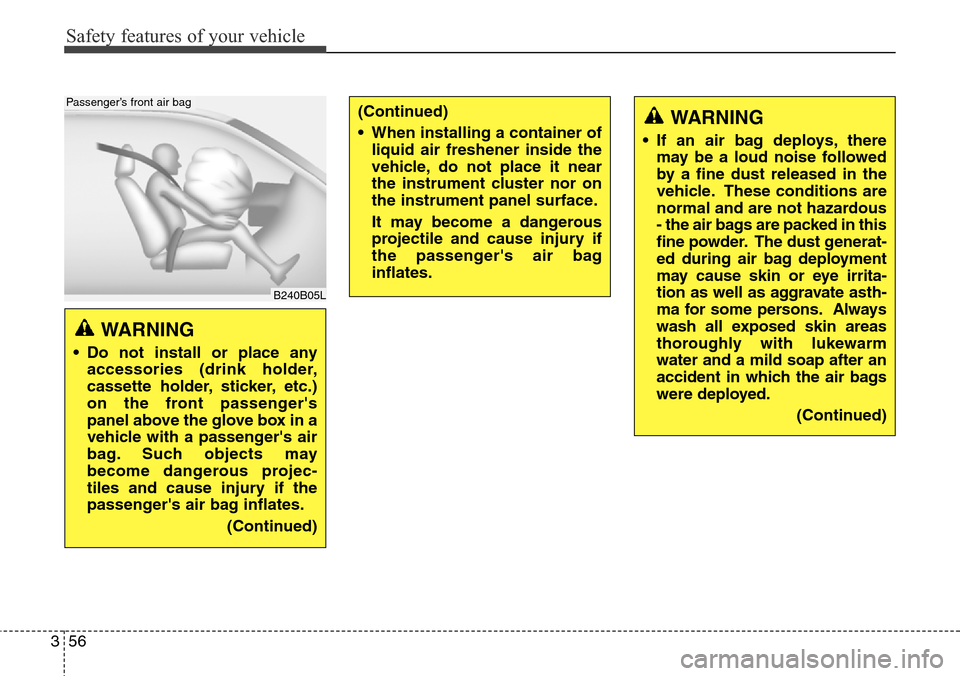
B240B05L
Passenger’s front air bag
WARNING
• If an air bag deploys, there
may be a loud noise followed
by a fine dust released in the
vehicle. These conditions are
normal and are not hazardous
- the air bags are packed in this
fine powder. The dust generat-
ed during air bag deployment
may cause skin or eye irrita-
tion as well as aggravate asth-
ma for some persons. Always
wash all exposed skin areas
thoroughly with lukewarm
water and a mild soap after an
accident in which the air bags
were deployed.
(Continued)
Page 76 of 483
357
Safety features of your vehicle
Driver's and passenger's front
air bag
Your vehicle is equipped with a
Supplemental Restraint (Air Bag)
System and the lap/shoulder belts at
both the driver and passenger seat-
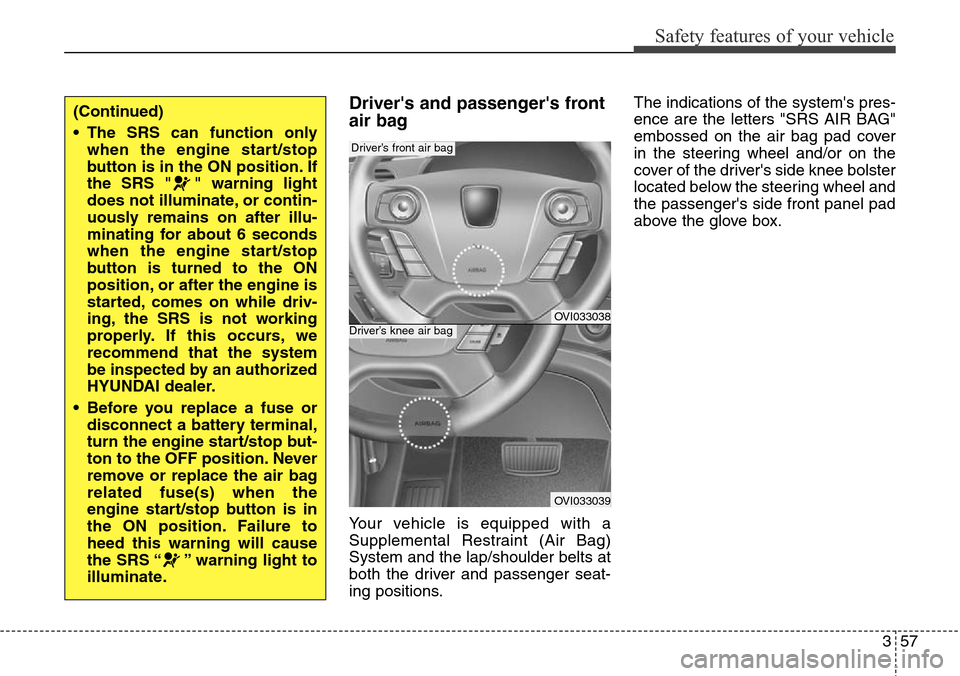
ing positions.The indications of the system's pres-
ence are the letters "SRS AIR BAG"
embossed on the air bag pad cover
in the steering wheel and/or on the
cover of the driver's side knee bolster
located below the steering wheel and
the passenger's side front panel pad
above the glove box.
(Continued)
• The SRS can function only
when the engine start/stop
button is in the ON position. If
the SRS " " warning light
does not illuminate, or contin-
uously remains on after illu-
minating for about 6 seconds
when the engine start/stop
button is turned to the ON
position, or after the engine is
started, comes on while driv-
ing, the SRS is not working
properly. If this occurs, we
recommend that the system
be inspected by an authorized
HYUNDAI dealer.
• Before you replace a fuse or
disconnect a battery terminal,
turn the engine start/stop but-
ton to the OFF position. Never
remove or replace the air bag
related fuse(s) when the
engine start/stop button is in
the ON position. Failure to
heed this warning will cause
the SRS “ ” warning light to
illuminate.
OVI033038
OVI033039
Driver’s knee air bag
Driver’s front air bag
Page 77 of 483
Safety features of your vehicle
58 3
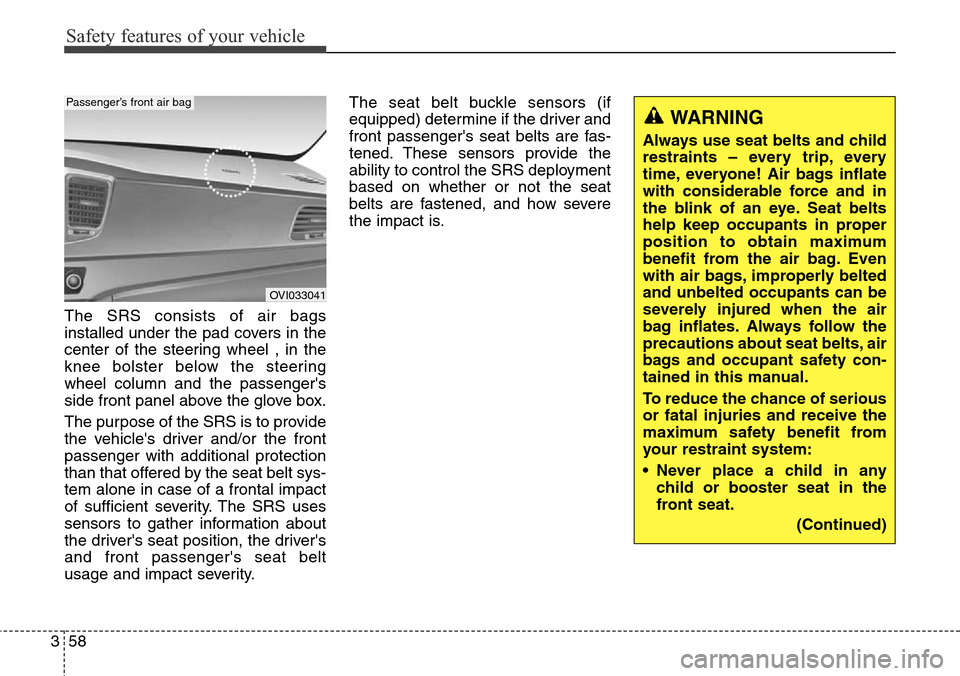
The SRS consists of air bags
installed under the pad covers in the
center of the steering wheel , in the
knee bolster below the steering
wheel column and the passenger's
side front panel above the glove box.
The purpose of the SRS is to provide
the vehicle's driver and/or the front
passenger with additional protection
than that offered by the seat belt sys-
tem alone in case of a frontal impact
of sufficient severity. The SRS uses
sensors to gather information about
the driver's seat position, the driver's
and front passenger's seat belt
usage and impact severity.The seat belt buckle sensors (if
equipped) determine if the driver and
front passenger's seat belts are fas-
tened. These sensors provide the
ability to control the SRS deployment
based on whether or not the seat
belts are fastened, and how severe
the impact is.
OVI033041
Passenger’s front air bag
WARNING
Always use seat belts and child
restraints – every trip, every
time, everyone! Air bags inflate
with considerable force and in
the blink of an eye. Seat belts
help keep occupants in proper
position to obtain maximum
benefit from the air bag. Even
with air bags, improperly belted
and unbelted occupants can be
severely injured when the air
bag inflates. Always follow the
precautions about seat belts, air
bags and occupant safety con-
tained in this manual.
To reduce the chance of serious
or fatal injuries and receive the
maximum safety benefit from
your restraint system:
• Never place a child in any
child or booster seat in the
front seat.
(Continued)
Page 78 of 483
359
Safety features of your vehicle
(Continued)
• No objects should be placed
over or near the air bag mod-
ules on the steering wheel,
instrument panel, driver’s side
knee bolster, and the front
passenger's panel above the
glove box, because any such
object could cause harm if the
vehicle is in a crash severe
enough to cause the air bags
to deploy.
• Do not tamper with or discon-
nect SRS wiring or other com-
ponents of the SRS system.
Doing so could result in injury,
due to accidental deployment
of the air bags or by rendering
the SRS inoperative.
• If the SRS air bag warning
light “ ”remains illuminat-
ed while the vehicle is being
driven, we recommend that
the system be replaced by an
authorized HYUNDAI dealer.
(Continued)(Continued)
• ABC – Always Buckle
Children in the back seat. It is
the safest place for children of
any age to ride.
• Front and side impact air bags
can injure occupants improp-
erly positioned.
• Move your seat as far back as
practical from the front air
bags, while still maintaining
control of the vehicle.
• You and your passengers
should never sit or lean
unnecessarily close to the air
bags. Improperly positioned
drivers and passengers can
be severely injured by inflat-
ing air bags.
• Never lean against the door or
center console – always sit in
an upright position.
(Continued)(Continued)
• Air bags can only be used
once - we recommend that the
system be replaced by an
authorized HYUNDAI dealer.
• The SRS is designed to deploy
the front air bags only when an
impact is sufficiently severe
and when the impact angle is
less than 30° from the forward
longitudinal axis of the vehi-
cle. Additionally, the air bags
will only deploy once. Seat
belts must be worn at all times.
• Front air bags are not intended
to deploy in side-impact, rear-
impact or rollover crashes. In
addition, front air bags will not
deploy in frontal crashes
below the deployment thresh-
old.
• A child restraint system must
never be placed in the front
seat. The infant or child could
be severely injured or killed by
an air bag deployment in case
of an accident.
(Continued)
Page 87 of 483
Safety features of your vehicle
68 3
SRS Care
The SRS is virtually maintenance-
free and so there are no parts you
can safely service by yourself. If the
SRS air bag warning light does not
illuminate when you turn the ignition
ON, or if it continuously remains on,
we recommend that the system be
inspected by an authorized HYUNDAI
dealer.
Improper handling of the SRS sys-
tem may result in serious personal
injury.WARNING
• Modification to SRS compo-
nents or wiring, including the
addition of any kind of badges
to the pad covers or modifica-
tions to the body structure,
can adversely affect SRS per-
formance and lead to possible
injury.
• For cleaning the air bag pad
covers, use only a soft, dry
cloth or one which has been
moistened with plain water.
Solvents or cleaners could
adversely affect the air bag
covers and proper deploy-
ment of the system.
• No objects should be placed
over or near the air bag mod-
ules on the steering wheel,
instrument panel, and the
front passenger's panel above
the glove box, because any
such object could cause harm
if the vehicle is in a crash
severe enough to cause the
air bags to inflate.
(Continued)
(Continued)
• If the air bags inflate, they
must be replaced by an
authorized HYUNDAI dealer.
• Do not tamper with or discon-
nect SRS wiring, or other
components of the SRS sys-
tem. Doing so could result in
injury, due to accidental infla-
tion of the air bags or by ren-
dering the SRS inoperative.
• If components of the air bag
system must be discarded, or
if the vehicle must be
scrapped, certain safety pre-
cautions must be observed.
An authorized HYUNDAI deal-
er knows these precautions
and can give you the neces-
sary information. Failure to
follow these precautions and
procedures could increase
the risk of personal injury.
• If your car was flooded and
has soaked carpeting or water
on the flooring, you shouldn't
try to start the engine; have
the car towed to an authorized
HYUNDAI dealer.
Page 91 of 483
Trip computer . . . . . . . . . . . . . . . . . . . . . . . . . . . . . 4-90
• Overview. . . . . . . . . . . . . . . . . . . . . . . . . . . . . . . . . . . . 4-90
• Trip A/B . . . . . . . . . . . . . . . . . . . . . . . . . . . . . . . . . . . . 4-91
• Fuel economy . . . . . . . . . . . . . . . . . . . . . . . . . . . . . . . . 4-92
Warning and indicator lights . . . . . . . . . . . . . . . . 4-94
• Warning lights . . . . . . . . . . . . . . . . . . . . . . . . . . . . . . . 4-94
• Indicator lights. . . . . . . . . . . . . . . . . . . . . . . . . . . . . . 4-103
Head up display (HUD) . . . . . . . . . . . . . . . . . . . . 4-108
Parking assist system . . . . . . . . . . . . . . . . . . . . . . 4-111
• Operation . . . . . . . . . . . . . . . . . . . . . . . . . . . . . . . . . . 4-111
• Non-operational conditions . . . . . . . . . . . . . . . . . . . 4-113
• Self-diagnosis . . . . . . . . . . . . . . . . . . . . . . . . . . . . . . . 4-115
Rearview camera . . . . . . . . . . . . . . . . . . . . . . . . . 4-116
Parking guide system . . . . . . . . . . . . . . . . . . . . . . 4-117
Around view monitoring system . . . . . . . . . . . . . 4-120
Lighting . . . . . . . . . . . . . . . . . . . . . . . . . . . . . . . . . 4-121
• Battery saver function. . . . . . . . . . . . . . . . . . . . . . . . 4-121
• Headlamp escort function. . . . . . . . . . . . . . . . . . . . . 4-121
• Lighting control . . . . . . . . . . . . . . . . . . . . . . . . . . . . . 4-122
• High beam operation. . . . . . . . . . . . . . . . . . . . . . . . . 4-124
• Turn signals and lane change signals . . . . . . . . . . . 4-125
• Front fog light . . . . . . . . . . . . . . . . . . . . . . . . . . . . . . 4-126
• Rear fog light . . . . . . . . . . . . . . . . . . . . . . . . . . . . . . . 4-126
• Daytime running light . . . . . . . . . . . . . . . . . . . . . . . . 4-127
• Headlamp leveling device . . . . . . . . . . . . . . . . . . . . . 4-127
• Headlamp washer . . . . . . . . . . . . . . . . . . . . . . . . . . . 4-127
Wipers and washers . . . . . . . . . . . . . . . . . . . . . . . 4-128
• Windshield wipers . . . . . . . . . . . . . . . . . . . . . . . . . . . 4-128
• Windshield washers. . . . . . . . . . . . . . . . . . . . . . . . . . 4-129
Interior light . . . . . . . . . . . . . . . . . . . . . . . . . . . . . 4-131
• Front . . . . . . . . . . . . . . . . . . . . . . . . . . . . . . . . . . . . . . 4-131
• Rear . . . . . . . . . . . . . . . . . . . . . . . . . . . . . . . . . . . . . . 4-132
• Trunk room lamp . . . . . . . . . . . . . . . . . . . . . . . . . . . 4-133
• Door courtesy lamp . . . . . . . . . . . . . . . . . . . . . . . . . . 4-133
• Glove box lamp . . . . . . . . . . . . . . . . . . . . . . . . . . . . . 4-133
• Vanity mirror lamp . . . . . . . . . . . . . . . . . . . . . . . . . . 4-134
Welcome system . . . . . . . . . . . . . . . . . . . . . . . . . . 4-135
• Puddle lamp . . . . . . . . . . . . . . . . . . . . . . . . . . . . . . . . 4-135
• Headlight . . . . . . . . . . . . . . . . . . . . . . . . . . . . . . . . . . 4-135
• Interior light. . . . . . . . . . . . . . . . . . . . . . . . . . . . . . . . 4-135
Defroster . . . . . . . . . . . . . . . . . . . . . . . . . . . . . . . . 4-136
Automatic climate control system. . . . . . . . . . . . 4-137
Windshield defrosting and defogging . . . . . . . . . 4-152
Storage compartments . . . . . . . . . . . . . . . . . . . . . 4-156
• Center console storage . . . . . . . . . . . . . . . . . . . . . . . 4-156
• Glove box . . . . . . . . . . . . . . . . . . . . . . . . . . . . . . . . . . 4-156
• Sunglass holder . . . . . . . . . . . . . . . . . . . . . . . . . . . . . 4-157
• Rear console storage . . . . . . . . . . . . . . . . . . . . . . . . . 4-158
• Cool and warm box . . . . . . . . . . . . . . . . . . . . . . . . . . 4-158
4
Page 97 of 483
Features of your vehicle
8 4
✽NOTICE
• After unlocking the trunk, the
trunk will lock automatically unless
it is opened within 30 seconds.
• Once the trunk is opened and then
closed, the trunk will lock auto-
matically.
• The word "HOLD" is written on
the button to inform you that you
must press and hold the button.
Power trunk
1. Press the trunk unlock button for
more than 1 second.
2. The hazard warning light will blink
twice to indicate the trunk is
unlocked and opened.
✽NOTICE
• Once the trunk is opened and then
closed, the trunk will lock auto-
matically.
• The word "HOLD" is written on
the button to inform you that you
must press and hold the button.
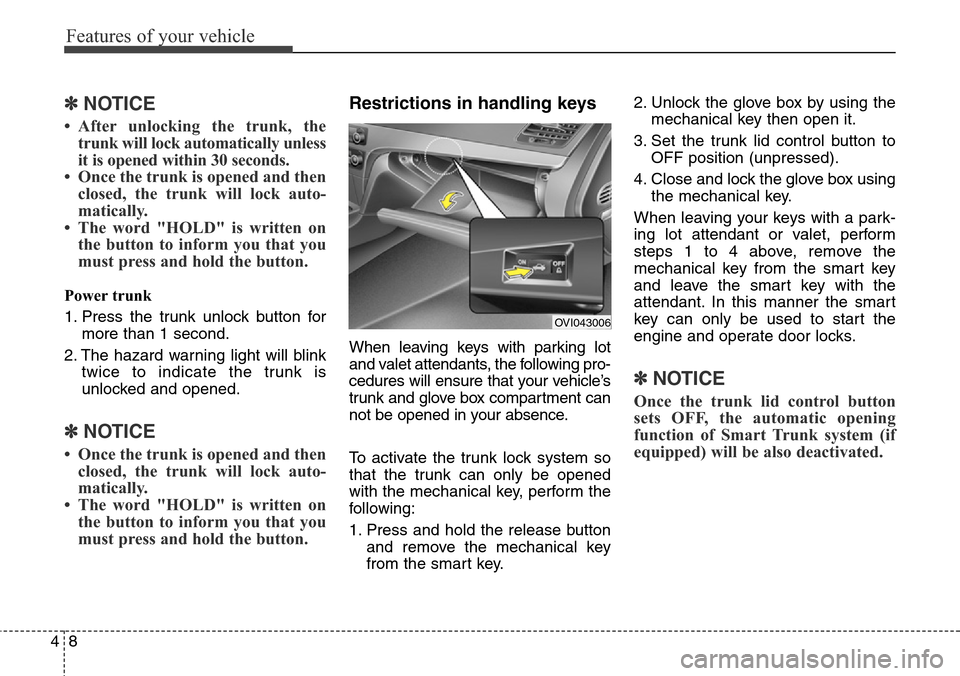
Restrictions in handling keys
When leaving keys with parking lot
and valet attendants, the following pro-
cedures will ensure that your vehicle’s
trunk and glove box compartment can
not be opened in your absence.
To activate the trunk lock system so
that the trunk can only be opened
with the mechanical key, perform the
following:
1. Press and hold the release button
and remove the mechanical key
from the smart key.2. Unlock the glove box by using the
mechanical key then open it.
3. Set the trunk lid control button to
OFF position (unpressed).
4. Close and lock the glove box using
the mechanical key.
When leaving your keys with a park-
ing lot attendant or valet, perform
steps 1 to 4 above, remove the
mechanical key from the smart key
and leave the smart key with the
attendant. In this manner the smart
key can only be used to start the
engine and operate door locks.
✽NOTICE
Once the trunk lid control button
sets OFF, the automatic opening
function of Smart Trunk system (if
equipped) will be also deactivated.
OVI043006
Page 98 of 483
49
Features of your vehicle
Lock release
To release the trunk lock feature,
open the glove box with the mechan-
ical key and set the trunk lid control
button to ON position (pressed). In
this position the trunk will open with
the trunk lid button or smart key.Smart key precautions
✽NOTICE
• If, for some reason, you happen to
lose your smart key, you will not
be able to start the engine. Tow the
vehicle, if necessary, we recom-
mend that you contact an author-
ized HYUNDAI dealer.
• A maximum of 3 smart keys
including card type (if equipped)
can be registered to a single vehi-
cle. If you lose a smart key, we rec-
ommend that you contact an
authorized HYUNDAI dealer.
• The smart key will not work if any
of the following occurs:
- The smart key is close to a radio
transmitter such as a radio sta-
tion or an airport which can
interfere with normal operation
of the smart key.
- The smart key is near a mobile
two-way radio system or a cellu-
lar phone.
- Another vehicle’s smart key is
being operated close to your
vehicle.
(Continued)(Continued)
When the smart key does not work
properly, open and close the door
with the mechanical key. If you
have a problem with the smart
key, we recommend that you con-
tact an authorized HYUNDAI
dealer.
• If the smart key is in close proxim-
ity to your cell phone or smart
phone, the signal from the smart
key could be blocked by normal
operation of your cell phone or
smart phone. This is especially
important when the phone is
active such as making call, receiv-
ing calls, text messaging, and/or
sending/receiving emails. Avoid
placing the smart key and your
cell phone or smart phone in the
same pants or jacket pocket and
maintain adequate distance
between the two devices.