turn signal Hyundai Equus 2016 User Guide
[x] Cancel search | Manufacturer: HYUNDAI, Model Year: 2016, Model line: Equus, Model: Hyundai Equus 2016Pages: 477, PDF Size: 16.25 MB
Page 250 of 477
Information
• If you install an unauthorized HIDhead lamp, your vehicle’s audio and
electronic device may malfunction.
• Prevent chemicals such as perfume, cosmetic oil, sun cream, hand clean-
er, and air freshener from contact-
ing the interior parts because they
may cause damage or discoloration.
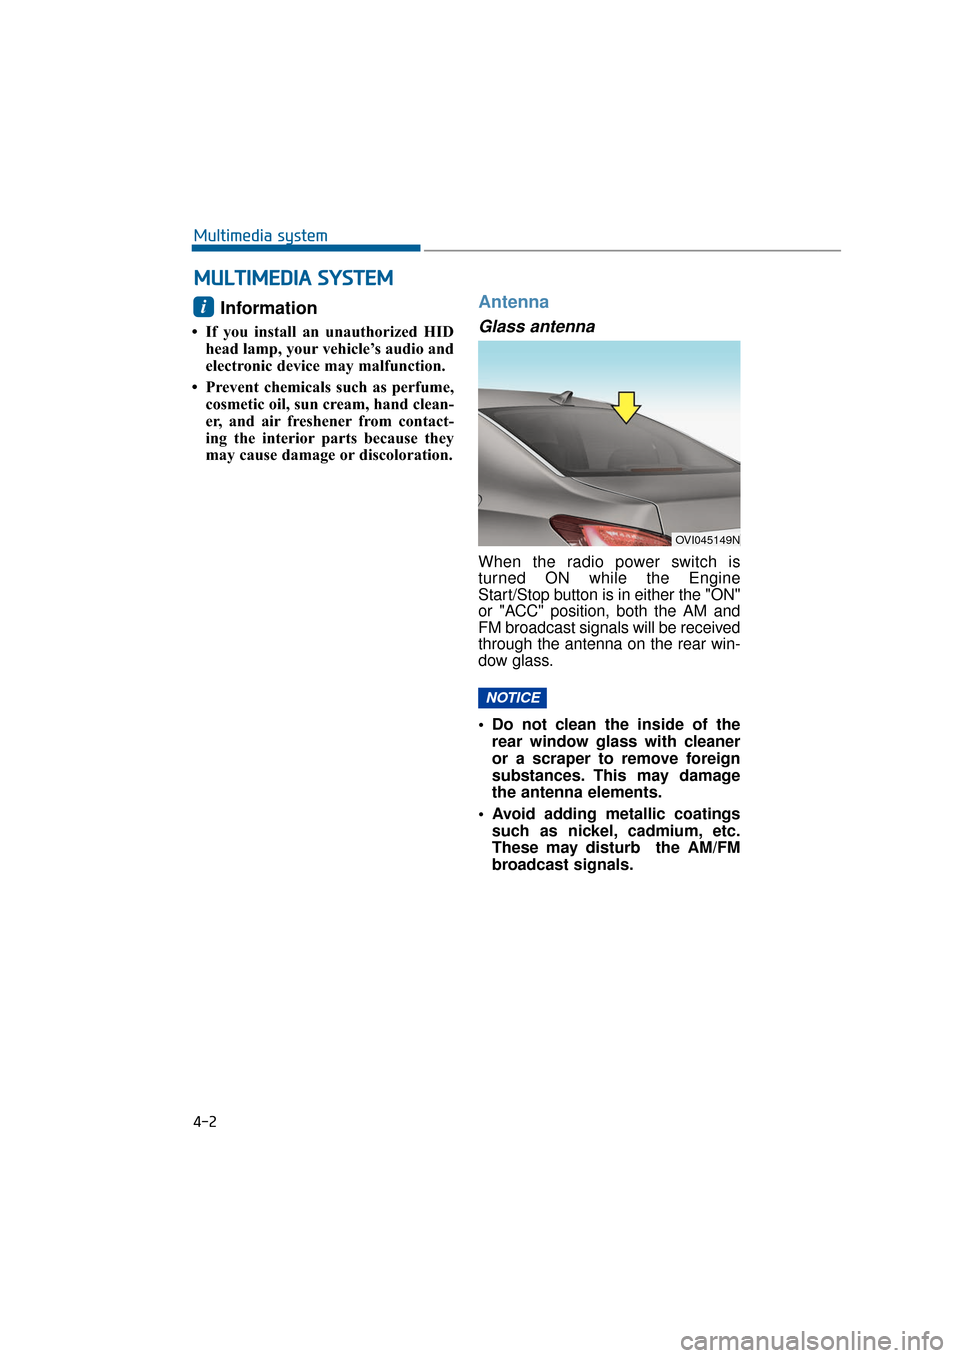
Antenna
Glass antenna
When the radio power switch is
turned ON while the Engine
Start/Stop button is in either the "ON"
or "ACC" position, both the AM and
FM broadcast signals will be received
through the antenna on the rear win-
dow glass.
• Do not clean the inside of therear window glass with cleaner
or a scraper to remove foreign
substances. This may damage
the antenna elements.
Avoid adding metallic coatings such as nickel, cadmium, etc.
These may disturb the AM/FM
broadcast signals.
NOTICE
i
M M U
UL
LT
T I
IM
M E
ED
D I
IA
A
S
S Y
Y S
ST
T E
EM
M
4-2
Multimedia system
OVI045149N
Page 304 of 477

2. Auditory warning
When driving out of the lane lines,
the warning alarm will sound.
3. Tactual warning (if equipped withpre-safe seat belt)
When driving out of the lane lines for
approximately 3 seconds, the pre-
safe seat belt provides haptic warn-
ing.
You can activate or deactivate this
tactual warning function. For this,
refer to the "User Settings Mode" in
chapter 3.The LDWS does not operate in following conditions:
The turn signal is turned ON before
changing the lanes.
(When the hazard warning flasher
is pressed ON, the LDWS excep-
tionally operates.)
Information
Before changing the lanes, turn the
turn signal ON.
i
5-53
Driving your vehicle05
OVI055063N
Page 311 of 477
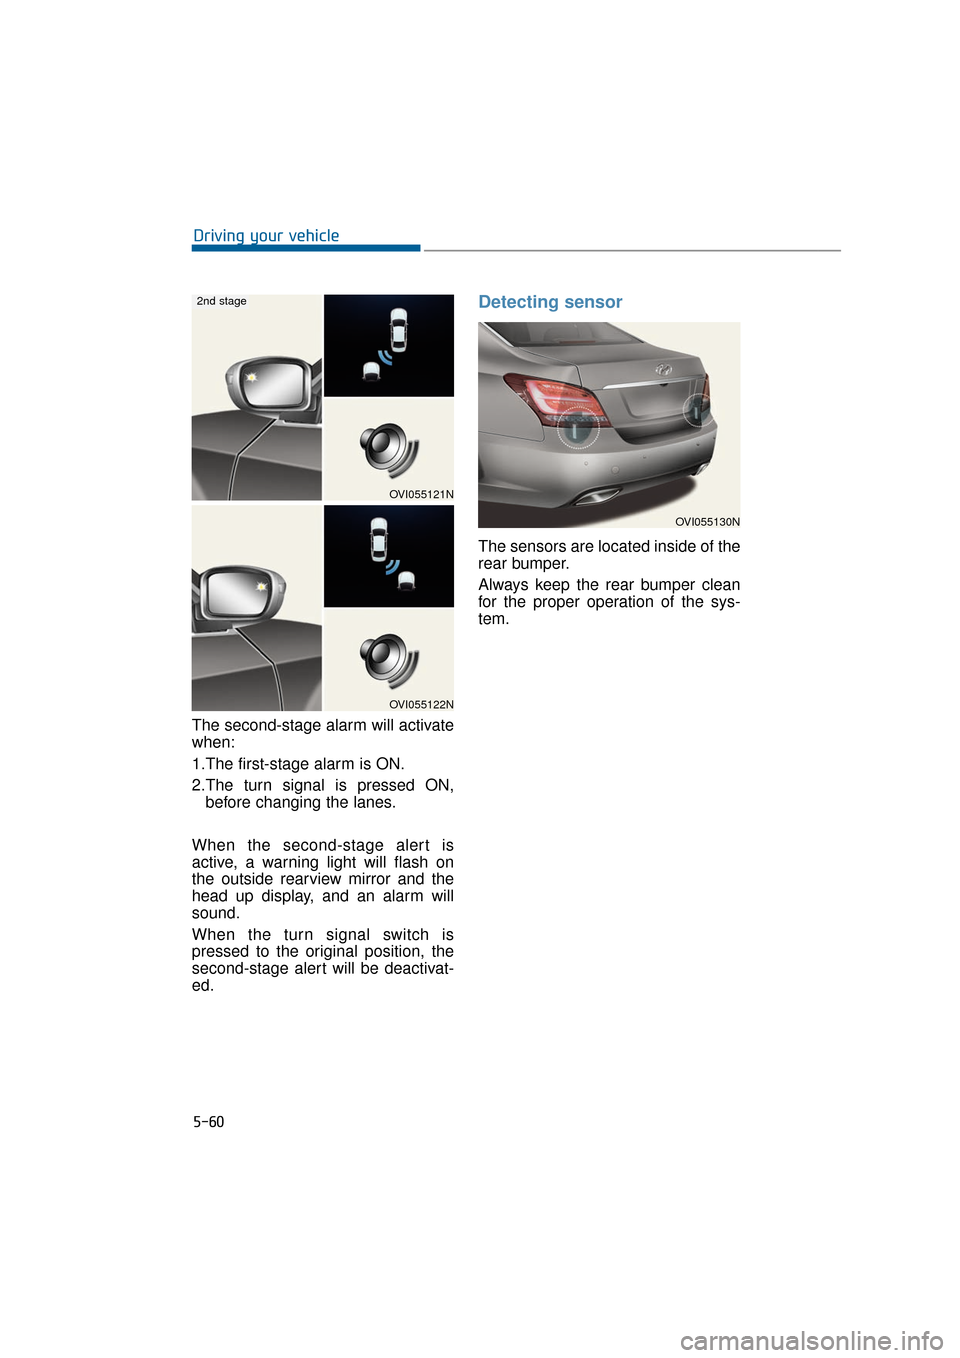
The second-stage alarm will activate
when:
1.The first-stage alarm is ON.
2.The turn signal is pressed ON,before changing the lanes.
When the second-stage alert is
active, a warning light will flash on
the outside rearview mirror and the
head up display, and an alarm will
sound.
When the turn signal switch is
pressed to the original position, the
second-stage alert will be deactivat-
ed.
Detecting sensor
The sensors are located inside of the
rear bumper.
Always keep the rear bumper clean
for the proper operation of the sys-
tem.
5-60
Driving your vehicle
OVI055130N
OVI055121N
OVI055122N
2nd stage
Page 335 of 477
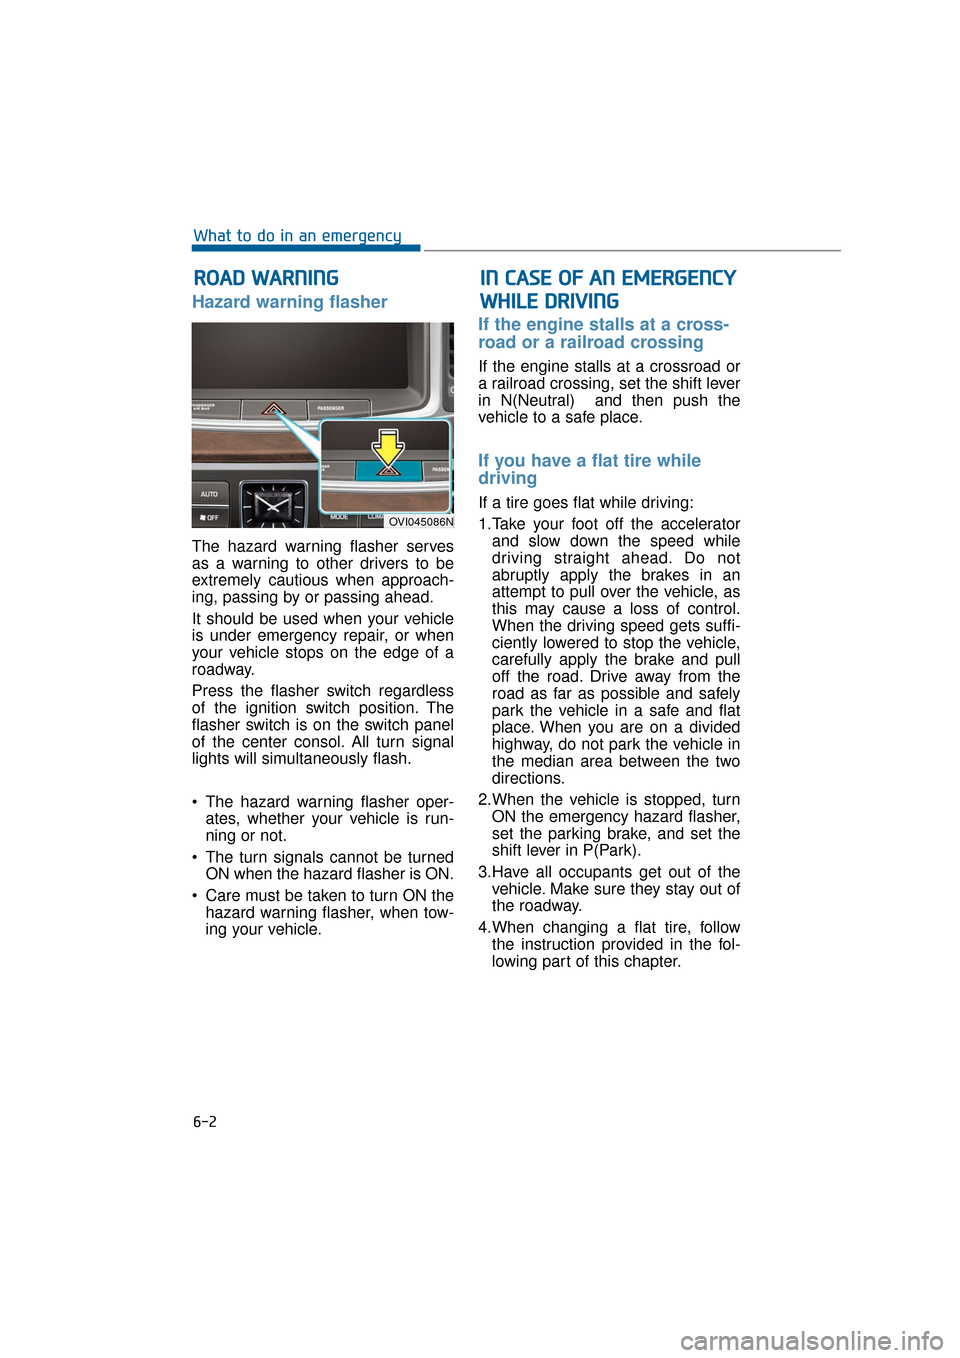
Hazard warning flasher
The hazard warning flasher serves
as a warning to other drivers to be
extremely cautious when approach-
ing, passing by or passing ahead.
It should be used when your vehicle
is under emergency repair, or when
your vehicle stops on the edge of a
roadway.
Press the flasher switch regardless
of the ignition switch position. The
flasher switch is on the switch panel
of the center consol. All turn signal
lights will simultaneously flash.
• The hazard warning flasher oper-ates, whether your vehicle is run-
ning or not.
The turn signals cannot be turned ON when the hazard flasher is ON.
Care must be taken to turn ON the hazard warning flasher, when tow-
ing your vehicle.
If the engine stalls at a cross-
road or a railroad crossing
If the engine stalls at a crossroad or
a railroad crossing, set the shift lever
in N(Neutral) and then push the
vehicle to a safe place.
If you have a flat tire while
driving
If a tire goes flat while driving:
1.Take your foot off the acceleratorand slow down the speed while
driving straight ahead. Do not
abruptly apply the brakes in an
attempt to pull over the vehicle, as
this may cause a loss of control.
When the driving speed gets suffi-
ciently lowered to stop the vehicle,
carefully apply the brake and pull
off the road. Drive away from the
road as far as possible and safely
park the vehicle in a safe and flat
place. When you are on a divided
highway, do not park the vehicle in
the median area between the two
directions.
2.When the vehicle is stopped, turn ON the emergency hazard flasher,
set the parking brake, and set the
shift lever in P(Park).
3.Have all occupants get out of the vehicle. Make sure they stay out of
the roadway.
4.When changing a flat tire, follow the instruction provided in the fol-
lowing part of this chapter.
R RO
O A
AD
D
W
W A
AR
RN
N I
IN
N G
G
6-2
What to do in an emergency
OVI045086N
I
IN
N
C
C A
A S
SE
E
O
O F
F
A
A N
N
E
E M
M E
ER
R G
G E
EN
N C
CY
Y
W
W H
HI
IL
L E
E
D
D R
RI
IV
V I
IN
N G
G
Page 360 of 477

Fuses ......................................................................7-\
56
Inner panel fuse replacement ......................................7-57
Engine compartment fuse replacement ....................7-59
Fuse/relay panel description .......................................7-60
Light bulbs.............................................................7-69
Headlight, position light, turn signal light,
side marker light and front fog light bulb
replacement ......................................................................7-\
70
Side repeater light bulb replacement.........................7-74
Rear combination light bulb replacement .................7-75
High mounted stop light ................................................7-75
License plate lamp replacement ..................................7-79
Interior light bulb replacement ....................................7-82
Appearance care ..................................................7-83
Exterior care ....................................................................7-83\
Interior care......................................................................7-\
88
Emission control system .....................................7-89
Crankcase emission control system ...........................7-89
Evaporative emission control system.........................7-89
Exhaust emission control system ...............................7-90
California perchlorate notice .............................7-92
Page 364 of 477
The following lists are about the vehi-
cle inspection and maintenance that
should be performed by the owner or
an authorized EQUUS dealer, as
indicated. This will ensure your safety
and dependable driving.
Any adverse conditions should imme-
diately be checked by your EQUUS
dealer.
These Owner Maintenance Checklists
are mostly uncovered by your vehicle
warranties. Thus, you may charges
you for expenses of labor, parts or
lubricants.
Owner's maintenance sched-
ule
While refueling:
Check the engine oil level.
Check coolant level in coolantreservoir.
Check the windshield washer fluid level.
Check for any low or under-inflated tires.
While driving:
Check for any changes in theexhaust sounds or the smells.
Check for any steering wheel vibra- tion. Check whether you feel more
tightness or looseness of the steer-
ing wheel.
Check for any slight tilting, or “pulls” to one side, while driving on
a flat surface.
Check for any unusual sounds, tilt- ing, a braking distance, or “hard-to-
push” brake pedal while stopping.
Check the transmission fluid level upon experiencing a skid or a sud-
den transmission gear change.
Check the P(Park) function of the auto transmission.
Check the parking brake.
Check for any fluid leak (water dripping from the A/C while or after
the normal driving).
At least once a month:
Check the coolant level in theengine coolant reservoir.
Check the operation of all exterior lights, such as the stoplights, turn
signals and hazard warning flash-
ers.
Check the inflation pressures of all tires including the spare.
O OW
W N
NE
ER
R '
'S
S
M
M A
AI
IN
N T
TE
EN
N A
AN
N C
CE
E
7-7
Maintenance07
Carefully check your engine
coolant level, when the engine
is hot. The hot coolant or steam
may blow out under pressure.
This may cause a skin burn or
other serious injuries.
WARNING
Page 427 of 477
7-70
Maintenance
Headlight, position light, turn
signal light, side marker light
and front fog light bulb
replacement
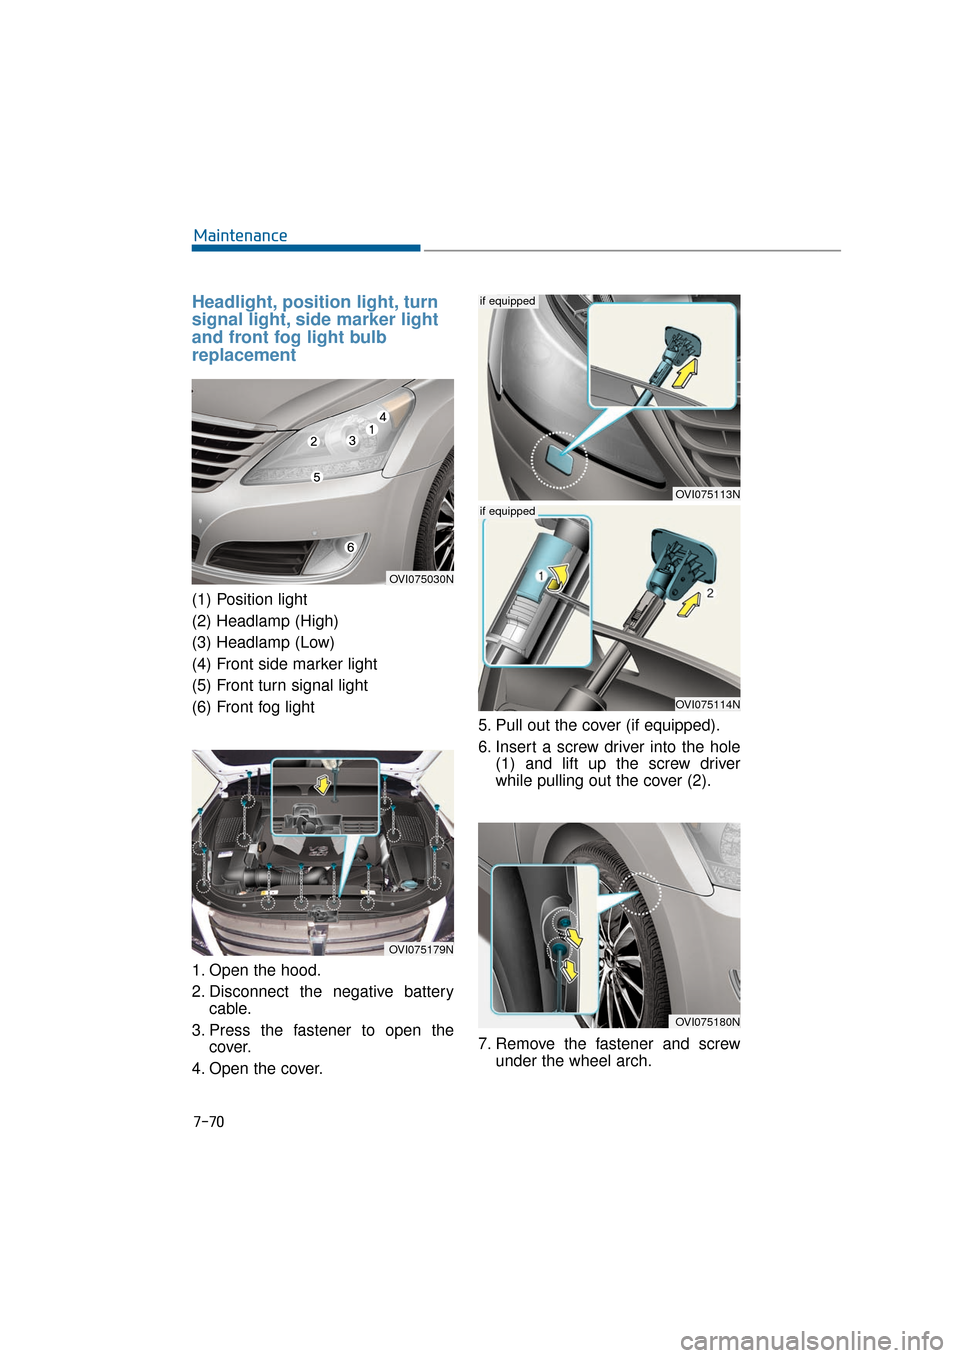
(1) Position light
(2) Headlamp (High)
(3) Headlamp (Low)
(4) Front side marker light
(5) Front turn signal light
(6) Front fog light
1. Open the hood.
2. Disconnect the negative batterycable.
3. Press the fastener to open the cover.
4. Open the cover. 5. Pull out the cover (if equipped).
6. Insert a screw driver into the hole
(1) and lift up the screw driver
while pulling out the cover (2).
7. Remove the fastener and screw under the wheel arch.
OVI075030N
OVI075179N
OVI075113N
if equipped
OVI075114N
if equipped
OVI075180N
Page 430 of 477
7-73
Maintenance07
Information
HID lamps have superior perform-
ance in comparison to halogen bulbs.
HID lamps are estimated to last twice
as long as halogen bulbs, or longer, by
the manufacturer, depending on the
usage hours. HID lamps needs to be
replaced at some point within the
vehicle life. Frequent turning the
headlamps ON and OFF shortens the
HID lamps life. HID lamps do not
blow out in the same manner as halo-
gen incandescent lamps. When a
headlamp blows out after a period of
operation, the lamp light gradually
fades away after being turned ON.
Even when the lamp is turned ON by
turning ON the switch, it needs to be
replaced. The HID lamp components
are more complex than the ones of
conventional halogen bulbs. Thus, the
repairing costs are more expensive.
Headlight (bulb type), front turnsignal, position, side markerand fog light bulbs
When a bulb is out, have the vehicle
checked by an authorized EQUUS
dealer.
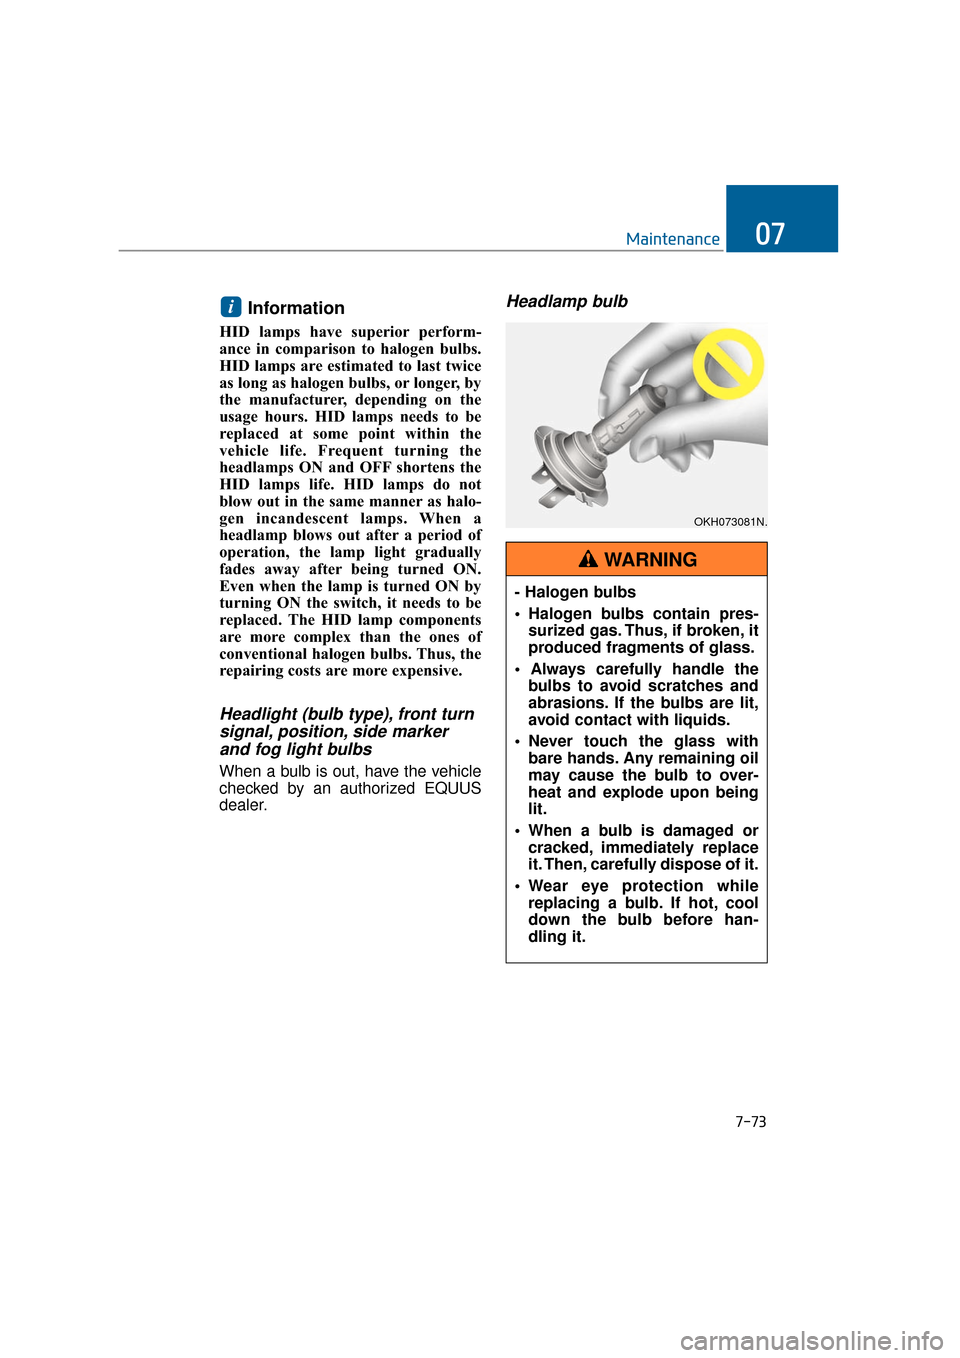
Headlamp bulb i
OKH073081N.
- Halogen bulbs
Halogen bulbs contain pres-
surized gas. Thus, if broken, it
produced fragments of glass.
bulbs to avoid scratches and
abrasions. If the bulbs are lit,
avoid contact with liquids.
Never touch the glass with bare hands. Any remaining oil
may cause the bulb to over-
heat and explode upon being
lit.
When a bulb is damaged or cracked, immediately replace
it. Then, carefully dispose of it.
Wear eye protection while replacing a bulb. If hot, cool
down the bulb before han-
dling it.
WARNING
Page 431 of 477
7-74
Maintenance
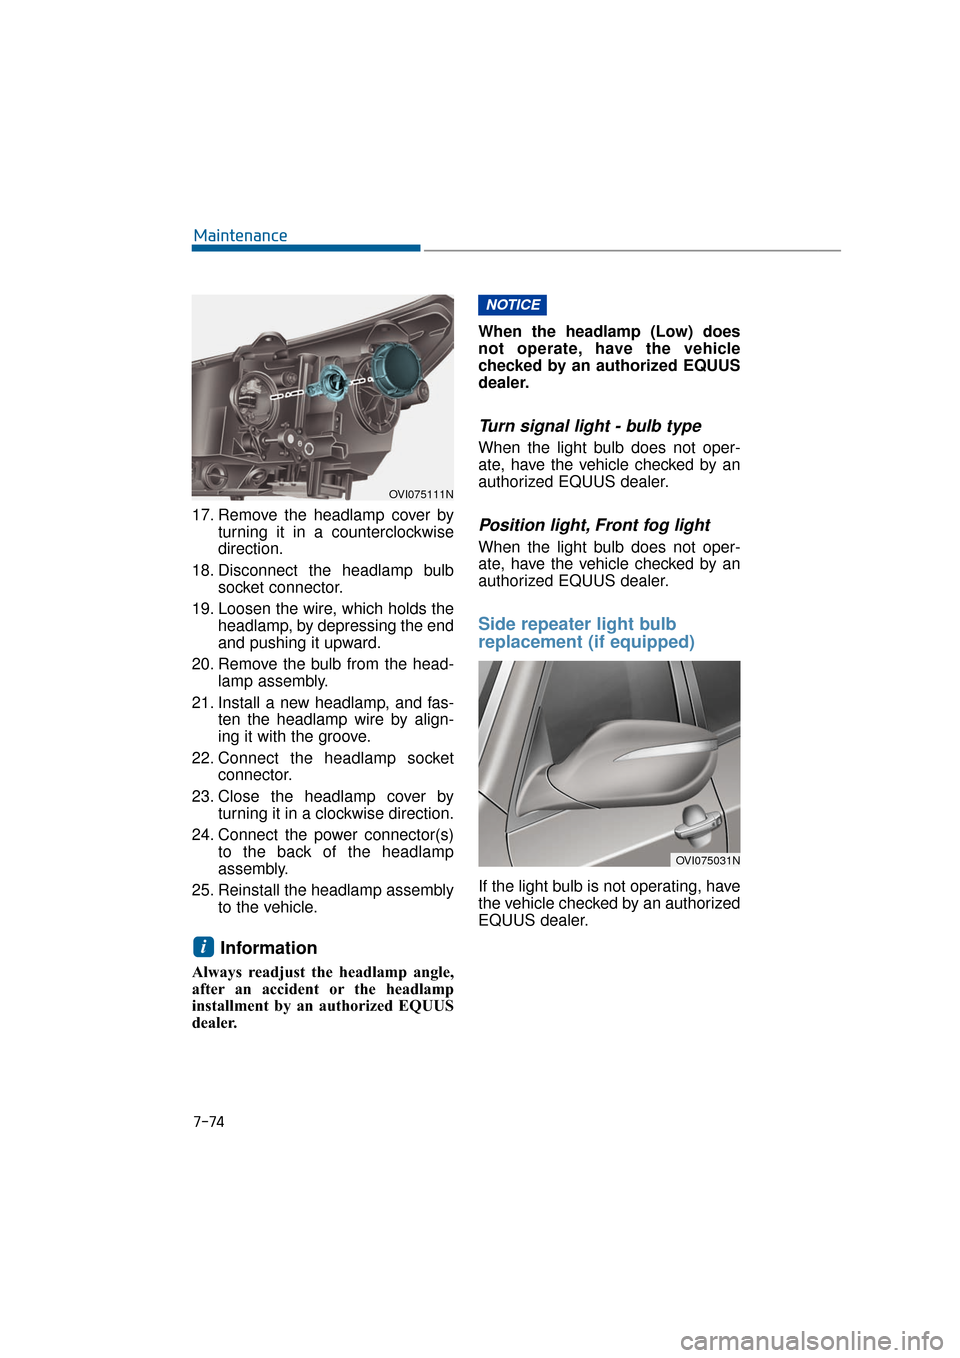
17. Remove the headlamp cover by turning it in a counterclockwise
direction.
18. Disconnect the headlamp bulb socket connector.
19. Loosen the wire, which holds the headlamp, by depressing the end
and pushing it upward.
20. Remove the bulb from the head- lamp assembly.
21. Install a new headlamp, and fas- ten the headlamp wire by align-
ing it with the groove.
22. Connect the headlamp socket connector.
23. Close the headlamp cover by turning it in a clockwise direction.
24. Connect the power connector(s) to the back of the headlamp
assembly.
25. Reinstall the headlamp assembly to the vehicle.
Information
Always readjust the headlamp angle,
after an accident or the headlamp
installment by an authorized EQUUS
dealer. When the headlamp (Low) does
not operate, have the vehicle
checked by an authorized EQUUS
dealer.
Turn signal light - bulb type
When the light bulb does not oper-
ate, have the vehicle checked by an
authorized EQUUS dealer.
Position light, Front fog light
When the light bulb does not oper-
ate, have the vehicle checked by an
authorized EQUUS dealer.
Side repeater light bulb
replacement (if equipped)
If the light bulb is not operating, have
the vehicle checked by an authorized
EQUUS dealer.
NOTICE
i
OVI075111N
OVI075031N
Page 432 of 477
7-75
Maintenance07
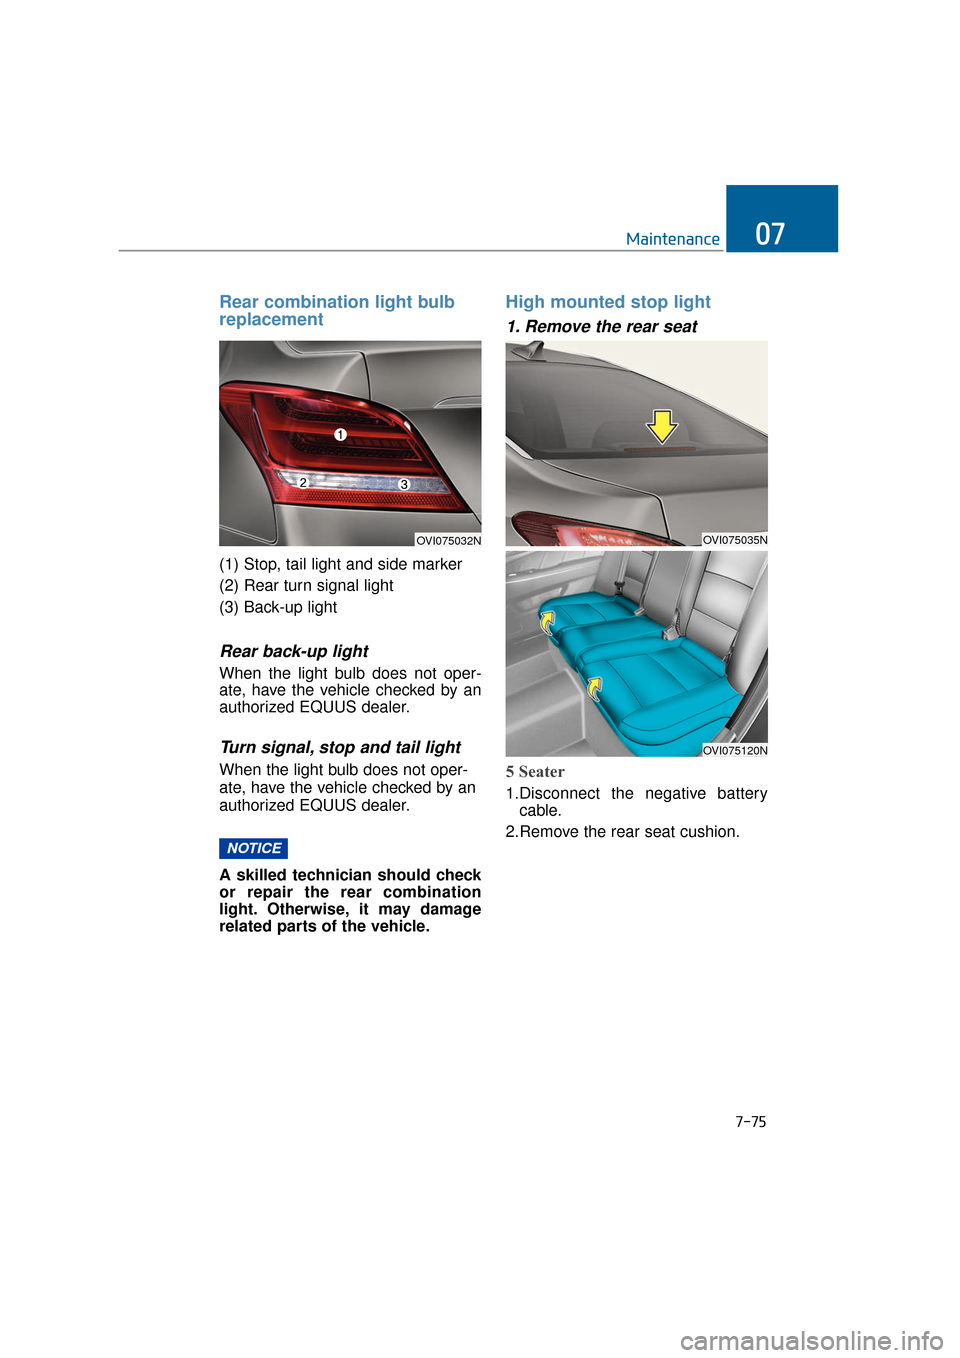
Rear combination light bulb
replacement
(1) Stop, tail light and side marker
(2) Rear turn signal light
(3) Back-up light
Rear back-up light
When the light bulb does not oper-
ate, have the vehicle checked by an
authorized EQUUS dealer.
Turn signal, stop and tail light
When the light bulb does not oper-
ate, have the vehicle checked by an
authorized EQUUS dealer.
A skilled technician should check
or repair the rear combination
light. Otherwise, it may damage
related parts of the vehicle.
High mounted stop light
1. Remove the rear seat
5 Seater
1.Disconnect the negative batterycable.
2.Remove the rear seat cushion.
NOTICE
OVI075032NOVI075035N
OVI075120N