remote control Hyundai Genesis 2015 Owner's Manual
[x] Cancel search | Manufacturer: HYUNDAI, Model Year: 2015, Model line: Genesis, Model: Hyundai Genesis 2015Pages: 501, PDF Size: 38.76 MB
Page 25 of 501

1-6
I IN
NS
ST
TR
RU
UM
ME
EN
NT
T
P
PA
AN
NE
EL
L
O
OV
VE
ER
RV
VI
IE
EW
W
(
(I
II
I)
)
Your vehicle at a glance
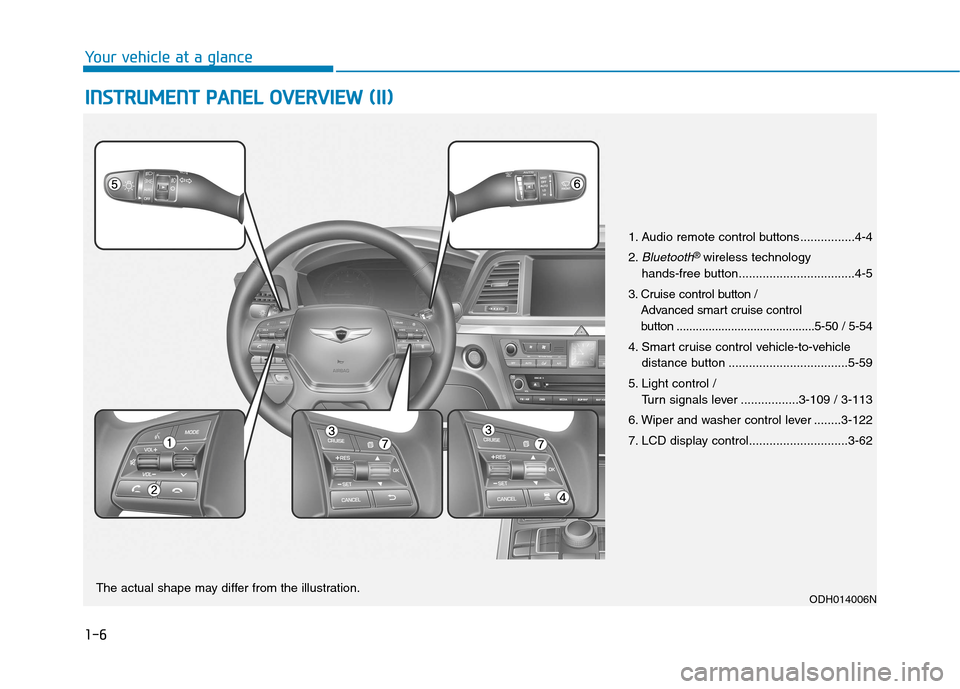
1. Audio remote control buttons ................4-4
2.
Bluetooth® wireless technology
hands-free button..................................4-5
3. Cruise control button /
Advanced smart cruise control
button ...........................................5-50 / 5-54
4. Smart cruise control vehicle-to-vehicle
distance button ...................................5-59
5. Light control /
Turn signals lever .................3-109 / 3-113
6. Wiper and washer control lever ........3-122
7. LCD display control.............................3-62
ODH014006NThe actual shape may differ from the illustration.
Page 129 of 501

3-35
Convenient features of your vehicle
3
Erasing HomeLink®buttons
Individual buttons cannot be erased.
However, to erase all three pro-
grammed buttons:
1. Press and hold the two outer
HomeLink
®buttons until the indi-
cator light begins to flash-after 20
seconds.
2. Release both buttons. Do not hold
for longer than 30 seconds.
The Integrated HomeLink
®Wireless
Control System is now in the training
(learn) mode and can be pro-
grammed at any time following the
appropriate steps in the Programming
chapters above.
NVS
®is a registered trademark and
Z-Nav™ is a trademark of the Gentex
Corporation, Zeeland, Michigan.
HomeLink
®is a registered trademark
owned by Johnson Controls,
Incorporated, Milwaukee, Wisconsin.
FCC ID: NZLZTVHL3
IC: 4112A-ZTVHL3This device complies with Part 15
of the FCC Rules.
Operation is subject to the following
two conditions:
1. This device may not cause harm-
ful interference, and
2. This device must accept any inter-
ference received, including inter-
ference that may cause undesired
operation.
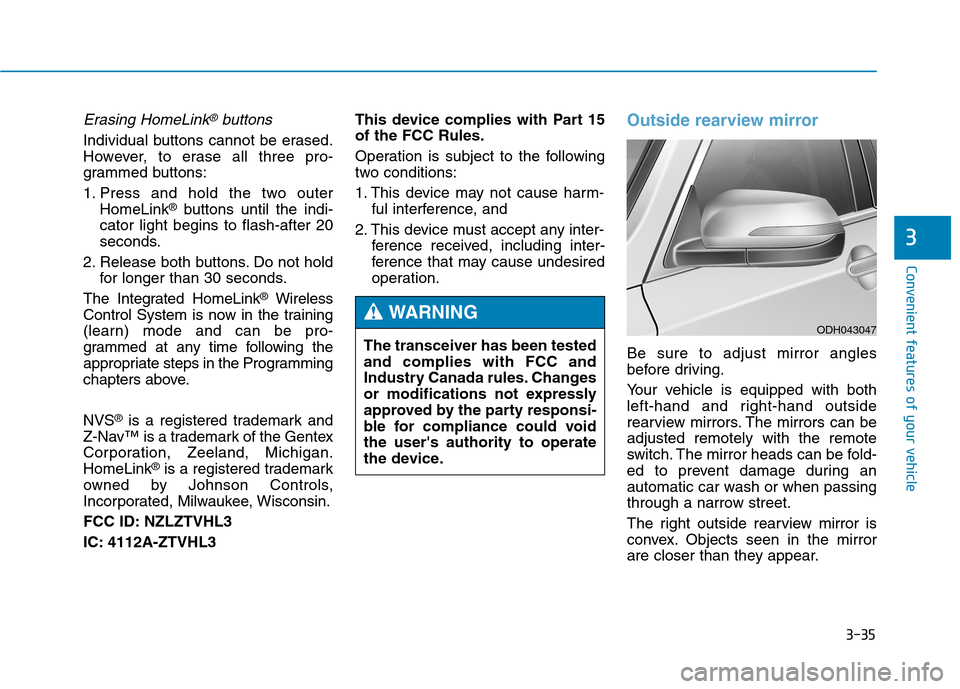
Outside rearview mirror
Be sure to adjust mirror angles
before driving.
Your vehicle is equipped with both
left-hand and right-hand outside
rearview mirrors. The mirrors can be
adjusted remotely with the remote
switch. The mirror heads can be fold-
ed to prevent damage during an
automatic car wash or when passing
through a narrow street.
The right outside rearview mirror is
convex. Objects seen in the mirror
are closer than they appear. The transceiver has been tested
and complies with FCC and
Industry Canada rules. Changes
or modifications not expressly
approved by the party responsi-
ble for compliance could void
the user's authority to operate
the device.
WARNINGODH043047
Page 132 of 501

3-38
Convenient features of your vehicle
Reverse parking aid function
When you move the shift lever to the
R (Reverse) position, the outside
rearview mirror(s) will rotate down-
wards to aid with driving in reverse.
The position of the outside rearview
mirror switch (1) determines whether
or not the mirrors will move:
Left/Right :When either the L (Left) or
R (Right) switch is select-
ed, both outside rearview
mirrors will move.
Neutral : When neither switch is select-
ed, the outside rearview mir-
rors will not move.The outside rearview mirrors will
automatically revert to their original
positions if any of the following occur:
The Engine Start/Stop button is
pressed to either the OFF position
or the ACC position.
The shift lever is moved to any
position except R (Reverse).
The remote control outside rearview
mirror switch is not selected.
ODH043042
Page 259 of 501

4-4
Steering wheel audio controlVOLUME (VOL + / - ) (1)
Move the VOLUME lever up to
increase volume.
Move the VOLUME lever down to
decrease volume.
SEEK/PRESET ( / ) (2)
If the SEEK/PRESET lever is moved
up or down and held for 0.8 second
or more, it will function in the follow-
ing modes;
RADIO mode
It will function as the AUTO SEEK
select button. It will SEEK until you
release the button.
MEDIA mode
It will function as the FF/REW button.
If the SEEK/PRESET lever is moved
up or down, it will function in the fol-
lowing modes;
RADIO mode
It will function as the PRESET STA-
TION UP/DOWN button.
MEDIA mode
It will function as the TRACK UP/
DOWN button.
MODE (3)
Press the MODE button to select
Radio, XM, Disc, or AUX.
MUTE ( ) (4)
Press the MUTE button to mute the
sound.
Press the MUTE button again to
activate the sound.
✽ ✽
NOTICE
Detailed information is described in
a separately supplied manual.
Multimedia System
ODH043118L
ODH043118L
■Type A
■Type B
Do not operate audio remote
control buttons simultaneously.
CAUTION
Page 450 of 501

7-68
Maintenance
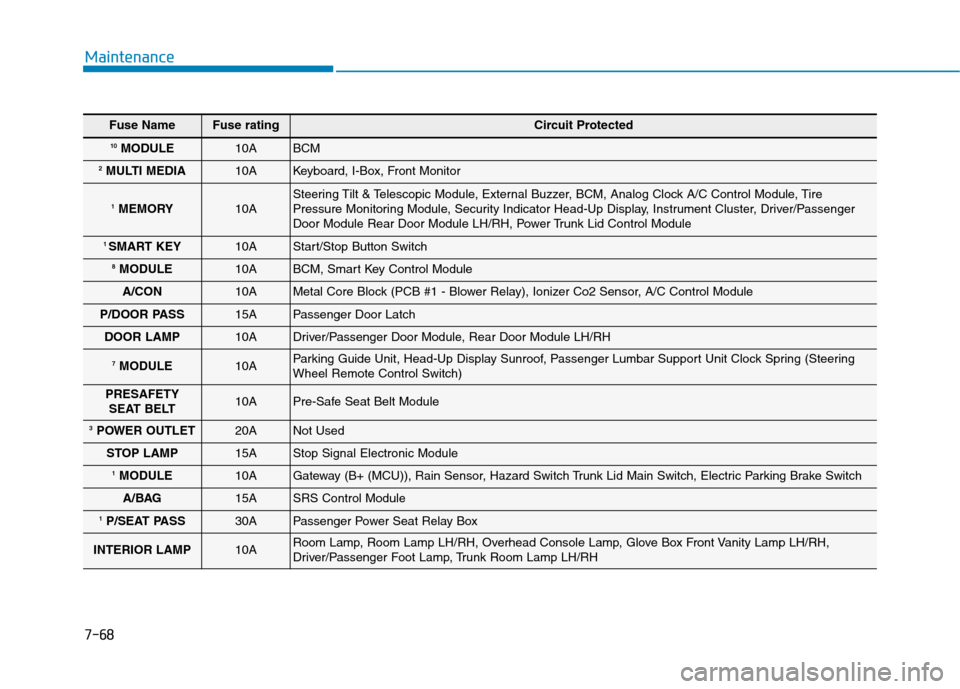
Fuse NameFuse ratingCircuit Protected
10MODULE10A BCM
2MULTI MEDIA 10A Keyboard, I-Box, Front Monitor
1MEMORY10A Steering Tilt & Telescopic Module, External Buzzer, BCM, Analog Clock A/C Control Module, Tire
Pressure Monitoring Module, Security Indicator Head-Up Display, Instrument Cluster, Driver/Passenger
Door Module Rear Door Module LH/RH, Power Trunk Lid Control Module
1 SMART KEY10A Start/Stop Button Switch
8MODULE10A BCM, Smart Key Control Module
A/CON 10A Metal Core Block (PCB #1 - Blower Relay), Ionizer Co2 Sensor, A/C Control Module
P/DOOR PASS 15A Passenger Door Latch
DOOR LAMP 10A Driver/Passenger Door Module, Rear Door Module LH/RH
7MODULE 10A Parking Guide Unit, Head-Up Display Sunroof, Passenger Lumbar Support Unit Clock Spring (Steering
Wheel Remote Control Switch)
PRESAFETY
SEAT BELT 10A Pre-Safe Seat Belt Module
3POWER OUTLET 20A Not Used
STOP LAMP 15A Stop Signal Electronic Module
1MODULE10A Gateway (B+ (MCU)), Rain Sensor, Hazard Switch Trunk Lid Main Switch, Electric Parking Brake Switch
A/BAG 15A SRS Control Module
1P/SEAT PASS 30A Passenger Power Seat Relay Box
INTERIOR LAMP 10A Room Lamp, Room Lamp LH/RH, Overhead Console Lamp, Glove Box Front Vanity Lamp LH/RH,
Driver/Passenger Foot Lamp, Trunk Room Lamp LH/RH