ECO mode Hyundai Genesis 2015 Quick Reference Guide
[x] Cancel search | Manufacturer: HYUNDAI, Model Year: 2015, Model line: Genesis, Model: Hyundai Genesis 2015Pages: 22, PDF Size: 21.37 MB
Page 2 of 22
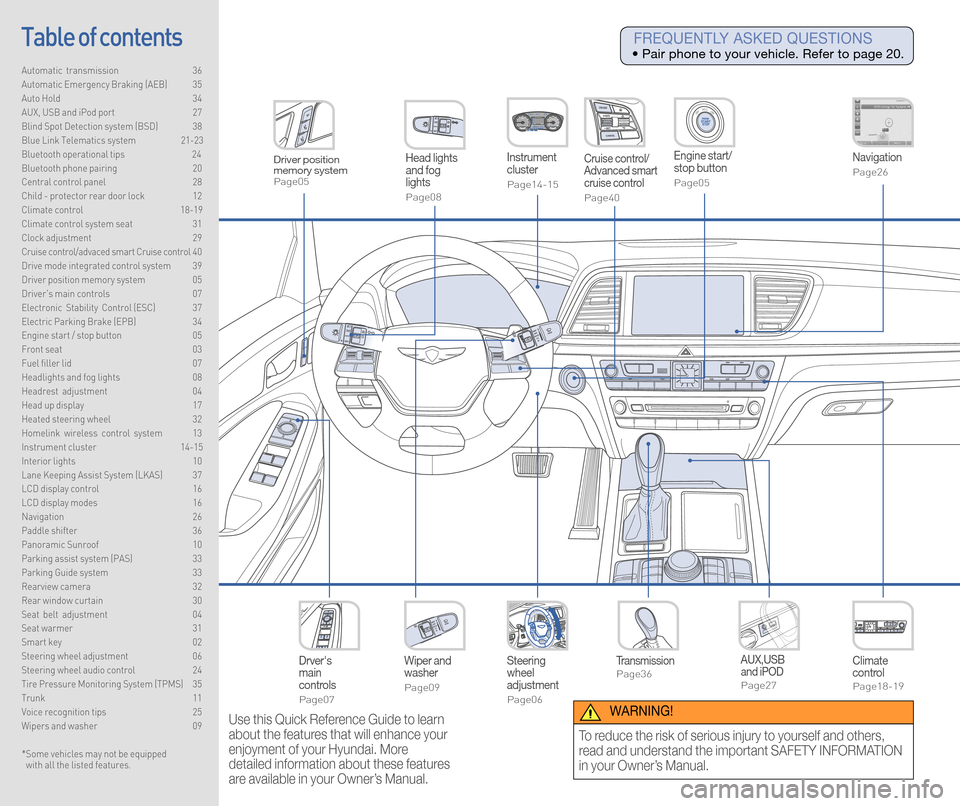
Steering
wheel
adjustment
Page06
Instrument
cluster
Page14-15
Navigation
Page26
Head lights
and fog
lights
Page08
Climate
control
Page18-19
Drver's
main
controls
Page07
Wiper and
washer
Page09
TransmissionPage36
Table of contents
Automatic transmission 36
Automatic Emergency Braking (AEB) 35
Auto Hold 34
AUX, USB and iPod port 27
Blind Spot Detection system (BSD) 38
Blue Link Telematics system 21-23
Bluetooth operational tips 24
Bluetooth phone pairing 20
Central control panel 28
Child - protector rear door lock 12
Climate control 18-19\
Climate control system seat 31
Clock adjustment 29
Cruise control/advaced smart Cruise control 40
Drive mode integrated control system 39
Driver position memory system 05
Driver's main controls 07
Electronic Stability Control (ESC) 37
Electric Parking Brake (EPB) 34
Engine start / stop button 05
Front seat 03
Fuel filler lid 07
Headlights and fog lights 08
Headrest adjustment 04
Head up display 17
Heated steering wheel 32
Homelink wireless control system 13
Instrument cluster 14-15
Interior lights 10
Lane Keeping Assist System (LKAS) 37
LCD display control 16
LCD display modes 16
Navigation 26
Paddle shifter 36
Panoramic Sunroof 10
Parking assist system (PAS) 33
Parking Guide system 33
Rearview camera 32
Rear window curtain 30
Seat belt adjustment 04
Seat warmer 31
Smart key 02
Steering wheel adjustment 06
Steering wheel audio control 24
Tire Pressure Monitoring System (TPMS) 35
Trunk 11
Voice recognition tips 25
Wipers and washer 09
Engine start/
stop button
Page05
Cruise control/
Advanced smart
cruise control
Page40
AUX,USB
and iPOD
Page27
Driver position
memory system
Page05
* Some vehicles may not be equipped
with all the listed features.
Use this Quick Reference Guide to learn
about the features that will enhance your
enjoyment of your Hyundai. More
detailed information about these features
are available in your Owner’s Manual.
FREQUENTLY ASKED QUESTIONS
• Pair phone to your vehicle. Refer to page 20.
WARNING!
To reduce the risk of serious injury to yourself and others,
read and understand the important SAFETY INFORMATION
in your Owner’s Manual.
Page 4 of 22
GETTING STARTED
Quick Reference Guide I 0504 I Quick Reference Guide
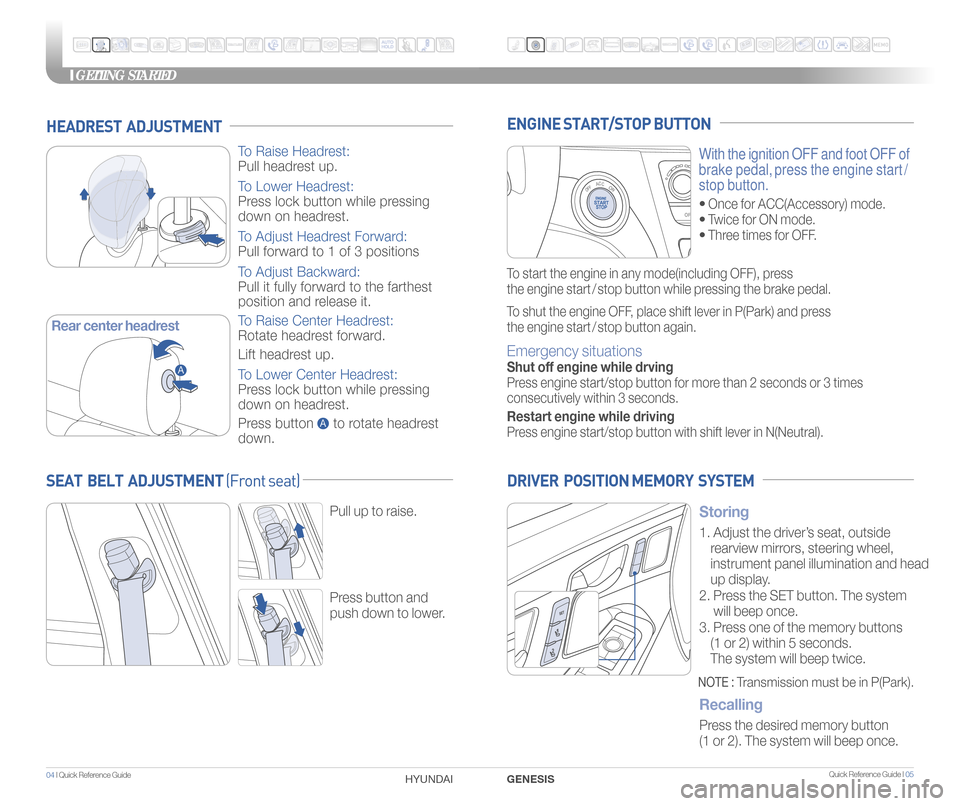
HEADREST ADJUSTMENT
To Raise Headrest:
Pull headrest up.
To Lower Headrest:
Press lock button while pressing
down on headrest.
To Adjust Headrest Forward:
Pull forward to 1 of 3 positions
To Adjust Backward:
Pull it fully forward to the farthest
position and release it.
To Raise Center Headrest:
Rotate headrest forward.
Lift headrest up.
To Lower Center Headrest:
Press lock button while pressing
down on headrest.
Press button to rotate headrest
down.
GENESIS
HYUNDAI
With the ignition OFF and foot OFF of
brake pedal, press the engine start /
stop button.
• Once for ACC(Accessory) mode.
• Twice for ON mode.
• Three times for OFF.
ENGINE START/STOP BUTTON
To start the engine in any mode(including OFF), press
the engine start / stop button while pressing the brake pedal.
To shut the engine OFF, place shift lever in P(Park) and press
the engine start / stop button again.
Emergency situations
Shut off engine while drving
Press engine start/stop button for more than 2 seconds or 3 times
consecutively within 3 seconds.
Restart engine while driving
Press engine start/stop button with shift lever in N(Neutral).
Storing
1. Adjust the driver’s seat, outside
rearview mirrors, steering wheel,
instrument panel illumination and head
up display.
2. Press the SET button. The system
will beep once.
3. Press one of the memory buttons
(1 or 2) within 5 seconds.
The system will beep twice.
Recalling
Press the desired memory button
(1 or 2). The system will beep once.
DRIVER POSITION MEMORY SYSTEM
NOTE : Transmission must be in P(Park).
SEAT BELT ADJUSTMENT (Front seat)
Pull up to raise.
Press button and
push down to lower.
A
A
Rear center headrest
Page 8 of 22
Quick Reference Guide I 13
FEATURES AND CONTROLS
12 I Quick Reference Guide
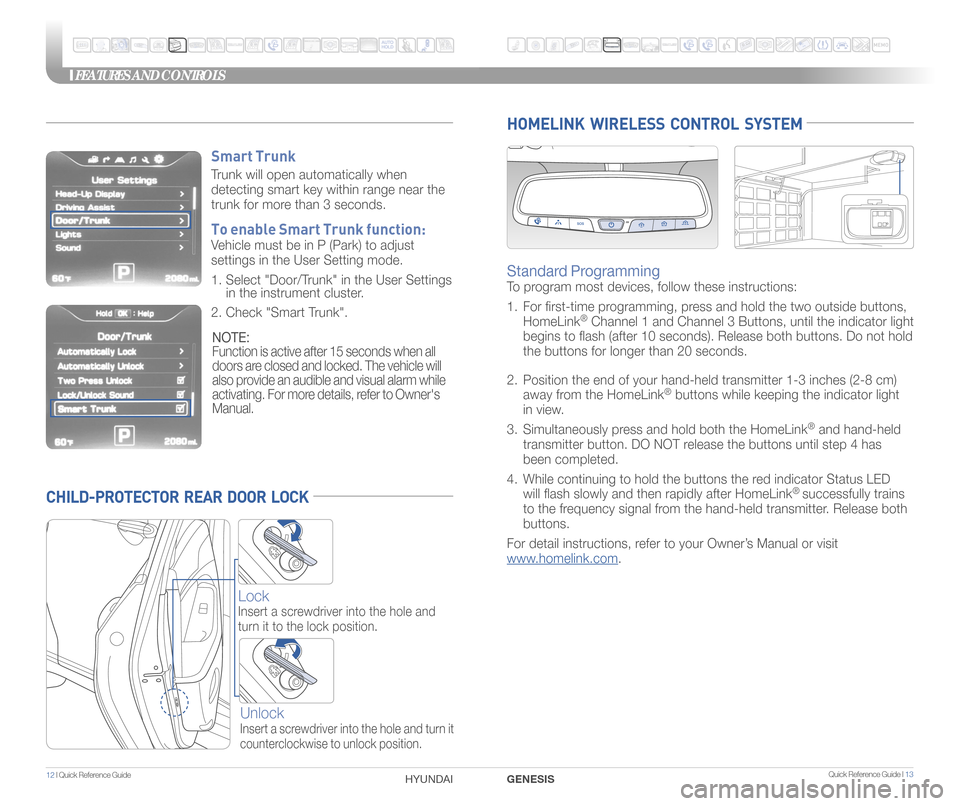
CHILD-PROTECTOR REAR DOOR LOCK
Lock
Insert a screwdriver into the hole and
turn it to the lock position.
Unlock
Insert a screwdriver into the hole and turn it
counterclockwise to unlock position.
HOMELINK WIRELESS CONTROL SYSTEM
Standard Programming
To program most devices, follow these instructions:
1. For �rst-time programming, press and hold the two outside buttons,
HomeLink
® Channel 1 and Channel 3 Buttons, until the indicator light
begins to �ash (after 10 seconds). Release both buttons. Do not hol\
d
the buttons for longer than 20 seconds.
2. Position the end of your hand-held transmitter 1-3 inches (2-8 cm)
away from the HomeLink
® buttons while keeping the indicator light
in view.
3. Simultaneously press and hold both the HomeLink
® and hand-held
transmitter button. DO NOT release the buttons until step 4 has
been completed.
4. While continuing to hold the buttons the red indicator Status LED
will �ash slowly and then rapidly after HomeLink
® successfully trains
to the frequency signal from the hand-held transmitter. Release both
buttons.
For detail instructions, refer to your Owner’s Manual or visit
www.homelink.com.
GENESIS
HYUNDAI
Smart Trunk
Trunk will open automatically when
detecting smart key within range near the
trunk for more than 3 seconds.
To enable Smart Trunk function:
Vehicle must be in P (Park) to adjust
settings in the User Setting mode.
1. Select "Door/Trunk" in the User Settings
in the instrument cluster.
2. Check "Smart Trunk".
NOTE:
Function is active after 15 seconds when all
doors are closed and locked. The vehicle will
also provide an audible and visual alarm while
activating. For more details, refer to Owner's
Manual.
Page 10 of 22
INSTRUMENT CLUSTER
Quick Reference Guide I 1716 I Quick Reference Guide
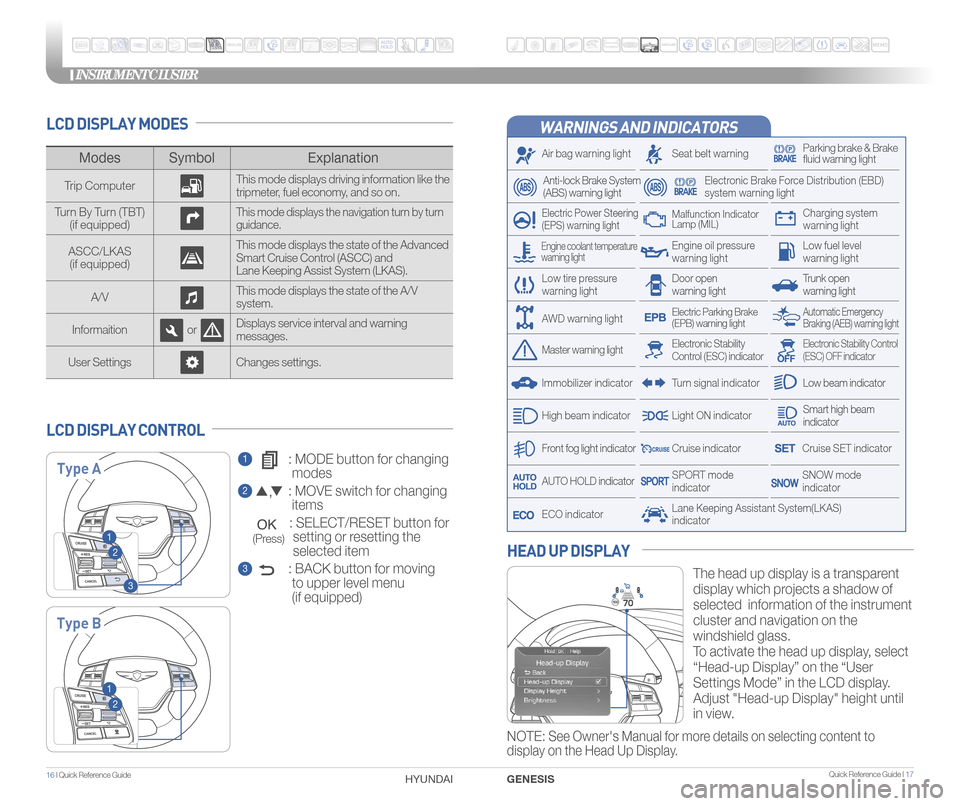
WARNINGS AND INDICATORS
Air bag warning light
Electric Power Steering
(EPS) warning light
Seat belt warningParking brake & Brake
fluid warning light
Electronic Brake Force Distribution (EBD)
system warning light
Low tire pressure
warning lightTrunk open
warning light
Low fuel level
warning light
Front fog light indicator
Low beam indicator
Smart high beam
indicator
SNOW mode
indicator
Light ON indicator
ECO indicator
SPORT mode
indicator
Anti-lock Brake System
(ABS) warning light
High beam indicator
Door open
warning light
Electronic Stability Control (ESC) indicatorMaster warning light
Automatic Emergency
Braking (AEB) warning lightElectric Parking Brake
(EPB) warning light
Engine oil pressure
warning light
Charging system
warning light
Immobilizer indicator
Malfunction Indicator
Lamp (MIL)
Electronic Stability Control
(ESC) OFF indicator
Cruise indicator
Lane Keeping Assistant System(LKAS)
indicator
Cruise SET indicator
AUTO HOLD indicator
Turn signal indicator
LCD DISPLAY MODES
The head up display is a transparent
display which projects a shadow of
selected information of the instrument
cluster and navigation on the
windshield glass.
To activate the head up display, select
“Head-up Display” on the “User
Settings Mode” in the LCD display.
Adjust "Head-up Display" height until
in view.
HEAD UP DISPLAY
1 : MODE button for changing
modes
2 : MOVE switch for changing
items
: SELECT/RESET button for
setting or resetting the
selected item
3 : BACK button for moving
to upper level menu
(if equipped)
LCD DISPLAY CONTROL
Modes Symbol Explanation
Trip Computer This mode displays driving information like the
tripmeter, fuel economy, and so on.
Turn By Turn (TBT) (if equipped)
This mode displays the navigation turn by turn
guidance.
ASCC/LKAS(if equipped) This mode displays the state of the Advanced
Smart Cruise Control (ASCC) and
Lane Keeping Assist System (LKAS).
A/V This mode displays the state of the A/V
system.
Informaition orDisplays service interval and warning
messages.
User Settings Changes settings.
Type A
Type B
1
2
3
1
2
Engine coolant temperature
warning light
AWD warning light
GENESIS
HYUNDAI
NOTE: See Owner's Manual for more details on selecting content to
display on the Head Up Display.
(Press)
Page 14 of 22
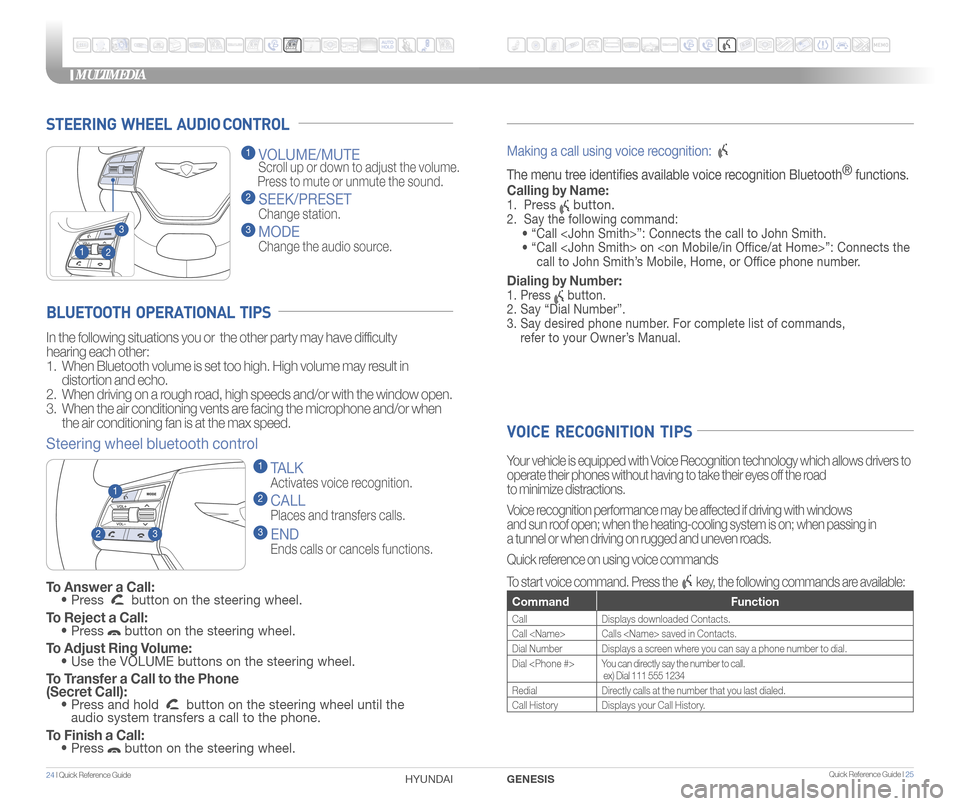
STEERING WHEEL AUDIO CONTROL
2
3
1
1 VOLUME/MUTE
Scroll up or down to adjust the volume.
Press to mute or unmute the sound.
2 SEEK/PRESET
Change station.
3 MODE
Change the audio source.
To Answer a Call: • Press button on the steering wheel.
To Reject a Call: • Press button on the steering wheel.
To Adjust Ring Volume: • Use the VOLUME buttons on the steering wheel.
To Transfer a Call to the Phone
(Secret Call):
• Press and hold button on the steering wheel until the
audio system transfers a call to the phone.
To Finish a Call: • Press button on the steering wheel.
BLUETOOTH OPERATIONAL TIPS
In the following situations you or the other party may have difficulty
hearing each other:
1. When Bluetooth volume is set too high. High volume may result in
distortion and echo.
2. When driving on a rough road, high speeds and/or with the window open.
3. When the air conditioning vents are facing the microphone and/or when
the air conditioning fan is at the max speed.
Steering wheel bluetooth control
1 TALK
Activates voice recognition.
2 CALL
Places and transfers calls.
3 END
Ends calls or cancels functions.
23
1
Making a call using voice recognition:
The menu tree identifes available voice recognition Bluetooth ®
functions.
Calling by Name:
1. Press button.
2. Say the following command:
• “Call
• “ Call
call to John Smith’s Mobile, Home, or Offce phone number.
Dialing by Number:
1. Press button.
2. Say “Dial Number”.
3. Say desired phone number. For complete list of commands,
refer to your Owner’s Manual.
VOICE RECOGNITION TIPS
Your vehicle is equipped with Voice Recognition technology which allows drivers to
operate their phones without having to take their eyes off the road
to minimize distractions.
Voice recognition performance may be affected if driving with windows
and sun roof open; when the heating-cooling system is on; when passing in
a tunnel or when driving on rugged and uneven roads.
Quick reference on using voice commands
To start voice command. Press the
key, the following commands are available:
Command Function
CallDisplays downloaded Contacts.
Call
Dial Number Displays a screen where you can say a phone number to dial.
Dial
ex) Dial 111 555 1234
Redial Directly calls at the number that you last dialed.
Call History Displays your Call History.
MULTIMEDIA
24 I Quick Reference Guide HYUNDAI Quick Reference Guide I 25GENESIS
Page 20 of 22
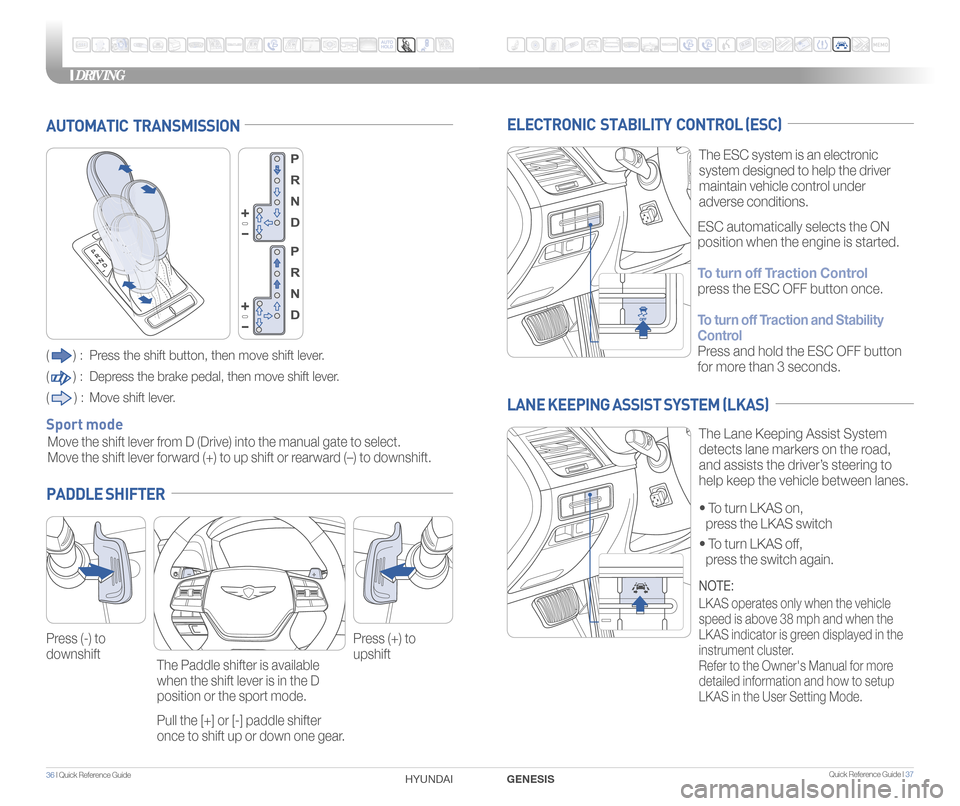
36 I Quick Reference Guide Quick Reference Guide I 37
DRIVING
GENESIS
HYUNDAI
ELECTRONIC STABILITY CONTROL (ESC)
The ESC system is an electronic
system designed to help the driver
maintain vehicle control under
adverse conditions.
• To turn LKAS on,
press the LKAS switch
•
To turn LKAS off,
press the switch again.
The Lane Keeping Assist System
detects lane markers on the road,
and assists the driver’s steering to
help keep the vehicle between lanes.
LANE KEEPING ASSIST SYSTEM (LKAS)
ESC automatically selects the ON
position when the engine is started.
To turn off Traction Control
press the ESC OFF button once.
To turn off Traction and Stability
Control
Press and hold the ESC OFF button
for more than 3 seconds.
NOTE:
LKAS operates only when the vehicle
speed is above 38 mph and when the
LKAS indicator is green displayed in the
instrument cluster.
Refer to the Owner's Manual for more
detailed information and how to setup
LKAS in the User Setting Mode.
AUTOMATIC TRANSMISSION
() : Press the shift button, then move shift lever.
(
) : Depress the brake pedal, then move shift lever.
(
) : Move shift lever.
Move the shift lever from D (Drive) into the manual gate to select.
Move the shift lever forward (+) to up shift or rearward (–) to downshift.
Sport mode
PADDLE SHIFTER
Press (-) to
downshift Press (+) to
upshift
The Paddle shifter is available
when the shift lever is in the D
position or the sport mode.
Pull the [+] or [-] paddle shifter
once to shift up or down one gear.
Page 21 of 22
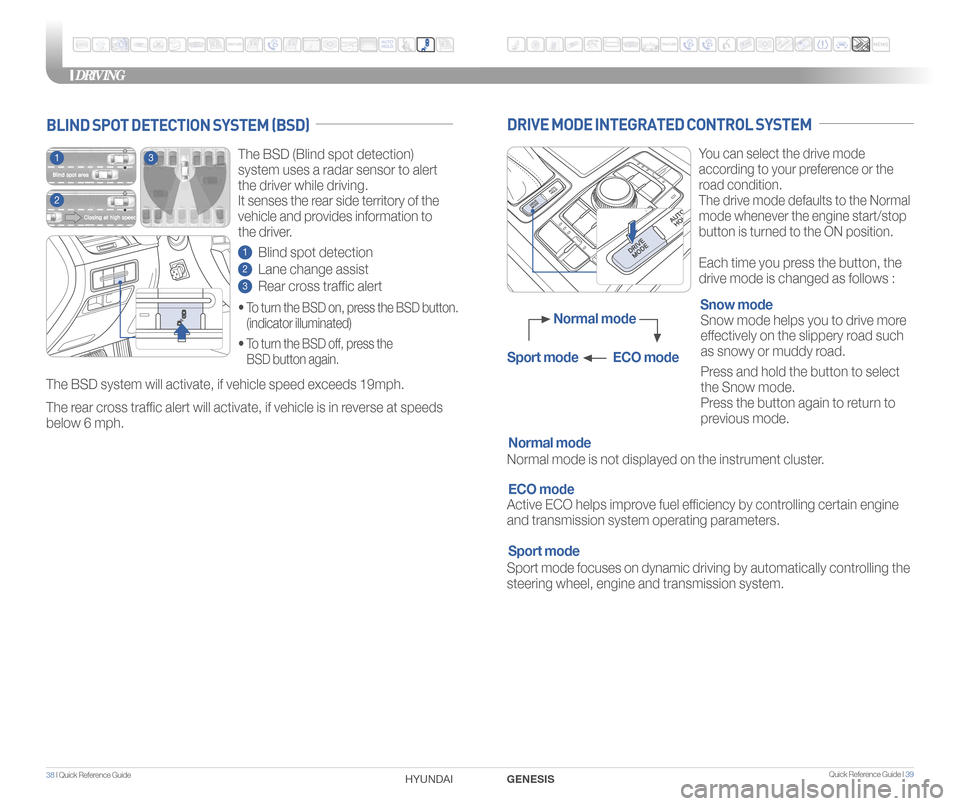
Quick Reference Guide I 3938 I Quick Reference Guide
DRIVING
GENESIS
HYUNDAI
You can select the drive mode
according to your preference or the
road condition.
The drive mode defaults to the Normal
mode whenever the engine start/stop
button is turned to the ON position.
Each time you press the button, the
drive mode is changed as follows :
DRIVE MODE INTEGRATED CONTROL SYSTEM
Normal mode is not displayed on the instrument cluster. Normal mode
Sport mode focuses on dynamic driving by automatically controlling the
steering wheel, engine and transmission system. Sport mode Snow mode helps you to drive more
effectively on the slippery road such
as
snowy or muddy road.
Press and hold the button to select
the Snow mode.
Press the button again to return to
previous mode.
Snow mode
Active ECO helps improve fuel efficiency by controlling certain engine
and transmission system operating parameters. ECO mode
Normal mode
Sport mode ECO mode
The BSD (Blind spot detection)
system uses a radar sensor to alert
the driver while driving.
It senses the rear side territory of the
vehicle and provides information to
the driver.
1 Blind spot detection
2 Lane change assist
3 Rear cross traffic alert
The BSD system will activate, if vehicle speed exceeds 19mph.
The rear cross traffic alert will activate, if vehicle is in reverse at speeds
below 6 mph.
BLIND SPOT DETECTION SYSTEM (BSD)
•
To turn the BSD on, press the BSD button.
(indicator illuminated)
•
To turn the BSD off, press the
BSD button again.
1
2
3
Page 22 of 22
Quick Reference Guide I 4140 I Quick Reference Guide
DRIVINGMEMO
HYUNDAI GENESIS
HYUNDAI OWNER DEALERSHIP NAME
SALES CONSULTANTDATE
VINPREVIOUS VEHICLE
GENESIS CUSTOMER DELIVERY CHECKLIST
BEFORE DELIVERY
�CONFIRM “GOOD BATTERY” USING GR8 AND STAPLE
TEST TICKET HERE
� SET TIRE PRESURE LF RF RR LR
�VERIFY VEHICLE IS CLEAN, IN GOOD CONDITION,
FREE OF CHIPS AND SCRATCHES · CLEAN WINDSHIELD
AND BACK WINDOW
�ENSURE FLOORMATS ARE SNAPPED INTO PLACE
Sales Consultant Date Sales Manager Date
Customer Date
Email
@
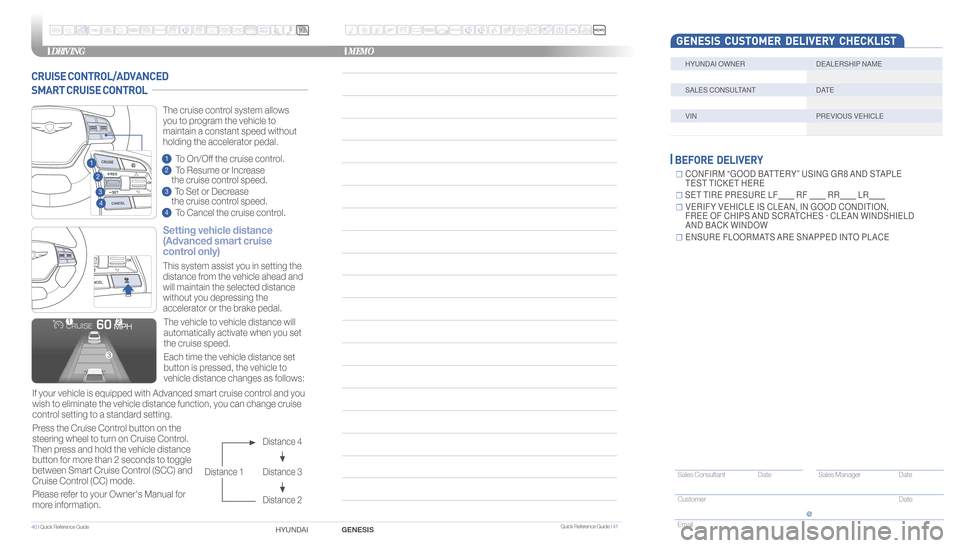
CRUISE CONTROL/ADVANCED
SMART CRUISE CONTROL
Setting vehicle distance
(Advanced smart cruise
control only)
The vehicle to vehicle distance will
automatically activate when you set
the cruise speed.
This system assist you in setting the
distance from the vehicle ahead and
will maintain the selected distance
without you depressing the
accelerator or the brake pedal.
If your vehicle is equipped with Advanced smart cruise control and you
wish to eliminate the vehicle distance function, you can change cruise
control setting to a standard setting.
Press the Cruise Control button on the
steering wheel to turn on Cruise Control.
Then press and hold the vehicle distance
button for more than 2 seconds to toggle
between Smart Cruise Control (SCC) and
Cruise Control (CC) mode.
Please refer to your Owner's Manual for
more information. Each time the vehicle distance set
button is pressed, the vehicle to
vehicle distance changes as follows:
The cruise control system allows
you to program the vehicle to
maintain a constant speed without
holding the accelerator pedal.
Distance 4
Distance 3
Distance 2
Distance 1
1
To On/Off the cruise control.
2 To Resume or Increase
the cruise control speed.
3 To Set or Decrease
the cruise control speed.
4 To Cancel the cruise control.
2
3
1
4