bonnet Hyundai Genesis 2016 - RHD (UK, Australia) Owner's Guide
[x] Cancel search | Manufacturer: HYUNDAI, Model Year: 2016, Model line: Genesis, Model: Hyundai Genesis 2016Pages: 502, PDF Size: 13.19 MB
Page 412 of 502
7-6
Maintenance
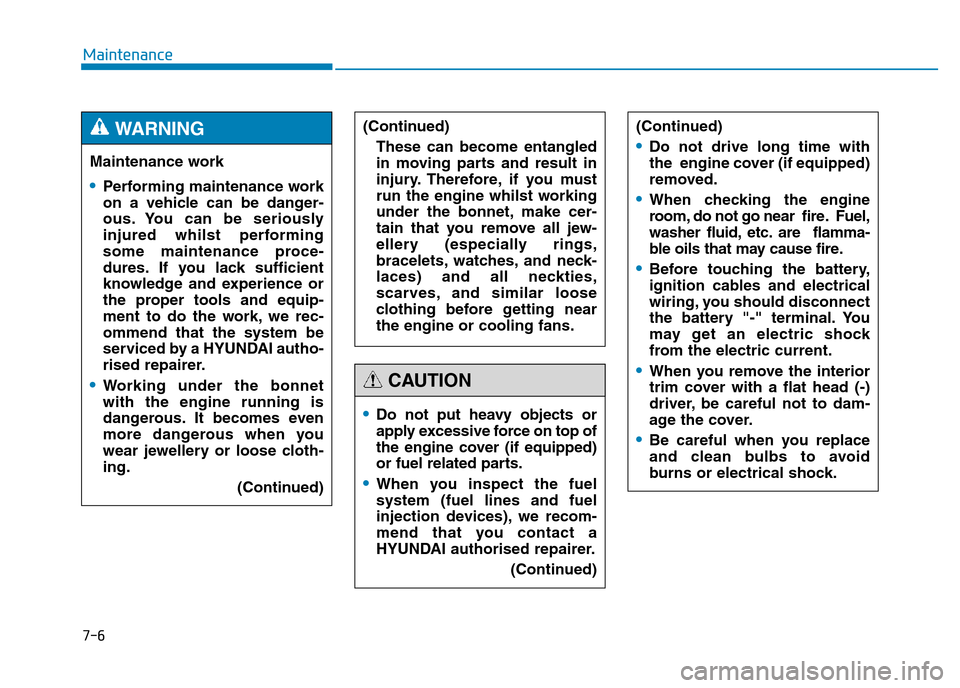
Maintenance work
•Performing maintenance work
on a vehicle can be danger-
ous. You can be seriously
injured whilst performing
some maintenance proce-
dures. If you lack sufficient
knowledge and experience or
the proper tools and equip-
ment to do the work, we rec-
ommend that the system be
serviced by a HYUNDAI autho-
rised repairer.
•Working under the bonnet
with the engine running is
dangerous. It becomes even
more dangerous when you
wear jewellery or loose cloth-
ing.
(Continued)
WARNING (Continued)
These can become entangled
in moving parts and result in
injury. Therefore, if you must
run the engine whilst working
under the bonnet, make cer-
tain that you remove all jew-
ellery (especially rings,
bracelets, watches, and neck-
laces) and all neckties,
scarves, and similar loose
clothing before getting near
the engine or cooling fans.
•Do not put heavy objects or
apply excessive force on top of
the engine cover (if equipped)
or fuel related parts.
•When you inspect the fuel
system (fuel lines and fuel
injection devices), we recom-
mend that you contact a
HYUNDAI authorised repairer.
(Continued)
CAUTION
(Continued)
•Do not drive long time with
the engine cover (if equipped)
removed.
•When checking the engine
room, do not go near fire. Fuel,
washer fluid, etc. are flamma-
ble oils that may cause fire.
•Before touching the battery,
ignition cables and electrical
wiring, you should disconnect
the battery "-" terminal. You
may get an electric shock
from the electric current.
•When you remove the interior
trim cover with a flat head (-)
driver, be careful not to dam-
age the cover.
•Be careful when you replace
and clean bulbs to avoid
burns or electrical shock.
Page 414 of 502
7-8
Maintenance
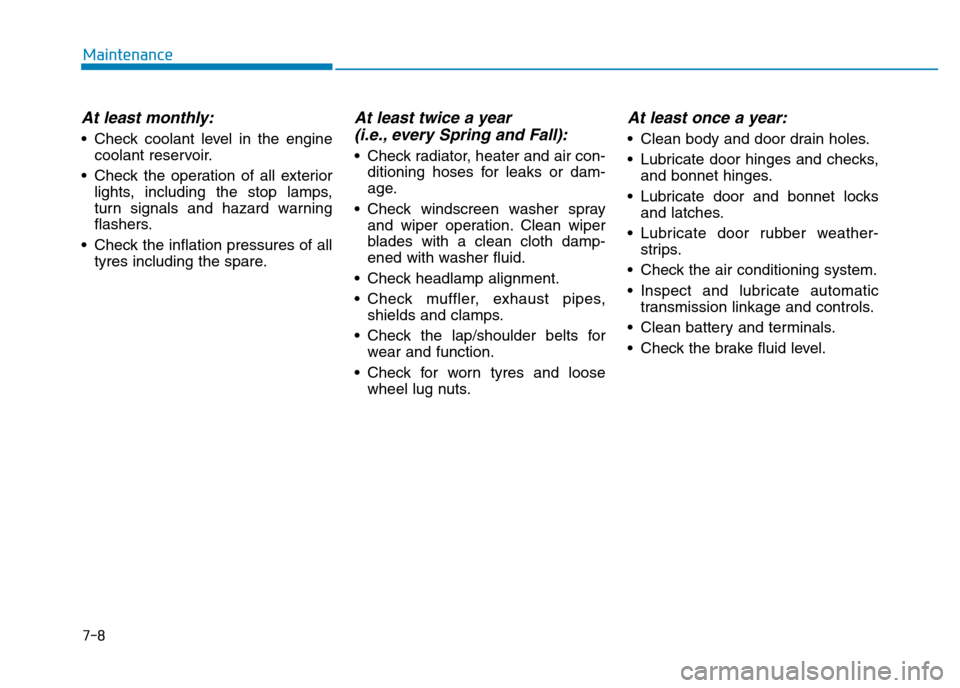
At least monthly:
• Check coolant level in the engine
coolant reservoir.
• Check the operation of all exterior
lights, including the stop lamps,
turn signals and hazard warning
flashers.
• Check the inflation pressures of all
tyres including the spare.
At least twice a year
(i.e., every Spring and Fall):
• Check radiator, heater and air con-
ditioning hoses for leaks or dam-
age.
• Check windscreen washer spray
and wiper operation. Clean wiper
blades with a clean cloth damp-
ened with washer fluid.
• Check headlamp alignment.
• Check muffler, exhaust pipes,
shields and clamps.
• Check the lap/shoulder belts for
wear and function.
• Check for worn tyres and loose
wheel lug nuts.
At least once a year:
• Clean body and door drain holes.
• Lubricate door hinges and checks,
and bonnet hinges.
• Lubricate door and bonnet locks
and latches.
• Lubricate door rubber weather-
strips.
• Check the air conditioning system.
• Inspect and lubricate automatic
transmission linkage and controls.
• Clean battery and terminals.
• Check the brake fluid level.
Page 460 of 502
7-54
Maintenance
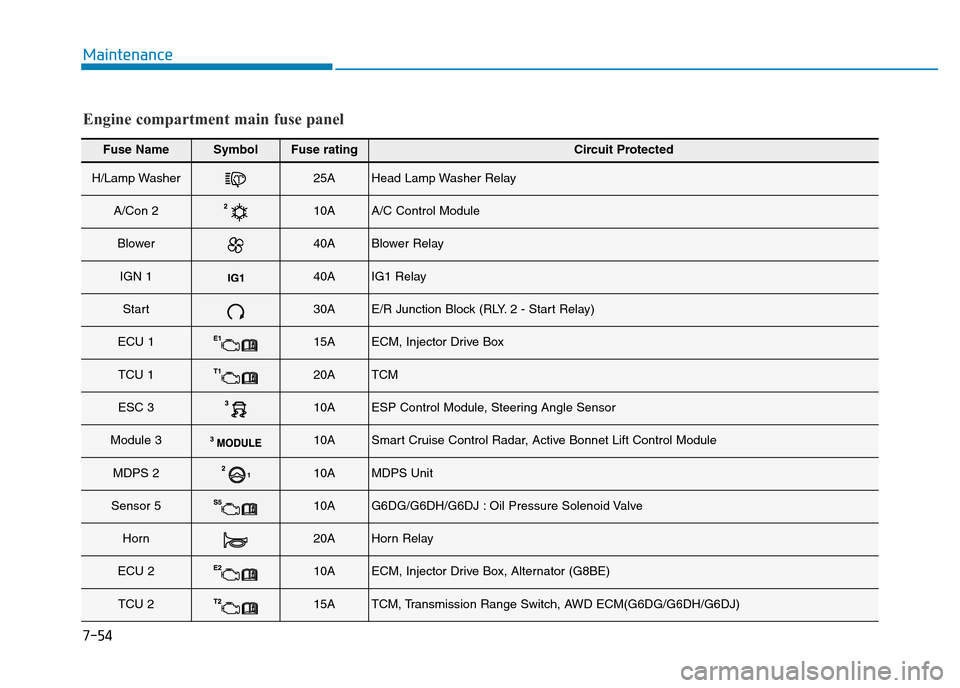
Fuse NameSymbolFuse ratingCircuit Protected
H/Lamp Washer25AHead Lamp Washer Relay
A/Con 210AA/C Control Module
Blower40ABlower Relay
IGN 140AIG1 Relay
Start30AE/R Junction Block (RLY. 2 - Start Relay)
ECU 115AECM, Injector Drive Box
TCU 120ATCM
ESC 310AESP Control Module, Steering Angle Sensor
Module 310ASmart Cruise Control Radar, Active Bonnet Lift Control Module
MDPS 210AMDPS Unit
Sensor 510AG6DG/G6DH/G6DJ : Oil Pressure Solenoid Valve
Horn20AHorn Relay
ECU 210AECM, Injector Drive Box, Alternator (G8BE)
TCU 215ATCM, Transmission Range Switch, AWD ECM(G6DG/G6DH/G6DJ)
Engine compartment main fuse panel
Page 461 of 502
7-55
7
Maintenance
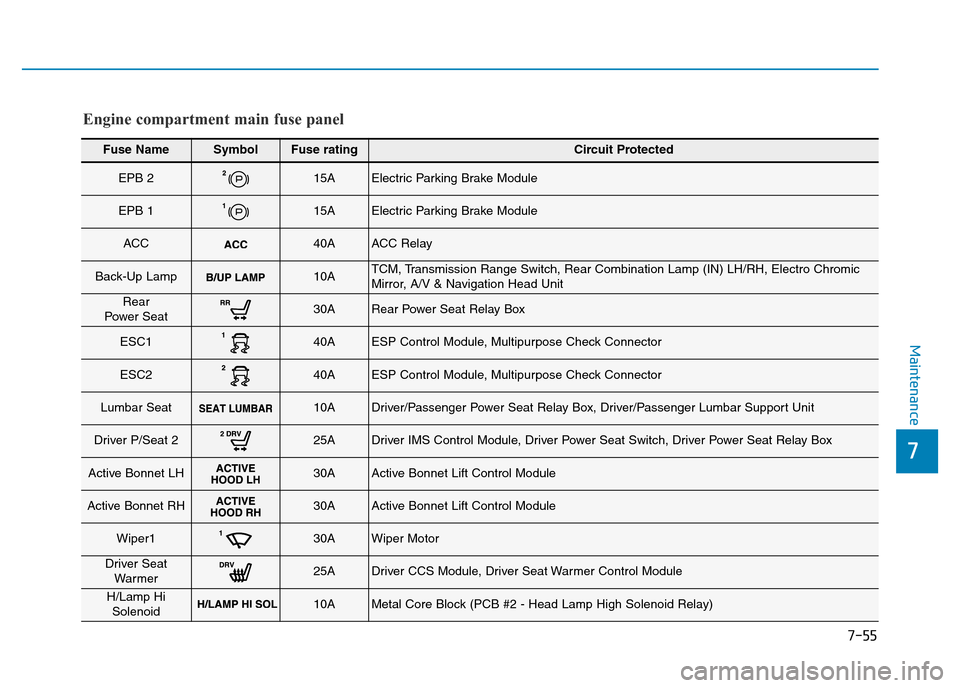
Engine compartment main fuse panel
Fuse NameSymbolFuse ratingCircuit Protected
EPB 215AElectric Parking Brake Module
EPB 115AElectric Parking Brake Module
ACC40AACC Relay
Back-Up Lamp10ATCM, Transmission Range Switch, Rear Combination Lamp (IN) LH/RH, Electro Chromic
Mirror, A/V & Navigation Head Unit
Rear
Power Seat30ARear Power Seat Relay Box
ESC140AESP Control Module, Multipurpose Check Connector
ESC240AESP Control Module, Multipurpose Check Connector
Lumbar Seat10ADriver/Passenger Power Seat Relay Box, Driver/Passenger Lumbar Support Unit
Driver P/Seat 225ADriver IMS Control Module, Driver Power Seat Switch, Driver Power Seat Relay Box
Active Bonnet LH30AActive Bonnet Lift Control Module
Active Bonnet RH30AActive Bonnet Lift Control Module
Wiper130AWiper Motor
Driver Seat
Warmer25ADriver CCS Module, Driver Seat Warmer Control Module
H/Lamp Hi
Solenoid10AMetal Core Block (PCB #2 - Head Lamp High Solenoid Relay)
Page 471 of 502
7-65
7
Maintenance
Headlamp, position lamp,
front turn signal lamp, front
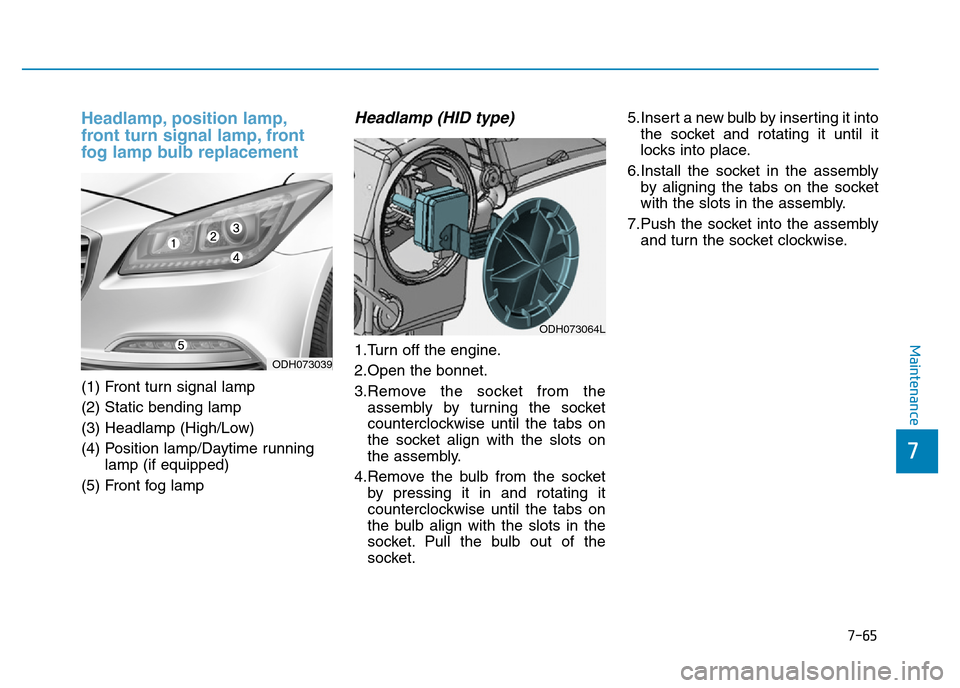
fog lamp bulb replacement
(1) Front turn signal lamp
(2) Static bending lamp
(3) Headlamp (High/Low)
(4) Position lamp/Daytime running
lamp (if equipped)
(5) Front fog lamp
Headlamp (HID type)
1.Turn off the engine.
2.Open the bonnet.
3.Remove the socket from the
assembly by turning the socket
counterclockwise until the tabs on
the socket align with the slots on
the assembly.
4.Remove the bulb from the socket
by pressing it in and rotating it
counterclockwise until the tabs on
the bulb align with the slots in the
socket. Pull the bulb out of the
socket.5.Insert a new bulb by inserting it into
the socket and rotating it until it
locks into place.
6.Install the socket in the assembly
by aligning the tabs on the socket
with the slots in the assembly.
7.Push the socket into the assembly
and turn the socket clockwise.ODH073039
ODH073064L
Page 472 of 502
7-66
Maintenance
✽NOTICE
HID lamps have superior perform-
ance vs. halogen bulbs.
HID lamps are estimated by the
manufacturer to last twice as long or
longer than halogen bulbs depend-
ing on their frequency of use. They
will probably require replacement
at some point in the life of the vehi-
cle. Cycling the headlamps on and
off more than typical use will short-
en HID lamps life. HID lamps do not
fail in the same manner as halogen
incandescent lamps. If a headlamp
goes out after a period of operation
but will immediately relight when
the headlamp switch is cycled it is
likely the HID lamp needs to be
replaced. HID lighting components
are more complex than conventional
halogen bulbs thus have higher
replacement cost.
✽NOTICE
We recommend that the headlamp
aiming be adjusted after an accident
or after the headlamp assembly is
reinstalled at a HYUNDAI autho-
rised repairer.
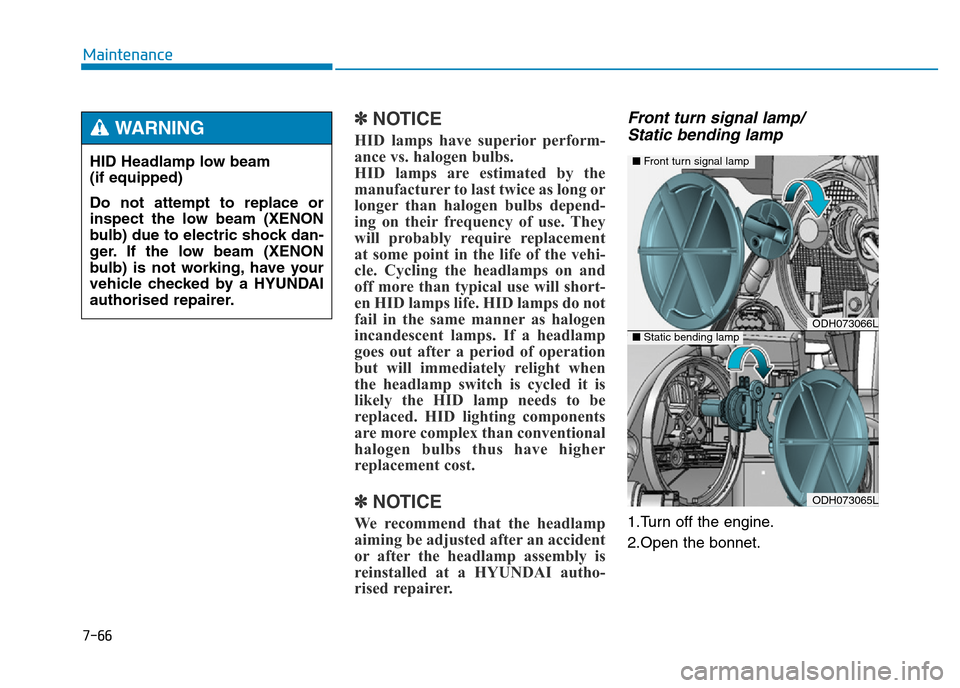
Front turn signal lamp/
Static bending lamp
1.Turn off the engine.
2.Open the bonnet. HID Headlamp low beam
(if equipped)
Do not attempt to replace or
inspect the low beam (XENON
bulb) due to electric shock dan-
ger. If the low beam (XENON
bulb) is not working, have your
vehicle checked by a HYUNDAI
authorised repairer.
WARNING
ODH073066L
ODH073065L
■Front turn signal lamp
■Static bending lamp
Page 502 of 502
8-11
8
Specifications & Consumer information
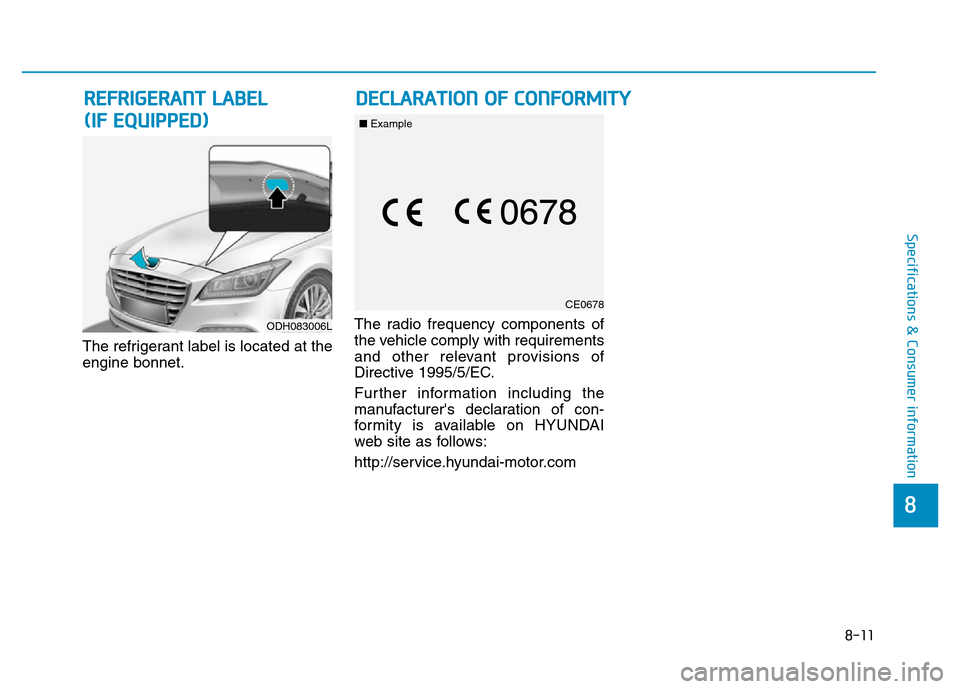
The refrigerant label is located at the
engine bonnet.The radio frequency components of
the vehicle comply with requirements
and other relevant provisions of
Directive 1995/5/EC.
Further information including the
manufacturer's declaration of con-
formity is available on HYUNDAI
web site as follows:
http://service.hyundai-motor.com
ODH083006L
CE0678
REFRIGERANT LABEL
(IF EQUIPPED)DECLARATION OF CONFORMITY
■Example