lock Hyundai Genesis Coupe 2010 Manual PDF
[x] Cancel search | Manufacturer: HYUNDAI, Model Year: 2010, Model line: Genesis Coupe, Model: Hyundai Genesis Coupe 2010Pages: 322, PDF Size: 25.93 MB
Page 289 of 322
Maintenance
46
7
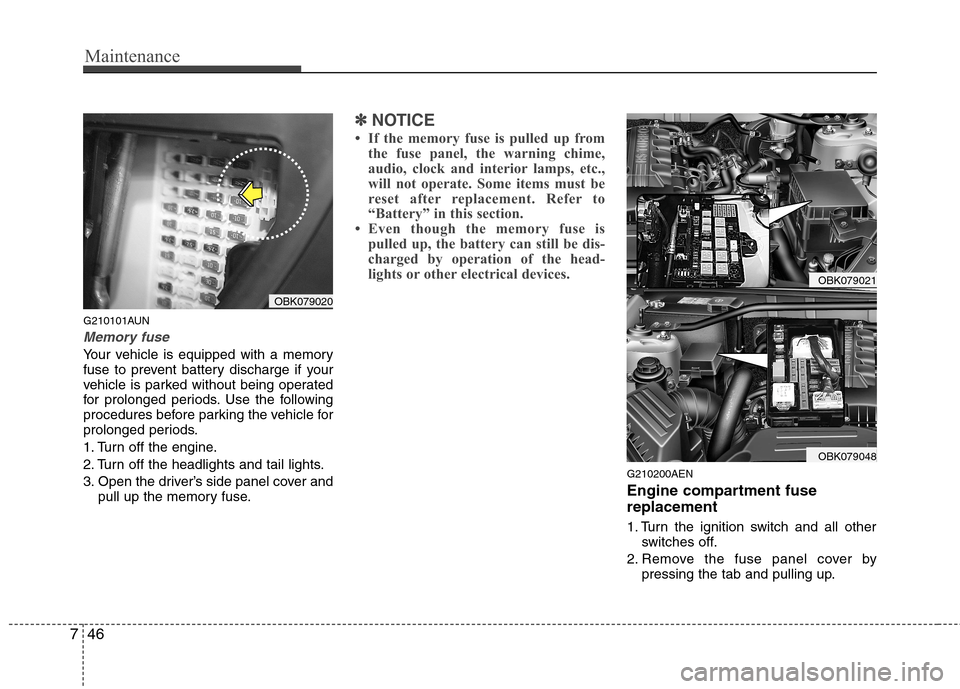
G210101AUN
Memory fuse
Your vehicle is equipped with a memory
fuse to prevent battery discharge if your
vehicle is parked without being operated
for prolonged periods. Use the following
procedures before parking the vehicle for
prolonged periods.
1. Turn off the engine.
2. Turn off the headlights and tail lights.
3. Open the driver’s side panel cover and
pull up the memory fuse.
✽✽ NOTICE
If the memory fuse is pulled up from the fuse panel, the warning chime,
audio, clock and interior lamps, etc.,
will not operate. Some items must be
reset after replacement. Refer to
“Battery” in this section.
Even though the memory fuse is
pulled up, the battery can still be dis-
charged by operation of the head-
lights or other electrical devices.
G210200AEN
Engine compartment fuse replacement
1. Turn the ignition switch and all other switches off.
2. Remove the fuse panel cover by pressing the tab and pulling up.
OBK079020
OBK079021
OBK079048
Page 292 of 322
749
Maintenance
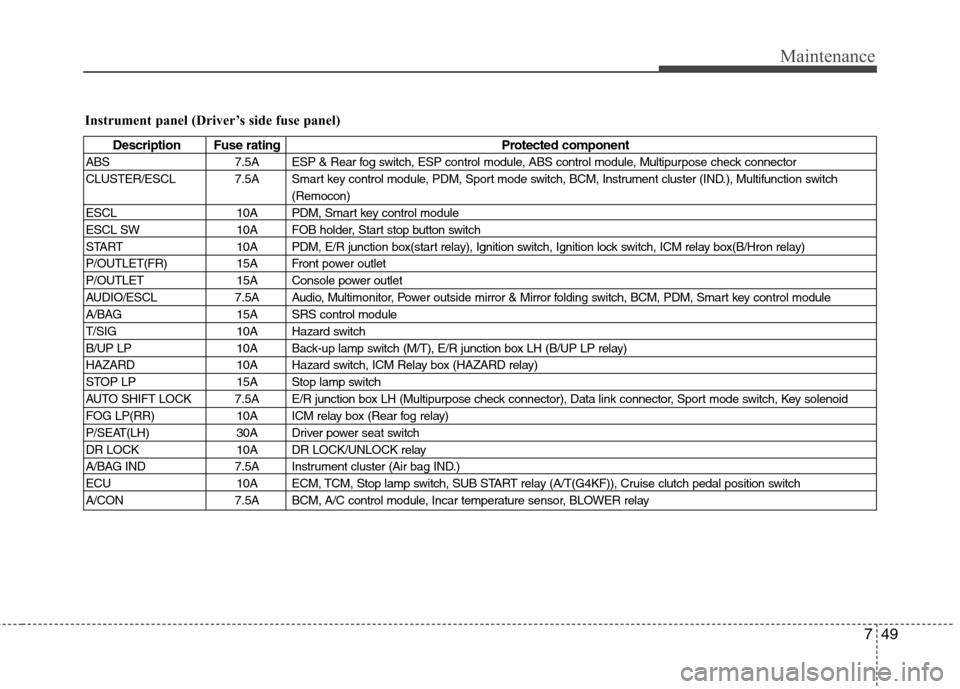
Instrument panel (Driver’s side fuse panel)
Description Fuse ratingProtected component
ABS 7.5A ESP & Rear fog switch, ESP control module, ABS control module, Multipurpose check connector
CLUSTER/ESCL 7.5A Smart key control module, PDM, Sport mode switch, BCM, Instrument cluster (IND.), Multifunction switch (Remocon)
ESCL 10A PDM, Smart key control module
ESCL SW 10A FOB holder, Start stop button switch
START 10A PDM, E/R junction box(start relay), Ignition switch, Ignition lock switch, ICM relay box(B/Hron relay)
P/OUTLET(FR) 15A Front power outlet
P/OUTLET 15A Console power outlet
AUDIO/ESCL 7.5A Audio, Multimonitor, Power outside mirror & Mirror folding switch, BCM, PDM, Smart key control module
A/BAG 15A SRS control module
T/SIG 10A Hazard switch
B/UP LP 10A Back-up lamp switch (M/T), E/R junction box LH (B/UP LP relay)
HAZARD 10A Hazard switch, ICM Relay box (HAZARD relay)
STOP LP 15A Stop lamp switch
AUTO SHIFT LOCK 7.5A E/R junction box LH (Multipurpose check connector), Data link connector, Sport mode switch, Key solenoid
FOG LP(RR) 10A ICM relay box (Rear fog relay)
P/SEAT(LH) 30A Driver power seat switch
DR LOCK 10A DR LOCK/UNLOCK relay
A/BAG IND 7.5A Instrument cluster (Air bag IND.)
ECU 10A ECM, TCM, Stop lamp switch, SUB START relay (A/T(G4KF)), Cruise clutch pedal position switch
A/CON 7.5A BCM, A/C control module, Incar temperature sensor, BLOWER relay
Page 294 of 322
751
Maintenance
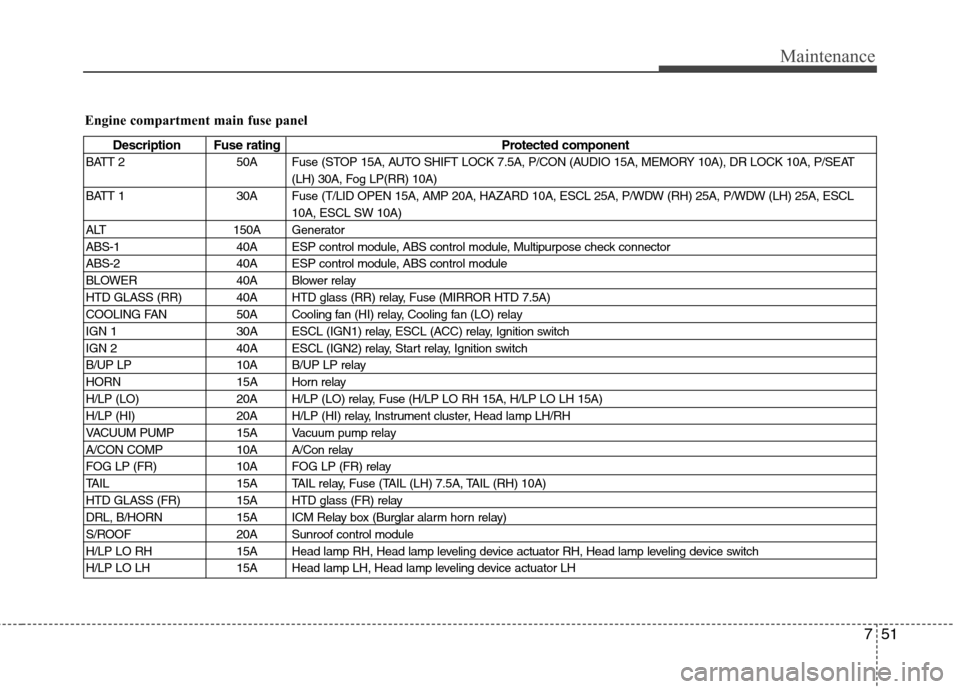
Engine compartment main fuse panel
Description Fuse ratingProtected component
BATT 2 50A Fuse (STOP 15A, AUTO SHIFT LOCK 7.5A, P/CON (AUDIO 15A, MEMORY 10A), DR LOCK 10A, P/SEAT (LH) 30A, Fog LP(RR) 10A)
BATT 1 30A Fuse (T/LID OPEN 15A, AMP 20A, HAZARD 10A, ESCL 25A, P/WDW (RH) 25A, P/WDW (LH) 25A, ESCL 10A, ESCL SW 10A)
ALT 150A Generator
ABS-1 40A ESP control module, ABS control module, Multipurpose check connector
ABS-2 40A ESP control module, ABS control module
BLOWER 40A Blower relay
HTD GLASS (RR) 40A HTD glass (RR) relay, Fuse (MIRROR HTD 7.5A)
COOLING FAN 50A Cooling fan (HI) relay, Cooling fan (LO) relay
IGN 1 30A ESCL (IGN1) relay, ESCL (ACC) relay, Ignition switch
IGN 2 40A ESCL (IGN2) relay, Start relay, Ignition switch
B/UP LP 10A B/UP LP relay
HORN 15A Horn relay
H/LP (LO) 20A H/LP (LO) relay, Fuse (H/LP LO RH 15A, H/LP LO LH 15A)
H/LP (HI) 20A H/LP (HI) relay, Instrument cluster, Head lamp LH/RH
VACUUM PUMP 15A Vacuum pump relay
A/CON COMP 10A A/Con relay
FOG LP (FR) 10A FOG LP (FR) relay
TAIL 15A TAIL relay, Fuse (TAIL (LH) 7.5A, TAIL (RH) 10A)
HTD GLASS (FR) 15A HTD glass (FR) relay
DRL, B/HORN 15A ICM Relay box (Burglar alarm horn relay)
S/ROOF 20A Sunroof control module
H/LP LO RH 15A Head lamp RH, Head lamp leveling device actuator RH, Head lamp leveling device switch
H/LP LO LH 15A Head lamp LH, Head lamp leveling device actuator LH
Page 296 of 322
753
Maintenance
LIGHT BULBS
G220000AEN
Use only the bulbs of the specified wattage.
✽✽ NOTICE
After heavy, driving rain or washing,
headlight and taillight lenses could
appear frosty. This condition is caused by
the temperature difference between the
lamp inside and outside. This is similar
to the condensation on your windows
inside your vehicle during the rain and
doesn’t indicate a problem with your
vehicle. If the water leaks into the lamp
bulb circuitry, have the vehicle checked
by an authorized HYUNDAI dealer.
G220100ABH
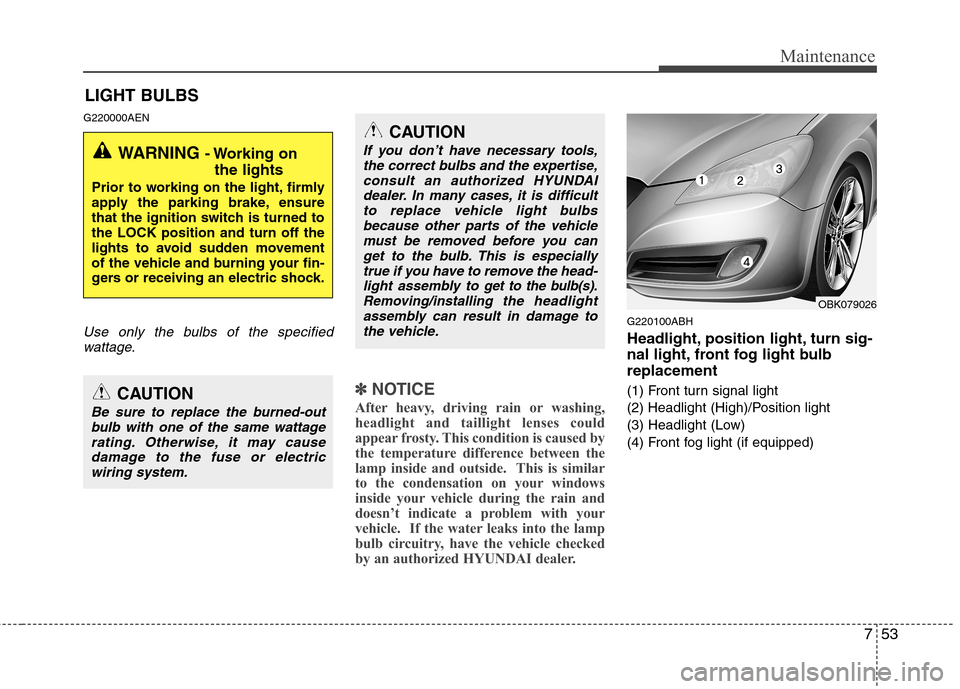
Headlight, position light, turn sig-
nal light, front fog light bulbreplacement
(1) Front turn signal light
(2) Headlight (High)/Position light
(3) Headlight (Low)
(4) Front fog light (if equipped)
WARNING - Working on
the lights
Prior to working on the light, firmly
apply the parking brake, ensure
that the ignition switch is turned tothe LOCK position and turn off the
lights to avoid sudden movement
of the vehicle and burning your fin-
gers or receiving an electric shock.
CAUTION
Be sure to replace the burned-out bulb with one of the same wattage
rating. Otherwise, it may cause damage to the fuse or electricwiring system.
CAUTION
If you don’t have necessary tools,the correct bulbs and the expertise,
consult an authorized HYUNDAIdealer. In many cases, it is difficultto replace vehicle light bulbs because other parts of the vehicle
must be removed before you canget to the bulb. This is especiallytrue if you have to remove the head-
light assembly to
get to the bulb(s).
Removing/installingthe headlight
assembly can result in damage to the vehicle.OBK079026
Page 298 of 322

755
Maintenance
6. Remove the headlight bulb cover byturning it counter clockwise.
7. Disconnect the headlight bulb socket connector.
8. Unsnap the headlight bulb retaining wire by depressing the end and push-
ing it upward.
9. Remove the bulb from the headlight assembly. 10. Install a new headlight bulb and snap
the headlight bulb retaining wire into
position by aligning the wire with the
groove on the bulb.
11. Connect the headlight bulb socket connector.
12. Install the headlight bulb cover by turning it clockwise.
13. Connect the power connector(s) to the back of the headlight assembly.
14. Reinstall the headlight assembly to the body of the vehicle.
(Continued)
If a bulb becomes damaged orcracked, replace it immediately
and carefully dispose of it.
Wear eye protection when chang- ing a bulb. Allow the bulb to cool
down before handling it.
OBK079045
Page 299 of 322

Maintenance
56
7
Turn signal light bulb replacement
6. Remove the socket from the assembly
by turning the socket counter clock-
wise until the tabs on the socket align
with the slots on the assembly.
7. Remove the bulb from the socket by pressing it in and rotating it until the
tabs on the bulb align with the slots in
the socket. Pull the bulb out of the
socket.
8. Insert a new bulb by inserting it into the socket and rotating it until it locks
into place.
9. Install the socket into the assembly by aligning the tabs on the socket with the
slots in the assembly. Push the socket
into the assembly and turn the socket
clockwise. G220103AENFront fog light bulb replacement
1. Remove the front bumper under cover
and reach your hand into the back of
the front bumper.
2. Disconnect the power connector from the socket.
3. Remove the bulb-socket from the housing by turning the socket counter
clockwise until the tabs on the socketalign with the slots on the housing.
4. Install the new bulb-socket into the housing by aligning the tabs on the
socket with the slots in the housing.
Push the socket into the housing and
turn the socket clockwise.
5. Connect the power connector to the socket.
6. Reinstall the front bumper under cover. G220102BEN
Headlight (HID type) bulb replace-
ment
If the light bulb is not operating, have the
vehicle checked by an authorized
HYUNDAI dealer.
OBK079046OBK079052N
WARNING - HID Headlight
low beam (if equipped)
Do not attempt to replace or
inspect the low beam (XENON bulb)
due to electric shock danger. If the
low beam (XENON bulb) is not
working, have your vehicle checked
by an authorized HYUNDAI Dealer
Page 301 of 322

Maintenance
58
7
3. Remove the socket from the assembly
by turning the socket counter clock-
wise until the tabs on the socket align
with the slots on the assembly.
4. Remove the bulb from the socket by pressing it in and rotating it until the
tabs on the bulb align with the slots in
the socket. Pull the bulb out of the
socket.
5. Insert a new bulb by inserting it into the socket and rotating it until it locks
into place.
6. Install the socket into the assembly by aligning the tabs on the socket with the
slots in the assembly. Push the socket
into the assembly and turn the socket
clockwise. G220400AEN High mounted stop light replacement
If the light is not operating, have the vehi-
cle checked by an authorized HYUNDAI
dealer.
G220400ABK
License plate light bulb replace- ment
1. Remove the lens by pressing the tabs.
2. Remove the socket by turning the
soket counter clockwise.
3. Remove the bulb by pulling it straight out.
4. Install a new bulb in the socket and install the socket to the lens.
5. Reinstall the lens securely.
OBK079031OBK079030OFD067030
Page 318 of 322
87
Specifications & Consumer information
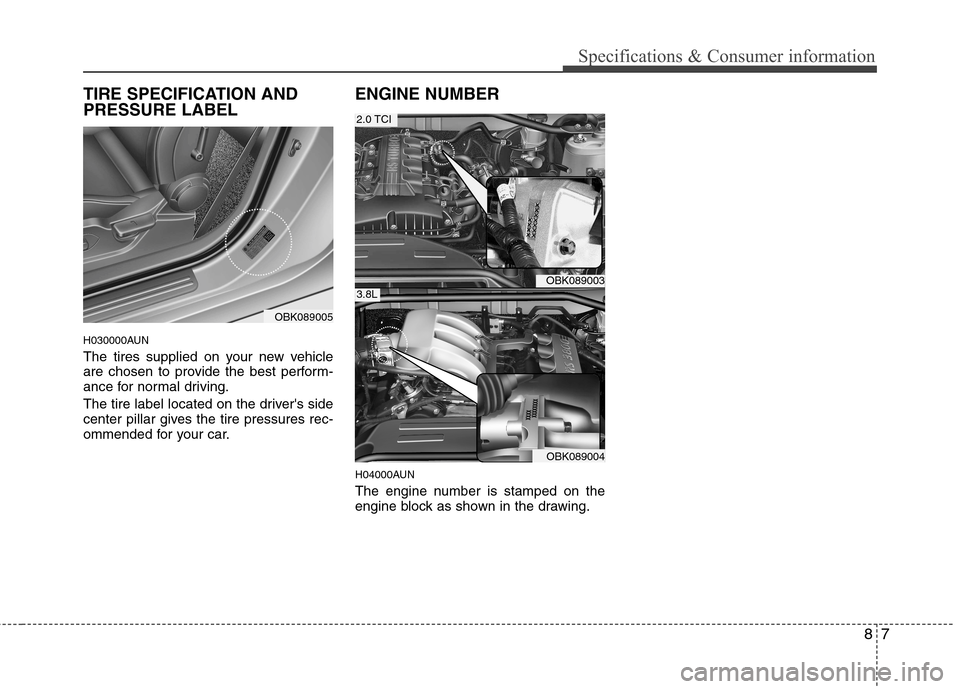
TIRE SPECIFICATION AND PRESSURE LABEL
H030000AUN
The tires supplied on your new vehicle
are chosen to provide the best perform-
ance for normal driving.
The tire label located on the driver's side
center pillar gives the tire pressures rec-
ommended for your car.ENGINE NUMBER
H04000AUN
The engine number is stamped on the
engine block as shown in the drawing.
OBK089003
OBK089004
3.8L
2.0 TCI
OBK089005
Page 320 of 322
Index
2
I
Air bag - supplemental restraint system ······················ 3-33
Air cleaner ··································································· 7-25
Appearance care ·························································· 7-60
Audio system ······························································· 4-97
Automatic climate control system ······························· 4-77
Automatic transmission ··············································· 5-16
Automatic transmission fluid ······································ 7-23
Battery ········································································· 7-31
Before driving ································································ 5-3
Brake and clutch fluid ················································· 7-21
Brake system ······························································· 5-22
Bulb wattage ·································································· 8-2
Child restraint system ·················································· 3-24
Climate control air filter ·············································· 7-26
Cruise control system ·················································· 5-32
Defroster ······································································ 4-67
Dimensions ···································································· 8-2
Door locks ··································································· 4-14 Economical operation ·················································· 5-36
Emergency commodity ················································ 6-19
Emergency starting ························································ 6-4
Emission control system ·············································· 7-66
Engine compartment ·············································· 2-4, 7-2
Engine coolant ····························································· 7-18
Engine number ······························································· 8-7
Engine oil ····································································· 7-17
Engine Start/Stop button ················································ 5-7
Explanation of scheduled maintenance items ············· 7-14
Fuel filler lid ································································ 4-25
Fuel requirements ·························································· 1-2
Fuses ············································································ 7-44
Hazard warning flasher ················································ 4-56
Hood ············································································ 4-24
How to use this manual ················································· 1-2
A
B
C
D
E
F
H