headlight Hyundai Genesis Coupe 2011 User Guide
[x] Cancel search | Manufacturer: HYUNDAI, Model Year: 2011, Model line: Genesis Coupe, Model: Hyundai Genesis Coupe 2011Pages: 343, PDF Size: 34.28 MB
Page 134 of 343
Features of your vehicle
66
4
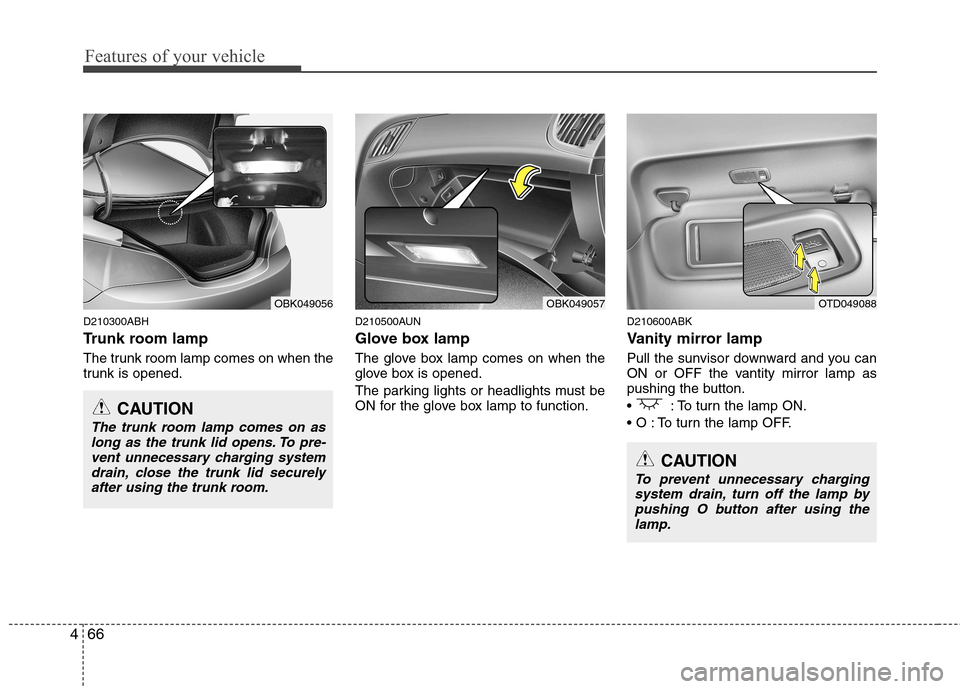
D210300ABH
Trunk room lamp
The trunk room lamp comes on when the
trunk is opened. D210500AUN
Glove box lamp
The glove box lamp comes on when the
glove box is opened.
The parking lights or headlights must be
ON for the glove box lamp to function.D210600ABK
Vanity mirror lamp
Pull the sunvisor downward and you can
ON or OFF the vantity mirror lamp as
pushing the button.
: To turn the lamp ON.
To turn the lamp OFF.
OBK049056OBK049057OTD049088
CAUTION
The trunk room lamp comes on as
long as the trunk lid opens. To pre-
vent unnecessary charging systemdrain, close the trunk lid securelyafter using the trunk room.
CAUTION
To prevent unnecessary chargingsystem drain, turn off the lamp by pushing O button after using thelamp.
Page 233 of 343
Driving your vehicle
40
5
Adjust your mirrors to reduce the glare
from other driver's headlights.
Keep your headlights clean and prop- erly aimed on vehicles not equipped with the automatic headlight aiming
feature. Dirty or improperly aimed
headlights will make it much more diffi-cult to see at night.
Avoid staring directly at the headlights of oncoming vehicles. You could be
temporarily blinded, and it will take
several seconds for your eyes to read-
just to the darkness.
E110500AUN Driving in the rain
Rain and wet roads can make driving
dangerous, especially if you’re not pre-
pared for the slick pavement. Here are a
few things to consider when driving in the
rain:
A heavy rainfall will make it harder tosee and will increase the distance
needed to stop your vehicle, so slow
down.
Keep your windshield wiping equip- ment in good shape. Replace your
windshield wiper blades when they
show signs of streaking or missingareas on the windshield. If your tires are not in good condition,
making a quick stop on wet pavement
can cause a skid and possibly lead to
an accident. Be sure your tires are in
good shape.
Turn on your headlights to make it eas- ier for others to see you.
Driving too fast through large puddles can affect your brakes. If you must go
through puddles, try to drive through
them slowly.
If you believe you may have gotten your brakes wet, apply them lightly
while driving until normal braking oper-
ation returns.
E110600AUN Driving in flooded areas
Avoid driving through flooded areas
unless you are sure the water is no high-
er than the bottom of the wheel hub.
Drive through any water slowly. Allowadequate stopping distance because
brake performance may be affected.
After driving through water, dry the
brakes by gently applying them several
times while the vehicle is moving slowly.
OBK059022N
Page 265 of 343

Maintenance
6
7
G030102ABH
While operating your vehicle:
Note any changes in the sound of the
exhaust or any smell of exhaust fumes
in the vehicle.
Check for vibrations in the steering wheel. Notice any increased steering
effort or looseness in the steering
wheel, or change in its straight-aheadposition.
Notice if your vehicle constantly turns slightly or “pulls” to one side when trav-
eling on smooth, level road.
When stopping, listen and check for unusual sounds, pulling to one side,
increased brake pedal travel or “hard-
to-push” brake pedal.
If any slipping or changes in the oper- ation of your transmission occurs,
check the transmission fluid level.
Check automatic transmission P (Park) function.
Check parking brake.
Check for fluid leaks under your vehicle (water dripping from the air condition-
ing system during or after use is nor-mal). G030103AUN
At least monthly:
Check the coolant level in the engine
coolant reservoir.
Check the operation of all exterior lights, including the stoplights, turn sig-
nals and hazard warning flashers.
Check the inflation pressures of all tires including the spare. G030104AHM
At least twice a year
(i.e., every Spring and Fall):
Check the radiator, heater and air con- ditioning hoses for leaks or damage.
Check the windshield washer spray and wiper operation. Clean the wiper
blades with clean cloth dampened with
washer fluid.
Check the headlight alignment.
Check the muffler, exhaust pipes, shields and clamps.
Check the lap/shoulder belts for wear and function.
Check for worn tires and loose wheel lug nuts.
Page 291 of 343
Maintenance
32
7
G190200AUN
Battery recharging
Your vehicle has a maintenance-free,
calcium-based battery.
If the battery becomes discharged in a
short time (because, for example, the
headlights or interior lights were left on
while the vehicle was not in use),
recharge it by slow charging (trickle)
for 10 hours.
If the battery gradually discharges because of high electric load while the
vehicle is being used, recharge it at 20-
30A for two hours.(Continued)
When lifting a plastic-cased bat-tery, excessive pressure on the
case may cause battery acid to
leak, resulting in personal injury.
Lift with a battery carrier or with
your hands on opposite corners.
Never attempt to recharge the battery when the battery cablesare connected.
The electrical ignition system works with high voltage. Never
touch these components with theengine running or the ignition
switched on.
Failure to follow the above warn-
ings can result in serious bodily
injury or death.WARNING - Recharging
battery
When recharging the battery,
observe the following precautions:
The battery must be removed from the vehicle and placed in an area with good ventilation.
Do not allow cigarettes, sparks, or flame near the battery.
Watch the battery during charg- ing, and stop or reduce the charg-
ing rate if the battery cells begin
gassing (boiling) violently or if
the temperature of the electrolyte
of any cell exceeds 49°C (120°F).
Wear eye protection when check- ing the battery during charging.
Disconnect the battery charger in the following order.
1. Turn off the battery charger main switch.
2. Unhook the negative clamp from the negative battery terminal.
3. Unhook the positive clamp from the positive battery terminal.
CAUTION
When you don’t use the vehicle
for a long time in the low temper-ature area, separate the batteryand keep it indoors.
Always charge the battery fully to prevent the battery case dam-
aged in low temperature area.
Page 298 of 343
739
Maintenance
G200601AUN
Compact spare tire replacement (ifequipped)
A compact spare tire has a shorter
tread life than a regular size tire.
Replace it when you can see the
tread wear indicator bars on the tire.The replacement compact spare tire
should be the same size and design
tire as the one provided with your
new vehicle and should be mountedon the same compact spare tire
wheel. The compact spare tire is notdesigned to be mounted on a regular
size wheel, and the compact spare
tire wheel is not designed for mount-
ing a regular size tire. G200700ABK Wheel replacement
When replacing the metal wheels for
any reason, make sure the new
wheels are equivalent to the original
factory units in diameter, rim widthand offset.
✽✽
NOTICE
The front tire size is different from
the rear tire size. So when you rotate
tires, check the tire and wheel size.
(Continued)
Using tires and wheel other than the recommended sizes
could cause unusual handling
characteristics and poor vehi-
cle control, resulting in a seri-ous accident.
Wheels that do not meet HYUNDAI’s specifications
may fit poorly and result in
damage to the vehicle or
unusual handling and poor
vehicle control.
The ABS works by comparing the speed of the wheels. Tire
size can affect wheel speed.
When replacing tires, all 4
tires must use the size origi-
nally supplied with the vehi-
cle. Using tires of a different
size can cause the ABS (Anti-
lock Brake System) and ESP
(Electronic Stability Program)
to work irregularly.
WARNING
A wheel that is not the correct
size may adversely affect wheel
and bearing life, braking and
stopping abilities, handling
characteristics, ground clear-
ance, body-to-tire clearance,
snow chain clearance,speedometer and odometer cal-
ibration, headlight aim and
bumper height.
Page 304 of 343
745
Maintenance
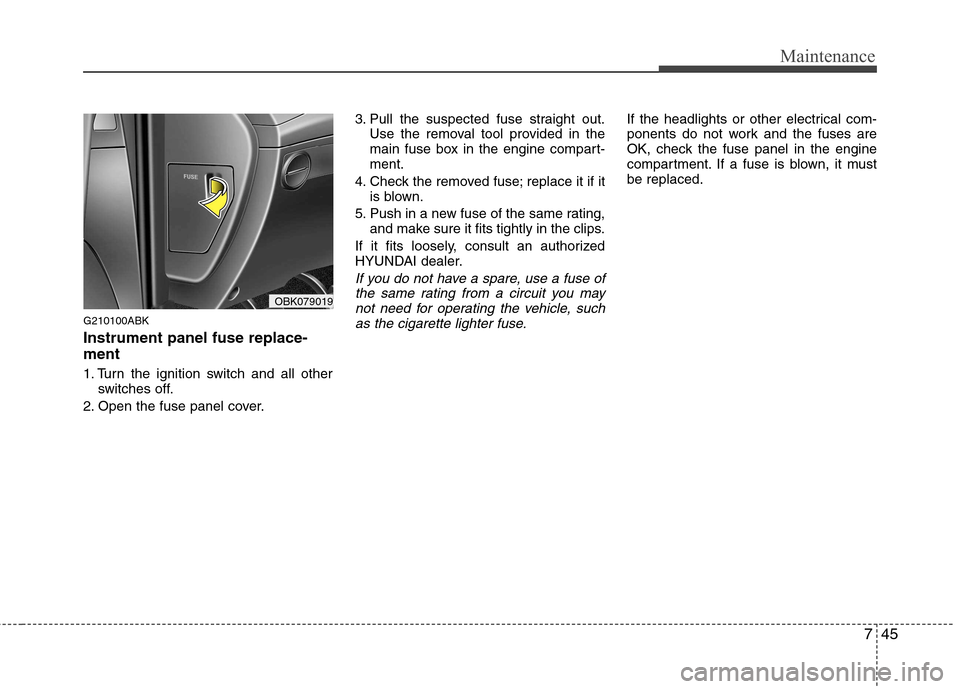
G210100ABK Instrument panel fuse replace- ment
1. Turn the ignition switch and all otherswitches off.
2. Open the fuse panel cover. 3. Pull the suspected fuse straight out.
Use the removal tool provided in the
main fuse box in the engine compart-ment.
4. Check the removed fuse; replace it if it is blown.
5. Push in a new fuse of the same rating, and make sure it fits tightly in the clips.
If it fits loosely, consult an authorized
HYUNDAI dealer.
If you do not have a spare, use a fuse of the same rating from a circuit you maynot need for operating the vehicle, such
as the cigarette lighter fuse.
If the headlights or other electrical com-
ponents do not work and the fuses are
OK, check the fuse panel in the engine
compartment. If a fuse is blown, it mustbe replaced.
OBK079019
Page 305 of 343
Maintenance
46
7
G210101AUN
Memory fuse
Your vehicle is equipped with a memory
fuse to prevent battery discharge if your
vehicle is parked without being operated
for prolonged periods. Use the following
procedures before parking the vehicle for
prolonged periods.
1. Turn off the engine.
2. Turn off the headlights and tail lights.
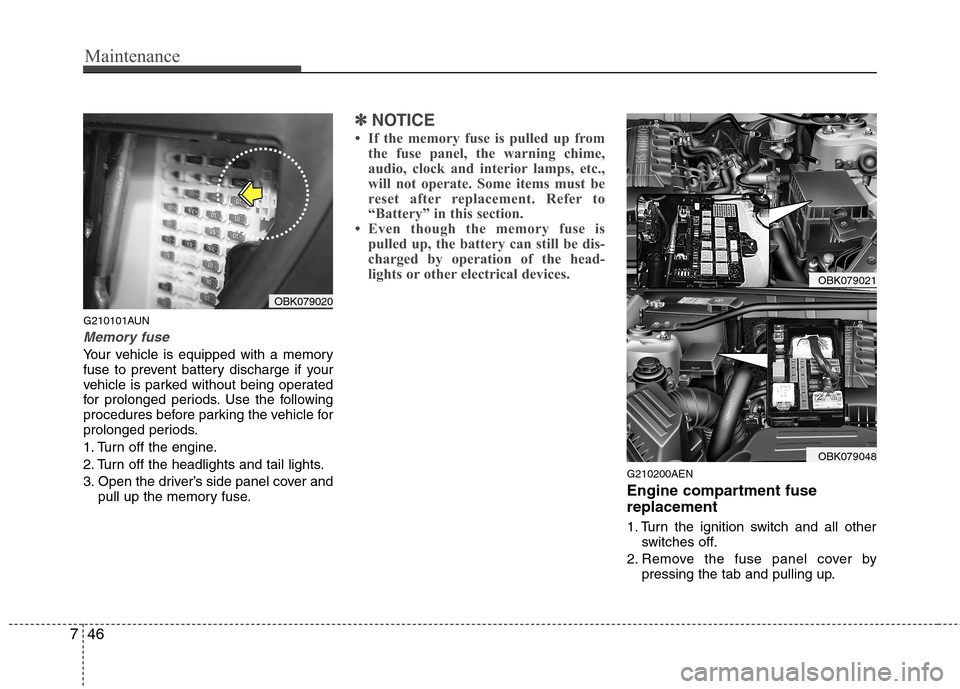
3. Open the driver’s side panel cover and
pull up the memory fuse.
✽✽ NOTICE
If the memory fuse is pulled up from the fuse panel, the warning chime,
audio, clock and interior lamps, etc.,
will not operate. Some items must be
reset after replacement. Refer to
“Battery” in this section.
Even though the memory fuse is
pulled up, the battery can still be dis-
charged by operation of the head-
lights or other electrical devices.
G210200AEN
Engine compartment fuse replacement
1. Turn the ignition switch and all other switches off.
2. Remove the fuse panel cover by pressing the tab and pulling up.
OBK079020
OBK079021
OBK079048
Page 312 of 343

753
Maintenance
LIGHT BULBS
G220000AEN
Use only the bulbs of the specified wattage.
✽✽ NOTICE
After heavy, driving rain or washing,
headlight and taillight lenses could
appear frosty. This condition is caused by
the temperature difference between the
lamp inside and outside. This is similar
to the condensation on your windows
inside your vehicle during the rain and
doesn’t indicate a problem with your
vehicle. If the water leaks into the lamp
bulb circuitry, have the vehicle checked
by an authorized HYUNDAI dealer.
G220100ABH
Headlight, position light, turn sig-
nal light, front fog light bulbreplacement
(1) Front turn signal light
(2) Headlight (High)/Position light
(3) Headlight (Low)
(4) Front fog light (if equipped)
WARNING - Working on
the lights
Prior to working on the light, firmly
apply the parking brake, ensure
that the ignition switch is turned tothe LOCK position and turn off the
lights to avoid sudden movement
of the vehicle and burning your fin-
gers or receiving an electric shock.
CAUTION
Be sure to replace the burned-out bulb with one of the same wattage
rating. Otherwise, it may cause damage to the fuse or electricwiring system.
CAUTION
If you don’t have necessary tools,the correct bulbs and the expertise,
consult an authorized HYUNDAIdealer. In many cases, it is difficultto replace vehicle light bulbs because other parts of the vehicle
must be removed before you canget to the bulb. This is especiallytrue if you have to remove the head-
light assembly to
get to the bulb(s).
Removing/installingthe headlight
assembly can result in damage to the vehicle.OBK079026
Page 313 of 343
Maintenance
54
7
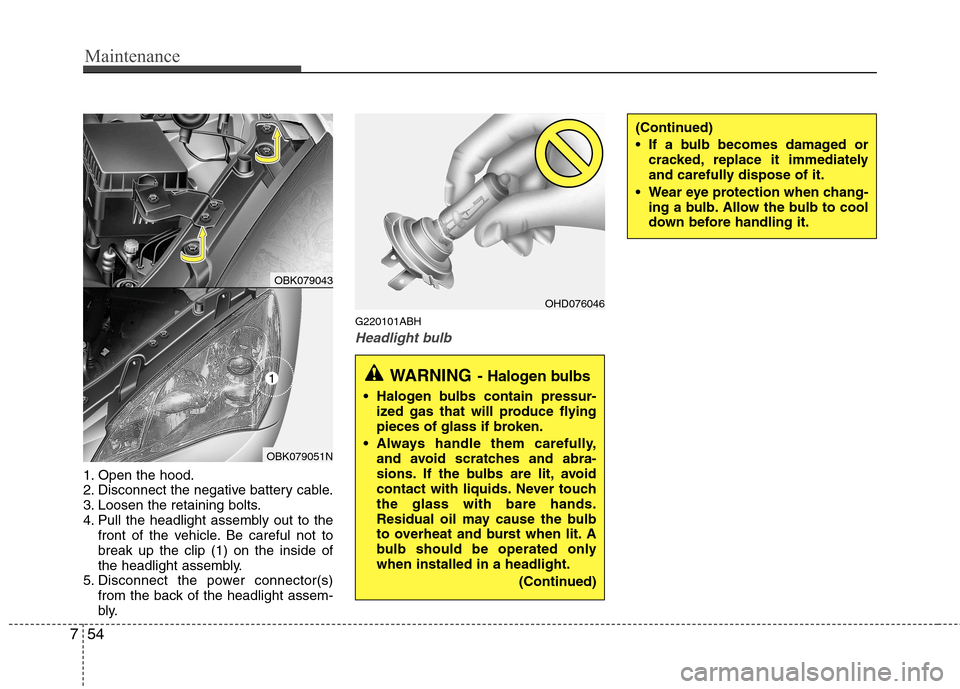
1. Open the hood.
2. Disconnect the negative battery cable.
3. Loosen the retaining bolts.
4. Pull the headlight assembly out to the
front of the vehicle. Be careful not tobreak up the clip (1) on the inside of
the headlight assembly.
5. Disconnect the power connector(s) from the back of the headlight assem-
bly. G220101ABH
Headlight bulb
OHD076046
WARNING
- Halogen bulbs
Halogen bulbs contain pressur-
ized gas that will produce flying
pieces of glass if broken.
Always handle them carefully, and avoid scratches and abra-
sions. If the bulbs are lit, avoid
contact with liquids. Never touchthe glass with bare hands.
Residual oil may cause the bulb
to overheat and burst when lit. A
bulb should be operated onlywhen installed in a headlight.
(Continued)
OBK079043
OBK079051N
1
(Continued)
If a bulb becomes damaged orcracked, replace it immediately
and carefully dispose of it.
Wear eye protection when chang- ing a bulb. Allow the bulb to cool
down before handling it.
Page 314 of 343
755
Maintenance
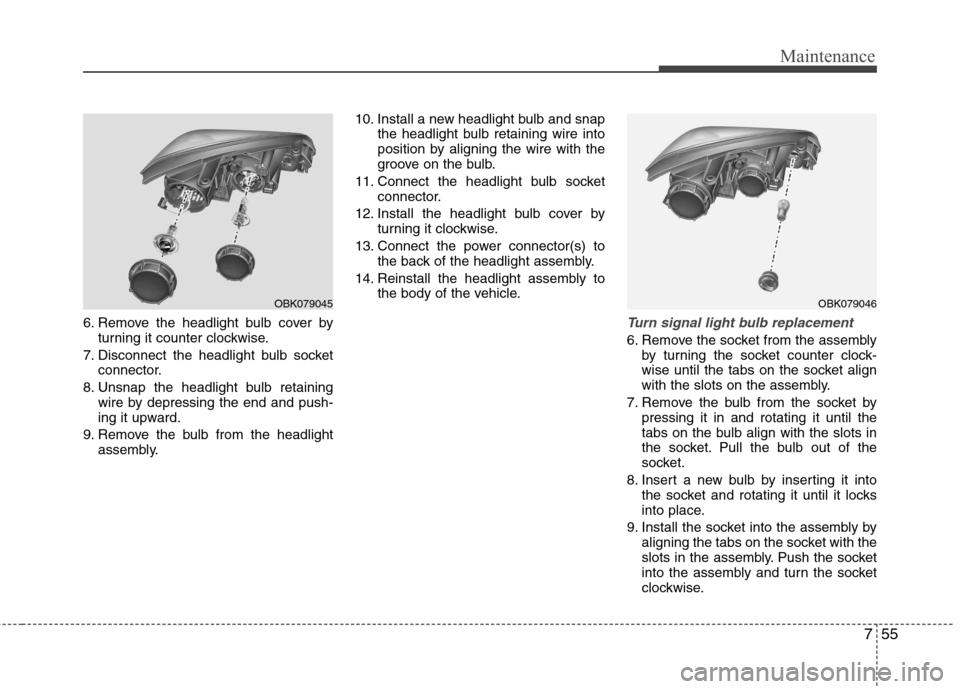
6. Remove the headlight bulb cover byturning it counter clockwise.
7. Disconnect the headlight bulb socket connector.
8. Unsnap the headlight bulb retaining wire by depressing the end and push-
ing it upward.
9. Remove the bulb from the headlight assembly. 10. Install a new headlight bulb and snap
the headlight bulb retaining wire into
position by aligning the wire with the
groove on the bulb.
11. Connect the headlight bulb socket connector.
12. Install the headlight bulb cover by turning it clockwise.
13. Connect the power connector(s) to the back of the headlight assembly.
14. Reinstall the headlight assembly to the body of the vehicle.Turn signal light bulb replacement
6. Remove the socket from the assemblyby turning the socket counter clock-
wise until the tabs on the socket align
with the slots on the assembly.
7. Remove the bulb from the socket by pressing it in and rotating it until the
tabs on the bulb align with the slots in
the socket. Pull the bulb out of the
socket.
8. Insert a new bulb by inserting it into the socket and rotating it until it locks
into place.
9. Install the socket into the assembly by aligning the tabs on the socket with the
slots in the assembly. Push the socket
into the assembly and turn the socket
clockwise.
OBK079045OBK079046