HYUNDAI GENESIS G70 2020 Owners Manual
Manufacturer: HYUNDAI, Model Year: 2020, Model line: GENESIS G70, Model: HYUNDAI GENESIS G70 2020Pages: 516, PDF Size: 12.84 MB
Page 211 of 516
3-126
Convenient features of your vehicle
Rear View Monitor (Type A)
(if equipped)
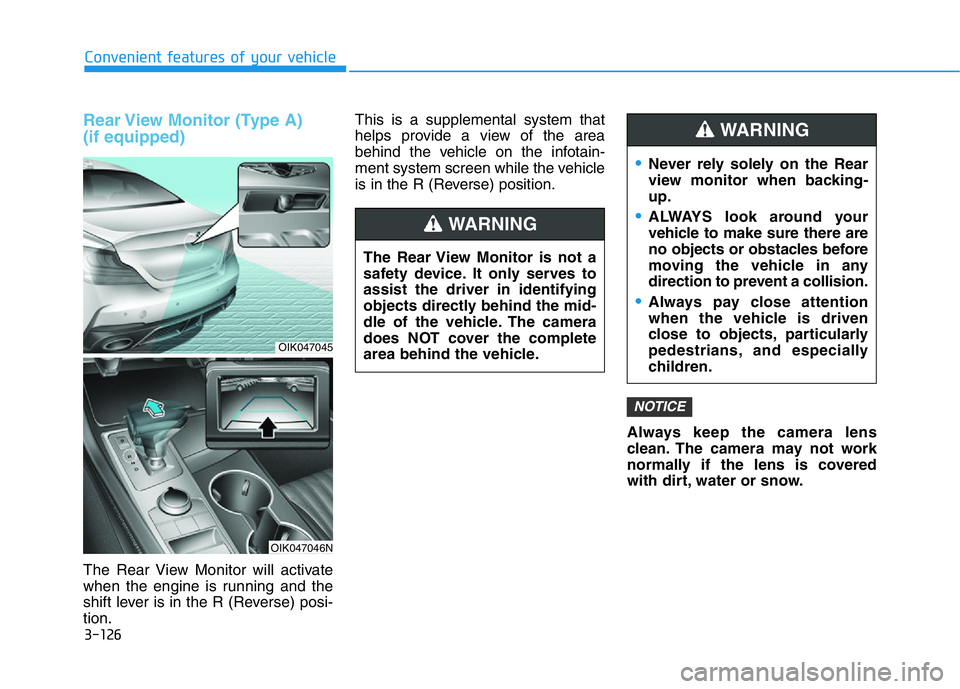
The Rear View Monitor will activate
when the engine is running and the
shift lever is in the R (Reverse) posi-
tion.This is a supplemental system that
helps provide a view of the area
behind the vehicle on the infotain-
ment system screen while the vehicle
is in the R (Reverse) position.
Always keep the camera lens
clean. The camera may not work
normally if the lens is covered
with dirt, water or snow.
NOTICE
The Rear View Monitor is not a
safety device. It only serves to
assist the driver in identifying
objects directly behind the mid-
dle of the vehicle. The camera
does NOT cover the complete
area behind the vehicle.
WARNING
OIK047045
OIK047046N
•Never rely solely on the Rear
view monitor when backing-
up.
•ALWAYS look around your
vehicle to make sure there are
no objects or obstacles before
moving the vehicle in any
direction to prevent a collision.
•Always pay close attention
when the vehicle is driven
close to objects, particularly
pedestrians, and especially
children.
WARNING
Page 212 of 516
3-127
Convenient features of your vehicle
3
Rear View Monitor (Type B)
(if equipped)
The Rear View Monitor system
assists you to drive safely by allow-
ing you to check the rear view
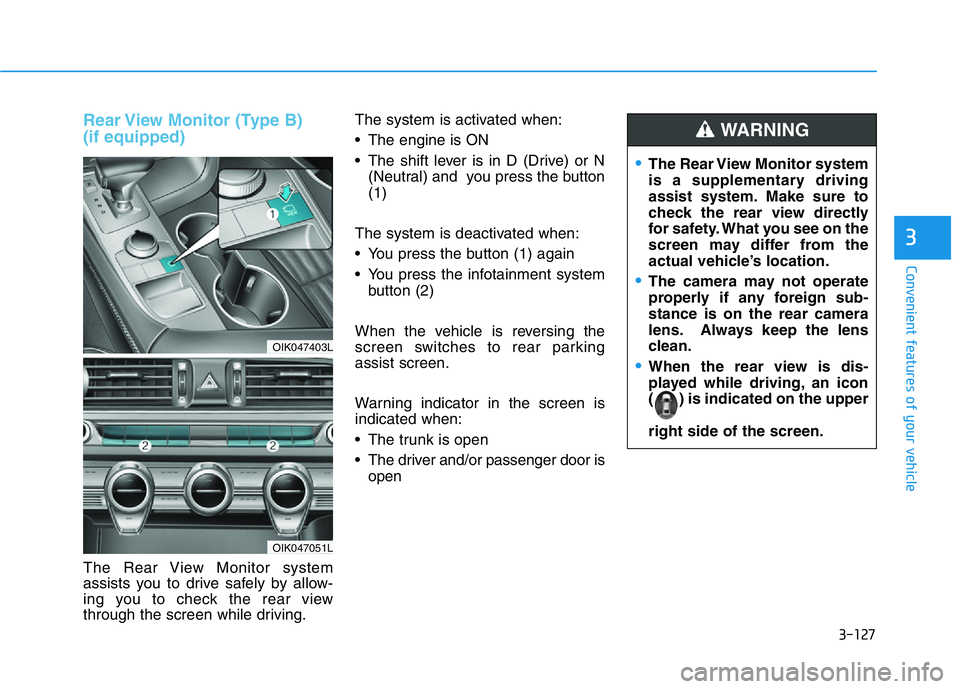
through the screen while driving.The system is activated when:
• The engine is ON
• The shift lever is in D (Drive) or N
(Neutral) and you press the button
(1)
The system is deactivated when:
• You press the button (1) again
• You press the infotainment system
button (2)
When the vehicle is reversing the
screen switches to rear parking
assist screen.
Warning indicator in the screen is
indicated when:
• The trunk is open
• The driver and/or passenger door is
open
OIK047403L
OIK047051L
•The Rear View Monitor system
is a supplementary driving
assist system. Make sure to
check the rear view directly
for safety. What you see on the
screen may differ from the
actual vehicle’s location.
•The camera may not operate
properly if any foreign sub-
stance is on the rear camera
lens. Always keep the lens
clean.
•When the rear view is dis-
played while driving, an icon
( ) is indicated on the upper
right side of the screen.
WARNING
Page 213 of 516
3-128
Convenient features of your vehicle
Surround View Monitor
(if equipped)
The Surround View Monitor system
can assist in parking by allowing the
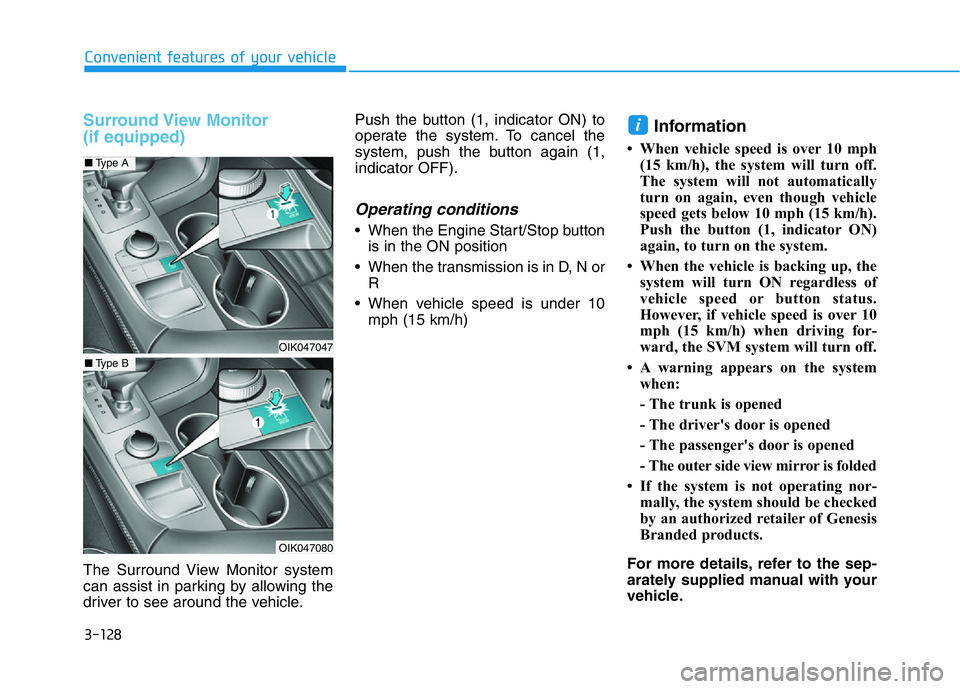
driver to see around the vehicle.Push the button (1, indicator ON) to
operate the system. To cancel the
system, push the button again (1,
indicator OFF).
Operating conditions
• When the Engine Start/Stop button
is in the ON position
• When the transmission is in D, N or
R
• When vehicle speed is under 10
mph (15 km/h)
Information
• When vehicle speed is over 10 mph
(15 km/h), the system will turn off.
The system will not automatically
turn on again, even though vehicle
speed gets below 10 mph (15 km/h).
Push the button (1, indicator ON)
again, to turn on the system.
• When the vehicle is backing up, the
system will turn ON regardless of
vehicle speed or button status.
However, if vehicle speed is over 10
mph (15 km/h) when driving for-
ward, the SVM system will turn off.
• A warning appears on the system
when:
- The trunk is opened
- The driver's door is opened
- The passenger's door is opened
- The outer side view mirror is folded
• If the system is not operating nor-
mally, the system should be checked
by an authorized retailer of Genesis
Branded products.
For more details, refer to the sep-
arately supplied manual with your
vehicle.
i
OIK047047
OIK047080
■Type A
■Type B
Page 214 of 516
3-129
Convenient features of your vehicle
3
Always keep the camera lens
clean. The camera may not work
normally if the lens is covered
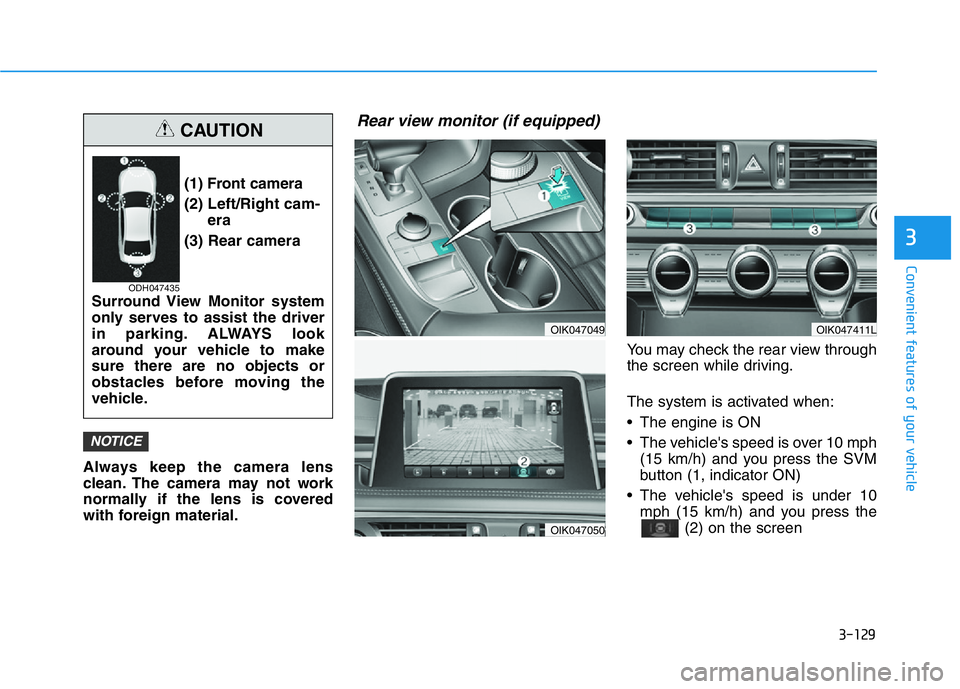
with foreign material.You may check the rear view through
the screen while driving.
The system is activated when:
• The engine is ON
• The vehicle's speed is over 10 mph
(15 km/h) and you press the SVM
button (1, indicator ON)
• The vehicle's speed is under 10
mph (15 km/h) and you press the
(2) on the screen
NOTICE
(1) Front camera
(2) Left/Right cam-
era
(3) Rear camera
Surround View Monitor system
only serves to assist the driver
in parking. ALWAYS look
around your vehicle to make
sure there are no objects or
obstacles before moving the
vehicle.
CAUTION
ODH047435
OIK047049
OIK047050
OIK047411L
Rear view monitor (if equipped)
Page 215 of 516

3-130
Convenient features of your vehicle
The system is deactivated when:
• You press the SVM button (1, indi-
cator OFF) again
• Other SVM system modes are
selected from the screen
• You press the infotainment system
button (3)
Information
• If vehicle speed is over 10 mph (15
km/h)
- the rear image stays ON when the
rear view was on the screen
- screen (top, front wide, front right
and front left) of other modes of
SVM system turns OFF and
switches to the original infotain-
ment system screen when other
modes were on the screen
• If the SVM system is ON and the
vehicle speed is under 10 mph (15
km/h)
- the rear image stays ON when the
rear view was on the screen
- a pop-up for selecting the SVM
mode (top, front wide, front right
and front left) appears when press-
ing (2) on the screen
i
Page 216 of 516
3-131
Convenient features of your vehicle
3
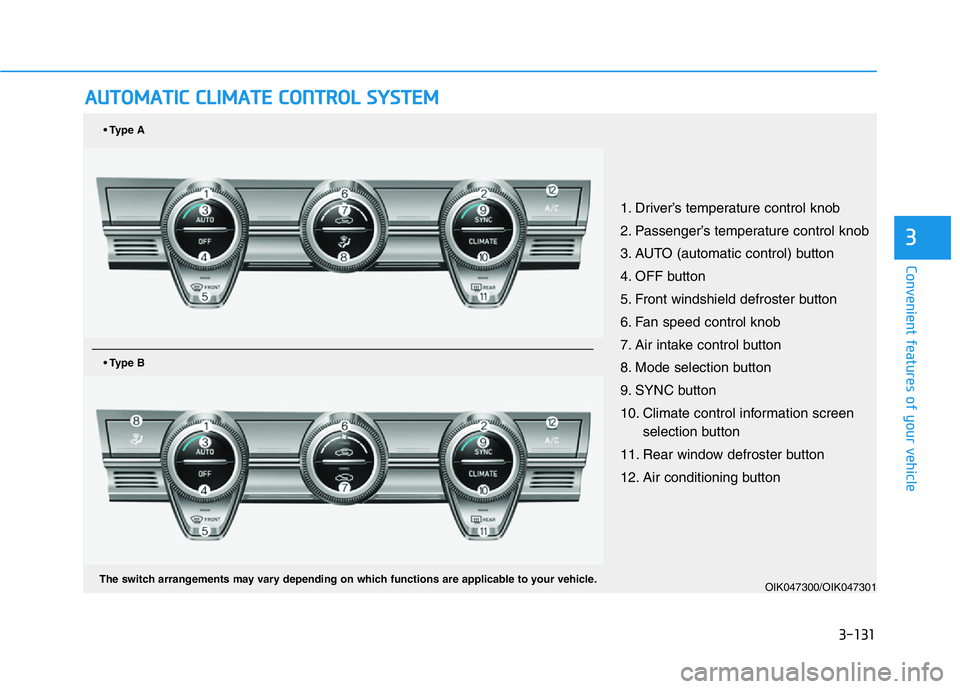
AUTOMATIC CLIMATE CONTROL SYSTEM
OIK047300/OIK047301
1. Driver’s temperature control knob
2. Passenger’s temperature control knob
3. AUTO (automatic control) button
4. OFF button
5. Front windshield defroster button
6. Fan speed control knob
7. Air intake control button
8. Mode selection button
9. SYNC button
10. Climate control information screen
selection button
11. Rear window defroster button
12. Air conditioning button
• Type A
• Type B
The switch arrangements may vary depending on which functions are applicable to your vehicle.
Page 217 of 516
3-132
Convenient features of your vehicle
OIK047300N/OIK047301N
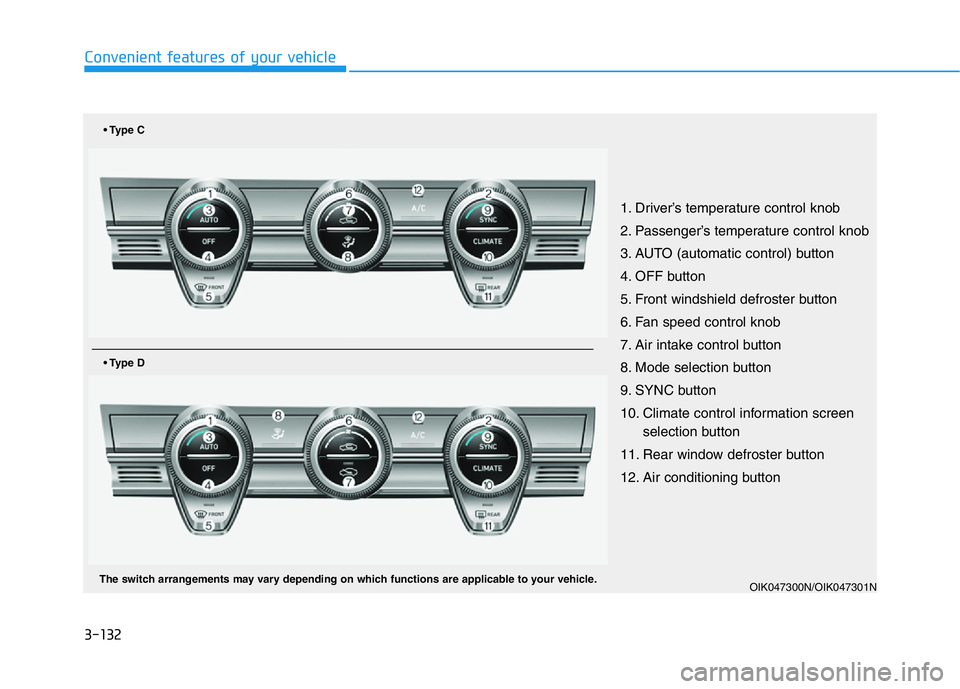
1. Driver’s temperature control knob
2. Passenger’s temperature control knob
3. AUTO (automatic control) button
4. OFF button
5. Front windshield defroster button
6. Fan speed control knob
7. Air intake control button
8. Mode selection button
9. SYNC button
10. Climate control information screen
selection button
11. Rear window defroster button
12. Air conditioning button
• Type C
• Type D
The switch arrangements may vary depending on which functions are applicable to your vehicle.
Page 218 of 516
3-133
Convenient features of your vehicle
3
Automatic Heating and Air
Conditioning
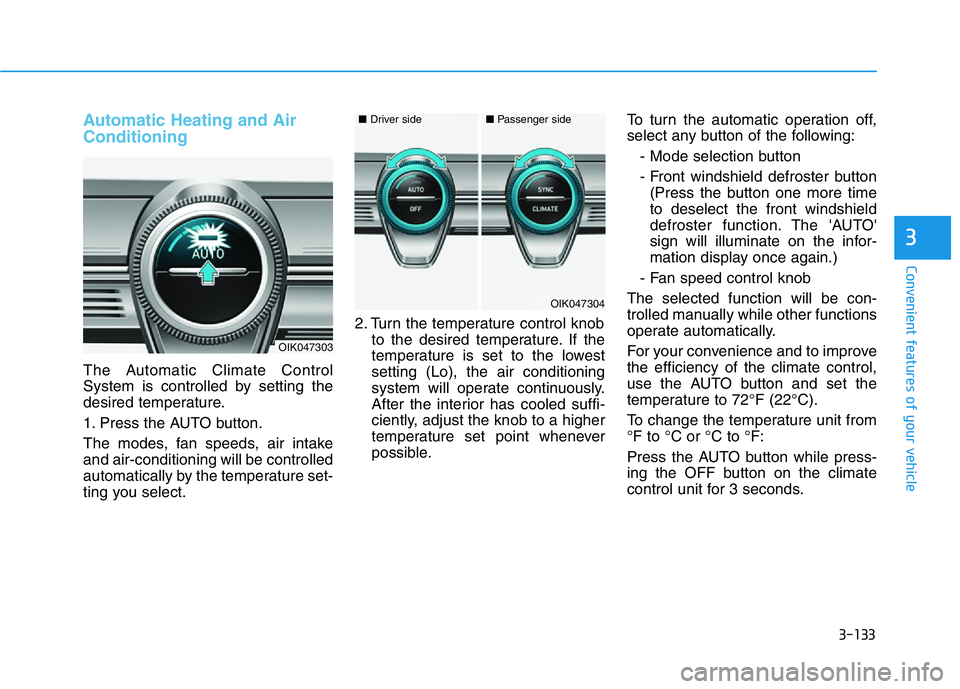
The Automatic Climate Control
System is controlled by setting the
desired temperature.
1. Press the AUTO button.
The modes, fan speeds, air intake
and air-conditioning will be controlled
automatically by the temperature set-
ting you select.2. Turn the temperature control knob
to the desired temperature. If the
temperature is set to the lowest
setting (Lo), the air conditioning
system will operate continuously.
After the interior has cooled suffi-
ciently, adjust the knob to a higher
temperature set point whenever
possible.To turn the automatic operation off,
select any button of the following:
- Mode selection button
- Front windshield defroster button
(Press the button one more time
to deselect the front windshield
defroster function. The 'AUTO'
sign will illuminate on the infor-
mation display once again.)
- Fan speed control knob
The selected function will be con-
trolled manually while other functions
operate automatically.
For your convenience and to improve
the efficiency of the climate control,
use the AUTO button and set the
temperature to 72°F (22°C).
To change the temperature unit from
°F to °C or °C to °F:
Press the AUTO button while press-
ing the OFF button on the climate
control unit for 3 seconds.
OIK047303
OIK047304
■Driver side■Passenger side
Page 219 of 516
3-134
Convenient features of your vehicle
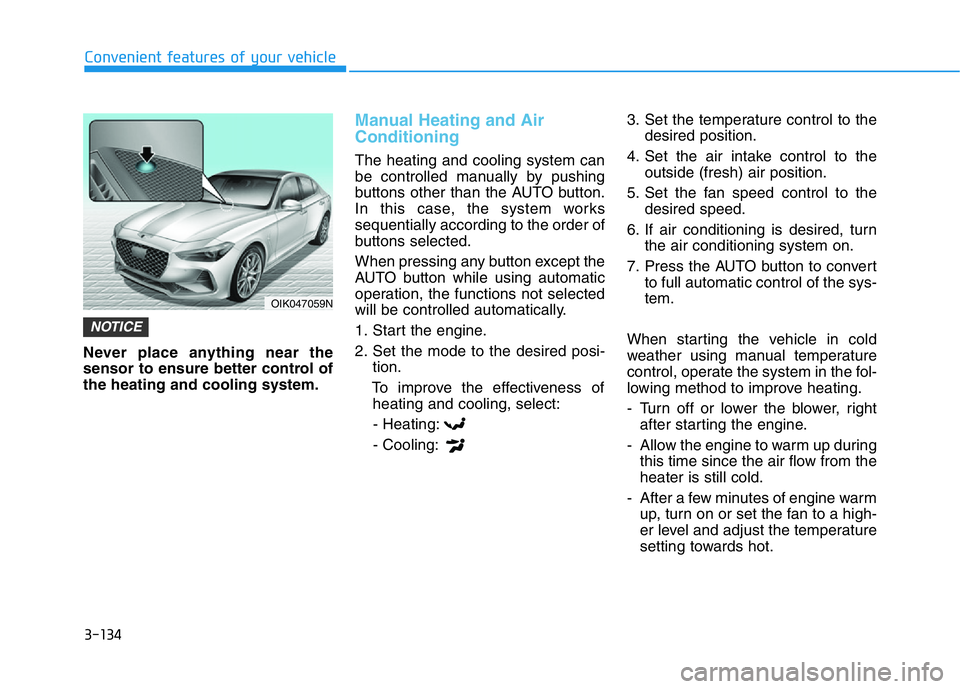
Never place anything near the
sensor to ensure better control of
the heating and cooling system.
Manual Heating and Air
Conditioning
The heating and cooling system can
be controlled manually by pushing
buttons other than the AUTO button.
In this case, the system works
sequentially according to the order of
buttons selected.
When pressing any button except the
AUTO button while using automatic
operation, the functions not selected
will be controlled automatically.
1. Start the engine.
2. Set the mode to the desired posi-
tion.
To improve the effectiveness of
heating and cooling, select:
- Heating:
- Cooling:3. Set the temperature control to the
desired position.
4. Set the air intake control to the
outside (fresh) air position.
5. Set the fan speed control to the
desired speed.
6. If air conditioning is desired, turn
the air conditioning system on.
7. Press the AUTO button to convert
to full automatic control of the sys-
tem.
When starting the vehicle in cold
weather using manual temperature
control, operate the system in the fol-
lowing method to improve heating.
- Turn off or lower the blower, right
after starting the engine.
- Allow the engine to warm up during
this time since the air flow from the
heater is still cold.
- After a few minutes of engine warm
up, turn on or set the fan to a high-
er level and adjust the temperature
setting towards hot.
NOTICE
OIK047059N
Page 220 of 516
3-135
Convenient features of your vehicle
3
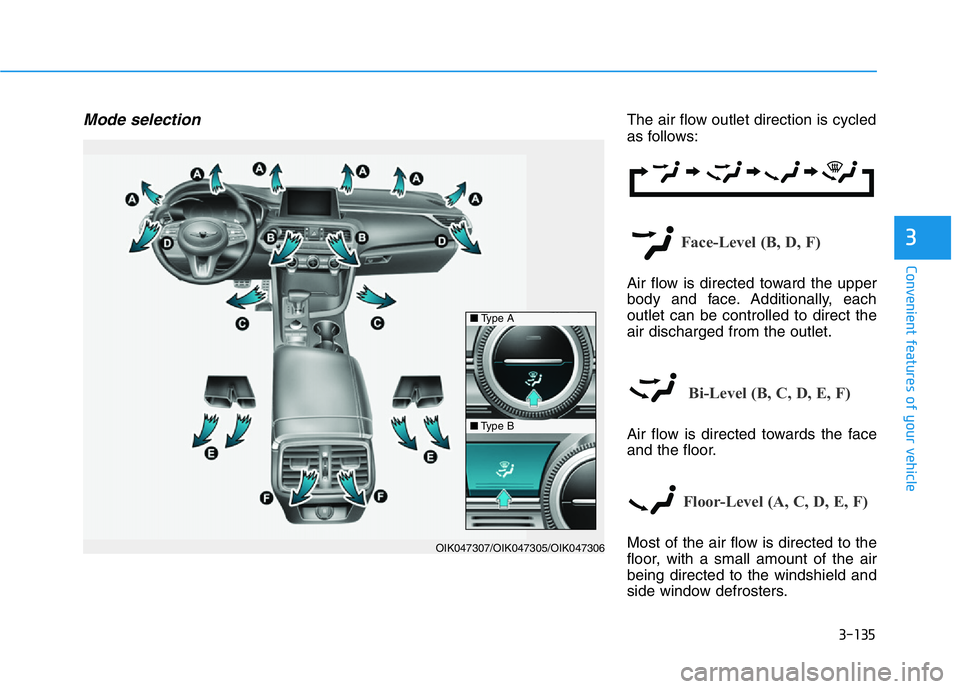
Mode selectionThe air flow outlet direction is cycled
as follows:
Face-Level (B, D, F)
Air flow is directed toward the upper
body and face. Additionally, each
outlet can be controlled to direct the
air discharged from the outlet.
Bi-Level (B, C, D, E, F)
Air flow is directed towards the face
and the floor.
Floor-Level (A, C, D, E, F)
Most of the air flow is directed to the
floor, with a small amount of the air
being directed to the windshield and
side window defrosters.OIK047307/OIK047305/OIK047306
■Type A
■Type B