manual transmission HYUNDAI GENESIS G90 2019 Owners Manual
[x] Cancel search | Manufacturer: HYUNDAI, Model Year: 2019, Model line: GENESIS G90, Model: HYUNDAI GENESIS G90 2019Pages: 538, PDF Size: 13.02 MB
Page 4 of 538
INTRODUCTION
Introduction
F4
Congratulations, and thank you for choosing the Genesis Branded Vehicle.
We are pleased to welcome you to the growing number of discerning people
who drive the Genesis Branded Vehicle. We are very proud of the advanced
engineering and high-quality construction of each Genesis Branded Vehicle
we build.
Your Owner’s Manual will introduce you to the features and operation of your
new Genesis Branded Vehicle. To become familiar with your new Genesis
Branded Vehicle, so that you can fully enjoy it, read this Owner's Manual care-
fully before driving your new vehicle.
This manual contains important safety information and instructions intended
to familiarize you with your vehicle’s controls and safety features so you can
safely operate your vehicle.
This manual also contains information on maintenance designed to enhance
safe operation of the vehicle. It is recommended that all service and mainte-
nance on your car be performed by an authorized retailer of Genesis Branded
products. Retailers of Genesis Branded products are prepared to provide
high-quality service, maintenance and any other assistance that may be
required.
This Owner's Manual should be considered a permanent part of your vehicle,
and should be kept in the vehicle so you can refer to it at any time. The man-
ual should stay with the vehicle if you sell it to provide the next owner with
important operating, safety and maintenance information.
Copyright 2020 Genesis Customer Care. All rights reserved. No part of this
publication may be reproduced, stored in any retrieval system or transmitted
in any form or by any means without the prior written permission of Genesis
Customer Care.Severe engine and transmission damage may result from the use of
poor quality fuels and lubricants that do not meet Genesis Branded
Vehicle specifications. You must always use high quality fuels and
lubricants that meet the specifications listed on Page 8-6 in the
Vehicle Specifications section of the Owner's Manual.
CAUTION
GENESIS CUSTOMER CARE
Page 18 of 538
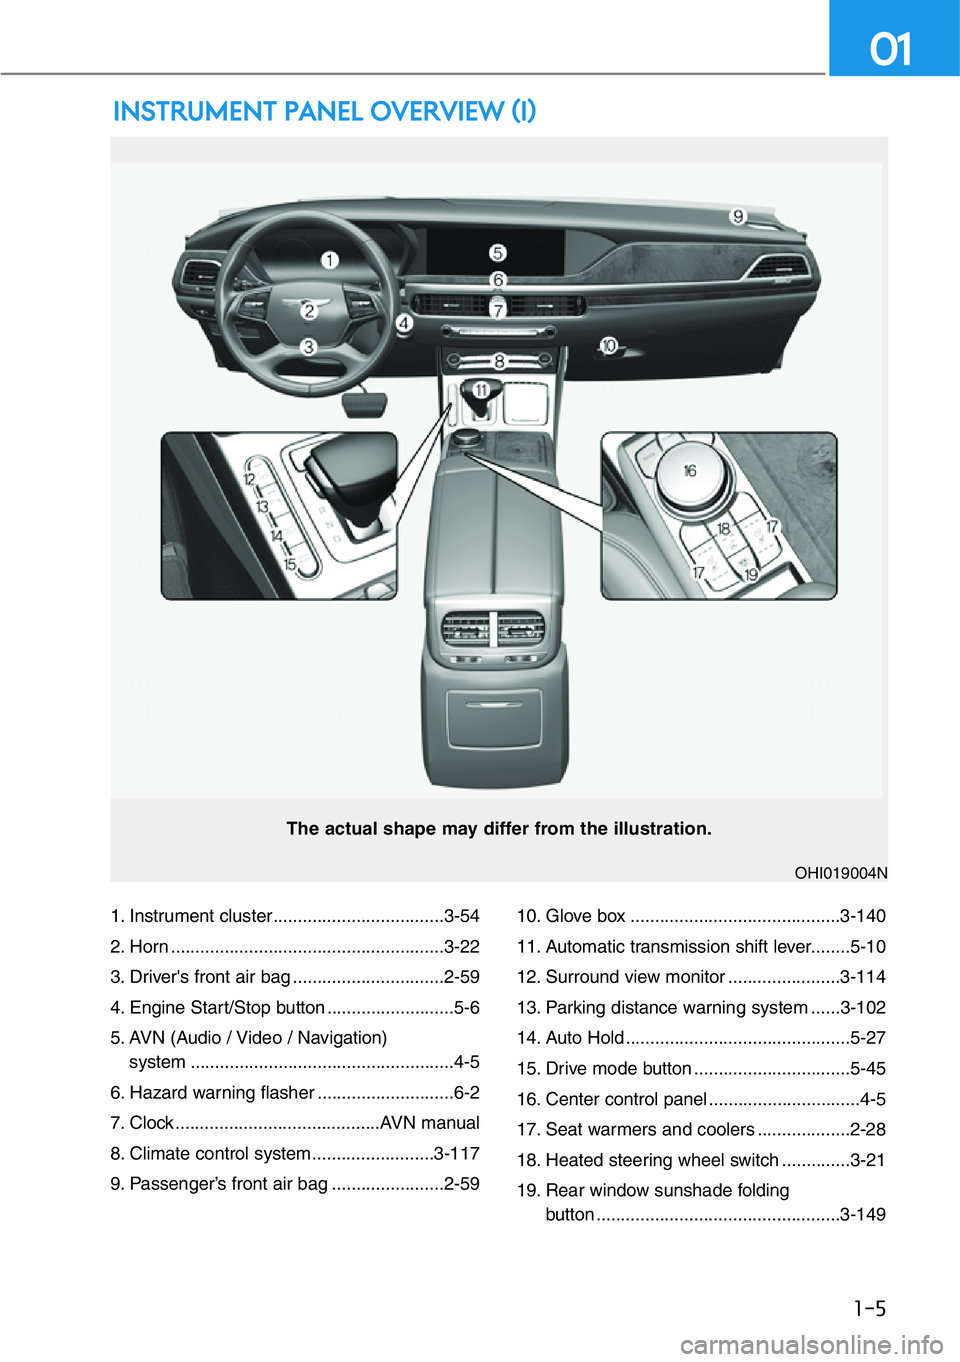
1. Instrument cluster ...................................3-54
2. Horn ........................................................3-22
3. Driver's front air bag ...............................2-59
4. Engine Start/Stop button ..........................5-6
5. AVN (Audio / Video / Navigation)
system ......................................................4-5
6. Hazard warning flasher ............................6-2
7. Clock ..........................................AVN manual
8. Climate control system.........................3-117
9. Passenger’s front air bag .......................2-5910. Glove box ...........................................3-140
11. Automatic transmission shift lever........5-10
12. Surround view monitor .......................3-114
13. Parking distance warning system ......3-102
14. Auto Hold ..............................................5-27
15. Drive mode button ................................5-45
16. Center control panel ...............................4-5
17. Seat warmers and coolers ...................2-28
18. Heated steering wheel switch ..............3-21
19. Rear window sunshade folding
button ..................................................3-149
INSTRUMENT PANEL OVERVIEW (I)
1-5
01
The actual shape may differ from the illustration.
OHI019004N
Page 160 of 538
3-59
03
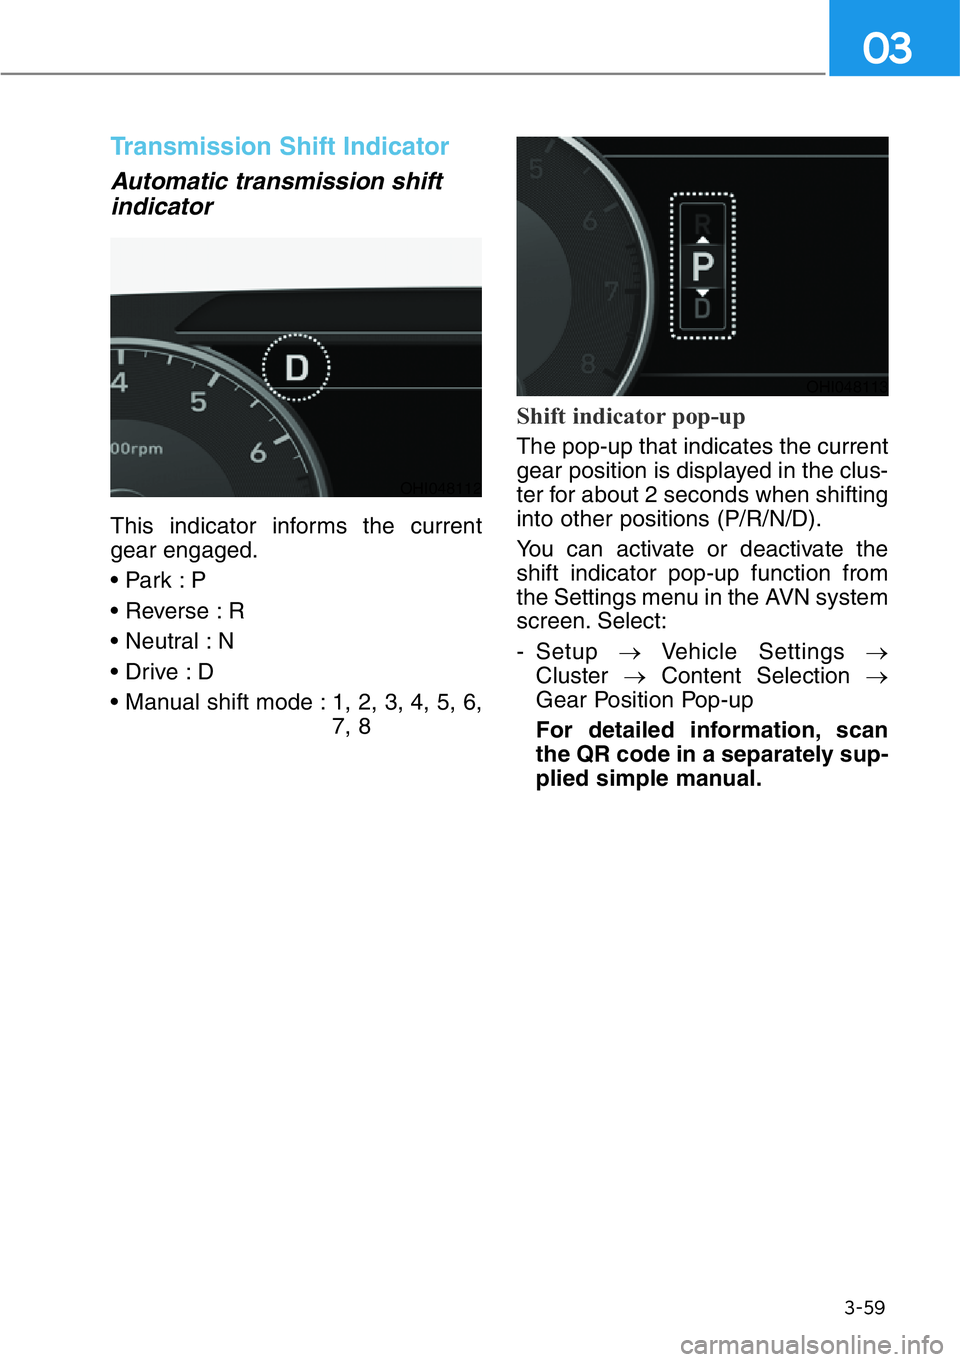
Transmission Shift Indicator
Automatic transmission shift
indicator
This indicator informs the current
gear engaged.
• Park : P
• Reverse : R
• Neutral : N
• Drive : D
• Manual shift mode : 1, 2, 3, 4, 5, 6,
7, 8
Shift indicator pop-up
The pop-up that indicates the current
gear position is displayed in the clus-
ter for about 2 seconds when shifting
into other positions (P/R/N/D).
You can activate or deactivate the
shift indicator pop-up function from
the Settings menu in the AVN system
screen. Select:
- Setup →Vehicle Settings →
Cluster →Content Selection →
Gear Position Pop-up
For detailed information, scan
the QR code in a separately sup-
plied simple manual.
OHI048112
OHI048113
Page 253 of 538
5
Before Driving ..............................5-4
Before Entering the Vehicle ............5-4
Before Starting ................................5-4
Engine Start/Stop Button ............5-6
Engine Stop/Start Button
Positions ..........................................5-7
Starting the Engine ........................5-8
Turning Off the Engine ....................5-9
Automatic Transmission..............5-10
Automatic Transmission
Operation ......................................5-10
Shift-lock System ............................5-14
When the Battery is Discharged ....5-14
Parking ............................................5-15
Paddle Shifter
(Manual Shift Mode) ......................5-15
LCD Display Messages ..................5-16
Good Driving Practices ..................5-19
Braking System ............................5-21
Power Brakes ..................................5-21
Disc Brakes Wear Indicator ..........5-22
Electronic Parking Brake (EPB) ......5-22
Auto Hold ........................................5-27
Anti-lock Brake System (ABS) ........5-31
Electronic Stability Control (ESC) ....33
Vehicle Stability Management
(VSM)..............................................5-36
Hill-Start Assist Control (HAC) ......5-37
Good Braking Practices ................5-38
All Wheel Drive (AWD) ..............5-39
Using All Wheel Drive (AWD) ........5-39
Emergency Precautions ................5-42
Genesis adaptive control
suspension ................................5-44
Electronic Control Suspension
(ECS) ..............................................5-44
Dynamic Stability Damping Control
(DSDC) ..........................................5-44
Drive Mode Integrated Control
System ........................................5-45
Drive Mode ....................................5-45
Coasting ......................................5-49
Coasting Setting ............................5-49
Coasting Operating Conditions ....5-49
Coasting Release Conditions ........5-50
Forward Collision-avoidance Assist
(FCA) System - Sensor Fusion Type
(Front Radar + Front Camera) ....5-51
System Setting and Operation ......5-51
FCA Warning Message and Brake
Control ..........................................5-53
FCA Sensor (Front Radar/Front
Camera) ........................................5-56
System Malfunction ......................5-58
Limitations of the System..............5-59
Forward Collision-avoidance
Assist - Lane-Change Oncoming
Function ......................................5-66
System Setting and Operation ......5-66
Limitations of the System ..............5-67
Blind-spot Collision Warning
(BCW)/Blind-spot Collision-
avoidance Assist (BCA) ..............5-68
System Description ........................5-68
System Setting and Operation ......5-69
Warning and System Control ........5-72
Detecting Sensor
(Camera and Radar) ......................5-75
System Malfunction ........................5-77
Limitations of the System ..............5-78
Rear Cross-traffic Collision Warning
(RCCW)/Rear Cross-Traffic
Collision-avoidance Assist
(RCCA) ........................................5-82
System Description ........................5-82
System Setting and Operation ......5-83
Warning and System Control ........5-85
5
5. Driving Your Vehicle
Page 263 of 538
5-11
05
Transmission ranges
The indicator in the instrument clus-
ter displays the gear position when
the Engine Start/Stop button is in the
ON position.
P (Park)
Always come to a complete stop
before shifting into P (Park).
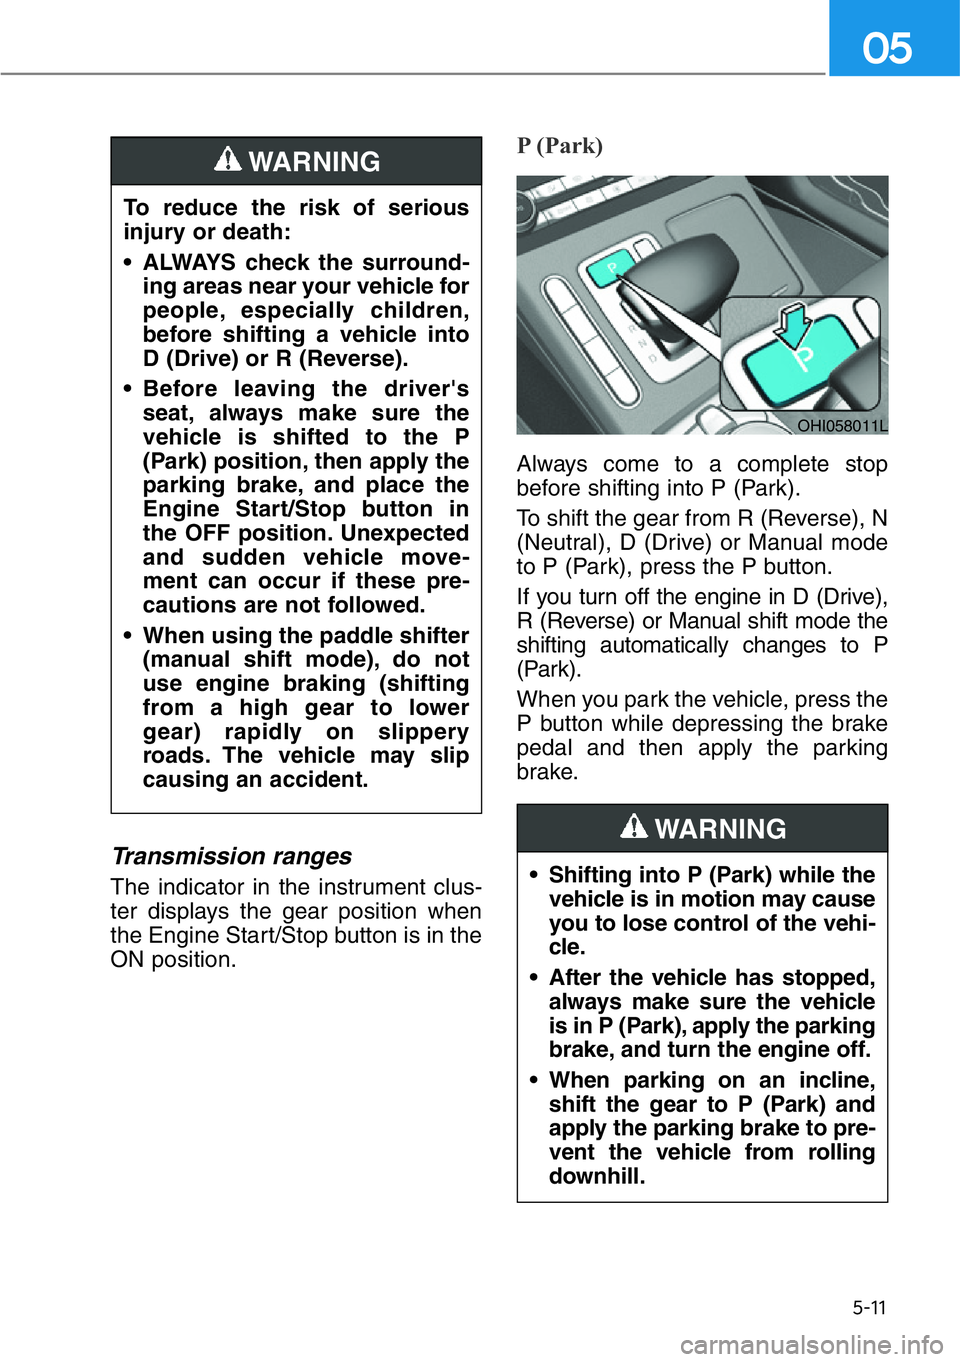
To shift the gear from R (Reverse), N
(Neutral), D (Drive) or Manual mode
to P (Park), press the P button.
If you turn off the engine in D (Drive),
R (Reverse) or Manual shift mode the
shifting automatically changes to P
(Park).
When you park the vehicle, press the
P button while depressing the brake
pedal and then apply the parking
brake. To reduce the risk of serious
injury or death:
• ALWAYS check the surround-
ing areas near your vehicle for
people, especially children,
before shifting a vehicle into
D (Drive) or R (Reverse).
• Before leaving the driver's
seat, always make sure the
vehicle is shifted to the P
(Park) position, then apply the
parking brake, and place the
Engine Start/Stop button in
the OFF position. Unexpected
and sudden vehicle move-
ment can occur if these pre-
cautions are not followed.
• When using the paddle shifter
(manual shift mode), do not
use engine braking (shifting
from a high gear to lower
gear) rapidly on slippery
roads. The vehicle may slip
causing an accident.
WARNING
• Shifting into P (Park) while the
vehicle is in motion may cause
you to lose control of the vehi-
cle.
• After the vehicle has stopped,
always make sure the vehicle
is in P (Park), apply the parking
brake, and turn the engine off.
• When parking on an incline,
shift the gear to P (Park) and
apply the parking brake to pre-
vent the vehicle from rolling
downhill.
WARNING
OHI058011L
Page 293 of 538
Driving in sand or mud
• Maintain slow and constant speed.
• Keep sufficient distance between
your vehicle and the vehicle in front
of you.
• Reduce vehicle speed and always
check the road condition.
• Avoid speeding, rapid acceleration,
sudden brake applications, and
sharp turns to prevent getting
stuck.
When the vehicle is stuck in snow,
sand or mud, avoid running the
engine continuously at high rpm,
doing so may damage the tires,
transmission, differential or AWD
system.
Information
• When using Snow Tires, mount
them on all four wheels.
• When using AutoSock
®(fabric snow
chain), install them on the rear tires.
For more information on Snow Tires
and Tire Chains, refer to "Winter
Driving" in this chapter.
Driving up or down hills
• Driving uphill
- Before starting off, check if it is
possible to drive uphill.
- Drive as straight as possible.
• Driving downhill
- Do not change gear while driving
downhill. Select gear before driv-
ing downhill.
- Drive slowly and select Manual
Shift Mode to provide engine
braking while driving downhill.
- Drive straight as possible.
i
NOTICE
5-41
05
Exercise extreme caution driv-
ing up or down steep hills. The
vehicle may flip depending on
the grade, terrain and water/
mud conditions.
WARNING
Page 298 of 538
5-46
Driving your vehicle
ECO mode
When ECO mode is
selected by pressing the
DRIVE MODE button, the
ECO indicator will illumi-
nate on the instrument
cluster.
• If the vehicle is set to ECO mode,
when the engine is turned OFF
and restarted the drive mode set-
ting will remain in ECO mode.
Information
Fuel efficiency depends on the driver's
driving habit and road condition.
When ECO mode is activated:
• The acceleration response may be
slightly reduced if the accelerator
pedal is depressed moderately.
• The air conditioner performance
may be limited.
• The shift pattern of the automatic
transmission may change.
• The engine noise may be louder at
some automatic transmission
shifts as down-shift requires press-
ing down more on the accelerator.
The above situations are normal
conditions when ECO mode is acti-
vated to help improve fuel efficiency.
Limitation of ECO mode operation:
If the following conditions occur while
ECO mode is operating, the system
operation is limited even though
there is no change in the ECO indi-
cator.
• When the coolant temperature is
low:
The system will be limited until
engine performance becomes nor-
mal.
• When driving up a hill:
The system will be limited to gain
power when driving uphill because
engine torque is restricted.
• When driving the vehicle in manual
shift mode using the paddle shifter.
The system will be limited accord-
ing to the shift location.
CUSTOM mode
When CUSTOM mode is
selected by pressing the
DRIVE MODE button, the
CUSTOM mode indicator
will illuminate on the
instrument cluster.
• In CUSTOM mode, the driver can
select separate modes and combine
them in the AVN system screen.
- Engine/Transmission: ECO/
COMFORT/SPORT/SMART
/Comfort(rear)
- Steering wheel: COMFORT/
SPORT/Comfort(rear)
- Suspension:
COMFORT/SPORT/Comfort(rear)
- AWD system: ECO/COMFORT/
SPORT
For detailed information, scan the
QR code in a separately supplied
simple manual.
i
Page 300 of 538
5-48
Driving your vehicle
• Limitation of SMART mode
The SMART mode may be limited
in following situations. (The OFF
indicator illuminates in those situa-
tions.)
- The driver manually moves the
shift lever :
It deactivates SMART mode. The
vehicle drives, as the driver man-
ually moves the shift lever.
- The cruise control is activated :
The cruise control system may
deactivate the SMART mode
when the vehicle is controlled by
the set speed of the smart cruise
control system. (SMART mode is
not deactivated just by activating
the cruise control system.)
- The transmission oil temperature
is either extremely low or
extremely high :
The SMART mode can be active
in most of the normal driving situ-
ations. However, an extremely
high/ low transmission oil temper-
ature may temporarily deactivate
the SMART mode, because the
transmission condition is out of
normal operation condition.
When Comfort(rear) is selected for
CUSTOM mode
The Comfort (rear) mode is a mode
that adjusts to minimize the discom-
fort of the rear passengers by provid-
ing a smooth and stable ride through
the adjustment of the suspension,
engine/transmission, and steering.
• To use Comfort(rear) mode, select
[Settings →Vehicle →Drive mode
→CUSTOM →POWER
TRAIN/STEERING/SUSPENSION
MODE →COMFORT] menu on
the navigation screen.
Page 301 of 538
When certain conditions are met, the
engine is automatically decoupled
from the transmission while the shift
lever is remained in D (Drive). In this
Coasting mode, the engine stays at
idling speed to reduce fuel consump-
tion and increase coasting distance.
Coasting Setting
The Coasting function must be
turned ON from the Settings menu in
the AVN system screen. Select:
- Setup →Vehicle Settings →Drive
Mode →Coasting
For detailed information, scan the
QR code in a separately supplied
simple manual.
When Coasting is turned ON and the
conditions are met, the function
operates with a "Coasting" message
illuminated at the top center of the
instrument cluster.
• If the accelerator pedal is
pressed quickly for accelerating
with the Coasting function in
operation, acceleration may
occur after the engagement of
the clutch inside the transmis-
sion. In turn, the driver may con-
tinue to feel acceleration even
after the system is turned off.
• Driving with the Coasting func-
tion off may be required in some
cases since the engine brake is
not applied while the Coasting
function is in operation.
• Operating the AVN system
screen to activate or deactivate
the Coasting function while driv-
ing may be dangerous as the dri-
ver's attention is dispersed.
Coasting Operating
Conditions
The Coasting function will operate
when the accelerator pedal is
depressed and released under the
following conditions.
• The driving mode is ECO mode.
• SMART is selected for Engine/
Transmission in CUSTOM mode
from the AVN system screen and
driver acceleration is SMART ECO
• ECO is selected for Engine/
Transmission in CUSTOM mode
from the AVN system screen
• The shift lever is in D (Drive)
• The Smart Cruise Control button is
OFF
• The accelerator or brake pedal is
not depressed
• The vehicle's speed is within
35–100 mph (55–160 km/h) range
• The road gradient is within -5~+5%
range
• In SMART mode, if the distance
between the vehicle ahead and the
relative speed is within a certain
range
Information
• If the front radar for smart cruise
control system cannot operate nor-
mally, the inter-vehicle distance and
relative speed condition are auto-
matically ignored.
• The Coasting function works after
the engine is turned on, the trans-
mission is warmed up, and the
engine sensor self-diagnosis is com-
pleted after starting.
• Depending on the driving situation,
Coasting operation may be tem-
porarily delayed even if the above
conditions are met.
i
NOTICE
COASTING (IF EQUIPPED)
5-49
05
Page 435 of 538
6-21
06
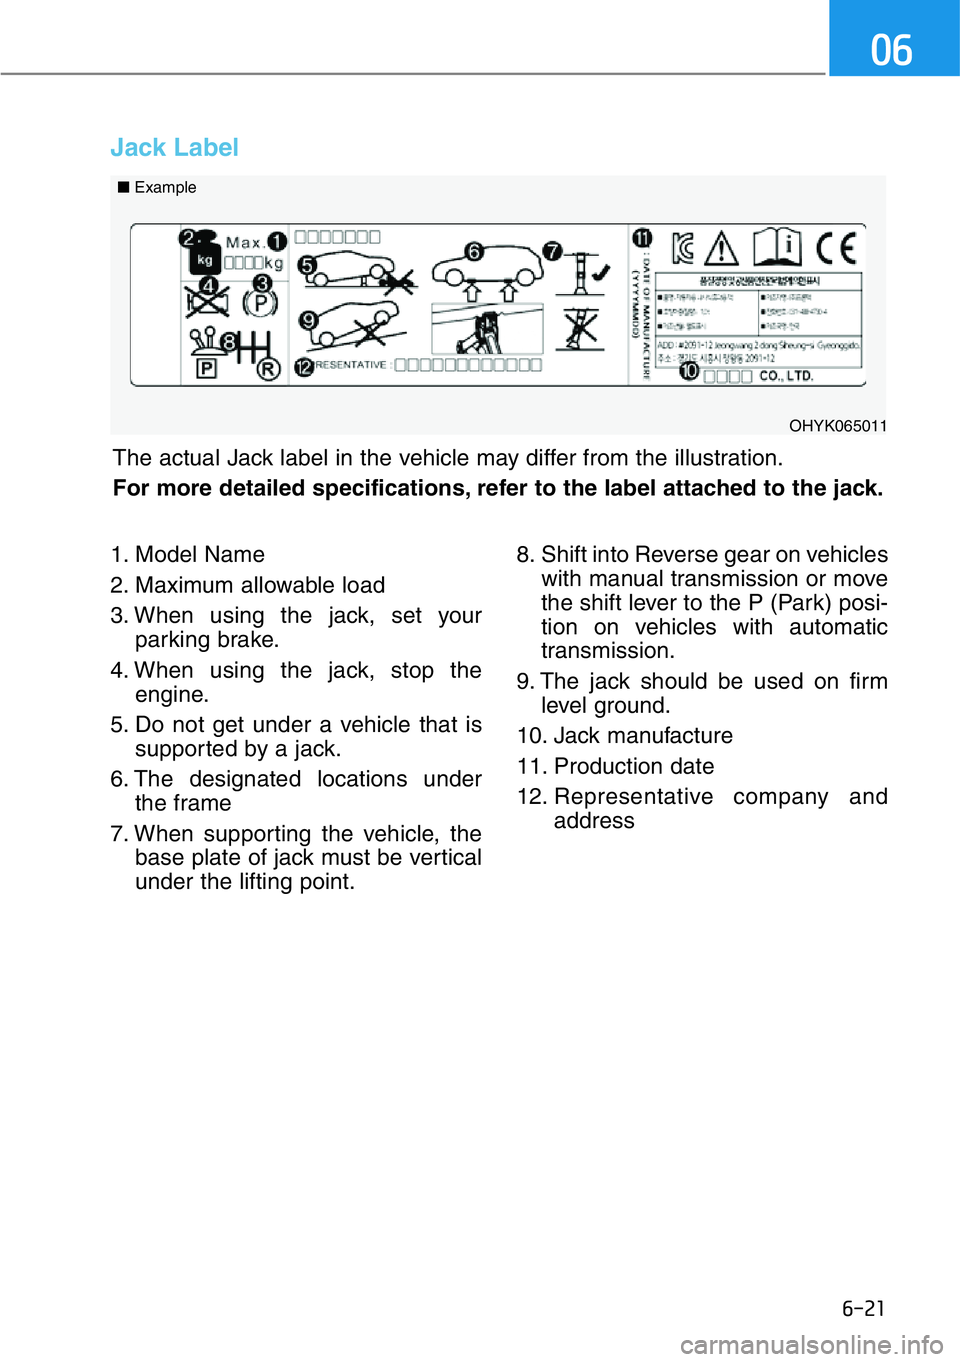
1. Model Name
2. Maximum allowable load
3. When using the jack, set your
parking brake.
4. When using the jack, stop the
engine.
5. Do not get under a vehicle that is
supported by a jack.
6. The designated locations under
the frame
7. When supporting the vehicle, the
base plate of jack must be vertical
under the lifting point.8. Shift into Reverse gear on vehicles
with manual transmission or move
the shift lever to the P (Park) posi-
tion on vehicles with automatic
transmission.
9. The jack should be used on firm
level ground.
10. Jack manufacture
11. Production date
12. Representative company and
address The actual Jack label in the vehicle may differ from the illustration.
For more detailed specifications, refer to the label attached to the jack.
Jack Label
OHYK065011 ■Example