lug HYUNDAI GENESIS G90 2021 Owner's Manual
[x] Cancel search | Manufacturer: HYUNDAI, Model Year: 2021, Model line: GENESIS G90, Model: HYUNDAI GENESIS G90 2021Pages: 538, PDF Size: 13.02 MB
Page 454 of 538
7-14
Maintenance
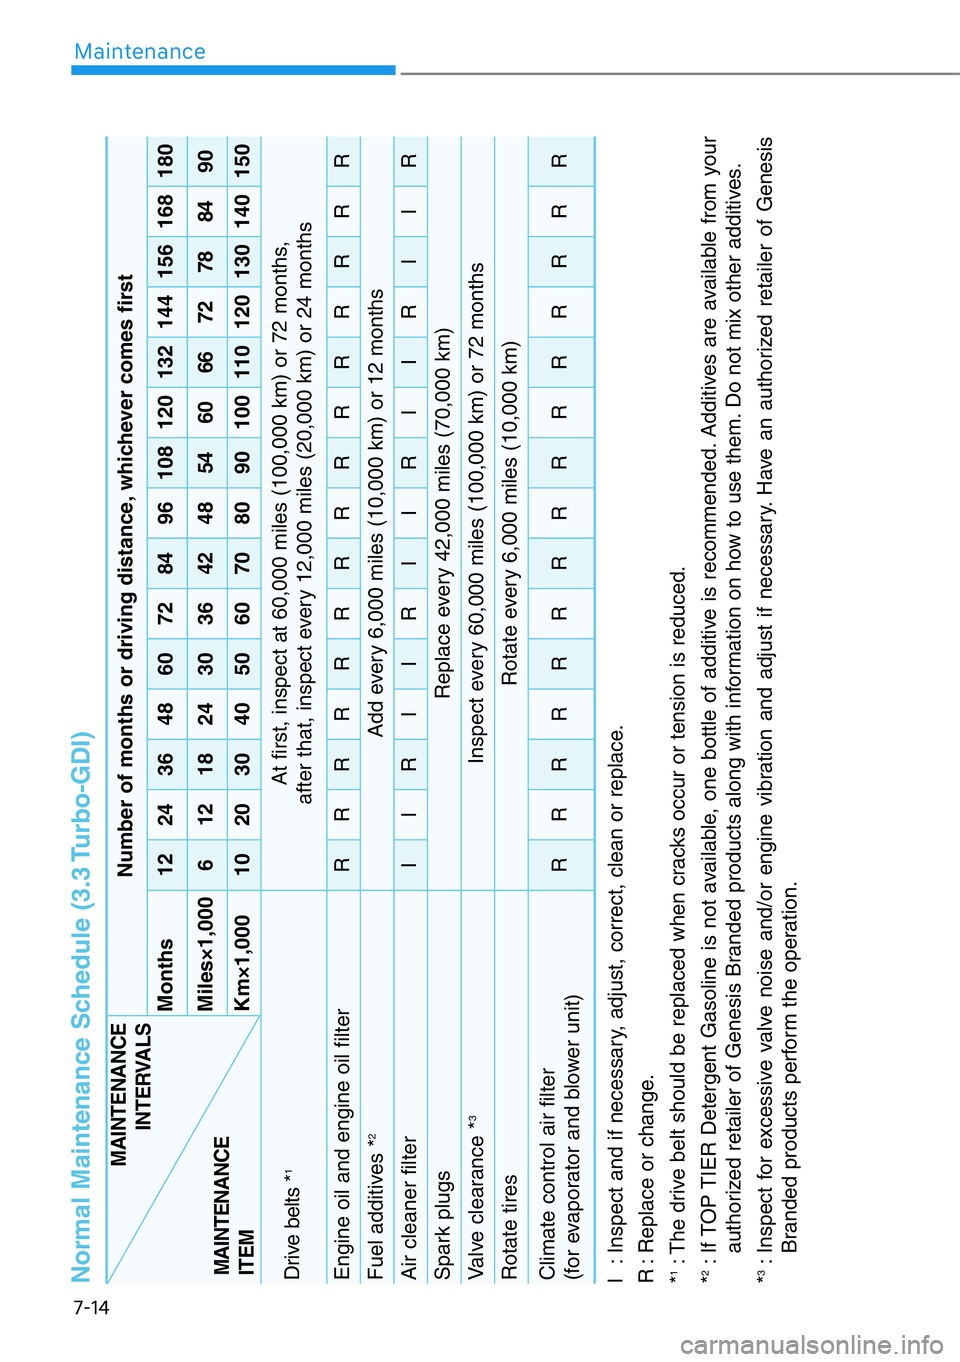
Normal Maintenance Schedule (3.3 Turbo-GDI)I : Inspect and if necessary, adjust, correct, clean or replace.
R : Replace or change.
*1: The drive belt should be replaced when cracks occur or tension is reduced.
*2: If TOP TIER Detergent Gasoline is not available, one bottle of additive is recommended. Additives are available from your
authorized retailer of Genesis Branded products along with information on how to use them. Do not mix other additives.
*3: Inspect for excessive valve noise and/or engine vibration and adjust if necessary. Have an authorized retailer of Genesis
Branded products perform the operation.
Number of months or driving distance, whichever comes first
18090150
At first, inspect at 60,000 miles (100,000 km) or 72 months,
after that, inspect every 12,000 miles (20,000 km) or 24 months
R
Add every 6,000 miles (10,000 km) or 12 months
R
Replace every 42,000 miles (70,000 km)
Inspect every 60,000 miles (100,000 km) or 72 months
Rotate every 6,000 miles (10,000 km)
R
16884140RIR
15678130RIR
14472120RRR
13266110RIR
12060100RIR
1085490RRR
964880RIR
844270RIR
723660RRR
603050RIR
482440RIR
361830RRR
241220RIR
12610RIR
MonthsMiles×1,000Km×1,000
Drive belts *
1
Engine oil and engine oil filterFuel additives *
2
Air cleaner filterSpark plugsValve clearance *
3
Rotate tiresClimate control air filter
(for evaporator and blower unit)
MAINTENANCE
INTERVALS
MAINTENANCE
ITEM
Page 457 of 538
7-17
07
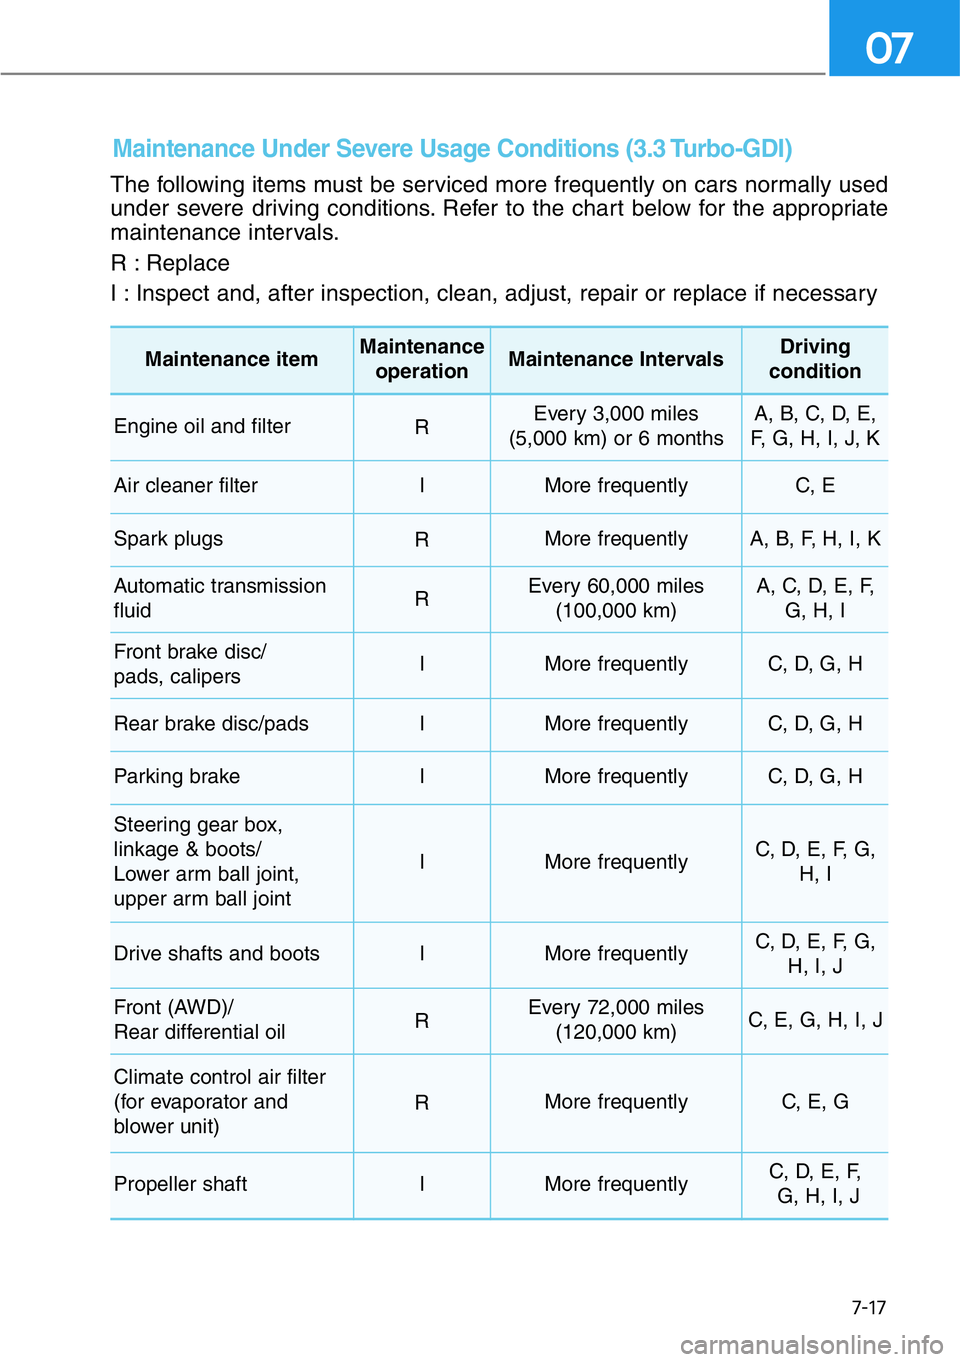
The following items must be serviced more frequently on cars normally used
under severe driving conditions. Refer to the chart below for the appropriate
maintenance intervals.
R : Replace
I : Inspect and, after inspection, clean, adjust, repair or replace if necessary
Maintenance Under Severe Usage Conditions (3.3 Turbo-GDI)
Maintenance itemMaintenance
operationMaintenance IntervalsDriving
condition
Engine oil and filterREvery 3,000 miles
(5,000 km) or 6 monthsA, B, C, D, E,
F, G, H, I, J, K
Air cleaner filterIMore frequentlyC, E
Spark plugs RMore frequentlyA, B, F, H, I, K
Automatic transmission
fluidREvery 60,000 miles
(100,000 km) A, C, D, E, F,
G, H, I
Front brake disc/
pads, calipersIMore frequentlyC, D, G, H
Rear brake disc/padsIMore frequentlyC, D, G, H
Parking brakeIMore frequentlyC, D, G, H
Steering gear box,
linkage & boots/
Lower arm ball joint,
upper arm ball joint
IMore frequentlyC, D, E, F, G,
H, I
Drive shafts and bootsIMore frequentlyC, D, E, F, G,
H, I, J
Front (AWD)/
Rear differential oilREvery 72,000 miles
(120,000 km)C, E, G, H, I, J
Climate control air filter
(for evaporator and
blower unit)
RMore frequentlyC, E, G
Propeller shaftIMore frequentlyC, D, E, F,
G, H, I, J
Page 459 of 538
7-19
07
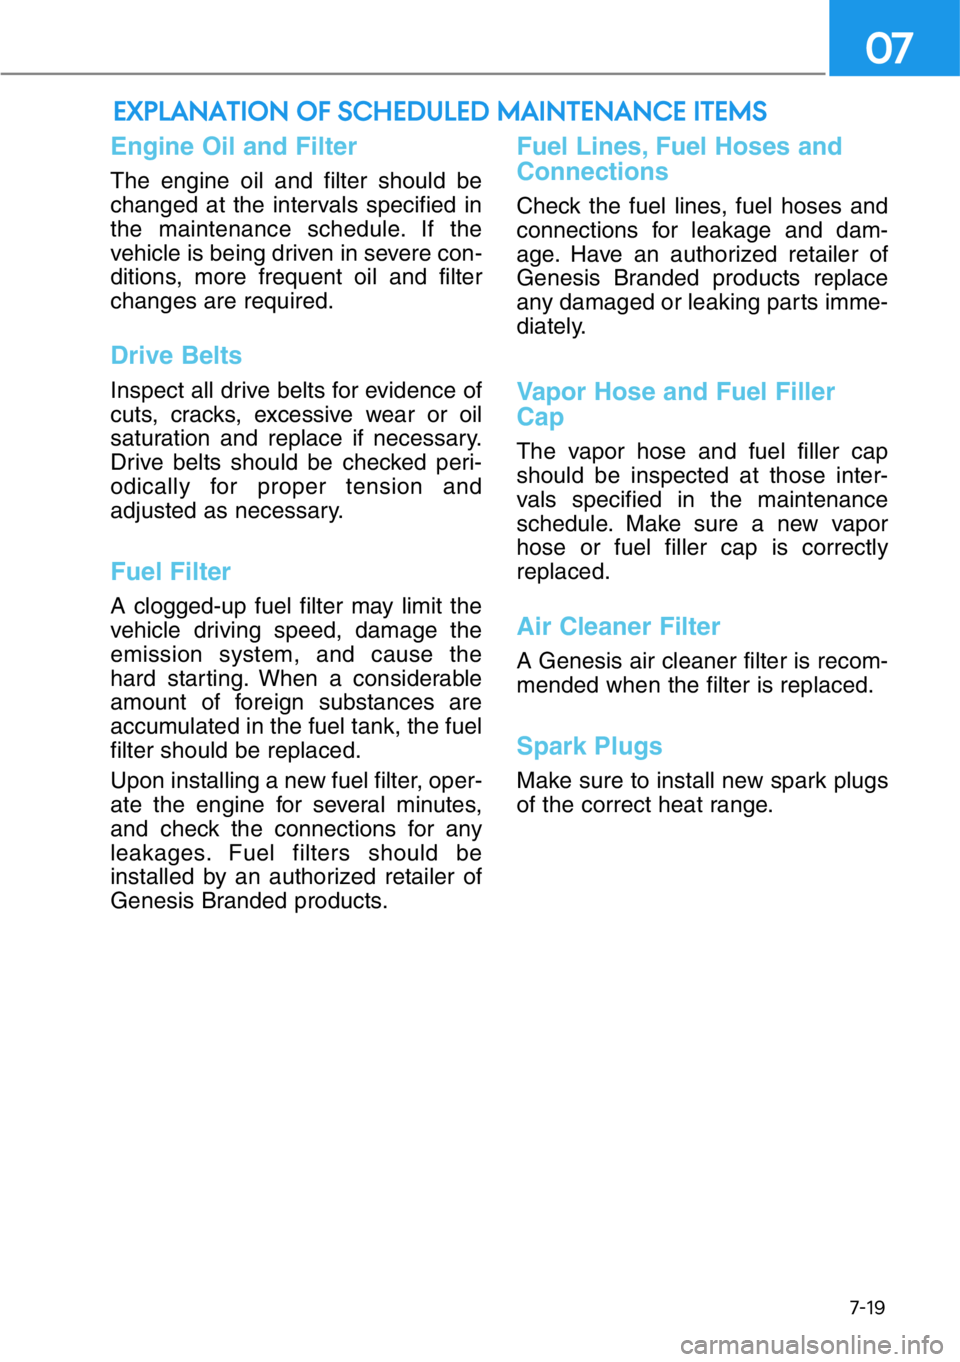
Engine Oil and Filter
The engine oil and filter should be
changed at the intervals specified in
the maintenance schedule. If the
vehicle is being driven in severe con-
ditions, more frequent oil and filter
changes are required.
Drive Belts
Inspect all drive belts for evidence of
cuts, cracks, excessive wear or oil
saturation and replace if necessary.
Drive belts should be checked peri-
odically for proper tension and
adjusted as necessary.
Fuel Filter
A clogged-up fuel filter may limit the
vehicle driving speed, damage the
emission system, and cause the
hard starting. When a considerable
amount of foreign substances are
accumulated in the fuel tank, the fuel
filter should be replaced.
Upon installing a new fuel filter, oper-
ate the engine for several minutes,
and check the connections for any
leakages. Fuel filters should be
installed by an authorized retailer of
Genesis Branded products.
Fuel Lines, Fuel Hoses and
Connections
Check the fuel lines, fuel hoses and
connections for leakage and dam-
age. Have an authorized retailer of
Genesis Branded products replace
any damaged or leaking parts imme-
diately.
Vapor Hose and Fuel Filler
Cap
The vapor hose and fuel filler cap
should be inspected at those inter-
vals specified in the maintenance
schedule. Make sure a new vapor
hose or fuel filler cap is correctly
replaced.
Air Cleaner Filter
A Genesis air cleaner filter is recom-
mended when the filter is replaced.
Spark Plugs
Make sure to install new spark plugs
of the correct heat range.
EXPLANATION OF SCHEDULED MAINTENANCE ITEMS
Page 465 of 538
7-25
07
Recommended engine coolant
• When adding coolant, use only
deionized water, distilled water or
soft water for your vehicle and
never mix hard water in the coolant
filled at the factory.
• An incorrect coolant mixture can
result in severe malfunction or
engine damage.
• The engine in your vehicle has alu-
minum engine parts and must be
protected by an ethylene-glycol
with phosphate based coolant to
prevent corrosion and freezing.
• Do not use alcohol or methanol
coolant or mix them with the spec-
ified coolant.
• Do not use a solution that contains
more than 60% antifreeze or less
than 35% antifreeze, which would
reduce the effectiveness of the
solution.
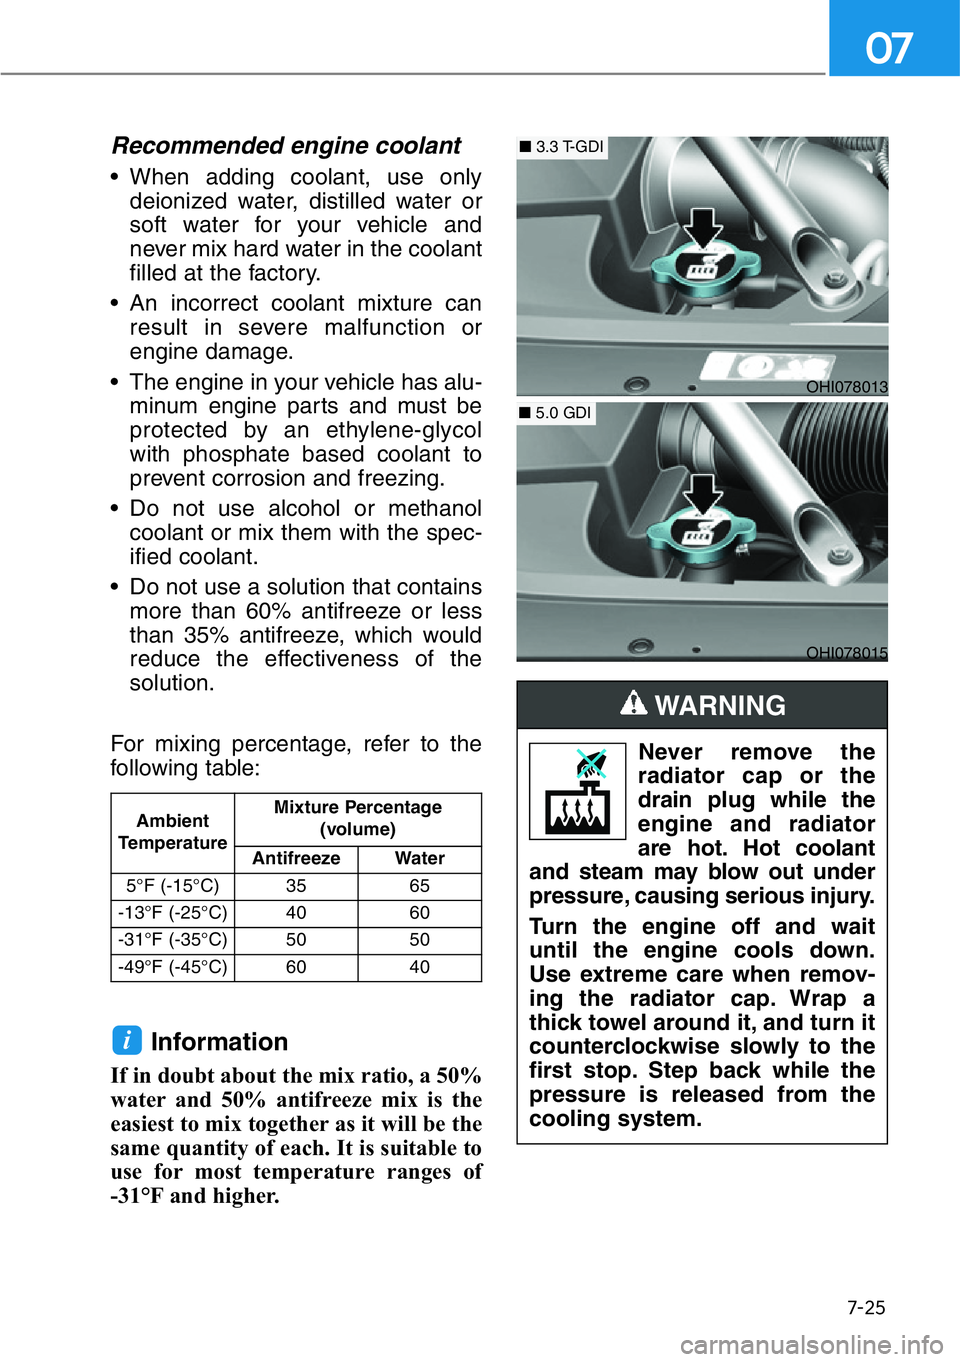
For mixing percentage, refer to the
following table:
Information
If in doubt about the mix ratio, a 50%
water and 50% antifreeze mix is the
easiest to mix together as it will be the
same quantity of each. It is suitable to
use for most temperature ranges of
-31°F and higher.
i
Ambient
TemperatureMixture Percentage
(volume)
Antifreeze Water
5°F (-15°C) 35 65
-13°F (-25°C) 40 60
-31°F (-35°C) 50 50
-49°F (-45°C) 60 40
Never remove the
radiator cap or the
drain plug while the
engine and radiator
are hot. Hot coolant
and steam may blow out under
pressure, causing serious injury.
Turn the engine off and wait
until the engine cools down.
Use extreme care when remov-
ing the radiator cap. Wrap a
thick towel around it, and turn it
counterclockwise slowly to the
first stop. Step back while the
pressure is released from the
cooling system.
WARNING
OHI078013
■3.3 T-GDI
OHI078015
■5.0 GDI
Page 479 of 538
7-39
07
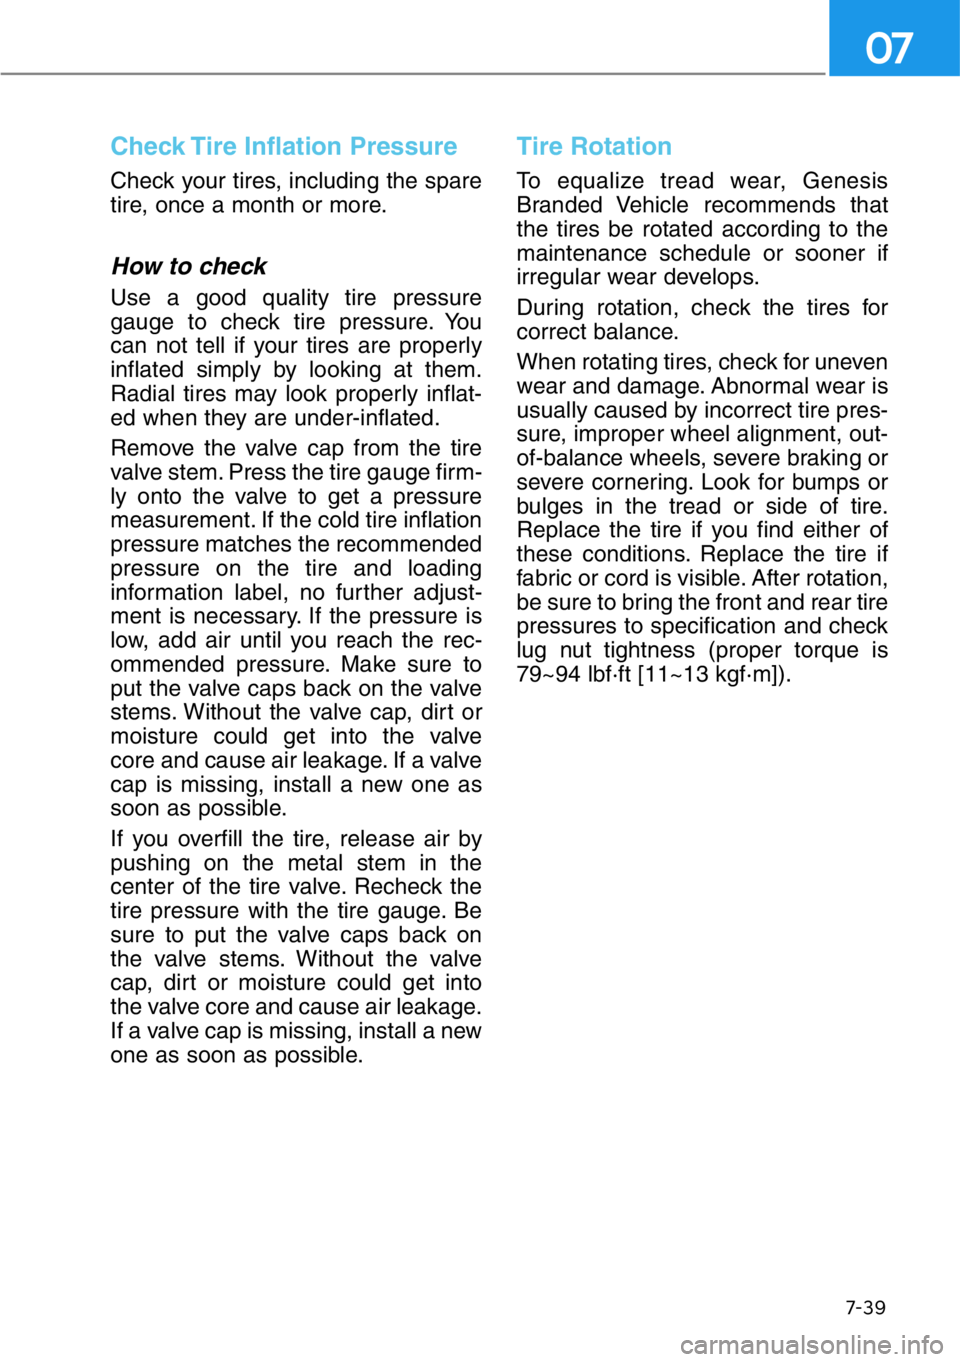
Check Tire Inflation Pressure
Check your tires, including the spare
tire, once a month or more.
How to check
Use a good quality tire pressure
gauge to check tire pressure. You
can not tell if your tires are properly
inflated simply by looking at them.
Radial tires may look properly inflat-
ed when they are under-inflated.
Remove the valve cap from the tire
valve stem. Press the tire gauge firm-
ly onto the valve to get a pressure
measurement. If the cold tire inflation
pressure matches the recommended
pressure on the tire and loading
information label, no further adjust-
ment is necessary. If the pressure is
low, add air until you reach the rec-
ommended pressure. Make sure to
put the valve caps back on the valve
stems. Without the valve cap, dirt or
moisture could get into the valve
core and cause air leakage. If a valve
cap is missing, install a new one as
soon as possible.
If you overfill the tire, release air by
pushing on the metal stem in the
center of the tire valve. Recheck the
tire pressure with the tire gauge. Be
sure to put the valve caps back on
the valve stems. Without the valve
cap, dirt or moisture could get into
the valve core and cause air leakage.
If a valve cap is missing, install a new
one as soon as possible.
Tire Rotation
To equalize tread wear, Genesis
Branded Vehicle recommends that
the tires be rotated according to the
maintenance schedule or sooner if
irregular wear develops.
During rotation, check the tires for
correct balance.
When rotating tires, check for uneven
wear and damage. Abnormal wear is
usually caused by incorrect tire pres-
sure, improper wheel alignment, out-
of-balance wheels, severe braking or
severe cornering. Look for bumps or
bulges in the tread or side of tire.
Replace the tire if you find either of
these conditions. Replace the tire if
fabric or cord is visible. After rotation,
be sure to bring the front and rear tire
pressures to specification and check
lug nut tightness (proper torque is
79~94 lbf·ft [11~13 kgf·m]).
Page 489 of 538
7-49
07
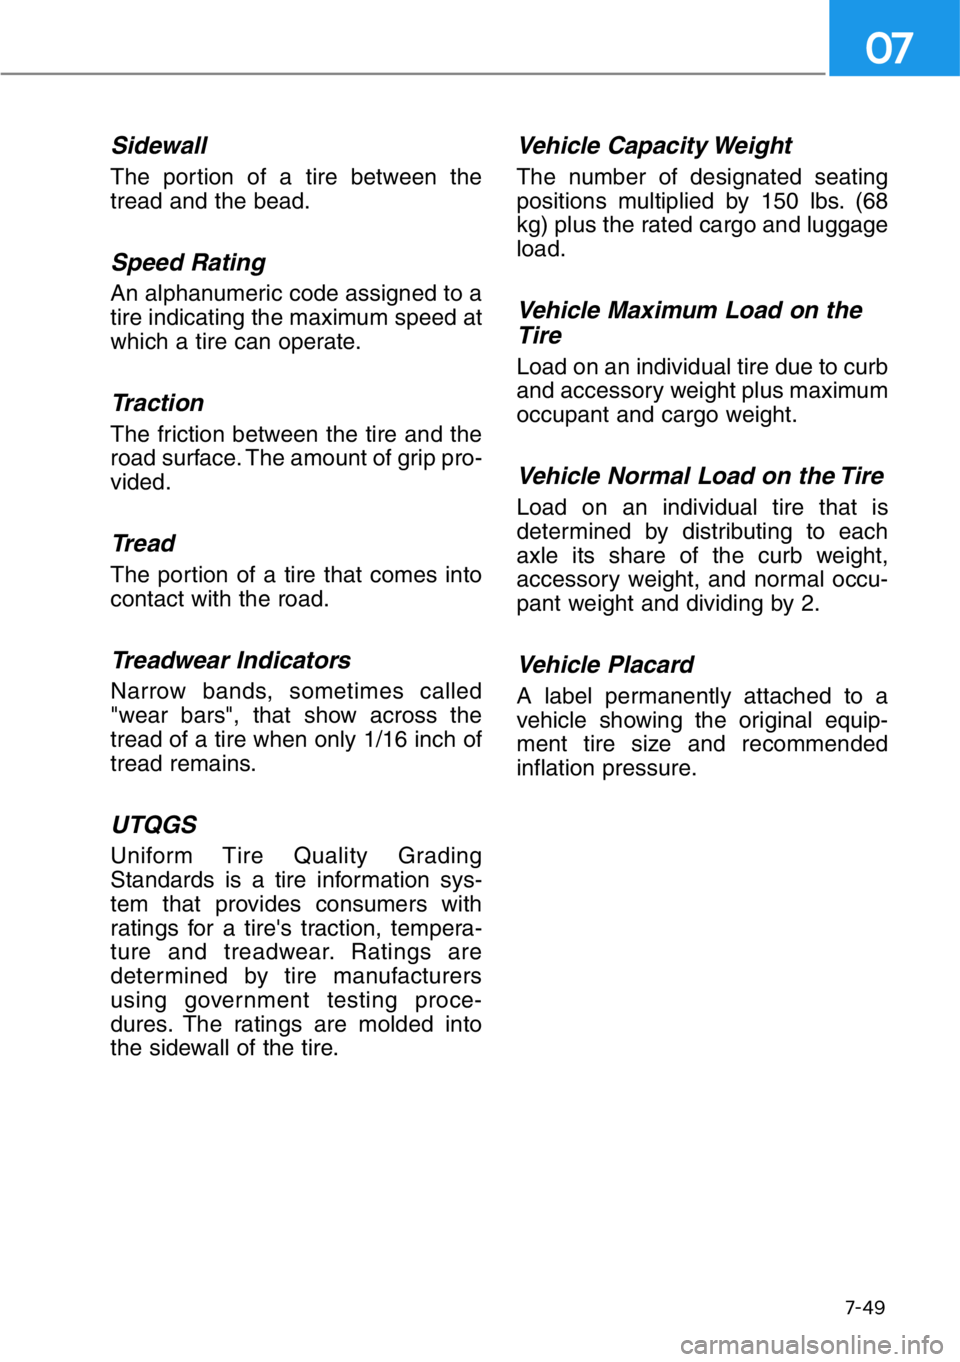
Sidewall
The portion of a tire between the
tread and the bead.
Speed Rating
An alphanumeric code assigned to a
tire indicating the maximum speed at
which a tire can operate.
Traction
The friction between the tire and the
road surface. The amount of grip pro-
vided.
Tread
The portion of a tire that comes into
contact with the road.
Treadwear Indicators
Narrow bands, sometimes called
"wear bars", that show across the
tread of a tire when only 1/16 inch of
tread remains.
UTQGS
Uniform Tire Quality Grading
Standards is a tire information sys-
tem that provides consumers with
ratings for a tire's traction, tempera-
ture and treadwear. Ratings are
determined by tire manufacturers
using government testing proce-
dures. The ratings are molded into
the sidewall of the tire.
Vehicle Capacity Weight
The number of designated seating
positions multiplied by 150 lbs. (68
kg) plus the rated cargo and luggage
load.
Vehicle Maximum Load on the
Tire
Load on an individual tire due to curb
and accessory weight plus maximum
occupant and cargo weight.
Vehicle Normal Load on the Tire
Load on an individual tire that is
determined by distributing to each
axle its share of the curb weight,
accessory weight, and normal occu-
pant weight and dividing by 2.
Vehicle Placard
A label permanently attached to a
vehicle showing the original equip-
ment tire size and recommended
inflation pressure.
Page 498 of 538
7-58
Maintenance
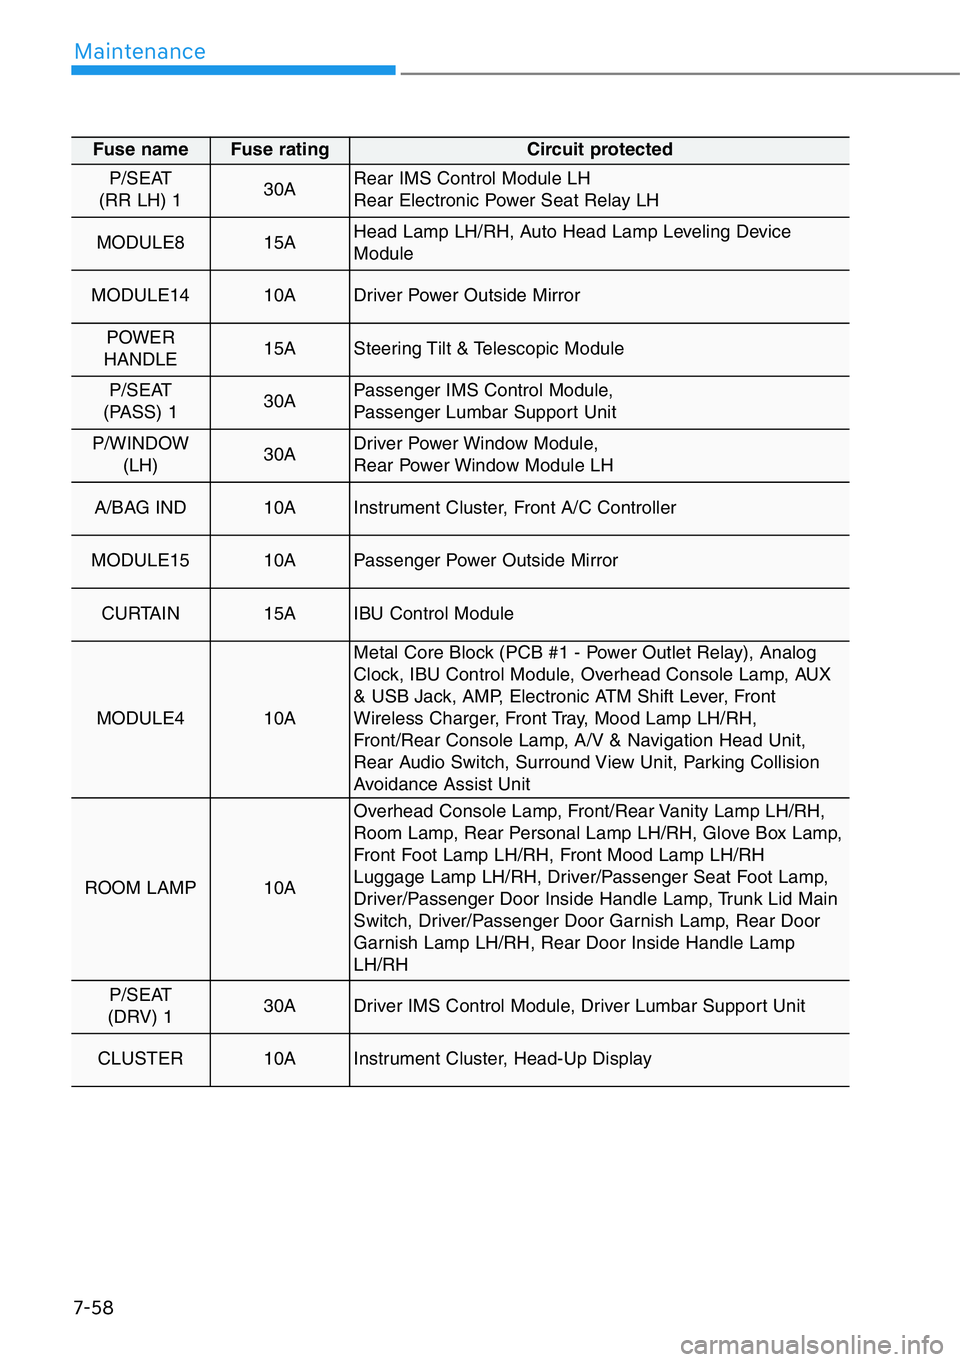
Fuse name Fuse rating Circuit protected
P/SEAT
(RR LH) 130ARear IMS Control Module LH
Rear Electronic Power Seat Relay LH
MODULE8 15AHead Lamp LH/RH, Auto Head Lamp Leveling Device
Module
MODULE1410ADriver Power Outside Mirror
POWER
HANDLE 15ASteering Tilt & Telescopic Module
P/SEAT
(PASS) 130APassenger IMS Control Module,
Passenger Lumbar Support Unit
P/WINDOW
(LH)30ADriver Power Window Module,
Rear Power Window Module LH
A/BAG IND10AInstrument Cluster, Front A/C Controller
MODULE1510APassenger Power Outside Mirror
CURTAIN 15AIBU Control Module
MODULE4 10A
Metal Core Block (PCB #1 - Power Outlet Relay), Analog
Clock, IBU Control Module, Overhead Console Lamp, AUX
& USB Jack, AMP, Electronic ATM Shift Lever, Front
Wireless Charger, Front Tray, Mood Lamp LH/RH,
Front/Rear Console Lamp, A/V & Navigation Head Unit,
Rear Audio Switch, Surround View Unit, Parking Collision
Avoidance Assist Unit
ROOM LAMP 10A
Overhead Console Lamp, Front/Rear Vanity Lamp LH/RH,
Room Lamp, Rear Personal Lamp LH/RH, Glove Box Lamp,
Front Foot Lamp LH/RH, Front Mood Lamp LH/RH
Luggage Lamp LH/RH, Driver/Passenger Seat Foot Lamp,
Driver/Passenger Door Inside Handle Lamp, Trunk Lid Main
Switch, Driver/Passenger Door Garnish Lamp, Rear Door
Garnish Lamp LH/RH, Rear Door Inside Handle Lamp
LH/RH
P/SEAT
(DRV) 130ADriver IMS Control Module, Driver Lumbar Support Unit
CLUSTER 10AInstrument Cluster, Head-Up Display
Page 528 of 538
8
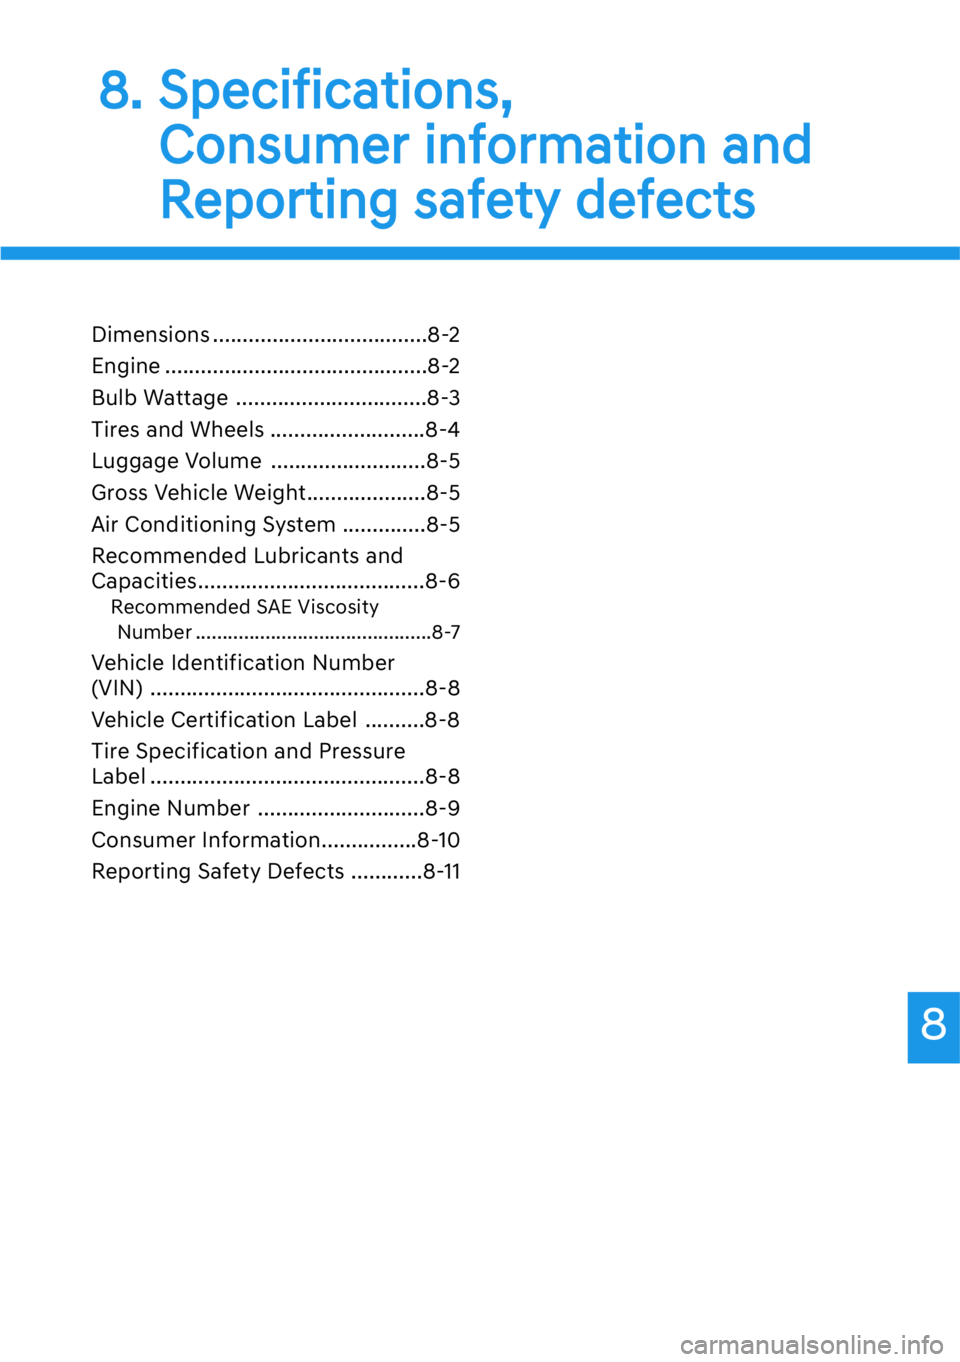
8. Specifications,
Consumer information and
Reporting safety defects
Dimensions ....................................8-2
Engine ............................................8-2
Bulb Wattage ................................8-3
Tires and Wheels ..........................8-4
Luggage Volume ..........................8-5
Gross Vehicle Weight....................8-5
Air Conditioning System ..............8-5
Recommended Lubricants and
Capacities......................................8-6
Recommended SAE Viscosity
Number ............................................8-7
Vehicle Identification Number
(VIN) ..............................................8-8
Vehicle Certification Label ..........8-8
Tire Specification and Pressure
Label ..............................................8-8
Engine Number ............................8-9
Consumer Information................8-10
Reporting Safety Defects ............8-11
Page 531 of 538
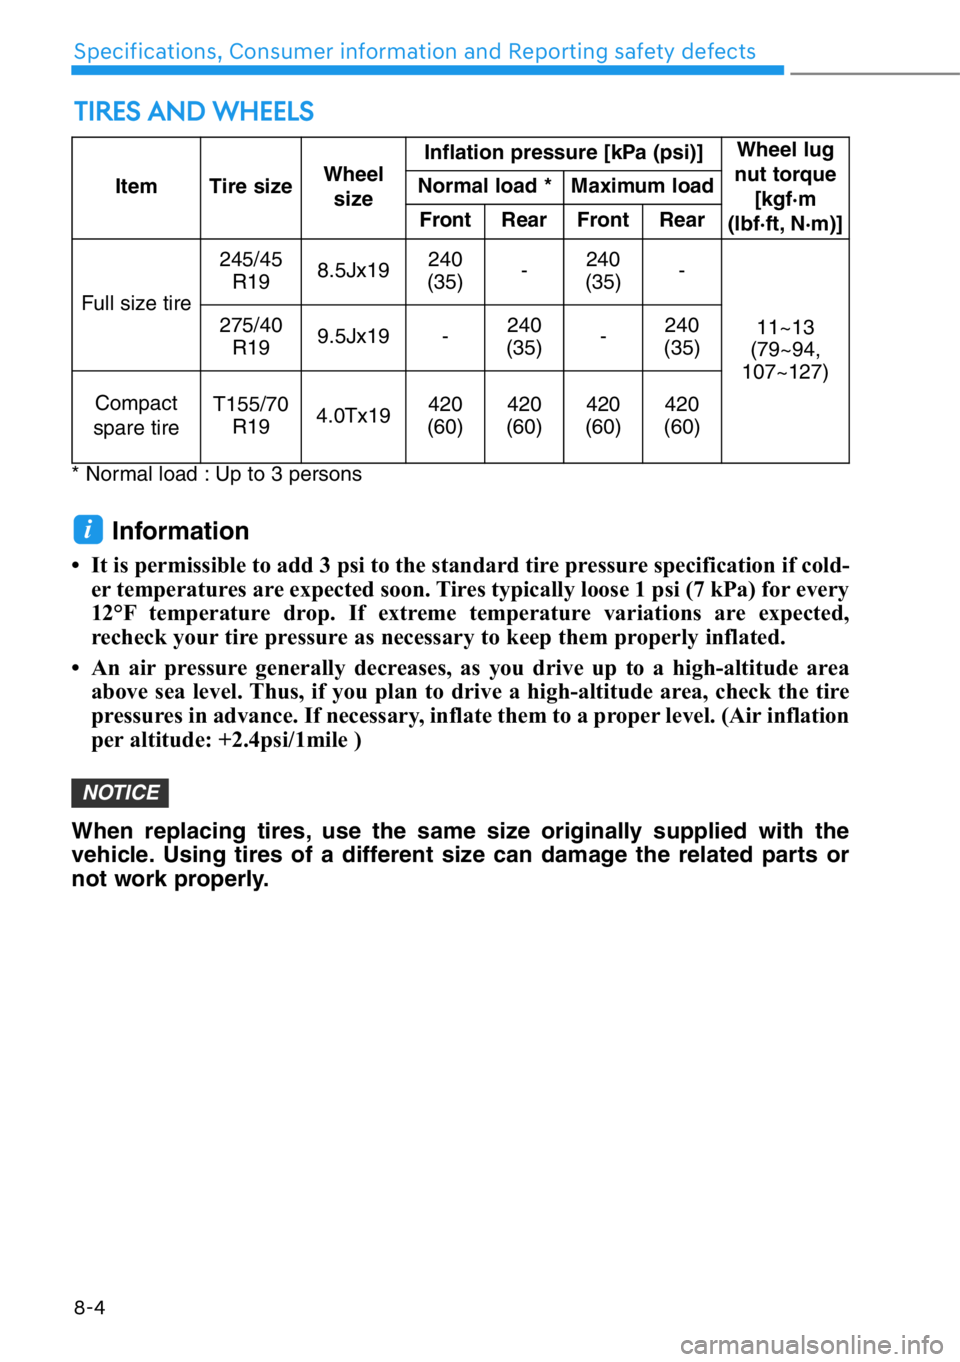
8-4
Specifications, Consumer information and Reporting safety defects
* Normal load : Up to 3 persons
Information
• It is permissible to add 3 psi to the standard tire pressure specification if cold-
er temperatures are expected soon. Tires typically loose 1 psi (7 kPa) for every
12°F temperature drop. If extreme temperature variations are expected,
recheck your tire pressure as necessary to keep them properly inflated.
• An air pressure generally decreases, as you drive up to a high-altitude area
above sea level. Thus, if you plan to drive a high-altitude area, check the tire
pressures in advance. If necessary, inflate them to a proper level. (Air inflation
per altitude: +2.4psi/1mile )
When replacing tires, use the same size originally supplied with the
vehicle. Using tires of a different size can damage the related parts or
not work properly.
NOTICE
i
TIRES AND WHEELS
Item Tire sizeWheel
sizeInflation pressure [kPa (psi)]Wheel lug
nut torque
[kgf·m
(lbf·ft, N·m)] Normal load * Maximum load
Front Rear Front Rear
Full size tire245/45
R198.5Jx19240
(35)-240
(35)-
11~13
(79~94,
107~127) 275/40
R199.5Jx19 -240
(35)-240
(35)
Compact
spare tireT155/70
R194.0Tx19420
(60)420
(60)420
(60)420
(60)
Page 532 of 538
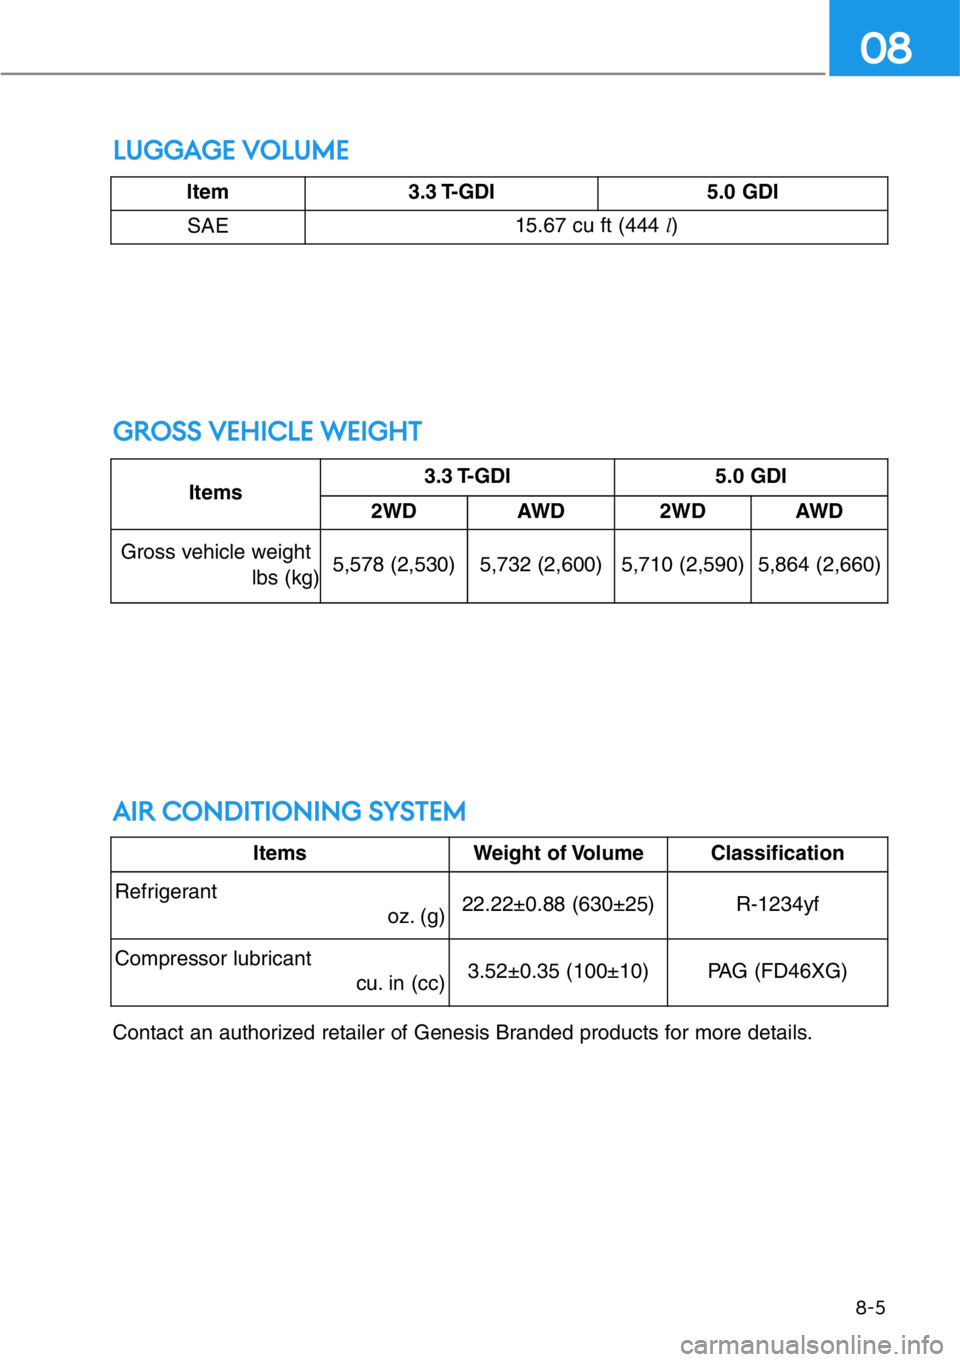
AIR CONDITIONING SYSTEM
8-5
08
Items3.3 T-GDI 5.0 GDI
2WD AWD 2WD AWD
Gross vehicle weight
lbs (kg)5,578 (2,530) 5,732 (2,600) 5,710 (2,590) 5,864 (2,660)
Contact an authorized retailer of Genesis Branded products for more details.Items Weight of Volume Classification
Refrigerant
oz. (g)22.22±0.88 (630±25) R-1234yf
Compressor lubricant
cu. in (cc)3.52±0.35 (100±10)PAG (FD46XG)
GROSS VEHICLE WEIGHT
ltem 3.3 T-GDI 5.0 GDI
SAE15.67 cu ft (444 l)
LUGGAGE VOLUME