oil level Hyundai Getz 2002 Owner's Guide
[x] Cancel search | Manufacturer: HYUNDAI, Model Year: 2002, Model line: Getz, Model: Hyundai Getz 2002Pages: 428, PDF Size: 6.13 MB
Page 184 of 428
DO-IT-YOURSELF MAINTENANCE 6- 11
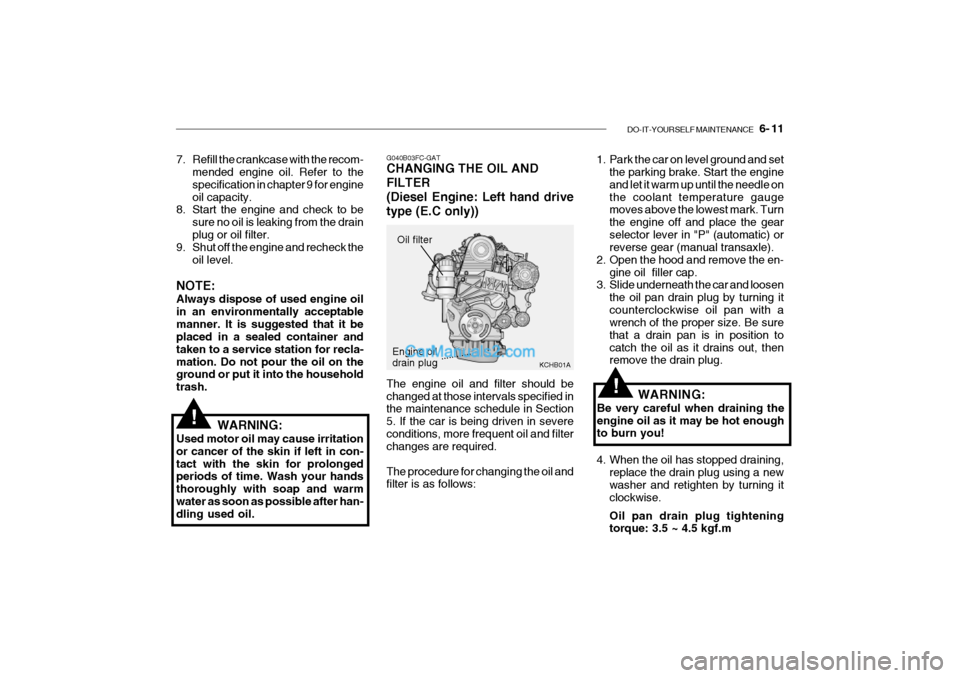
G040B03FC-GAT CHANGING THE OIL AND FILTER
(Diesel Engine: Left hand drivetype (E.C only)) The engine oil and filter should be changed at those intervals specified in the maintenance schedule in Section 5. If the car is being driven in severeconditions, more frequent oil and filter changes are required. The procedure for changing the oil and filter is as follows: 1. Park the car on level ground and set
the parking brake. Start the engine and let it warm up until the needle onthe coolant temperature gauge moves above the lowest mark. Turn the engine off and place the gearselector lever in "P" (automatic) or reverse gear (manual transaxle).
2. Open the hood and remove the en- gine oil filler cap.
3. Slide underneath the car and loosen
the oil pan drain plug by turning it counterclockwise oil pan with a wrench of the proper size. Be sure that a drain pan is in position tocatch the oil as it drains out, then remove the drain plug.
7. Refill the crankcase with the recom-
mended engine oil. Refer to the specification in chapter 9 for engineoil capacity.
8. Start the engine and check to be
sure no oil is leaking from the drainplug or oil filter.
9. Shut off the engine and recheck the
oil level.
NOTE: Always dispose of used engine oil in an environmentally acceptablemanner. It is suggested that it be placed in a sealed container and taken to a service station for recla-mation. Do not pour the oil on the ground or put it into the household trash.
WARNING:
Used motor oil may cause irritationor cancer of the skin if left in con-tact with the skin for prolonged periods of time. Wash your hands thoroughly with soap and warmwater as soon as possible after han- dling used oil.
!
Engine oil drain plug Oil filter
KCHB01A
WARNING:
Be very careful when draining the engine oil as it may be hot enough to burn you!!
4. When the oil has stopped draining, replace the drain plug using a new washer and retighten by turning it clockwise. Oil pan drain plug tightening torque: 3.5 ~ 4.5 kgf.m
............
Page 185 of 428

6- 12 DO-IT-YOURSELF MAINTENANCE
5. Loosen the oil filter drain plug by
turning it counterclockwise with a wrench of the proper size and drain out some oil in the oil filter. Be sure that a drain pan is in position tocatch the oil.
6. Loosen the oil filter upper cap with a
proper tool from the lower case untilan O-ring is seen. Then, drain the oil completely.
7. Pull out the oil filter upper cap with element from the lower case.Using a clean cloth, remove any dirt or oil accumulated around the lowercase.
8. Install a new copper washer of the
oil filter drain plug by the side oflower case and retighten by turning it clockwise. Tightening torque : 0.8 ~ 1.0 kgf.m
9. After mounting a new oil filter ele- ment and new O-ring to upper cap,install the upper cap to lower case and retighten by turning it clock-wise. Do not over-tighten. Tightening torque : 2.3 ~ 2.5 kgf.m
10.Refill the crankcase with the rec- ommended engine oil. Refer to the specification in chapter 9 for engine oil capacity.
11.Start the engine and check to be sure no oil is leaking from the drainplug or oil filter.
12.Shut off the engine and recheck the oil level.
NOTE: It is recommended that the engine oil and filter should be changed by an authorized Hyundai dealer.
G040B01FC
Oil filter drain plug O-ring
Oil filter element
Washer
Upper cap
Lower case NOTE: Always dispose of used engine oil in an environmentally acceptable manner. It is suggested that it beplaced in a sealed container and taken to a service station for maybe reclaimation. Do not pour the oil onthe ground or put it into the house- hold trash.
WARNING:
Used motor oil may cause irritation or cancer of the skin if left in con- tact with the skin for prolonged periods of time. Wash your handsthoroughly with soap and warm water as soon as possible after han- dling used oil.
!
Page 191 of 428

6- 18 DO-IT-YOURSELF MAINTENANCE
G100A03A-GAT CHECKING THE TRANSAXLE OIL (MANUAL)
G090A01A-GAT FILLING THE WASHER RESER- VOIR The washer fluid reservoir supplies fluid to the windshield washer system. A good quality washer fluid should beused to fill the washer reservoir. The fluid level should be checked more frequently during bad weather or when-ever the washer system is in more frequent use. The capacity of the washer reservoir is3.0 liters (3.2 U.S. quarts). CAUTION:
o Radiator antifreeze (engine cool- ant) should not be used in thewasher system because it will damage the car's finish.
o The washer lever should not be pulled and the washer shouldnot be operated if the washer reservoir is empty. This can dam-age the washer fluid pump.
!
HTB173
HXGS506
Drain plug
Filler plug
Transaxle lubricant in the manual transaxle should be checked at those intervals specified in the vehicle main-tenance schedule in Section 5. Recommended Oil Use only HYUNDAI GENUINE PARTS MTF 75W/90 (API GL-4) in the manual transaxle. Manual Transaxle Oil Capacity The oil capacity of the manual transaxle is 2.15 liters.
WARNING:
It is always better to check thetransaxle oil level when the engine is cool or cold. If the engine is hot, you should exercise great cautionto avoid burning yourself on hot engine or exhaust parts.
!
Page 192 of 428
DO-IT-YOURSELF MAINTENANCE 6- 19
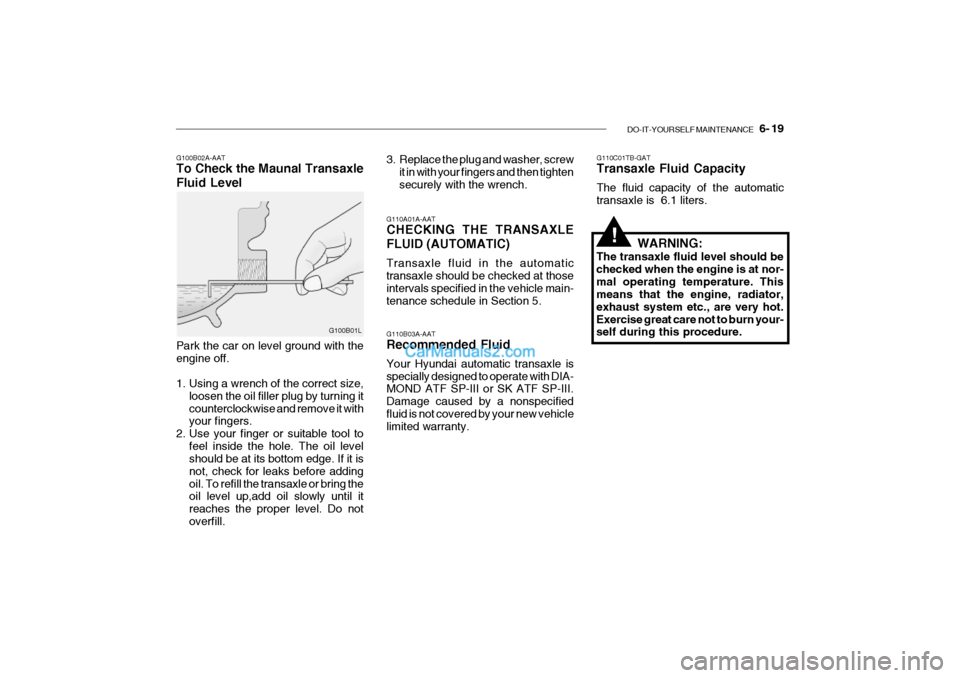
G100B02A-AAT To Check the Maunal Transaxle Fluid Level
G110A01A-AAT CHECKING THE TRANSAXLE FLUID (AUTOMATIC) Transaxle fluid in the automatic transaxle should be checked at those intervals specified in the vehicle main-tenance schedule in Section 5. G110B03A-AAT Recommended Fluid Your Hyundai automatic transaxle is specially designed to operate with DIA-
MOND ATF SP-III or SK ATF SP-III. Damage caused by a nonspecifiedfluid is not covered by your new vehicle limited warranty.G110C01TB-GAT Transaxle Fluid Capacity The fluid capacity of the automatic transaxle is 6.1 liters.
G100B01L
Park the car on level ground with the engine off.
1. Using a wrench of the correct size, loosen the oil filler plug by turning it counterclockwise and remove it with your fingers.
2. Use your finger or suitable tool to feel inside the hole. The oil levelshould be at its bottom edge. If it is not, check for leaks before addingoil. To refill the transaxle or bring the oil level up,add oil slowly until it reaches the proper level. Do notoverfill. 3. Replace the plug and washer, screw
it in with your fingers and then tightensecurely with the wrench.
WARNING:
The transaxle fluid level should bechecked when the engine is at nor-mal operating temperature. This means that the engine, radiator, exhaust system etc., are very hot.Exercise great care not to burn your- self during this procedure.
!
Page 203 of 428

6- 30 DO-IT-YOURSELF MAINTENANCE
HTB287
G240A01A-AAT POWER STEERING HOSES It is suggested that you check the power steering hose connections for fluid leakage at regular intervals. Thepower steering hoses should be re- placed if there is severe surface crack- ing, scuffing or worn spots. Deteriora-tion of the hose could cause prema- ture failure. G300A01TB-GAT REMOVAL OF WATER FROM THE FUEL FILTER(DIESEL ENGINE) If the fuel filter warning light illuminates during driving, it indicates that water has accumulated in the fuel filter. If this occurs, remove the water as describedbelow.
G230A03A-GAT POWER STEERING FLUID LEVEL The power steering fluid level should be checked regularly.To check the power steering fluid level, be sure the ignition is "OFF", then check to make certain that the powersteering fluid level is between the "MAX" and "MIN" level markings on the fluid reservoir. NOTE: Grinding noise from the power steering pump may be heard imme-diately after the engine is started in extremely cold conditions (below - 20°C). If the noise stops during warm
HTB163
up, there is no abnormal function in the system. It is due to a power steering fluid characteristic in ex-tremely cold conditions. Recommended Fluid Use PSF-3 type fluid NOTE: Do not start the engine when the power steering oil reservoir is empty.
Page 204 of 428

DO-IT-YOURSELF MAINTENANCE 6- 31
1. Remove the engine cover.
2. Disconnect the air intake hose from
air cleaner cover.
3. Loosen the drain plug at the bottom of the fuel filter.
4. Tighten the drain plug when water no longer comes out.
5. Check to be sure that the warning
lamp illuminates when the ignition key is turned to "ON", and that it goes off when the engine is started. If in doubt, consult your nearestauthorized HYUNDAI dealer.
NOTE: It is recommended that water accu- mulated in the fuel filter should beremoved by an authorized Hyundai dealer. G300B01FC
WARNING:
Be sure to carefully wipe away anywater drained out in this manner, because the fuel mixed in the watermight be ignited and result in a fire.
!
5. Open the hood.
6. Draw the vertical line (through the center of each headlight beam pat-tern) and the horizontal line (throughthe center of each headlight beam pattern) on the aiming screen. And then, draw the horizontal paral- lel line at 30 mm (1.18 in.) under the horizontal line.
7. Adjust each cut-off line of the low beam to the parallel line with a phillipsscrewdriver - VERTICAL AIMING.
8. Adjust each cut-off line of the low
beam to each vertical line with aphillips screwdriver - HORIZONTAL AIMING. HTB269
Horizontal Aiming
Vertical Aiming
G290A01FC-GAT HEADLIGHT AIMING ADJUST- MENT Before performing aiming adjustment, make sure of the following.
1. Keep all tires inflated to the correct pressure.
2. Place the vehicle on level ground
and press the front bumper and rear bumper down several times. Place the vehicle at a distance of 3,000 mm (118 in.) from the test wall.
3. See that the vehicle is unloaded (except for full levels of coolant,engine oil and fuel, and spare tire,jack, and tools).
4. Clean the head lights lens and turn
on the headlight (low beam).
Page 232 of 428

INDEX 10- 5
P Parking Brake ........................................................... 1-67
Power Steering Fluid Level ............................. ..........6-30
Power Windows ........................................................ 1-12
R Rear Seat .................................................................. 1-15
Rear Window Defroster Switch ................................ 1-56
SSeat Front ....................................................................... 1-13
Seatback Holder ....................................................... 1-70
Seat Pocket .............................................................. 1-70
Seat Warmer ............................................................. 1-19
Seat Belts
3-Point system ....................................................... 1-22
Adjustable height .................................................... 1-22
Adjusting your seat be lt .........................................1-23
Care of seat belts .................................................. 1-21
Precautions ............................................................ 1-20
Spark Plugs ............................................................... 6-15
Spectacle Case ......................................................... 1-63
Speedometer ............................................................. 1-49
Starting ........................................................................ 2-5
Steering Wheel Freeplay .................. ........................ 6-24
Steering Wheel Tilt Lever .............. ...........................1-74
Stereo Radio Operation (K210/K220, K240, H280)
............................................................ 1-86, 1-91, 1-96Stereo Sound System
............................................... 1-84
Sun Visor .................................................................. 1-73
Sunroof ...................................................................... 1-60
T Tachometer ............................................................... 1-49
Tail gate .................................................................... 1-69
Theft-Alarm system ..................................................... 1-9
Tires Balancing .................................................................. 8-5
Chains ...................................................................... 8-4
If you have a flat tire ............................................... 3-6
Information ............................................................... 8-3
Pressure ................................................................... 8-3
Replacement ............................................................ 8-7
Rotation .................................................................... 8-5
Snow tires ................................................................ 8-4
Spare tire ................................................................. 3-5
Traction .................................................................... 8-5
Towing
A trailer (or vehicle) ............................................... 2-18
Emergency ............................................................. 3-13
If your car must be towed .....................................3-11
Trailer or Vehicle towing ........................................... 2-18
Transaxle Automatic ................................................................. 2-9
Automatic transaxle fluid checking ........................6-19
Manual ..................................................................... 2-7
Manual transaxle Oil checking............................... 6-18
Trip Computer ........................................................... 1-51
Trip Odometer ........................................................... 1-50
Page 244 of 428

YOUR VEHICLE AT A GLANCE
B255A01TB-GAT INDICATOR SYMBOLS ON THE INSTRUMENT PANEL * A detail explanations of these items will be found on page 1-37
SRS (Airbag) Service Reminder Indicator ABS Service Reminder Indicator Turn Signal Indicator Lights High Beam Indicator Light Oil Pressure Warning Light Parking Brake/Brake Level Warning Light Charging System Warning Light Tail Gate Open Warning LightDoor Ajar Warning Light and Chime
Low Fuel Level Warning Light Malfunction Indicator Light Seat Belt Reminder Light
O/D OFF Indicator (Automatic transaxle only)
Electric Power Steering System (EPS)Warning Light
Diesel Pre-heat Indicator Light (Diesel only)
Fuel Filter Warning Light (Diesel only)
Immobilizer Indicator
Page 279 of 428
FEATURES OF YOUR HYUNDAI 1- 35
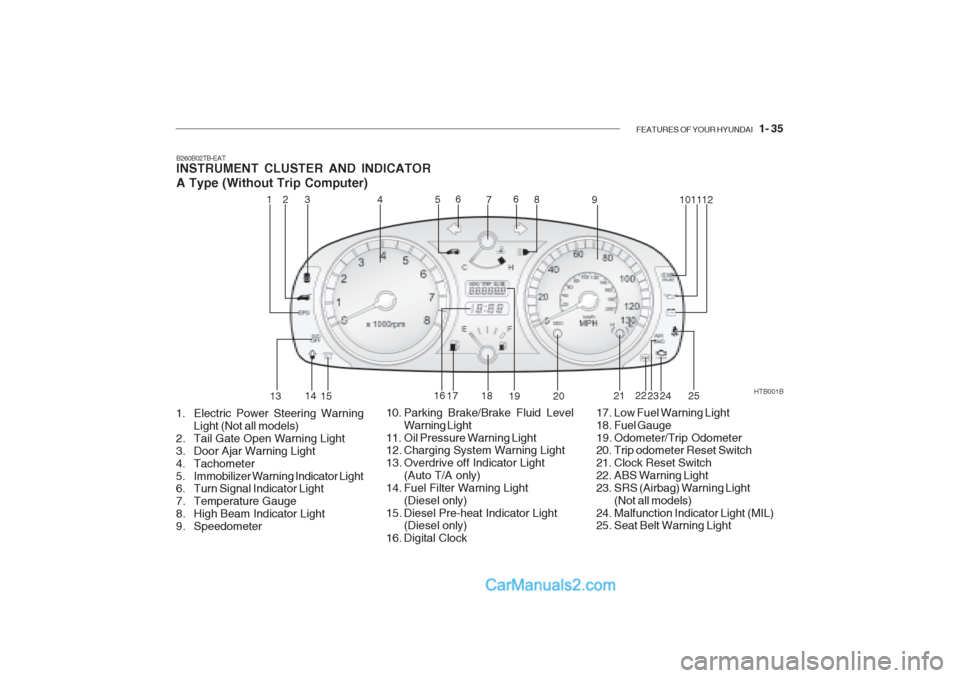
B260B02TB-EAT INSTRUMENT CLUSTER AND INDICATOR A Type (Without Trip Computer)
1. Electric Power Steering Warning Light (Not all models)
2. Tail Gate Open Warning Light
3. Door Ajar Warning Light
4. Tachometer
5. Immobilizer Warning Indicator Light
6. Turn Signal Indicator Light
7. Temperature Gauge
8. High Beam Indicator Light
9. Speedometer HTB001B
10. Parking Brake/Brake Fluid Level Warning Light
11. Oil Pressure Warning Light
12. Charging System Warning Light
13. Overdrive off Indicator Light
(Auto T/A only)
14. Fuel Filter Warning Light
(Diesel only)
15. Diesel Pre-heat Indicator Light (Diesel only)
16. Digital Clock 17. Low Fuel Warning Light
18. Fuel Gauge
19. Odometer/Trip Odometer
20. Trip odometer Reset Switch
21. Clock Reset Switch
22. ABS Warning Light
23. SRS (Airbag) Warning Light
(Not all models)
24. Malfunction Indicator Light (MIL)
25. Seat Belt Warning Light
1
24
536
7 8
9 101112
13 14
15 16
17 18 19 20 2122
23 24
6
25
Page 280 of 428
1- 36 FEATURES OF YOUR HYUNDAI
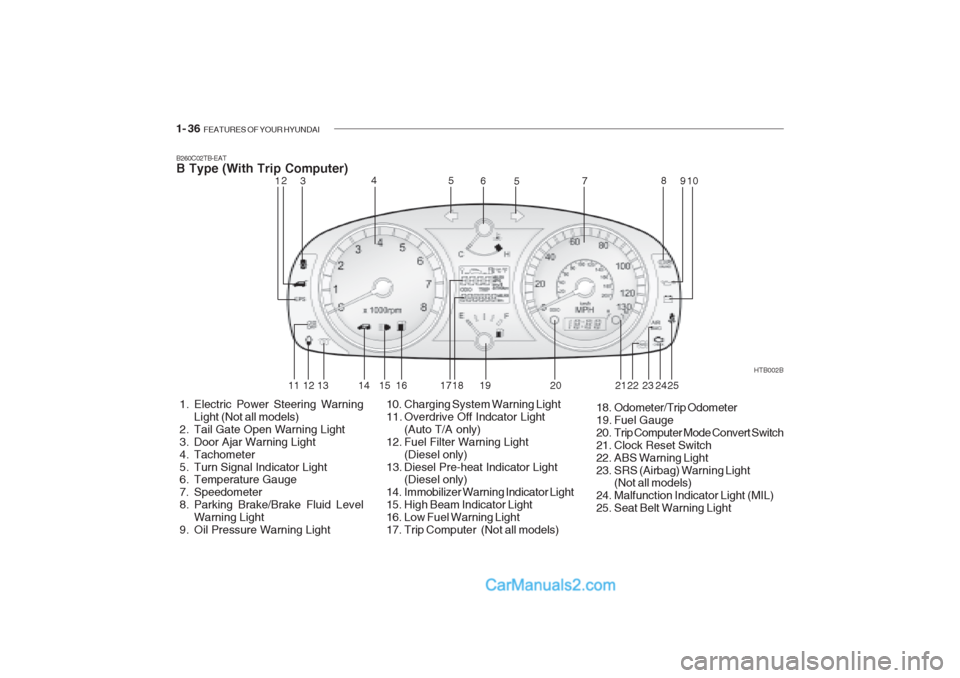
B260C02TB-EAT B Type (With Trip Computer)
1. Electric Power Steering Warning
Light (Not all models)
2. Tail Gate Open Warning Light
3. Door Ajar Warning Light
4. Tachometer
5. Turn Signal Indicator Light
6. Temperature Gauge
7. Speedometer
8. Parking Brake/Brake Fluid Level Warning Light
9. Oil Pressure Warning Light HTB002B
10. Charging System Warning Light
11. Overdrive Off Indcator Light (Auto T/A only)
12. Fuel Filter Warning Light (Diesel only)
13. Diesel Pre-heat Indicator Light (Diesel only)
14. Immobilizer Warning Indicator Light
15. High Beam Indicator Light
16. Low Fuel Warning Light
17. Trip Computer (Not all models) 18. Odometer/Trip Odometer
19. Fuel Gauge
20. Trip Computer Mode Convert Switch
21. Clock Reset Switch
22. ABS Warning Light
23. SRS (Airbag) Warning Light
(Not all models)
24. Malfunction Indicator Light (MIL)
25. Seat Belt Warning Light
12 3 4
5
5
67 8
910
11 12 13 14 15 16 1718 19 20 22 23
242521