fuse box Hyundai Getz 2002 Owner's Manual
[x] Cancel search | Manufacturer: HYUNDAI, Model Year: 2002, Model line: Getz, Model: Hyundai Getz 2002Pages: 428, PDF Size: 6.13 MB
Page 10 of 428

YOUR VEHICLE AT A GLANCE
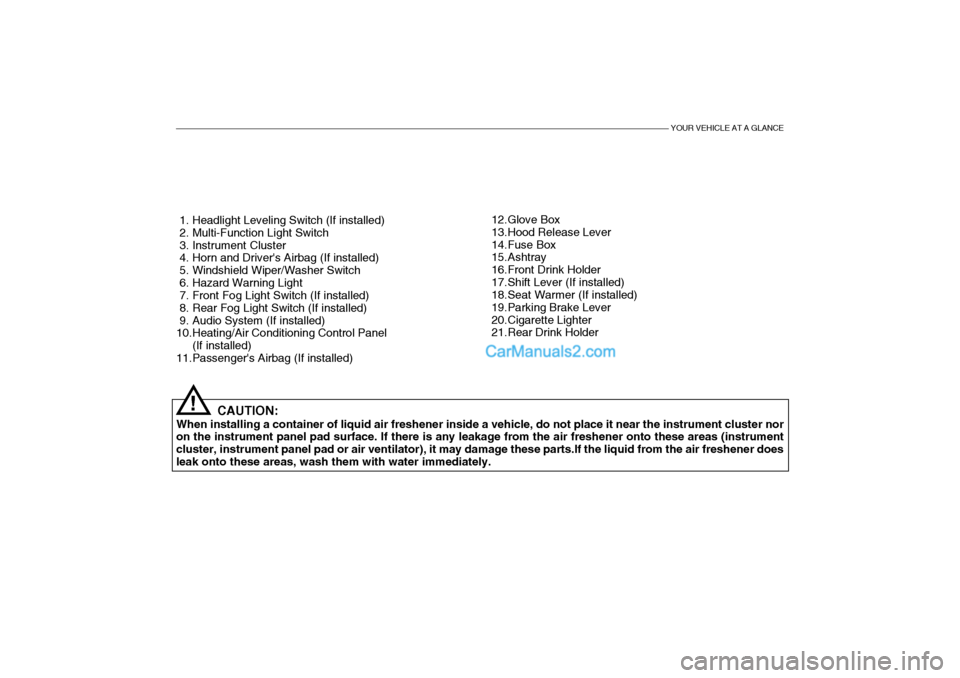
1. Headlight Leveling Switch (If installed)
2. Multi-Function Light Switch
3. Instrument Cluster
4. Horn and Driver's Airbag (If installed)
5. Windshield Wiper/Washer Switch
6. Hazard Warning Light
7. Front Fog Light Switch (If installed)
8. Rear Fog Light Switch (If installed)
9. Audio System (If installed)
10.Heating/Air Conditioning Control Panel(If installed)
11.Passenger's Airbag (If installed)
CAUTION:
When installing a container of liquid air freshener inside a vehicle, do not place it near the instrument cluster noron the instrument panel pad surface. If there is any leakage from the air freshener onto these areas (instrument cluster, instrument panel pad or air ventilator), it may damage these parts.If the liquid from the air freshener doesleak onto these areas, wash them with water immediately. 12.Glove Box
13.Hood Release Lever
14.Fuse Box
15.Ashtray
16.Front Drink Holder
17.Shift Lever (If installed)
18.Seat Warmer (If installed)
19.Parking Brake Lever
20.Cigarette Lighter
21.Rear Drink Holder
!
Page 12 of 428

YOUR VEHICLE AT A GLANCE
1. Glove Box
2. Passenger's Airbag (If installed)
3. Heating/Air Conditioning Control Panel(If installed)
4. Audio System (If installed)
5. Rear Fog Light Switch (If installed)
6. Front Fog Light Switch (If installed)
7. Hazard Warning Light
8. Windshield Wiper/Washer Switch
9. Horn and Driver's Airbag (If installed)
10. Instrument Cluster
CAUTION:
When installing a container of liquid air freshener inside a vehicle, do not place it near the instrument cluster nor on the instrument panel pad surface. If there is any leakage from the air freshener onto these areas (instrument cluster, instrument panel pad or air ventilator), it may damage these parts. If the liquid from the air freshener does leak onto these areas, wash them with water immediately. 11. Multi-Function Light Switch
12. Headlight Leveling Switch (If installed)
13. Rear Drink Holder
14. Cigarette Lighter
15. Parking Brake Lever
16. Seat Warmer (If installed)
17. Shift Lever (If installed)
18. Front Drink Holder
19. Ashtray
20. Fuse Box
21. Hood Release Lever
!
Page 199 of 428

6- 26 DO-IT-YOURSELF MAINTENANCE
Drive belts should be checked periodi- cally for proper tension and adjusted if necessary. At the same time, beltsshould be examined for cracks, wear, fraying or other evidence of deteriora- tion and replaced if necessary.Belt routing should also be checked to be sure there is no interference be- tween the belts and other parts of theengine. After a belt is replaced, the new belt should be adjusted again after two or three weeks to eliminateslack resulting from initial stretching after use. G200A01A-AAT CHECKING AND REPLACING FUSESReplacing a Fusible Link
G200A01L
Melted
Good
G190B01TB-GAT CHECKING DRIVE BELTS (Diesel)
A/C comp.
Auto tensioner Pulley
G190B01TB
AlternatorPower steering pump
At the scheduled maintenance inspec- tion, belts should be examined forcracks, wear, fraying or other evidence of deterioration and replaced if neces- sary.Belt routing should also be checked to be sure there is no interference be- tween the belts and other parts of theengine. A fusible link will melt if the electricalcircuits from the battery are ever over-loaded, thus preventing damage to the entire wiring harness. (This could be caused by a short in the system draw-ing too much current.) If this ever happens, have a Hyundai dealer de- termine the cause, repair the systemand replace the fusible link. The fusible links are located in a fuse box for easy inspection.
Page 200 of 428

DO-IT-YOURSELF MAINTENANCE 6- 27
CAUTION:
When replacing a fusible link, never use anything but a new fusible link with the same or lower amperage rating. Never use a piece of wire ora higher-rated fusible link. This could result in serious damage and create a fire hazard.!
4. Replace the blown fuse by pressing a new fuse of the same rating into place. The fuse should be a snug fit. If it is not, have the fuse clip repairedor replaced by a Hyundai dealer. If you do not have a spare fuse, you may be able to borrow a fuse of thesame or lower rating from an acces-
G200B02A-AAT Replacing Accessory Fuse The fuse box for the lights and other electrical accessories will be found low on the dashboard on the driver's side.Inside the box you will find a list show- ing the circuits protected by each fuse. If any of your car's lights or otherelectrical accessories stop working, a blown fuse could be the reason. If the fuse has burned out, you will see thatthe metal strip inside the fuse has burned through. If you suspect a blown fuse, follow this procedure:
HTB180
1. Turn off the ignition and all other
switches.
2. Open the fuse box and examine each fuse. Remove each fuse by pulling it toward you (a small "fuse puller" tool is contained in the fusebox to simplify this operation).
3. Be sure to check all other fuses
even if you find one that appears tohave burned out.
HTB223
Page 211 of 428

6- 38 DO-IT-YOURSELF MAINTENANCE
G200C01TB-GAT FUSE PANEL DESCRIPTION Engine Compartment
HTB261-EPROTECTED COMPONENTS
Ignition Switch
Ignition Switch, Start Relay
Fuel pump, Alternator, ECM
Auto Fuel Cut Switch
Radiator Fan
Headlight, Defogger RelayABSECMA/CON, Fuel PumpInjectorA/Conditioner
HornABSABS
Blower, Blower Motor
Power Window
Electronic power steering AlternatorSpare Fuse Spare FuseSpare Fuse
FUSE RATING
30A30A30A20A30A50A10A10A10A15A10A10A20A40A30A30A50A 15A 10A10A
DESCRIPTION
IGN 2IGN 1ECU
F/PUMP RAD
BATT ABS
ECU
SNSR INJ
A/CON HORN ABS1ABS2 BLW
P/WDW EPS
BATT( ) SPARE
SPARE
SPARE
NOTE:
Not all fuse panel descriptions in this manual may be applicable to your vehicle. It is accurate at the time of printing. When you inspect the fuse box on your vehicle, refer to the fuse box label.
1.1L 1.3/1.6L 100A120A
Page 230 of 428

INDEX 10- 3
D Defrosting / Defogging .............................................. 1-80
Door Door locks ................................................................ 1-7
Locking, unlocking front doors with a key ............... 1-7
Drink Holder .............................................................. 1-59
Drive Belts ................................................................ 6-25
Driving
Economical driving ................................................. 2-14
Smooth cornering ................................................... 2-15
Winter driving ......................................................... 2-15
EEmission Control Syst em ........................................... 7-2
Engine Before starting the engine ....................................... 2-3
Compartment ........................................................... 6-2
Coolant ................................................................... 6-13
Coolant temperature gauge ................................... 1-49
If the engine overheats ............................................ 3-4
Number .................................................................... 8-2
Oil ............................................................................. 6-7
Starting ..................................................................... 2-3
Engine Exhaust Can Be Dangerous ........................... 2-2F Fog Light
Front ....................................................................... 1-57
Rear ....................................................................... 1-57
Front Seats Adjustable front seats ............................................ 1-13
Adjustable headrest s .............................................. 1-14
Adjusting seat forward and rear ward..................... 1-13
Adjusting seatback angle .......................................1-13
Lumbar support control .................. ........................ 1-14
Seat cushion height adjustment............................ 1-15
Seat warmer ........................................................... 1-19
Fuel Capacity ................................................................... 9-2
Gauge .................................................................... 1-48
recommendations ..................................................... 1-2
Fuel Filler Lid Remote release ...................................................... 1-68
Fuses ........................................................................ 6-26
Fuse Panel description ............................................. 6-38
G General Checks .......................................................... 6-6
Glove Box ................................................................. 1-63
Page 243 of 428

YOUR VEHICLE AT A GLANCE
1. Glove Box
2. Passenger's Airbag (Not all models)
3. Heating/Air Conditioning Control Panel(Not all models)
4. Rear Fog Light Switch
5. Front Fog Light Switch (Not all models)
6. Hazard Warning Light
7. Windshield Wiper/Washer Switch
8. Horn and Driver's Airbag (Not all models)
9. Instrument Cluster
10. Multi-Function Light Switch
CAUTION:
When installing a container of liquid air freshener inside a vehicle, do not place it near the instrument cluster nor on the instrument panel pad surface. If there is any leakage from the air freshener onto these areas (instrument cluster, instrument panel pad or air ventilator), it may damage these parts. If the liquid from the air freshener does leak onto these areas, wash them with water immediately. 11. Headlight Leveling Switch (Not all models)
12. Rear Drink Holder
13. Cigarette Lighter
14. Parking Brake Lever
15. Shift Lever (Not all models)
16. Front Drink Holder
17. Ashtray
18. Fuse Box
19. Hood Release Lever
!
Page 398 of 428

6- 24 DO-IT-YOURSELF MAINTENANCE
SG200A1-E FUSIBLE LINKS The fusible link prevents damage to the wiring harness in the event of an elec-trical system malfunction. Failure of a fusiblelink is indicative of a serious overload condition having occurred andtherefore the electrical system should be checked by a Hyundai dealer before a replacement link is fitted.
WARNING:
Under no circumstances should a fusible link be replaced with any- thing other than a new link of thesame rating. The use of higher rated links or other means of connecting the circuit will create a potential firehazard.
!
G200B01E-EAT INDIVIDUAL CIRCUIT FUSES The fuse box containing the individual circuit fuses will be found in the back-side of multi box located in the right side of driver. The multi box is removed by pulling lightly and then releasing the lid.A fuse rating grid will be found on the reverse side of the cover. In the event of fuse failure, the fuse should be re-placed with one of equivalent rating. A fuse removal tool is provided within the fuse box to facilitate replacement.In the event of a replacement fuse failing shortly after installation a mal- function within the circuit protected bythat fuse is indicated. The circuit should be checked by a Hyundai dealer at the first available opportunity. HTB180-D
HTB223
WARNING:
The use of replacement fuses having a higher rating than specified or other means of connecting the circuit willcreate a potential fire hazard.
!
Page 408 of 428

6- 34 DO-IT-YOURSELF MAINTENANCE
G200C01TB-GAT FUSE PANEL DESCRIPTION Engine Compartment
HTB261-EPROTECTED COMPONENTS
Ignition Switch
Ignition Switch, Start Relay
Fuel pump, Alternator, ECM
Auto Fuel Cut Switch
Radiator Fan
Headlight, Defogger RelayABSECMA/CON, Fuel PumpInjectorA/Conditioner
HornABSABS
Blower, Blower Motor
Power Window
Electronic power steering AlternatorSpare Fuse Spare FuseSpare Fuse
FUSE RATING
30A30A30A20A30A50A10A10A10A15A10A10A20A40A30A30A50A 15A 10A10A
DESCRIPTION
IGN 2IGN 1ECU
F/PUMP RAD
BATT ABS
ECU
SNSR INJ
A/CON HORN ABS1ABS2 BLW
P/WDW EPS
BATT( ) SPARE
SPARE
SPARE
NOTE:
Not all fuse panel descriptions in this manual may be applicable to your vehicle. It is accurate at the time of printing. When you inspect the fuse box on your vehicle, refer to the fuse box label.
1.1L 1.3/1.6L 100A120A
Page 426 of 428

INDEX 10- 3
ENGINE OIL REPLENISHMENT ................................ 6-8
ENGINE OIL ............................................................... 6-6 F FRONT ASHTRAY .................................................... 1-52
FRONT SEAT ........................................................... 1-11
FRONT FOG LIGHT SWITCH .................................. 1-50
FUEL ECONOMY ....................................................... 2-7
FUEL GAUGE ........................................................... 1-41
FUEL RECOMMENDATIONS ..................................... 1-1
FUSE PANEL DESCRIPTION ..................................6-34
FUSIBLE LINKS ........................................................ 6-24
GGLOVE BOX ............................................................. 1-57
HHAZARD WARNING SYSTEM................................. 1-49
HEADLIGHT AIMING ADJUSTEMENT ....................6-27
HEADLIGHT BULB ................................................... 6-28
HEADLIGHT LEVELING DEVICE SYSTEM .............1-53
HEAD RESTRAINT ADJ USTMENT .......................... 1-12
HEATED REAR WINDOW ............. ...........................1-50
HEATING AND COOLING CONTROL .....................1-68
HEIGHT ADJUSTABLE FRONT SEAT SHOULDER BELT ................................................ 1-18
HORN ........................................................................ 1-67
HOW TO USE LUGGAGE ROOM ............................1-63I
IF THE ENGINE CANNOT BE CRANKED
................. 3-2
IF THE ENGINE OVERHEATS ................................... 3-4
IF THE ENGINE WILL NOT START ........................... 3-2
IF THE EVENT OF A PUNCTURE ............................. 3-6
IMMOBILIZER SYSTEM ............................................. 1-4
INDIVIDUAL CIRCUIT FUSES .................................6-24
INSTRUMENT CLUSTER AND INDICATO RS .........1-35
INTERIOR LIGHT ..................................................... 1-56
INTERIOR REAR VIEW MIRROR ............................ 1-59
JJUMP STARTING ....................................................... 3-3
KKEY POSITI ONS ........................................................ 2-3
LLIGHTING SW ITCH .................................................. 1-47
LUGGAGE BOARD ................................................... 1-65
LUGGAGE NET ........................................................ 1-65
LUGGAGE ROOM .................................................... 1-63
LUGGAGE UNDER TRAY .............................. .......... 1-64
LUMBAR SUPPORT ADJUSTMENT ........................1-12